

Delish. Yummy. Dangerous. Addicting. Versatile. Easy. Not Simple. Quick for a Danish standard...from what Natashya says over at Living In The Kitchen with Puppies, which is where I came across this wonderful recipe.....but not fast by any means.
This is my first experience making a Danish and it really was fun! I have a lot to learn in the technique area, but everyone has to start somewhere, right? One day I'll look back at this post and cringe at my lack of something...form or handling.... but today...I'm proud. :)
I'm going to show you the steps and all my imperfections. Maybe you'll learn something. Or maybe you can teach me something....a tip? a trick? Either way, it's all good. All the way down to my rolly polly tummy.
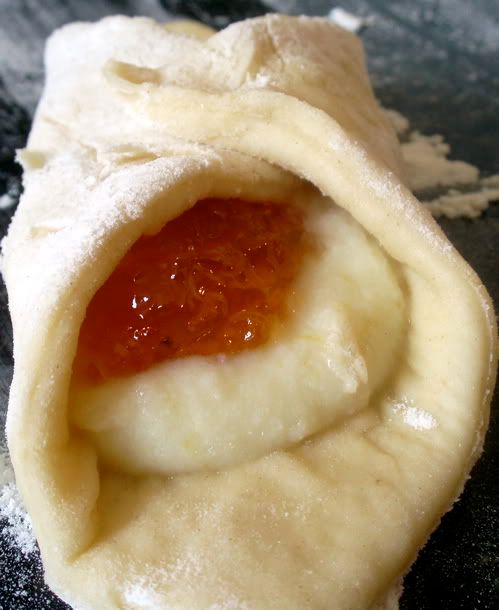
I don't have the recipe for the Kumkwat Jelly....that was a gift from my adopted grandmother, Ruth, next door. I'll work on getting it if y'all are interested.

The night before....begin preparing your pastry.
Natashya says this recipe comes from Nigella Lawson...
Processor Danish Pastry
Printable Version
(filling recipe and printable link below)
1/4 cup warm water
1/2 cup milk at room temp
1 large egg at room temp
2 1/4 cups white bread flour
2 1/4 teaspoons yeast
1 teaspoon salt
1 tablespoon sugar
1 cup unsalted butter, sliced...cold
In a measuring cup mix together the water and milk. Add the egg and beat with a fork to combine. Set aside.
Put the flour, yeast, salt and sugar into your food processor. Pulse for a second to combine. Add the butter and pulse for a couple of seconds until the butter is cut into the flour mixture with visible chunks.

Pour the contents of the food processor into a large mixing bowl and pour the egg mixture into the bowl. Fold the ingredients together until just combined....you don't want to over do it.

It may not be pretty but I'm pretty sure those little chunks of butter are important. They have a special purpose....an important roll....in creating buttery, flakey pastry.
Cover the bowl with a plastic wrap and store in your fridge overnight. (You can actually store it up to 4 days...but who has that kind of patience? I want my pastry NOW!)
After the longest night in history (aside from Christmas Eve)....remove the bowl from the fridge and let it come to room temperature.
Lightly flour your surface and dump the dough in the middle. roll the dough out to about 20 inches. I think that was a little too thin....next time I'm going to try 18 inches and see what happens.
Now...fold your dough the way you do a letter....into thirds....

Kinda wish it was more precise but I'm not all that good with this sort of thing and I was afraid to overwork the dough.
Next you're going to turn the dough so that the folded edge is on your left and roll it out to 20 inches again. Repeat this process 3 times.
Now I'm confused....do you do the whole process 3 times or 4 times? Let see....if you do it once...then repeat 3 times...that's a total of 4 times. Hmmm...I think I only did the whole process a total of 3 times but maybe it's suppose to be 4?
Cut the dough in half, wrap each piece in plastic wrap and refrigerate for 1/2 hour. You can freeze the dough at this point for later use if you desire.
While the dough is chillin', make the filling:
Lemon Ricotta Filling for Danish
Printable Version
1 cup ricotta cheese
6 tablespoons sugar
Pinch of salt
1 tablespoon lemon zest
1 large egg, beaten
3 tablespoons unsalted butter, melted and cooled
Combine all ingredients
Take your pastry (one sheet at a time...leaving the other sheet in the fridge). Unfold the pastry and roll it into a rectangle...not much.

Size isn't specified but since it's going to make 6 Danishes, I had the height 2/3rds the length. Then I cut it half, length wise and then into thirds height wise, so that I ended up with 6 squares. My squares were a bit of a mess so I trimmed them a bit

Those little squiggly pastry bits have a purpose.....stay tuned.
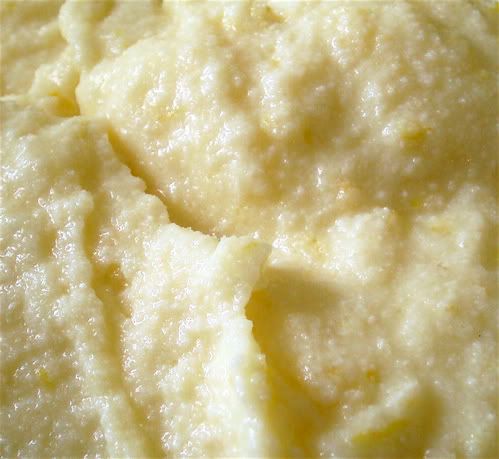
Fill each square with a wad of Lemon Ricotta Filling and dab a bit of your favorite jam on top

Fold up the corners. I only folded two opposite ends but you can do all 4 if you'd like. Pinch the corners together and place onto a baking sheet that's been lined with parchment paper (love that stuff!!!)
Brush with an egg wash (1 egg beaten with 2 tablespoons of milk). Let them rise for about 1 1/2 hrs, or until they have doubled in size.
Get the other half of your pastry out of the fridge and make your second batch.
About an hour into the rise time, preheat your oven to 350'F.
Just before baking, check to see if you pinched the corners together enough....if they're being defiant....pinch them together again.
Place them in the oven and bake for about 15 minutes....until nice and golden brown. I think I ended up having to bake them a few minutes longer...just keep an eye on them.
Transfer to a wire rack to cool a little. (plop your second batch into the oven)

As you can see...I'm not a good pincher. Several of them rebelled. Badly. Not that it affected the flavor...they just weren't all neat and pretty looking.
Mix together a little clear glaze....1/3 cup sugar, 1/4 cup water in a small sauce pan. Bring to a boil and remove from heat.
Brush the Danishes with the glaze to make them all pretty and shiny.

YUM!!!
Ok, remember those pastry scraps? I rolled them in butter and smothered them in cinnamon and baked them into these lovely little cinnamon pastry fries...

This is my entry into Two for Tuesdays Real Food. I read about it over at Heathers... GirliChef. This is a while new thing....and from what I understand (correct me if I'm wrong)...Real Food is about cooking / baking/ stuff that is not from processed foods. Heather explains it a lot better than I do...so head on over to her place and check it out.

It sounds like a lot of fun...and it's pretty much how I try to cook anyways....well...most of the time.


Wow! you are very brave to try this pastry...and looks like they turned out scrumptious too!
ReplyDeleteI bookmarked this when I saw Natashya make them! I adore cheese Danish, and I'm very afraid what would happen to my hips if I ever learned to make them.
ReplyDeleteThis sounds amazing, Dani!! I've had Nigella's danish recipe bookmarked forever to try...now I know I definitely need to get my butt in gear! Thanks for bringing this goodness to Two for Tuesdays...YUM!! ;) ....ps...how in the world did you end up with the blog hop on your page, LOL!?
ReplyDeleteWow! I'm impressed. They look good. I haven't tried this pastry yet. The last time I tried it, it was in hot Singapore and butter were oozing every where from my dough. After that, I never tried it again. I learnt since then that fridge is my best friend if I ever try to make this pastry in hot weather again. :)
ReplyDeleteJeannie - they were scrumptious! And as for being brave? I think ignorance is bliss...I didn't "think"...I just did. LOL
ReplyDeletePam - Oh ya...the hips are in graaaaave danger. All I have to say is it's a good thing you can't just whip these babies up lickety split.
Heather - Ya, you need to try these babies. And um about the blog hop?....I dunno. I was reading your blog, writing mine, clicking on things...copying, pasting...oh and did I tell you that it was midnight? Anyways....I'll email you LOL.
Ninja...LOL....oh I can imagine how frustrating that mustve been. You'd practically have to climb into the fridge to make a pastry there!
Wow! Very impressive! It looks delicious! I've never tried making a Danish and must give it a try. Good job!!!
ReplyDeleteThese look wonderful. Great tutorial on how to make them. I am so impressed.
ReplyDeleteThey look beautiful - I've always hesitated to try making danishes from scratch but I may just give your recipe a try!!
ReplyDeleteOh wow, those look wicked good. Course I'm a sucker for Danish, even though I've never made them myself.
ReplyDeleteHi Danielle;
ReplyDeleteI found your blog on Dessert Stalking....and am I glad I did. Your Danish looks AMAZING! I've hesitated trying my hand at this pastry dough...you've got me thinking I should give it a whirl. That filling has me swooning....MMMMmmmmm.
Oh wow, you did an amazing job. You must have loads of patience because I think just might get fed up through the long process! The lemon ricotta filling looks fantastic as well. My grandmother always made little cinnamon/sugar treats with the scraps as well as we went more crazy over those than whatever she was baking up!
ReplyDeleteThose look oh, so good!!! Following from 2 for Tuesdays ... :)
ReplyDeletefoodfloozie.blogspot.com
Thanks for linking up to Two for Tuesdays. That's funny about how you got the linky up - but it just gives us all more links this week, right ;)
ReplyDeleteThese Danish's look truly amazing! I am feeling a bit inspired to try my hand at something similar sometime soon. Thanks so much!
They're perfect! I remember my mom loving cheese danishes when I was young, but I've never seen them made with Ricotta. Great idea.
ReplyDeleteHi Danielle, Thanks for participating in the Two for Tuesdays recipe blog hop and I hope to see you again next week! This recipe looks divine! I so adore cheese danish and its great to know you can make it so healthy! Grabbed your RSS feed, twitter, facebook and follow. Keep it REAL...Alex
ReplyDeletethat is some downright flaky and fabulous pastry, danielle! i like the uniqueness of the accompaniments, too. thanks for the choice food porn.
ReplyDeleteI LOVE DANISH! Cheese is my absolute favorite :)
ReplyDelete