Yum Peaceful Cooking: January 2011

Saturday, January 29, 2011

Supremes de Volaille Archiduc


Only a handful of unassuming ingredients and this has got to be the best chicken I have ever had in my life!

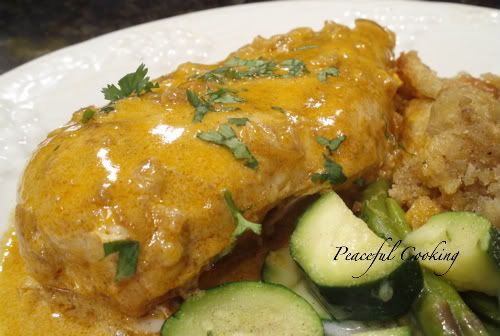
Julia Child once again amazes me! In english, this recipe is called Chicken Breasts with Paprika, Onions, and Cream.

The chicken was tender, juicy and the sauce.....oooooohmg!!! Fabulous!

I wonder if the chicken breasts she cooked with back then were a lot smaller than the ones we purchase today? The reason I'm curious is because Julia had said to cook the chicken breast in the oven for only 6 minutes. Luckily I used her method of checking for doneness and ended up cooking it much longer. I mean....after 6 minutes, the chicken was still pink on the outside...let alone the inside.

Here's what Julia says about Chicken Breasts (a.k.a. Supremes de Volaille): 'The flesh of a perfectly cooked supreme is white with the faintest pinky blush, its juices run clear yellow and it is definitely juicy.'

And how do we know when it's done? Well....you poke it. With your finger...not a fork!! (you don't want all the juices to run out). If its still soft and yields to the touch, it's not done yet. If the flesh springs back with 'gentle resilience', then it's done. If there's no resilience at all....you've baked the crap out of it and will have a very dry, not so appetizing piece of crap chicken.

Supremes de Volaille Archiduc
Printable Version

Preheat the oven to 400' F
Cut a piece of wax paper, the size of the pan you will be using and butter one side of it.

4 boneless skinless chicken breasts
1/2 teaspoon lemon juice
1/4 teaspoon salt
big pinch of white pepper
1/4 cup chicken stock
1/4 cup dry white vermouth (or port, or Madeira)
1 cup whipping cream
2 tablespoons minced parsley (I didn't have any so I used cilantro)
2/3 cup finely minced white onion
5 tablespoons butter
1 tablespoon paprika
1/8 teaspoon salt
additional salt, pepper and lemon juice if needed

Rub drops of lemon juice onto the chicken then sprinkle with salt and pepper.

Drop the minced onions in boiling water for 1 minute (this creates a more mild flavor for the onion). Drain, rinse under cold water. In a stove-top safe casserole dish (or a large oven safe pan) melt the butter and cook the onions with the 1/8 teaspoon of salt and the paprika, covered, for about 10 minutes over a very low heat. The onions should be tender and translucent. Not brown.

Place the chicken in the onion butter mixture, turning the chicken to coat. Place the buttered wax paper, butter side down, over the chicken. Cover and place in the oven until done.

Julia says to check after 6 minutes. Our chickens these days must be bustier because it took mine about 20  minutes! I'd say check them after 10 or 15....do the finger test and go from there.

Once done, place the chicken on a warming platter (or in my case, a plate covered with tin foil).

Pour the stock and vermouth into the pan that the chicken just came from. Heat to a boil and quickly reduce the liquid over high heat until the liquid is syrupy. (not thick like Mrs. Buttersworth).

Stir in the cream and once again boil down over high heat until the cream has thickened.

Julia doesn't say to stir...but it made me nervous not to, so I did.

Remove from heat. Taste and adjust flavors by adding more lemon juice, salt and pepper if needed.

Pour the sauce over the chicken. Garnish with parsley and serve.


This was so good that I squirreled away a piece for lunch the next day. I reheated it in a microwave and it was still amazingly tender!

I can't wait to have this again!

Monday, January 24, 2011

Leftover Bread Makes The Best Stuffing!


With all the bread I've been baking this past year, I find myself with a lot of leftover pieces. After a couple of days, I start getting worried about the bread being stale or getting yukky and I hate the thought of wasting it. When this is the case, especially if its a really tasty loaf, I put it in a zip lock baggy and toss it in the freezer. (it's either that or eat it myself...which I'd have to problem doing.....but in all honesty, I prefer not to have to purchase new pants, the next unsaid size up). Eventually, the bread pieces add up. I think my initial intention was to make a bread pudding of sorts. Which I really could've done.

But this one particular night I was in the mood for stuffing.

I can't tell you what kind of breads I used. There were all sorts. Which added different textures and flavor to my homemade stuffing. It really was fun. What I basically did was look at one of those Mrs. Cubbisons Stuffing boxes and followed the recommendations on the back, based on how much bread I had.

I defrosted my bread on a wire rack (didn't want any moisture to make my bread soggy). Defrosting them really didn't take long. Basically, I started in the morning. By mid afternoon, they were defrosted and dry and I cut the random pieces of bread into chunks. It doesn't take all morning for the bread to defrost but I wanted them to dry out as much as possible.

You know....you can use any kind of bread for this. It's a nice way to keep waste down. I sometimes add the heals of different store bought loaves to the batch.

If the bread has indeed started to mold, they end up in my compost bin.

Once the bread has been cubed, I laid them out on a baking sheet


and stuck them in a warm (about 250' F) oven and let them dry out, tossing them around every once in a while. This could take some time....depending on the moisture in the bread and how big your cubes are. I think it took about 45 minutes. Don't hold me to it...just keep an eye on everything as it goes.

Once dried...you're ready to roll. And the combination possibilities are endless. I will give you a starting point....you know what you like and can adjust to your personal tastes. Just know that what you buy in a box can be made from your leftover pieces of bread and will be just as good, if not better. Not to mention a little cheaper.

And you just might feel better doing it.

12 oz of dried bread cubes
2/3 cup diced onion
2/3 cup diced celery
2/3 cup sliced mushrooms
3 cloves garlic, minced 
3/4 cup butter
3/4 cup chicken broth
1 teaspoons (or so) poultry seasoning
1/2 teaspoon dried sage
salt and pepper to taste

Preheat your oven to 350'


Melt the butter in a pan and saute the veggies until tender. In a large bowl, combine everything. Well....if you've ever made stuffing before, you know the routine....toss until the bread cubes are evenly coated. If you like a more moist stuffing, add more broth.

Coat a casserole dish with cooking spray and bake for about 30 minutes.

Of course you can use it to stuff a turkey or chicken as well.


And there you have it......a basic recipe. Change it up...add your own touch with your own favorites. My mom loves to add boudin sausage (taken out of the skins, crumbled and cooked). Although Sir Sportsalot won't let me do that. Truth be told, he was bummed that I added the mushrooms. He's a traditionalist. And he loves stuffing!!! But he likes it the way I've always made it, which is the way his mother and grandmother made it (basic. no mushrooms). Any change (even though I'd consider it an improvement) is looked upon expressionless....with a silent (until dinner is over) resignation. When there's some left on the plate after dinner is over, I know it wasn't accepted.

With that said...I'm sorry to say, this will be the last batch of stuffing I make which includes mushrooms.

Sigh.

This is my entry into this weeks Hearth and Soul Blog Hop!

hearthandsoulgirlichef

Sunday, January 23, 2011

Veggie Melt on HBin5 Dilled Rye Bread


One of my all time favorite burgers is a Patty Melt. I love everything about it. The meat...the cheese, grilled onions...and the grilled rye bread.

A looooooong time ago, Sir Sportsalot bought me a bread machine for Christmas. I was thrilled!! Wooo hooo...home made bread. Look at me, I'm Betty Crocker and Little House on the Prairie all mixed together....I'm providing wholesome homemade bread in a modern, doable way, for my family......Until I tasted it. Oh how I wanted to believe it was wonderful. I wanted to hold on to that inner pride of being able to make bread from scratch. But there was just something about the flavor that was....off. I was in denial for a long time. I even tried to figure out what to do with that bottom slice....the one with the hole from the little kneading paddle. I bought a bread machine cookbook. Only I never used it cuz I couldn't remember what capacity mine was. But I did try other recipes provided by the manufacture....and really almost enjoyed the herb bread recipe which consisted of caraway seeds, dill and parsley. All those flavors almost successfully masked the machine flavor and the whole family would devoured the loaf. The bread reminded me of rye bread.

Fast forward 15 years and here I am....bread machine in the garage (where it belongs) yet I'm still providing fresh, homemade bread for my family. Without the help of a machine. And I am really proud of myself. I use to be very afraid of yeast....and rising, and resting...and just knowing bread dough. With that knowing though, comes confidence...and sometimes nerve. It's ok to add, and adjust. So with this HBin5 assignment for Dilled Rye Whole Wheat Bread came memories of the rye wanna-be bread of my past. 

Sooooooo....I added caraway seeds and parsley to this dough. Which happened to be a very wet dough and required quite a bit of flour dusting in order to handle. But all in all, it turned out wonderfully!


Great crust, great crumb......delicious flavor. 

One of the joys I get when I make my bread is seeing my kids friends come by and devour healthy bread.

Now that I have these two loaves of amped-up Dilled Rye, naturally my mind thinks 'Patty Melt!!!!'. 

I've made my fair share of patty melts over the years so this time I chose the full blown healthy route.

Don't ask me where I got this recipe for the "Ultimate Veggie Burger" cuz I have no clue. For some reason I emailed it to myself a few years ago...oh, March 18, 2009 at 9:00 PM to be exact (according to the printed email recipe). The recipe seemed rather involved. Too involved for a mere veggie burger (keep in mind...this being said by a meat lover) and I never got around to making it...until now. I studied the recipe and made a few swaps/changes:

makes 6 burgers

Instead of lentils, I used black beans
I doubled the celery
I omitted the leeks (didn't have any on hand)
I doubled the garlic
I omitted cashews (didn't have any on hand and it didn't appeal to me)
I used greek yogurt instead of mayonnaise
I used corn flake crumbs instead of panko ONLY because I had nothing else!!!!

With all that said, here's how things went.....


1 15 oz can black beans, drained and rinsed (thinking back, that may not be necessary)
Salt and Pepper as needed
1/4 cup plus 2 tablespoons bulgur wheat
vegetable oil as needed
1 medium onion, chopped fine (about 1 cup)
1 celery rib, sliced
2 garlic cloves, chopped
1/2 lb mushrooms, sliced (although I only had a couple on hand...wish I had more)
1/4 cup greek yogurt
1 cup bread crumbs or panko crumbs

In a small saucepan, bring 1 cup of salted (1/4 tsp) water to a boil. Stir in the bulgur wheat and cover immediately. Remove from heat and let stand until all the water has absorbed...about 20 minutes.

In a heavy skillet, heat a couple of teaspoons of vegetable oil. Saute the onions, celery, garlic and mushrooms over medium heat until tender.


In a medium sized bowl, combine the bulgur wheat, black beans, sauteed veggies and yogurt.


Transfer the mixture to a food processor and pulse until coarsely chopped...about 15 - 20 times. Transfer back into the bowl and add the bread crumbs and salt and pepper to taste.

Guess what? There's no raw egg or raw meat in this mixture. You are free to taste it and adjust the flavors as needed.

Which I highly recommend you do....I'll explain that in a minute.

Divide your veggie burger mix into 6 equal sized balls.


And shape them how ever you want them....round, square....oval? Yes, I made mine oval because I wanted them to fit nicely on my slices of bread. These will not shrink or change shape. Make them the size you want.

Pour a bit of oil in a skillet, and fry, turning carefully because they aren't as sturdy as meat.


But these babies do brown nicely. At a quick glance you might not realize they're not meat.


I was thrilled with the visual of these burger patties.

The flavor? Not so much. It wasn't awful or anything....just bland.

Not being a vegetarian myself....I didn't realize how important large quantities of herbs and spices are needed for some things. Next time, I'd add more garlic. More salt and pepper....maybe some creole seasoning or old bay. Something. A-1?

Anyways.....I melted some american cheese (cuz for a Patty Melt...that's the only cheese that will do for me), grilled up some onions......


And did enjoy a healthy Veggie Melt.

With a little tweaking, I think this recipe could be a real winner. The ultimate? I think that should be determined by a vegetarian.

What changes would you suggest for this veggie burger recipe?

Wednesday, January 19, 2011

Julia Child's Cotes De Porc Poelees

 
Pork Chops. Plain and simple but they sound soooo decadent in french. This is one of the many incredible recipes from Mastering the Art of French Cooking (found on pg. 386)

Did I mention that these pork chops are anything but plain? Simple yes. A few steps....of course. Great results...for sure.

It all starts with a simple marinade. It's even titled "Marinade Simple" a.k.a. Lemon Juice and Herb Marinade. Julie states that it can be used on chops, steaks and small boned roasts.

Per 1 pound of pork:

1 tsp salt
1/8 tsp pepper (I think I doubled that...I like me some pepper)
3 TB lemon juice (I didn't have any lemons so I used limes instead)
3 TB olive oil
3 parsley sprigs (didn't have any so I used a couple teaspoons of dry parsley)
1/4 tsp thyme or sage (I used sage...not a big fan of thyme)
1 bay leaf
1 clove mashed garlic

Combine all ingredients and pour over meat in a zip lock baggy. Refrigerate for a minimum of 2 hours....6 to 12 hours would be better. Turn baggy over every so often.

Cotes De Porc Poelees (a.k.a. Casserole-sauteed Pork Chops)
Printable Version

6 pork chops, 1" thick and marinaded
3 - 4 tablespoons pork fat, lard, or cooking oil (Yes....I put my lard to use)
2 TB butter
2 cloves garlic, halved
1/2 cup dry white wine, dry white vermouth, brown stock, beef bouillon or marinade liquid (I used vermouth)

Preheat the oven to 325' F

Dry the pork chops on a paper towel.

Heat the fat in a heavy large oven safe skillet or fireproof casserole dish over medium heat. Brown the chops on each side for 3 - 4 minutes. As they brown transfer them to a dish. You will probably have to work in batches of 2 to 3 at a time. You don't want to crowd them when you brown them....this will cause them to steam instead of brown.

Pour the fat out of the pan and discard (when it is cool and save). Add the butter and garlic to the pan. Return the chops to the pan. It's ok to overlap them. Baste them with the melted butter garlic. Cover and heat until the meat sizzles. Place the pan in the lower 3rd section of your preheated oven for 25 - 30 minutes. Once or twice during the cooking time, turn the chops over and baste with the butter and juices.

They are done when the meat juices run clear yellow with no traces of red.

Remove the chops to a hot platter.

Remove all but 2 TB of the remaining juice in the pan. Pour in the liquid (in my case, vermouth) and boil rapidly....scraping up all the good yummy crunchies off the bottom. Boil for just a few minutes until the juice has reduced down to 1/2 cup.....this is your concentrated sauce. Taste for seasoning and add salt and pepper if needed.

Pour over chops and server


 As you might notice...my little chops were not 1 inch. I reduced the cooking time to accommodate.

They were delicious! And tender and juicy. And full of all sorts of wonderful flavor.


If you haven't noticed, I don't cook pork chops very often. I think the last time I did....I did the shake and bake thing. Complete with a side of apple sauce. (and when I do that I can't help but think of Peter from the Brady Bunch saying..."Pork Chops and Apple Sauce). I'm not use to these little beauties being so versatile. If they weren't so expensive in the market, I'd probably cook them more often. (wonder if the pig farmers and big markets can hear me?). Anyway, I'd guess that besides bacon, I cook pork once a month or less. How often do you cook pork? (just curious)

Sunday, January 16, 2011

Flour Tortillas


Helloooooooooooo

Yep, it's me. Haven't been cooking a whole lot. At least....nothing too terribly new. I've been in a verbal / writing funk too. I've been distracted. But I've still been in the kitchen. Playing with the most well known boy in the United States of America. Several times, actually.

I've been playing with the Pillsbury Doughboy.

I'm trying to come up with recipes for the big Bake Off. I have never bought as many Pillsbury items in a year as I have the past couple of weeks. I wonder how much their sales increase just by people making purchases for recipe experiments in the kitchen.....telling themselves that it's ok....because if by chance they win the million dollars or even the top 100....what difference is the cost of a few dozen biscuits, crescents and pie crusts? Besides...it's fun. It keeps me busy and for the most part, keeps me out of trouble.

But, in between my mad scientist moments, I have been making some real food. And playing around here and there.

I'm not saying this particular one was a success. But I'm not saying it was a flop either.

It just wasn't what I was expecting....or something. It just wasn't exactly...I dunno....right?

When I set my mind to making flour tortillas, I didn't know they were more involved than corn tortillas.

I have a magazine article that a gal at work shared with me. A recipe for tortillas from a writer known as Cowgirl Chef. I read her recipe and then decided to check out the Pioneer Woman's blog. She also has a recipe. A bit different though. So I chose the Pioneer Woman's Homemade Flour Tortillas.

I even went as far as purchasing.......

LARD!


I had to go to three different stores before I found it....and then I felt so guilty walking up to the checkout line with just a box of lard in my hand. I wanted to hide my face in shame....or at least hide the lard in my jacket until I got to the cashier.

I am no longer a lard virgin.

 And I'm not sure how I feel about it.

I've cooked with butter, oil, and shortening. But there's something about lard. Just the word is offensive...I mean....it's associated with....someone's ass!! Why was 'lard' chosen as one of the most offensive food words? I mean, you don't ever hear anyone refer to someone else as a butter ass. Or an evoo ass. Even shortening ass falls....short.

So, yes. I purposely, diligently, determinedly purchased lard specifically for flour tortillas.


I used this stuff. This greasy, wad of pure, unadulterated fat.

I followed the directions given by our beloved Pioneer Woman:

2 1/2 cups a.p. flour
2 1/2 tsp baking powder
1 tsp salt
1/2 cup plus 2 TB LARD
1 cup hot water

Combine your flour, baking powder and salt and then add chunks of lard. Cut the lard into the flour mixture until you have a bowl of course crumbs.

Slowly pour in the hot water, stirring to mix. Lightly knead your dough about 30 - 40 times.

This is where I had a problem. It was a very wet mess! There was no such thing as kneading. Not sure if I did something wrong....but I ended up adding another cup of flour before proceeding.

At which point I covered the bowl and let the dough rest for about an hour. I then divided the dough into 16 balls....each ball about the size of a small lime


These were covered and allowed to rest for about 30 minutes.

Then.....because these things are so greasy, I didn't need to dust my counter top with flour or anything. hmmm....mabye I should've anyway? Well....I heated up my skillet, no oil. Just dry. I rolled the ball as thin as I could


Cooked them for about 20 - 30 seconds per side


Not all of them were as round (and this is not nearly as perfectly round as the ones from the store) as this one. And no matter how thin I rolled them balls out....the tortillas were too thick. Almost pita thick without the pocket.

And a bit too greasy.

Should i have added more flour?  hmmmm.

But.....they did the job. My fajitas makings were well taken care of. And they were washed down nicely with my margarita.


I enjoyed making them. I want to try again. Next time I'm going to try Cowgirl Chef's recipe. I'm going to try it with the recommended butter or shortening and then I'm going to try them with....

LARD!!

Hey, I wanna see what all the fuss is about. Is there really a difference in how stuff tastes? Does it really make a savory pie crust that much better?

Besides, I have to use the stuff up. I mean...I don't want it to go to waist waste. Or butt for that matter.....although since I plan on using it, it will end up where it belongs....in the end.

Either way...I'll let you know how everything turns out.

Wednesday, January 5, 2011

HBin5 Christmas Stollen (Island Style)


Ya...It's January. Christmas is done and over with. Although you wouldn't know it by looking around my house. I still have to take down the tree and repack all those decorations...and you know the drill. Not fun. But this bread was fun. It was the HBin5 assignment for December. The Healthy Bread in 5 Minutes a Day bread group is hosted by Michelle over at Big Black Dogs

 
I did make it before Christmas but just didn't get around to posting it. With all the changes I made, I think this would also be a great bread for Easter (whenever that occurs this year..is it early? late?). Anyway...what was I going to say? Man, it's been a long day. O'well...neeeeeeeext....

I can not post the recipe but if you have the book Healthy Bread in 5 Minutes a Day, you'll find the original recipe on page 279. I will tell you what I changed.....

- As is my custom...I halved the whole wheat flour and replaced it with all purpose, unbleached flour.
- I used the marzipan and not the almond paste (it was an either or thing in the recipe).
- Instead of brandy, I used coconut rum and orange liquor (my favorite is Patron Citronge)
- Instead of candied and dried cherries and such, I used a tropical fruit blend (apricot, pineapple, mango, ginger, etc etc.)
- I soaked the dried fruit in coconut rum over night.
- I then replaced some of the water in the recipe with said soaking coconut rum. I didn't measure the amount of rum used for soaking....I just made sure the fruit was covered. I then measured the rum after soaking and added water to equal the required 2 cups.

Once the dough was ready for use...I rolled it out as required and sprinkled in the marzipan.


You know....if you make a full batch of this dough, it makes three 1.5 lb loaves. The recipe calls for 1/2 cup of marzipan or almond paste. I wonder....are you suppose to divide that into thirds? or use 1/2 cup per loaf? Cuz it was such a small amount that one could hardly tell it was there.

Anyway...I then folded the dough sorta like an "S" shape


Allowed it to rest and then bake until golden brown


Just look at all those morsels of coconut rum soaked tropical fruits!

I then generously dusted my lovely loaf with powdered sugar


And now I remember what I was going to say earlier that I forgot. When I first read about this bread, all I could think about was the ever feared, dreaded....doorstopper tradition that is referred to as Fruit Cake. I wanted to run away, screaming!!! I just couldn't make myself bake anything that remotely resembled Fruit Cake! That is why I made the changes that I did.

And it was a huge hit!!! You could smell the coconut rum as the bread entered your mouth. The fruit was soft and edible. The bread was flavorful without being too sweet (even with all that powdered sugar). The dough would've made great muffins if I hadn't burnt the bottoms. Although I did save the tops. I think I'll make a nice bread pudding with them.

Sooo...I think this is the last of my holiday recipes that I'm going to share this year. Thank you for putting up with my tardiness.

The next loaf up for assignment is a bit more healthy...Whole Wheat Flaxseed. It was actually "due" on the first of January...but you know me...

Fashionably late as always

My goal is to have some made up this weekend.

Monday, January 3, 2011

Poblano Cream Sauce


When I saw the name "poblano cream sauce", somehow I just knew deep down in the depths of my soul stomach, that I would really like it. A month or so later, when I saw poblanos at the Mexican market, I grabbed a few. Dutifully, I placed them in my crisper....and forgot about them. You know what? Those babies have staying power. As I was planning my New Years Eve dinner-at-home menu, I decided on a Mexican theme....Taquitos with homemade tortillas and a big ole pot of Tortilla Soup. As I scoured the fridge for ingredients, I came across my 3 poblanos....waiting ever so patiently for their time of glory.

And the hunt began. (you see...I could not, for the life of me, remember where I had seen that first recipe that got this started in my brain). I looked at Martha Stewarts recipe...but it seemed....I dunno...weak? Then I looked at another recipe that also seemed weak, in a different way. But they both had their own strengths. I took the strengths and combined them and came up with this version. Let me just say....I almost ate it as soup!!! I couldn't stop dipping my spoon in for a taste. And another. And then once again because it was so good! By the time my guests arrived, I had gone through so many tasting spoons that I had to wash some just so my guests could eat the Tortilla Soup like the well bred, upstanding citizens that they are.

Poblano Cream Sauce
Printable Version

3 fresh poblano chillies
2-3 teaspoons oil
1 large onion, chopped
3 garlic cloves, chopped
1/2 cup milk
4 tablespoons butter
1 tablespoon flour
1 cup Mexican Crema
Salt to taste

Roast the poblanos over an open fire, until the skins are blackened.


I have a grill grate that was hardly used because it was purchased to replace the old one for the gas grill. Shortly after, we tossed the gas grill (hated it) and reverted back to a Weber. Anyway...I kept the grate and found a great use for it!!! After a few turns on the grate, my poblanos were perfect!


I placed them in a zip lock baggy for several minutes so the skins would loosen up and easily peel off.


I then removed the seeds and the stem....gave them a rough chop and placed them in a blender.

In a medium sized sauce pan, I heated up the oil and sauteed the onion and garlic until tender. They then joined the poblanos in the blender along with the milk for a little pureeing.


Wipe out the sauce pan and melt the butter....add the flour and brown lightly, stirring constantly. Lower the heat and pour in the poblano puree mixture and stir until smooth. Add the Mexican Crema,


stir constantly until it's bubbly and beginning to thicken. Remove from heat and add salt to taste


Now....what do you did I do with this delicious sauce? Most of the recipes out there say to pour it over chicken. I used it to dip my taquitos in. I used it to dip my chips in. I used it to garnish my tortilla soup.

Next day....I used it to garnish my breakfast!!!


Hash browns, with melted cheese, bacon, egg over easy, queso fresco, fried tortilla strips and a bunch of Poblano Cream Sauce!!!

It was amazing!

I think next time, I want to make a Mexican version of eggs benedict with this sauce.  What would you like to do with some?

This is my entry for this weeks Hearth and Soul Hop

hearthandsoulgirlichef