This is the second time in my adult life that beets have found their way into my kitchen. The last time these purple-ish red veggies crossed my threshold was back a few years ago when I was baking my way through Healthy Bread in Five Minutes a Day and I decided to give beets a break (from my childhood memory of having to gag them down) and made some beautify
Red Beet Buns.
Loved how they looked but hated how they tasted.
Well, I was faced with them again a couple of nights ago that all started with a phone call that went something like this:
me: "Hello?"
caller: "Hi, this is Nicole from Whole Foods Market and I'm calling to remind you about the cooking class that you signed up for."
me: "Cooking class?" (First of all I had no idea they HAD cooking classes. Second of all, I couldn't remember the last time I'd been to Whole Foods)
caller: "Yes, you've signed up for our Transition to a Gluten Free Diet cooking class"
me: "Ooooh...(the bells are ringing) my daughter must've signed me up"
Turns out that yes, my daughter signed us both up for this class. Since it was free, I figured why not. So I went. It was more like a lecture than a real cooking class. The place was packed. The instructor/dietitian was wonderful and demonstrated how to make several dishes along with sharing some great information about eating gluten free.
I know there are a lot of people out there who have to eat gluten free do to Celiac Cisease. I also know that there are a lot of people out there who just choose to eat gluten free. What I didn't know was that somewhere between those two reasons are the gluten intolerant. My youngest child has gone gluten free. It started out as a choice after finding out about
GMO foods but ended up being more of a mild sensitivity reason. Apparently gluten can possibly cause a lot of things that you wouldn't even realize (headaches, hair loss, dry cracked skin are just a few of the possibilities).
Here's a great list of websites that were recommended at the class if you want to do more research:
www.celiac.org
www.gluten.net
www.csaceliacs.org
www.celiaccenter.org
www.foodallergy.org
www.livingwithout.com
(yes, I'm hosting a giveaway...here's a sneak peek. more details in a minute)
Back to beets. Ok, so there I was, sitting in a room full on strangers, and the assistant was passing around one of the foods that was prepared. The star ingredient was suppose to be quinoa. But all I could think about were the beets inside that little cup that was heading my way. Sure, I could've said 'No Thank you, I'll pass'. But that wouldn't have been very foodie of me. So I took the cup...looked at it...my nostrils flared a little as I eyeballed those big chunks of beets...sniffed a little
Then came the tentative, cautious, very doubtful bite....
Omg...it was good!! Really? Yes, really!! I mean...of course it still tasted like beets but there's something in the roasting process that mellows and sweetens the beet.
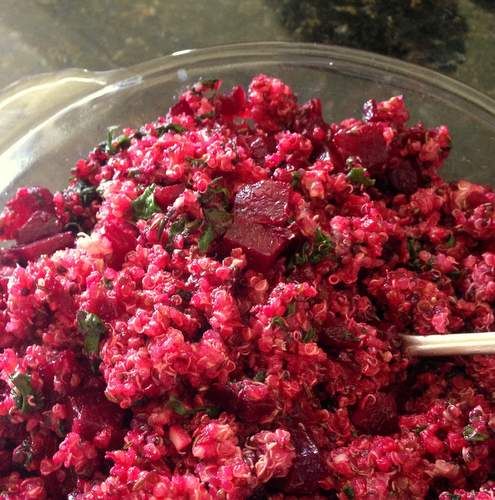
Quinoa and Roasted Beet Salad
Printable Version
1 bunch of beets
Greens from 1 bunch of beets
Salt to taste
1 to 2 TB extra virgin olive oil
2 garlic cloves, minced
2 tsp caraway seeds, lightly cruhed
4 cups cooked quinoa
Crumbled goat cheese to garnish (optional, I opted out)
Preheat the oven to 400' F
Trim the greens off the beets. Scrub the beets and wrap them individually in foil. Bake for about an hour, until for tender. Let them cool. Once cool enough to handle, peel off the skins, cut into 1/4" dice. Set aside.
While the beets are in the oven, cook your quinoa. 1 cup of dry quinoa yields about 3 cups. This recipe calls for 4 cups. You can cook 2 cups of dry quinoa per the package instructions and put whats leftover in the fridge. It'll be good for a couple of days. Or, you can freeze it. Quinoa freezes very well and thaws quickly for future use.
Wash the beet greens and remove the center vein. Steam for for 2 or 3 minutes then plunge them into ice water to 'refresh' them a bit. Squeeze them dry and chop. (beet greens act a lot like spinach greens).
In a large heavy skillet, heat the olive oil over medium heat. Add the garlic and cook, stirring, until fragrant (about 30 seconds). Add in the caraway seeds and beet greens along with some salt and pepper to taste. Cook and stir for about 30 more seconds. Toss in the quinoa and beets
Toss together until everything is well combined, heated through and the quinoa is beet red.
And there you have it...a beautiful salad full of amazing nutrients. And it's gluten free for those who need it. And hey...now I don't have to say that I don't like beets. I can say...I like roasted beets.
Now...its GIVEAWAY time!!
Just in time for Mother's Day.
Tate's Bake Shop would love to send 1 lucky winner this beautiful, chock full of goodies basket. You will find it packed with:
Lemon Tea Loaf
Buttery-rich Shortbread Squares
Individual Coffee cake
Box of Tate's Bake Shop's famous crispy Chocolate Chip Cookies
Baking with Friends Cookbook
Entering to win is simple:
Leave a comment.
If you'd like a better chance at winning, do a few extra things:
Announce the giveaway on:
Facebook (then leave a comment)
Twitter (then leave another comment)
Google+ (and another comment)
etc etc.
Basically,
each comment you leave stating how you've shared the news about my giveaway,
will equal one entry.
Contest ends May 1st, 11:59 pm
Tate's Bake Shop is also giving all my readers (and their family and friends) a
discount. All purchases made until 5/12/13 will receive a 20% discount by using the discount code: mom13
Good luck!
**** 5/1/13 note: I had the incorrect picture of the basket posted before. It has now been corrected. I appologize for any inconvenience or misrepresentation.