Yum Peaceful Cooking: chocolate
Showing posts with label chocolate. Show all posts

Sunday, November 9, 2014

Almond Mocha Pudding Cookies


Let's make this short and sweet. Just like the recipe for these delicious cookies. I will however give you a quick background.

During my recent visit in Alabama, my sister and I were craving something sweet. Or maybe it was just me and she politely went along with it (how southern of her). Either way, we quickly discovered the limitations of our resources. But I was determined. I mean...I was in a gorgeously huge kitchen after all....and I needed to bake!


A quick inventory found us with flour, sugar, butter, and eggs....thats good. We have the basics. What else....a box of chocolate pudding? Hmmm....this could be interesting. Oh, and a handful of sliced almonds..

Well...this is a job for Google! A quick search for 'pudding in cookies' came up a surprisingly long list of results. I had never heard of using pudding in cookies (apparently I'm in the minority where that's concerned. Oh well, so much for thinking we were on the cutting edge of a new method). What we ended up with were amazing, delicious, soft, melt in your mouth cookies!

Almond Mocha Pudding Cookies

Inspired by Kraft Easy Pudding Cookies
makes about 4 dozen 2" cookies

1 cup butter or margarine, softened (read the tip below regarding the end result based on which one is used)
1 cup granulated sugar
1 3.9 oz packet of instant pudding
1 tsp instant coffee
2 eggs
2 cups self rising flour
1/4 cup sliced almonds

Preheat your oven to 350'

In a large bowl, beat together the butter and sugar until light and fluffy,

Add the pudding and instant coffee and beat until combined.

Beat in the eggs one at a time.

Mix in the flour until well combined.

Scoop out 1 tablespoon of cookie dough, form into a ball and place onto a baking sheet, 2 inches apart. Place a few almond slices on top of the dough ball and gently press to secure.

Bake 11 - 13 minutes. Allow to cool 1 minute before placing onto a cooling rack. Allow to cool completely. (HA!! Ya right! Who are we trying to kid here? Grab one...for each hand.)


Tip:
Margarine will result in a fluffy almost cake like cookie
Butter will result in a flatter, not as fluffy cookie

Both are soft, chewy and amazingly delicious! Don't be surprised if they don't last more than 24 hrs.

Saturday, April 26, 2014

Vegan Chocolate Hazelnut Spread


Chocolate hazelnut spread. A great flavor combination. And, that very famous brand.....which I really did like.....except for one thing. It left a strange waxy coating in my mouth. And honestly.... it's not the healthy snack spread that's boasted about on those commercials. I mean...really....2 tablespoons at 200 calories? Over half of the calories come from fat.  Not to mention 21 grams of sugar, 12 grams of fat, plus....artificial flavors. 

As if we should expect anything else. After all, it is the sad fact of processed food. 

But that's beside the point....my focus here is on an amazing alternative. Because no matter how much I question the "famous" one....I still crave that combination.  Because really...I do love it. And now I have a great, healthy, easy alternative. That not only leaves my mouth feeling 'wax-free', but makes me feel so much better about eating it. 

My daughter found the recipe on Instagram and unfortunately there wasn't a website link for me to give credit to. If you are an 'instagramer'...you can find the recipe on laulweighlossjourney's account. 

I've made this mock Nutella twice. Once I blanched the hazelnuts first to remove the skins. The second time I left the skins on. There's no difference in the texture or flavor. Just in color.....


The main difference between the store brands and the homemade version is the consistency. It's thinner....and a bit grainier. You'll think you messed up when you first mix it up but don't worry, it does thicken once refrigerated. It doesn't become as thick as store brands, but it's enough. 

And really....it's so easy. No cooking involved. Just a food processor. And if you make your own almond milk (which doesn't get cooked)...you can call this "raw". All of the ingredients are raw, or are available raw.

Are you ready to get a little healthier and step a little further away from the processed?

Let's do it! 

Vegan Chocolate Hazelnut Spread

1 cup hazelnuts (skins on or off, its up to you)
1 TB coconut oil
3 TB cacao powder
4 TB maple syrup
1/8 tsp salt (also known as 'a pinch')
1/2 cup almond milk

In a food processor, pulse the hazelnuts a few times then puree them until they start forming a paste. Add in the coconut oil and continue processing until smooth. 


Add in the remaining ingredients and process until completely combined and smooth and creamy.

It will be a bit runny, but just pour and scrape it into a container (mason jars work great!), cover and place in the refrigerator.

After a couple of hours, you will notice that it's getting thicker. After that, I have no idea because It has yet to last more than 12 hours in my house. 


My daughter found some Belgian Chocolate Thins at the Italian Deli today....and let me tell you....I could eat the whole box with my Chocolate Hazelnut Spread. 


And not feel guilty.

Well, at least not very much. 

Wednesday, February 12, 2014

I Heart Chocolate with Van's Foods Snacks


It's almost Valentine's Day and everywhere you look, there's chocolates and candies. Which are cute and tasty but not what my girls would want to eat. I needed to come up with an alternative plan (something other than the cute little socks covered in hearts that I got them).

Chocolate is always good...especially dark chocolate. Good quality chocolate. Ok, wait...let me back up a minute.

Van's Natural Foods recently sent me some boxes of new snacks they've recently launched.... PB&J Sandwich Bars. Gluten-free PB&J Sandwich Bars to be exact. They're goal? To help us stick to that 'I'm going to eat healthier this year' resolution. They couldn't have come at a better time, cuz to be honest, it won't be long before summer is here (and you know what that means). If you fell off the wagon...get back on. It's ok. We won't tell.


So, I got these boxes of PB&J Sandwich Bars...two flavors: blueberry and strawberry. They were really good. So good that my daughters ate them all before I could do anything with them. They tasted like little peanut butter and jelly sandwiches. And they didn't have that intense weird sweetness that you find in other snack bars.

No product to play with meant a trip to the market to hunt them down. These babies are so new that my local markets don't have them yet. You can bet that when I see them...I will buy them! Meanwhile, I purchased another snack bar that they make...Peanut Butter and Chocolate Chewy Granola. Also gluten-free with only 11 grams of sugar (cane sugar is the only added sugar in this product). Perfect for my Valentine plans.

I Heart Chocolate

Grab a bag of good dark chocolate and a tablespoon of shortening or coconut oil.


Place the bowl over a double boiler or a sauce pan with boiling water, off the heat. Stir until melted.


You don't have to add the oil, but it does make the chocolate smoother and shiny.

Take a few snack bars and cut them into 1 inch squares.


Place one on a fork


 And dunk. (Kinda makes me want to be one of those squares)


Place on a wire rack. If you have some cute little hearts, stick them on before the chocolate hardens.


Once they've hardened some (they won't get super hard cuz of the oil) give them to your true love, knowing that you're not loading them up with junk. A true gesture of love.


Before I let you go...I want to remind you that I'm having a Giveaway that will be ending on Monday, February 17th,2014. Hurry on over to ENTER for your chance to win 1 pound of Ceylon Cinnamon and get my recipe for Milk & Honey Cinnamon Raisin Bread

Aaaaand, one more thing. Keep an eye out. I will be posting again about Vans Healthy Foods and it will include another GIVEAWAY! I can't tell you what I'll be giving away yet...cuz it's a secret. 

Meanwhile, have a Happy Valentine's Day. If you can't be with the one you love, love the one you're with. Even if its yourself. (Sorry....I know...that song will now be stuck in your head. I know this cuz it's stuck in mine too).  

I was not compensated for this post, however Van's Natural Foods supplied me with samples and coupons for their products. All opinions are my own.

Saturday, May 18, 2013

Strawberry Chocolate Torte


It's National Strawberry month and strawberry season is at it's peak. Farmers markets and stands are boasting sweet berries by the pint, half flat or full flat. If you were to drive through Ventura County, CA...you'd probably see a road side fruit and vegetable stand on every corner. As a matter of fact, the yearly Strawberry Festival is going on this weekend in Oxnard. A mere 45 minute drive (without traffic) from my house and I've never been. I don't understand how that's happening. I mean, strawberries are my favorite fruit...I've lived here all my life.....how do I keep missing the most fabulous festival of the year?

I'm so disappointed in myself. I've let my berry love down. This must be remedied!

In the meantime, lets console my strawberry craving with a delightful torte.


This recipe was inspired by a couple of recipes I ran into. As much as I love raspberries (they are a very close second to strawberries...but are fighting for that position with blackberries) I just had to stay true to my first love.

Chocolate Cake with Strawberries
Raspberry Chocolate Torte


Strawberry Chocolate Torte
Printable Version

Cake:
8 oz dark chocolate, chopped
3/4 cup butter, diced
2 tsp vanilla extract
1/4 tsp instant coffee granules
3 1/2 oz toasted almonds
2 heaped TB flour
1/2 tsp salt
5 eggs
3/4 cup granulated sugar (if you have bakers or caster sugar, that would be best)
8 fresh strawberries, plus more for garnish
8 oz cream cheese, room temperature

Glaze:
8 oz dark chocolate, chopped
1/2 cup heavy cream

Preheat your oven to 325' F. Line the bottoms of 2 round cake pans with parchment paper (you can spray the bottom with cooking spray before placing the parchment paper inside, to keep the paper in place).

Cake:
Put the 8 oz of chocolate and the butter in a medium sized, microwave safe bowl.


Melt the chocolate and butter in a the microwave (or use a double boiler) in 30 second increments, stirring in between until nearly all the chocolate is melted. Complete the process by stirring until fully melted.


Set aside to cool. Once cool, stir in vanilla and coffee granules.

In a food process, finely grind the almonds. Add in the flour and salt and transfer to a small bowl. Set aside.

With an electric mixer, beat the eggs in a large bowl until they double in volume (about 5 minutes). Slowly add the sugar and beat for 1 more minute. Fold in the cooled melted chocolate until just combined. Sprinkle in half of the almond/flour mixture and fold until just combine then sprinkle in the other half, folding until just combined.


Divide the batter between the two cake pans. Bake for 15 minutes or until toothpick comes out with only a few crumbs.


Allow to cool in the pans.

Meanwhile, make the filling by smashing the strawberries and combining with the cream cheese.


Carefully remove the cakes from the pans. Place one of a plate. Spread the filling over it. Place the other cake on top.


Thats where I ran into some problems. My cake crumbled....(I think I may have slightly over cooked them)


I pieced it together...hoping the filling would help keep it in place, acting like glue...which it did. But...it wasn't a pretty site.

Thank God for glaze!!!

Lets hurry up and make that glaze so I don't have to see this mess any more...

Glaze:
Bring the cream to a boil. Place the chocolate into a medium bowl. Pour the hot cream over the chocolate and stir until melted.

Spread the glaze over the cake...


The glaze will thicken as it sets. 

Garnish with strawberries and a bit of powdered sugar if desired.


And there you have it. A delicious, seemingly beautiful dessert (who can see the crumbled section, right? No one has to know...trust me) that is bound to satisfy.

Saturday, September 8, 2012

Devil's Food Cupcakes with Hazelnut Crunch


Are you ready for this? I mean.....are you really ready for this?!

This is a Bon Appetit recipe for a 3 layer cake. I didn't have a need for cake. So I decided to make cupcakes. Easier to share at work that way.....so I wouldn't have to eat them all myself. Cuz as good as these are...I would eat them all. They are the fluffiest, lightest cupcakes I have ever eaten in my life. Hands down!


Be prepared though...there are a few steps. And a lot...I mean a LOT of beating. But it's all worth it. Trust me. Hopefully you have a KitchenAid stand mixer (unlike yours truly)...it will go by quicker than if you're using a handheld.

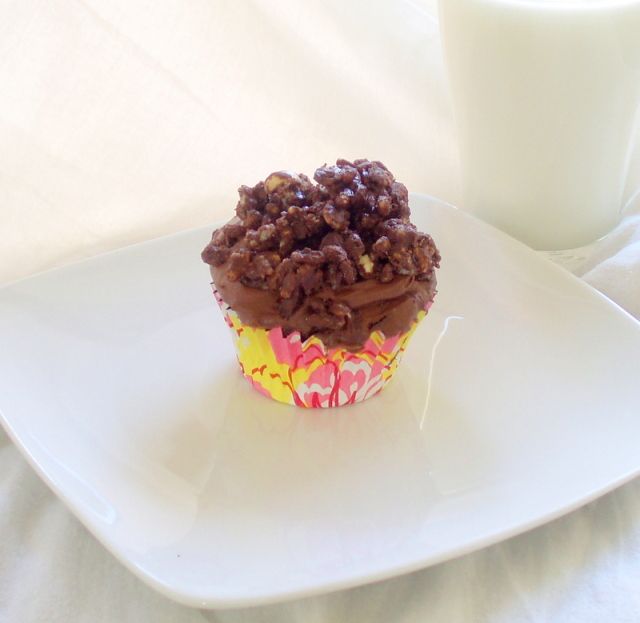
Another thing...there are 3 parts to this cupcake. You have the cake part, the frosting...and then you have the crunchy topping. You can make the cake part (cupcakes) a day in advance. Everything else should be made the day you're going to assemble them. They store nicely in the fridge, covered. Just let them sit at room temperature for an hour before eating...gives the icing time to soften a bit. The only part of the cupcake that suffers over time ...is the crunchy topping. It loses its crunch. Not that it goes bad, it's just not as good.

Oh...and did I mention that the frosting alone has ONE POUND of chocolate in it? Oh ya, baby....give me that chocolate!! One thing I did (by accident but it turned out great) was that I used semisweet chocolate, only, in the frosting. The recipe called for 8 oz of high quality milk chocolate (plus 8 oz of whatever kind of semisweet chocolate) and some how I missed the word "milk". I ended up adding some powdered sugar to sweeten it up a bit. You can use milk chocolate as the original recipe calls for or do it the way I did. Which ever you prefer...it's going to be great!

Ok, ready or not ...here goes

Devil's Food Cupcake with Hazelnut Crunch
Printable Version
Makes 36 cupcakes

Part 1 - Cake:
2 1/3 cups cake flour
1 cup unsweetened cocoa powder
1 1/2 tsp baking soda
1 tsp salt
1/4 tsp baking powder
2 tsp instant espresso powder
1 cup hot coffee
1 cup buttermilk
2 1/2 cups sugar
1 cup unsalted butter, room temperature
4 large eggs
1 large egg yolk
1 1/2 tsp vanilla extract
4 oz semisweet or bittersweet chocolate (not to exceed 70%), melted and cooled

Preheat the oven to 350'. Line 36 muffin cups (or work in batches).

Sift together the flour, cocoa powder, baking soda, salt and baking powder into a medium bowl. Set aside.

Combine the coffee and espresso powder into another medium bowl then whisk in the buttermilk. Set aside.

In a large bowl, beat together the sugar and butter, until light and fluffy (this should take about 5 minutes). Add in the eggs one at a time, beating each egg until incorporated into the mix before adding the next one. Scrape down the sides as needed. Then beat in the egg yolk and vanilla. Turn the mixer onto high and continue beating until the mixture has doubled in volume and is very light and fluffy. This should take about 3 minutes. Scrape down the sides of the bowl, making sure the eggs and the butter mixture are well incorporated. Now beat for another minute.

(Told ya there was a lot of beating. And we just got started!)

Turn the speed down to low and beat in the flour mixture in thirds, alternating with the coffee mixture....beginning and ending with the flour mixture. Then drizzle in the melted chocolate. Mix until just blended.

Fill the muffin tins about 3/4 full (I used a standard sized ice cream scoop to measure and pour..works great!).

Bake for about 18 - 20 minutes, or until toothpick inserted in the center comes out clean. Cool on a wire rack.

Part II - Hazelnut Crunch
1/4 cup hazelnuts
2 oz semisweet or bittersweet chocolate (not to exceed 70%) chopped
2 TB unsalted butter
1/2 cup Nutella
3 cups toasted rice cereal

Preheat the oven to 350'.

Spread the hazelnuts onto a parchment paper lined cookie sheet. Toast the nuts for about 6 - 7 minutes or until fragrant. Keep an eye on them. You don't want them to burn. They go from toasted to burned rather quickly. Allow to cool. Chop coarsely. Set aside.

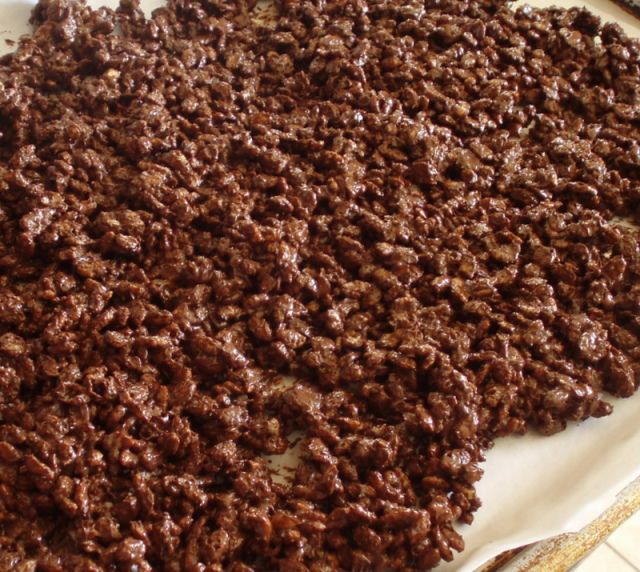
In a double boiler, combine the chocolate and butter. Heat until melted, stirring often. Remove from heat. Add in the chopped hazelnuts and Nutella. Stir until well mixed. Fold in the rice cereal.

Spread mixture onto the parchment lined cookie sheet.  Freeze for about 30 minutes.


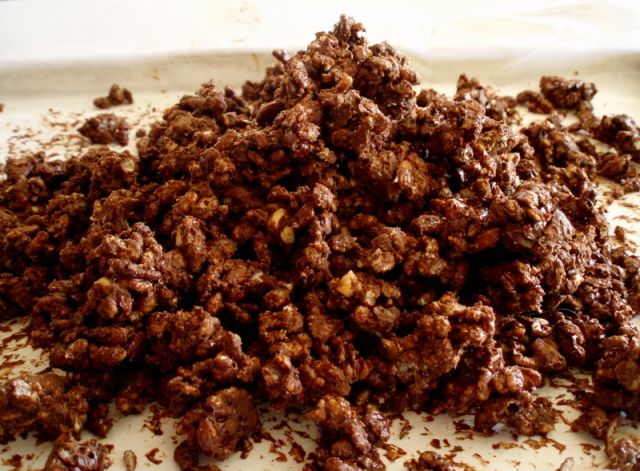
Break up the hazelnut mixture with your hands, into small pieces. Place in a bowl, cover and stick it in the fridge until we're ready to use it.


Part III - Frosting
8 oz of high quality chocolate, chopped (original recipe calls for milk chocolate. I used semisweet and added about *1/2 cup powdered sugar in the end to balance out the sweetness)
8 oz of semisweet or bittersweet chocolate (not to exceed 61%), chopped
1 1/2 TB light corn syrup
1 1/2 cups heavy cream
1 cup chilled, unsalted butter, cut into 1/2" cubes
*1/2 cup powdered sugar, sifted (use powdered sugar ONLY if you don't use milk chocolate as stated above)

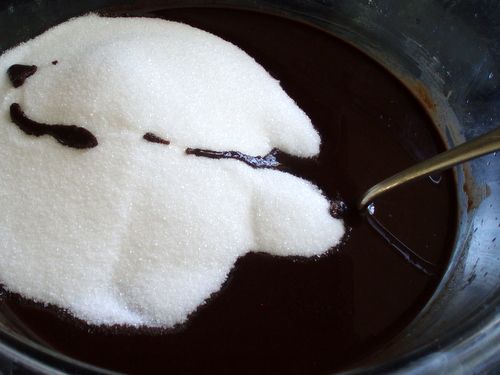
In a medium bowl, combine both chocolates and the corn syrup.

In a small saucepan, bring the heavy cream just to a boil. Pour over the chocolate and stir until the chocolate is melted and smooth.

Using a mixer, beat for about 6 or 7 minutes until the chocolate mixture has cooled.

While the mixer is still running, beat in a few pieces of butter at a time. Beat until incorporated before adding the next few pieces of butter. If using just semisweet chocolate, beat in the powdered sugar. Continue beating until the chocolate is thick and has lightened in color. If you're using a stand mixer, this should take about 5 minutes. If you have a handheld mixer....it could take up to 15 minutes. During this time, if the frosting seems to be really thin, stop. Place in the fridge to chill and firm up a bit, then continue beating.

Once the frosting is done, generously ice your cupcakes and sprinkle the hazelnut crunch over the top.


I made these a week ago. I really wish I had one right now.

Side note: I bought some of those foil lined cupcake liners that don't get messed up during baking. They work great, as you can see. No oil smudges seeping through the liner. Funny thing though...the instructions for the liners said that you don't have to have a muffin tin to use them. Just place the liners on a cookie sheet, fill with batter and bake.


Sure it works...if you want to make football cupcakes (football season IS upon us you know).

Saturday, June 23, 2012

The Perfect P.M.S. Brownie


One night last week I was craving brownies. Which is odd for me. I'm not a "brownie" person (I maybe have mentioned this before). I enjoy brownies.....there's nothing wrong with brownies. But if I had to choose between brownies, cakes, cupcakes, pies, cookies or ice cream. I'd choose cookies. (at least that's my answer today). But I think sometimes, one needs chocolate. Copious amounts of luscious chocolate. Other than a chocolate bar....the only way to really get that desire filled is with a brownie.

Back to my night of craving. It was late. I was lazy so I didn't make them. The next day one of my fellow Brujas (there are four of us Brujas at work and sometimes we like to indulge in sinfully delicious fun) sent me a link to a Betty Crocker email that had a recipe for Salted Dulce de Leche Swirl Brownies. I think it was a sign from heaven. My craving was meant to be satiated.

You're going to want to start making this batch of brownies either early in the morning, or the night before. Why???!!!!! I know....when one wants brownies, one wants them now. But there's an important step that makes them extra rich....you have to make (term used lightly) dulce de leche.

Dulce de Leche
1 14oz can of sweetened condensed milk
1 tsp salt

Remove the label from the can. Place the can (unopened) in a very large pot and fill with water until the can is completely submerged. Cover, bring to a boil and then reduce the heat down to medium-low. Cook for 3 (yes 3) hours. Check every now and then to make sure the can is still completely covered with water....adding more water if necessary. Allow the can to cool completely.

Once cooled you can open it.

This is the part that's always frustrating for me. Opening of cans. I have yet to purchase a new can opener that works consistently and for more than a few weeks. I always struggle with the darned things. Something somehow malfunctions and the gears don't seem to line up or something...I dunno....but I struggle and cuss and swear until I toss the damn can opener aside and dig out my really super old, probably made for camping, can opener.


Works every time.

btw...don't get me started on electric can openers. I have one. I got it for Christmas about 10 or more years ago. It's still in the box. I think Sir Sportsalot forgot that he needs to install it. 

Soo.....you open your cooled can of sweetened condensed milk that has caramelized which is now dulce de leche


Scoop it into a small bowl and stir in the salt. Set aside.

For the bownies....use your favorite brownie recipe. Whether its from a box, or made from scratch. I often use the Baker's One Bowl Brownies recipe. Its easy...and it's good.

One Bowl Brownies

4 oz unsweetened chocolate
3/4 cup butter
2 cups sugar
3 eggs
1 tsp vanilla
1 cup flour
1 cup chopped nuts of choice (optional)

Preheat your oven to 350' F
Line a pan with parchment paper (makes for easy clean up) or grease a pan. One recipe says to use a 9" square pan....and another says to use 13 x 9. I think it might depend on your recipe and how thick you want your brownies. You might have to adjust the cooking time accordingly. Just let the toothpick be your guide. In this case...a semi clean toothpick.

In a large bowl, microwave the butter and chocolate on high for 2 minutes, or until the butter is melted. Stir until the chocolate melts.

Stir in the sugar


Blend in the eggs and vanilla....stir quickly at this point....so the eggs don't start to cook from the warmth of the chocolate mixture.

Add the flour and optional nuts. Mix well


It's a little tempting to just grab a spoon here and now, and dig in.

Spread half of your brownie mix into your prepared pan. Top with 1/3 of the delce de leche and swirl it around with a knife


Carefully spread the rest of your brownie mix on, and then top with the remaining dulce de leche...and swirl again.

Bake for 40 minutes or until a toothpick comes out almost...kinda, sorta clean.

With this brownie recipe...I did have to increase the baking time by about 10 minutes. If you're using a box mix....try the 40 minutes...and see how it goes from there.

Allow to cool completely.

Topping

6 oz dark chocolate, chopped
Coarse Sea Salt (I just used coarse kosher salt)

Melt the chocolate either in a double boiler, or by placing the chocolate in a bowl in the microwave and heating on high for 1 to 2 minutes, stirring every 30 seconds until melted and smooth.

Cut the brownies into squares (size is up to you). Spread the melted chocolate over each one. It helps if you just keep all the brownies together and you can just pour the chocolate over all of them with a little help from a spoon. Sprinkle with salt.

Get a nice tall glass of cold milk....and take a few minutes to enjoy these rich, extremely chocolaty, salty brownies.


In my opinion....these are perfect for....well....you know....those times when cravings must win.

Sunday, June 3, 2012

Chambord Chocolate Mousse


I have discovered the wonderfulness of Chambord. Until a few short weeks ago, I had never even heard of it. A co-worker mentioned something about a Chambord Margarita and was shocked that I had never heard of it. Then she was excited that she got to introduce me to something new, food related. That night I bought a small bottle and was instantly in love. We've been playing ever since.

One of the results of my "playing" is this delicious Chambord Lemonade. You can find the recipe (along with lots and lots of great cocktail recipes) over at Cocktail Puppy


If you've never ventured over there...I highly recommend it.

Now, on with the show. My Chambord Chocolate Mousse. The inspiration was born from my love of chocolate and raspberries, but was not an instant success. The first recipe I tried was not mousse-like at all. It tasted good...but was way too firm, and overly rich. I had used a recipe that I tried last year hoping that the issue was the cook and not the recipe (my first attempt had the same results). After 2 tries I realized it was the fault of the recipe. Too much chocolate and not enough air (from eggs or cream or something). I'm not a professional by any means or even an expert. When I try a recipe and it fails, I assume its my fault. When I try it twice with the same failure...well, let's just say I feel better about myself.

This time, I consulted an expert. None other than Julia Child. I don't know why I didn't do this from the beginning. I mean, I've made Julia's Chocolate Mousse before and loved it! I guess one must remember that when one is searching for fabulous results, one must start with a fabulous recipe from a fabulous chef.

This recipe calls for strong coffee. Easy peasy. Then I remembered that I have a bag of Limited Edition Godiva Dark Chocolate Raspberry coffee in my cupboard. How perfect is that? If you don't have this....don't worry. Use regular coffee. This was just a perfect fluke.


I found a box of Tartelette cups in my cupboard that I decided to use at the last minute. Another perfect fluke. Of course those little cups couldn't contain the mounds of mousse that was made so I did use various dessert cups and ramekins to hold the rest.

Chambord Chocolate Mousse
Printable Recipe

4 eggs, separated
3/4 cup fine sugar (I used bakers sugar)
1/4 cup Chambord Raspberry Liqueur
6 oz semi-sweet baking chocolate
4 tablespoons strong coffee
6 oz unsalted butter, softened
pinch of salt
1 tablespoon granulated sugar
Whipped cream, raspberries and chocolate shavings to garnish
 In a large bowl (about 3 quart size), beat the eggs yolks and sugar together until the mixture is a pale yellow and a slow dissolving ribbon forms.


Add the Chambord and beat until combined. 
Place the bowl over a pan of water that is not quite simmering and continue to beat the mixture until it's foamy, which should take about 3 - 4 minutes. Now Julia says that the mixture should also be too hot for your finger. After 4 minutes it was foamy but not too hot for my finger. And I really didn't want to keep sticking my finger in it. And I really didn't want to burn my finger. So...once it was foamy, I was happy. 

Then, place the bowl inside a larger bowl of ice cold water and continue beating for another 3 - 4 minutes until the mixture is cool and once again forms the slowly dissolving ribbon. 

In a medium sized bowl, melt the chocolate and coffee over hot water, stirring constantly so you don't scorch the chocolate. Remove from heat and beat in the butter a bit at a time so you make a smooth creamy chocolate delight.

Beat the chocolate into the egg yolk mixture. Set aside.

In yet another bowl, beat the egg whites and salt until soft peaks form. Sprinkle in the granulated sugar and continue beating until stiff peaks form. 

Stir in 1/4 of the egg whites into the chocolate mixture. Then fold in the remaining egg whites. 

Place the mousse into your desired dessert cups and chill for at least 2 hrs or over night. 


Mmmm....I could tell just by the sheer fluffiness of the mousse that this is exactly what I had envisioned when I decided to combine the Chambord and chocolate


I really wish I had more of those little shortbread tartelette cups. I'm going to have to remember to pick up some more for future use.

When your mousse has set, garnish as desired and enjoy


The Chambord flavor wasn't over powering...the fresh berry really made the raspberry flavor pop.  The mousse is foamy and creamy and absolutely wonderful. I know there are several steps (and lots of bowls used) for this recipe. But trust me....it is worth every minute.

The tartelettes would be great for a dinner party....the perfect little taste bud teasers that they are. If you want the full mousse experience....grab the dessert cup....


You'll be much more satisfied.