Yum Peaceful Cooking: Mexican
Showing posts with label Mexican. Show all posts

Wednesday, October 22, 2014

Taco Salad and Del Real Foods #Giveaway


Some dinners just hit the spot. In more ways than one. Whether it's just what your taste buds were craving, or it's exactly what your crazy, unpredictable life needed.

Taco salads have always been a quick and tasty solution for crazy day dinners. Toss together some taco-like veggies and cook up some ground beef....

Oh wait..ground beef....that takes a bit more time to prepare. And what if you're like me and rarely have ground beef on hand, let alone defrosted? Although just about any kind of leftover meat works wonderfully in a taco salad. If you have any leftover.

I received a wonderful cooler full of Del Real Foods that saved the day more than once this week. Actually more than twice. The past 2 weeks have been challenging on many levels. Least of all, I had taken the October Unprocessed challenge, which I'm totally loving. But sometimes, something has to give and so often it's our food. We tend to cave into the fast, convenient foods.


Well, let me tell you a little something about Del Real Foods. A lot of the products are just pure, typical kitchen found ingredients (just read the labels). They contain no preservatives. There are gluten free choices, dairy free choice, and zero trans fat. They use family traditional recipes that have been passed down from generation to generation. Each product is cooked in small batches over an open kettle. (Man...I want to be in that kitchen!)

Knowing this made me feel much better about not making dinner from scratch. But you know what? It certainly tasted like I had! My favorite? The cartinas. Tender, fall apart, juicy. Just the way it's suppose to be. And with fantastic flavor!!

Makes great taco salads! And simple nachos....


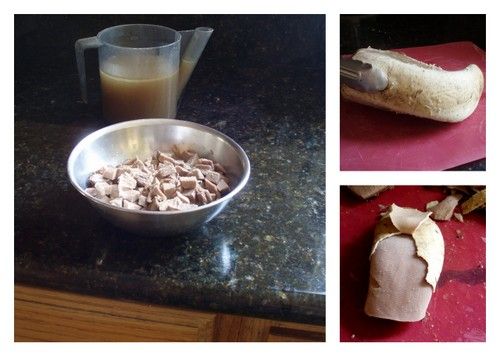
And let me tell you about their tamales!


Well, the photo should speak for itself. These aren't your typically grocery store bought tamales. They aren't skimpy in flavor OR size. I mean, these bad boys are loaded with tender, juicy meat! Great for on-the-go dinner or lunch.

One last thing. You will not find any of their products in the freezer.

Want a chance to give it a try for yourself? How cool would it be to win a 
Del Real Foods Party in a Box! 
This will give you a chance to either try several meals at home....or you can invite your family and friends over for a party, with fantastic food at a minimal effort. 


Hang on just a minute more....lets get back to the Taco Salad I started off talking about. For some reason it had been quite a while since I made a taco salad. I remember my mom making them when I was a kid but I think taco salads have grown up since then and I'm totally loving the more authentic foods that are available to us now.

This recipe is very loose and subject to change based on tastes and preference, not to mention quantities.

I used the Del Real Carnitas, however, any of their meats would be fantastic.

Chop up the following:
Roma tomatoes
Green onions
lettuce
avocado
cilantro
(jicama would be great as well)

Toss it all together then drain and rinse some black beans, grab a handful of pepitas, shred some cheese and throw that in, along with the carnitas.

Cover a plate with tortilla chips, top with the salad then pour on your favorite dressing (I happen to love cilantro and pepita dressing) and garnish with some queso fresco and a few lime wedges.

Poof...dinner is served! And now I want some for breakfast.

And now...the moment you've been waiting for... Del Real Foods is offering a "Party in a Box" to one of you. One lucky winner will receive delicious Mexican refrigerated food, such as carnitas, tamales and the newest addition of pork al pastor pupusas, a Del Real Foods cooler roller bag and a water bottle!

To enter, you must first leave a comment. There are more options for entries to increase your chances of winning. Good luck!!


This giveaway is open to US residents only. This giveaway will run from Wednesday, October 22, 2014 through Tuesday, October 28, 2014 (11:59 pm PT). Winner will be notified within 48 hours of the close of the contest and given 48 hours to respond before a new winner is chosen. 

I was not compensated for this post, however Del Real Foods supplied me with samples of their product and will be providing the product for the giveaway. All opinions are my own.


Wednesday, June 18, 2014

Elote #PicnicGame


Today we are celebrating International Picnic Day by bringing you a basket packed with goodies from A to Z, in the style of the picnic game

Drop by the Sunday Supper Movement to see the whole picnic spread out on our virtual blanket.

I'm going on a picnic and I'm bringing... 
Asian Chicken Salad from Try Anything Once Culinary 
Beautiful Beet Salad from Small Wallet, Big Appetite 
Chicken Muffuletta from Marlene Baird
Double Chocolate Chip Cookie Cups from The Dinner-Mom 

Aaaaaaand...Elote

Wait...what?! Elote?

Yes, Elote...as in Mexican Street Corn. Totally yummy grilled corn on the cob with seasonings and cheese and stuff.

The first time I tried (or even heard of) Elote was not that long ago, at a Dodger game. And I fell in love!

Its super easy. way delicious, and perfect for picnics.

Simply get your grill on


And get your cleaned corn on the grill


I grilled them on a lower heat at first, turning often until they were just about cooked, then added more coals to get a good char going.

I knew they were done when I could smell them. Oh the smell of sweet, sweet corn.


Then for the good stuff (this is enough for 4 - 6 ears of corn)

Elote
inspired by The Kitchn

4 -6 grilled corn ears
2 tablespoons chili powder
1 tablespoon cumin
1 teaspoon garlic powder
1/8 teaspoon cinnamon
Salt to taste
1/2 cup mayonnaise
1/2 cup Cotija cheese, finely crumbled
2 limes sliced into wedges

Combine the chili powder, cumin, garlic powder, cinnamon and desired amount of salt.

Slather a good amount of mayonnaise all over the corn. Don't be shy. Don't be weirded out. Trust me. It's amazing.

Sprinkle (or shower, depending on how much seasoning you like) the chili powder mixture all over the the place. 

Then sprinkle on the cheese and drizzle with some lime juice. 

Grab that cobber and dig in.....


And be ready for your taste buds to be wowed! All those flavors coming together is absolutely delicious. The sweet corn, slightly spicy chili powder, smokey cumin and then the slightest hint of cinnamon all accented by the tangy Cojita cheese and lime juice. This very well could be my favorite corn. 


Sunday, June 15, 2014

Grilled Chipotle Chicken Pizza #SundaySupper


I'm excited to say that I have joined the #SundaySupper Movement! And this is my first participating post. Wouldn't you know it....it's all about Man Food! Is there much out there that men won't eat?

I think not.

At the bottom, you will find a list of other #SundaySupper blogger's Man Food recipes and links. You can check them all out and see what you find that'll make your man happy.

What man doesn't like pizza? There might be a few out there but I've never met one. This Father's Day, to celebrate the man in your life, rather than turning on the oven to bake your pizza (and getting the house all hot and uncomfortable), why not take a shot at it on the grill? The flavor that's imparted is wonderful, just like anything else that's BBQ'd. You know that tell-tale smokey flavor that announces 'summer' loud and clear. Grilled pizza is fun, quick, and so darned good!

As with all pizzas, there are 3 components: the dough/crust, the sauce, and the toppings. Most of which can be partially prepared ahead of time. Even a day beforehand. 


First I'm going to share a beautiful pizza dough recipe. I've used it several times over the past few years and for the life of me, I cannot remember where I originally got the recipe (which is really bugging me now cuz I really would love to give them credit). 

Pizza Dough:
Ingredients:
1 package of active dry yeast (comes out to 2 1/2 tsp)
3 cups of all purpose flour
1/2 TBS honey 
1 teaspoon salt
1/4 cup olive oil
1 cup warm water (about 110 - 115 degrees)

Directions:
Mix the honey and the water together. Add the yeast. Let sit for about 10 minutes, until it foams. Add salt and oil and give it a quick stir. Add the flour and mix well. Mix together with a wooden spoon or by hand. If it's too wet, add a bit of flour (1 TBS at a time) until its dry enough. If it's too dry, add a bit of water (1 TBS at a time) until its right. Turn out onto a well floured surface and knead until its nice and smooth. You might want to step away for a few minutes during kneading to let the dough rest. When you come back, it will knead so nicely and get all smooth and beautiful for you. 

Form the dough into a ball and put into a large oiled bowl. Cover with a clean cloth and let it rise in a warm area until it has doubled in size (about 35 - 45 minutes or more). Punch down and let it rise again until it has doubled in size (about 1 - 1.5 hrs). Punch it down. 

At this point, you can store it in the refrigerator in a lightly covered container, for a few days. Do not seal the container tight as the dough will still rise (albeit slowly) in the fridge and you do not want the gases to build up and cause an explosion. When ready to use, remove from the fridge and let it sit at room temp a bit before working with it. 

Turn it onto a well floured surface and prepare your dough for pizza. I divided it up into 4 balls and made individual sized pizzas. The number of pizza you get out of this dough will depend on how think you want your crust and how big you want them. 


Chipotle Pizza Sauce:
Inspired by The Neely's Chipotle Sauce

Ingredients:
1 cup sour cream (if you can get Mexican sour cream, all the better)
2 chipotle peppers, seeded
2 green onions, roughly chopped
1 garlic clove, chopped
1/4 teaspoon cumin
Juice from 1 lime

Directions:
Place all of the ingredients in a food processor or blender and puree until smooth and creamy. Store in the refrigerator until ready to use. At least an hour or 2 would be good in order for the flavors to mesh together and get all warm and fuzzy.

Note: If you are sensitive to heat, then use 1 chipotle. If you like it really hot, then leave the seeds in.


Shredded Smokey Chicken:
Preheat the oven to 425' F if using the oven to bake the chicken, otherwise prepare your grill accordingly.

Ingredients:
3 boneless, skinless chicken thighs
1 tablespoon chili powder
1 teaspoon garlic powder
1/2 teaspoon cumin
juice from 1/2 lemon
Salt and pepper to taste

Directions:
Rinse and pat dry the chicken.

In a small bowl, combine the chili powder, garlic powder and cumin.

Drizzle the chicken with lemon juice on both sides and sprinkle with salt and pepper. Rub the chili powder combo on the chicken, on both sides.

Bake in a hot oven on a baking sheet that has been sprayed with cooking spray, for about 30 minutes, or until done. Or grill over medium-hot coals until the juices inside run clear.


Let cool first, then shred.

Toppings:
Shredded cheddar cheese
Shredded jack cheese
Grilled onions
Grilled bell peppers
Sliced avocado
Chopped cilantro
Lime wedges


Grilling and assembling the pizza:
Heat up your grill and make it hot. You want a even heat. If you are using charcoal, spread those hot coals evenly around, under your grate.

On a lightly floured surface, shape your dough as desired. Place it on a pizza peel that is lightly dusted with flour or cornmeal, if you have one. If you don't have a pizza peel, dust the bottom side of a cookie sheet and use that.


Slide the dough off the peel and onto the middle of your grill (this should be done in one full sweep). Cover and let cook for maybe 3 - 5 minutes? Check it and see what's going on. It all depends on how charred you want it.

It will bubble up and get all cool looking


When it's lightly browned, remove it using a couple of spatulas, flipping it over onto your peel.


The cooked side will now be the top of your pizza. Spread the Chipotle sauce over the crust


Add the cheese, shredded chicken, grilled onions and more cheese and then slide it back onto the grill.


Cover and grill for another few minutes, until the top is melted and bubbly and the bottom is a deep golden brown or even a bit charred, should you so desire.


Remove. Add the avocados, cilantro and drizzle with lime juice.

Slice and serve!


The cool cream in the sauce keeps the chipotle peppers under control. To a point. It's a bit spicy but that's what's so darned good about it. That smokey chipotle heat, which is also enhanced by the grill. The chicken is just plain good, especially with all that melted cheese everywhere. All in all, this is just a great combo of flavors that naturally go well together. Put it all on a deliciously homemade pizza crust and you can't go wrong.


Manly Starters:
Manly Mains:
Manly Desserts:
Wine Pairings for Man Food #SundaySupper byENOFYLZ Wine Blog


Sunday Supper Movement


Join the #SundaySupper conversation on twitter on Sunday! We tweet throughout the day and share recipes from all over the world. Our weekly chat starts at 7:00 pm ET. Follow the #SundaySupper hashtag and remember to include it in your tweets to join in the chat. Check out our#SundaySupper Pinterest board for more fabulous recipes and food photos.
Would you like to join the Sunday Supper Movement? It’s easy. You can sign up by clicking here: Sunday Supper Movement.
« Last Edit: Today at 08:05:48 AM by Susan @ LittleRedKitchen »

Sunday, November 18, 2012

Mexican Meatball Quesadilla (made with leftover meat)


These are not your typical meatballs. Not because they're flavored with a Mexican flair. And not because they were put inside a quesadilla. What makes them so unusual is that they are made from LEFTOVER meat.

Cooked meat from the night before that I had leftover.

This concept was brought to my attention as I was searching for a recipe to make of Chef Jacques Pepin's. Jacques Pepin is a world famous french Chef. He co-started in a series on PBS back in the day with Julia Child, called Julia and Jacques Cooking at Home. This is just one of his many achievements.

This is the fifth and final recipe for my little Facebook challenge:

A quick and easy dinner, very similar to chicken piccata. Amazing flavor! 


Easy to make, with amazing results. This is one of my favorites out of this bunch.


3. Ina Garten's (altered a tiny bit) Apple Pear Pie in a Cast Iron Skillet
In this recipe, the pie crust stood out the most. I did enjoy the addition of orange with the fruit. 


Quick and easy and oooh so rich. Really enjoyed the puff pastry lattice on this baby.


Leftover meat. I don't know about you, but I struggle with this often. I've done sandwiches and cold salads with it. There are soups and casseroles and a whole crud load of recipes out there to help us with leftover meat.

But have you ever made it into meatballs? This concept captured my attention in a big way. As I read Chef Jacques's recipe, and realized the versatility....a whole new leftover world opened up for me. Jacques used leftover beef and then added a tomato sauce. Beef isn't eaten all that often around here. Chicken reigns queen in my kitchen. A few ingredient swaps, all was in order.

I'm thinking....in the very near future, with Thanksgiving just days away....this is a great alternative for turkey leftovers.


Mexican Meatball Quesadilla (made with leftover chicken)
Inspired by Jacques Pepin's Meatballs and Tomato Sauce
Printable Version

12 oz leftover cooked Mexican flavored chicken (or your meat of choice)
3 TB flour
1 tsp baking powder
1 tsp salt (or to taste)
1/2 cup minced onions
1/4 cup jalapeno, minced (or any veggie that goes with your meat and theme: celery, mushroom, etc)
1 clove of garlic, minced
1/4 tsp cumin (or any seasoning that goes with your theme; thyme, oregano, basil, etc)
1/4 tsp pepper (or to taste)
3 lg eggs
Vegetable oil to fry
Panko, bread crumbs, flour (optional, to coat meatballs)

For assembling quesadilla:
Tortillas (four or corn)
Cheddar cheese
Cilantro
Sour cream

Toss the meat into a food processor and process away... until finely chopped.

In a large bowl, combine the remaining ingredients except for the oil and panko. Squish everything together with your hands. Come on...we're the cooks...we're allowed to have a little fun with our food. Get dirty. Form into about 16 meatballs. Flatten them a little. Why not...I mean, when I make ground beef meatballs, they always ended up flattened anything (unless I boil them but that's a horse of a different color). Gently roll the meatballs in panko, bread crumbs or flour is desired. I used a panko flour mixture.

Heat a skillet with about 1/4" of oil until hot (Jacques says..."...until shimmering"). Cook the meatballs on high heat until brown. Gently turn them over, reduce heat to medium and cook for another 3 minutes.


Poof....done. Transfer them to a paper towel lined plate and get ready to serve them any way you desire.


They kinda resemble tiny patties. But honestly, what's the difference between a meatball and a patty? In my head...the shape and size.

By looking at the insides of that meatball, can you tell it was made with leftovers? Oh man...and is it good! Not the least bit dry. Full of flavor. The texture is just as it should be. Absolutely delicious!!


I can't tell you how excited I am about the results of these meatballs. Seriously....I might make a roast just so I can have some leftovers to give the beef version a try.


After popping a few in my mouth and savoring the success, I wrapped them in a tortilla, smothered with cheese, quickly cooked in a hot buttered skillet until cheese is melted, garnished with cilantro and sour cream.

How would you serve your meatballs? In a tomato sauce, bbq sauce, alfredo......?

Friday, October 5, 2012

Lengua Entomatada (Beef Tongue with Tomato) and Giveaway!


Yes, you heard right. Beef Tongue. It's in there. It's good. I swear.

And you're talking to someone who went waaaaaaaaaay beyond hercomfort zone on this one.

Before we go there, let me say a few things here. And I think you'll wanna hear them.

First off, for the past 3 weeks, I've been participating in the Muy Bueno Cookbook Spotlight & Cook-Off sponsored by Hippocrene and hosted at girlichef  


This cookbook is truly Muy Bueno. Here's a list of the recipes I've cooked during these wonderful three weeks:


You can go to girlichef's site and see what everyone else made. After all, I'm not the only one reviewing it.

When the Muy Bueno Cookbook arrived, of course I instantly started browsing through the recipes. The first thing I thought was....wow, I've either made or eaten a lot of these recipes! Do you know why that is? No, not because I have a lot of Mexican friends. No, not because I live in Southern California where every other corner has a little Mexican joint or restaurant. (although those reasons do have a lot to do with it) but....the recipes in Muy Bueno are for authentic, Mexican home cooked meals.Ones we all know and love and wish we could make. They have been passed down from generation to generation to generation. The 3 women that make up Muy Bueno the cookbook and blog are a family team...a mother (Vangie) and her 2 daughters (Veronica and Yvette). All of whom have been greatly inspired by the grandmother, Jesusita. When you open this cookbook, you feel a sort of reverence. You can sense how important heritage is and how food really brings this family together.

Muy Bueno Cookbook has just about every Mexican dish you can think of (and more) and provides easy to follow directions, beautiful photographs and a touching story or memory that makes it all the more special. With all the cooking I do, and a lot of it is Mexican (because this white girl and her family loves Mexican food), this is the first true Mexican cookbook I've owned. And I cannot tell you how thrilled I am with it.

You have a chance to be thrilled to own your own copy of Muy Bueno Cookbook as well.

I'm giving a copy of Muy Bueno Cookbook away! 

I'll give you the details after we talk about beef tongue.

Beef tongue. I've seen it. I've ignored it with a shiver.
I never ever thought that my kitchen would see one of these on its counter.

Silly me asked one of my daughters to pick out a recipe from Muy Bueno for me to cook. A special recipe  just for this giveway.

Jacquie decides on beef tongue. "Mom, [with a grin on her face] this is really out of your comfort zone, isn't it?!"

"Um, ya. really?"

Jacquie: "Beef tongue is really good! I swear! I've had it before. You'll like it".

"Ya? [long pause] Ok. I guess."

So...I took the challenge. Off to the market I go. The butcher offered a 3 plus lb tongue. I opted for the much smaller 2.5 lb thing. And started my adventure the following morning. Way before anyone else in the house was awake.
I knew this baby needed to be in the crockpot before it was seen by the local population (ie: family, especially Sir Sportsalot).


Funny thing. I posted the above photo on Facebook and you should read the reactions! "WTH?!"
"OMG!! No Way!!!", "Gross that looks like a large finger", "I hope it looks better cooked", "I'll be there for dinner. So good!"

When I asked if anyone had eaten cow tongue, I received extreme responses from both ends of the spectrum: "Yes, very good sliced very thin...", "Makes yummy tacos!", "....it was like it was tasting me - while I was tasting it. ::shudder::", "Eating that will be like French kissing a cow! No thanks!!"

Well....I guess I had to just find out for myself.

Lengua Entomatada (Beef Tongue with Tomato)
Printable Version

2.5 - 3 lbs of beef tongue
3 cups water
1 small onion, quartered
5 cloves garlic
2 tsp sea salt
1 - 14.5 can peeled or diced tomatoes
1 TB olive oil
1/3 cup chopped white onion
1 TB all purpose flour
1/4 tsp black pepper
1/2 tsp garlic powder

Place the beef tongue, water, small quartered onion, and sea salt in a crock pot. Cook on low heat for 6 to 8 hours, until tender.

Once it's done, remove the tongue from the crockpot. Strain the stock and set it aside or refrigerate it if you have time so you can easily skim the fat.

While the tongue is still warm but not too hot to touch, peel off the outer layer of skin.

Under that skin, there was another layer....that was......nubbly. It kinda bugged me in a way that food shouldn't bug you....so I trimmed that off too.

Dice the tongue into 1/2" cubes and set aside.

In a food processor or blender, puree the tomatoes. Set aside

In a large skillet, over medium heat, heat up the oil. Add the diced onion and saute until translucent (about 2 minutes). Add the flour and stir for another 2 minutes. Add in the pureed tomatoes and let come to a boil.

Add the cubed tongue, 1/2 cup of the beef tongue stock, black pepper and garlic powder. Reduce the heat and simmer until the sauce thickens, about 5 minutes or so. You want the sauce to be thick, not runny.

Especially if you're going to do something fun with it....like....fill gorditas.


Well, let me tell you something.

YUM! Really. Honestly....beef tongue is good. As I diced it up, I picked up a cube and slowly brought it to my mouth. Paused....contemplated my action....nostrils were flared in anticipation of...I dunno...thinking it would taste like liver? (I'm not a liver fan). I then popped the cube into my mouth...tentatively chewed in slow motion...stopped. Waited for the negative, involuntary reflex. Nothing. Thought about it. Realized that it is indeed, very tasty. Tender. Not liver or organ like at all. Good beef flavor. Not stringy like roasts. Not fatty like ground beef. And best of all...it no longer resembled a tongue!!

I did it! I made it! I ate it! I loved it!

Now, if you want the recipe for the gorditas that I spooned the lenqua into, you'll either have to wait until I post it, search the various websites....

OR

Win yourself a copy of Muy Bueno Cookbook.  

Rules:

  • Entries must be made by Monday October 8th (Happy Columbus Day) 12:00 PM, pacific standard time.
  • Must be 18 or older to win
  • Must reside in the continental U.S. to win 
  • Must post comment on this blog (no facebook, twitter or email entries will be accepted)


Lots of ways to enter:

  • Post a comment. (If you are posting anonymously, please include your email address.) If you do not wish to enter the contest, but would like to post a comment, just say you're opting out. 
  • Follow me on Twitter (post a comment saying you are)
  • Tweet about the giveaway (post a comment saying you did)
  • Follow me on Facebook (post a comment saying you are)
  • Post this giveaway on your Facebook page (post a comment saying you did)
  • Follow me on Pinterest (post a comment saying you are)
  • Pin this page (post a comment saying you did)
  • StumbleUpon this age (post a comment saying you did)
That's 8 ways to enter. Good luck!!

Wednesday, September 26, 2012

Capirotada - Mexican Bread Pudding


Last week in reviewing the Muy Bueno Cookbook we had the option of making Mushroom, Jalapeno, and Cilantro Salsa and/or Capirotada (Mexican Bread Pudding). I had planned on doing both and posting both, last week. I only got to do the salsa. I had purchased all of the ingredients for Capirotada, and was ready to make it when I discovered it's not something you can just "whip up". Not that it's labor intensive but there is some time (prep and rest) needed. I had to wait until the following weekend to make it.

If you're not familiar with Mexican Bread Pudding, let me start off by saying it's not a custardy bread putting. There are no eggs or cream in the recipe. The bread soaks in this wonderfully amazing syrup thats made with piloncillo,. cinnamon, cloves and water. Piloncillo is sorta, kinda like brown sugar. I found mine at the Mexican market. It's sold in cones and is very hard. Have you ever come across those brown sugar 'stones' before and they don't break apart? Its hard (if not more so) than that. The other difference....flavor. Piloncillo definitely has a much stronger maple flavor to it. If you can't find piloncillo then go with dark brown sugar, but hopefully, you'll be able to find it. It's wonderful.

Now, the difference between Capirotada and your standard bread pudding doesn't end with the custard and flavor. Capirotada has a very deep religious meaning and is typically eaten during Lent. The list of ingredients are very symbolic: Bread represents the Body of Christ, the syrup is his blood, the cloves stand for the nails on the cross, the cinnamon represent the wooden cross and the cheese is the Holy Shroud.

This dish is meant to be eaten warm and heats up nicely even a day or two after it has been made.

Capirotada
Printable Version

4 bolillo rolls (or French rolls)
4 TB butter
4 1/2 cups water
12 ounces piloncillo (or 1 1/2 cups dark brown sugar, packed)
4 cinnamon sticks
6 whole cloves
1 cup raisins
3 cups shredded Longhorn Cheddar or Colby cheese

Preheat oven to 350' F


Slice the bread rolls into 1/2" slices. Butter both sides. Place on a baking sheet and bake for about 3 minutes per side or until lightly golden and dry. You might have to do this in stages. Set aside to cool.


In a large saucepan, combine water, piloncillo, cinnamon and cloves. Bring to a boil, reduce heat and simmer for about 20 minutes. This is what we're calling you're syrup. Remove from heat and let steep for 2 hours. Pour through a strainer and discard the cinnamon and cloves.

Spray an 8x10 baking dish with cooking spray. Layer the ingredients in this order: 1/3 of the toasted bread, 1/3 of the raisins, 1/3 of the cheese. Pour 1 1/2 cups of your syrup over everything. Let set for 15 minutes. Repeat two more times.


Once everything has set for its last 15 minutes, spray a piece of aluminum foil with cooking spray and cover your pudding.

Bake at 350' for 40 minutes. Remove the foil and continue baking for another 10 - 15 minutes. Serve warm.


This was soooo good! I love maple and brown sugar. I love bread. I love cheese. And all this works together so very well. The bottom layers of bread are soaked in syrup...YUM. The top layer is adds a great texture...the raisins, well you can't have bread pudding (of any kind) without those. I think this would be a wonderful dish for Christmas. 

I'm participating in the Muy Bueno Cookbook Spotlight & Cook-Off sponsored by Hippocrene and hosted at girlichef 

Sunday, September 23, 2012

Prickly Pear Margarita


As I was thumbing through the recipes and reading the stories in Muy Bueno, I just happened to notice that 'Drinks' had a pretty thick chapter (A huge plus in my book) and when I saw this vibrant fuchsia margarita...I knew it was meant to be. I mean...look at that color! AND its a margarita. How perfect is that?!

The Muy Bueno Cookbook is a complication of old-world northern Mexican recipes that span 3 generations. The stories and memories that are shared are touching and heart felt. They bring the recipes to life as the importance of family and tradition are expressed. The team that make up Muy Bueno include Evangilina and her daughters, Yvette and Veronica.  The three of them pay an incredible tribute to the grandmother in such a way that makes you wish you could've spent time in her kitchen, in her presence. Learning the old-world ways. But since that's not going to happen...lucky for us, Muy Bueno can bring those ways to your kitchen.

This week I have chosen a recipe to review based on my love of margaritas and my intrigue of making such a beautiful drink. In the cookbook, this drink was dedicated to the Grandma (Jesusita) because of her love of her tunas (prickly pears) and color de rosa (the color pink). I'd like to raise my glass and propose a toast.
'Here's to holding tradition and family values close to your heart. Honor those that came before us and guide those who come behind us.'

Prickly Pear Margarita
Printable Version

4 prickly pears, peeled and sliced
1/4 cup water
3 1/2 cups crushed ice
3 oz fresh squeezed lime juice
3 oz frozen limeade
6 oz silver tequila
4 1/2 oz triple sec (I used Citronge)
3 TB simple syrup
lime wedges and coarse salt to garnish


Until yesterday, I had NO idea that the insides of these prickly pears are pink. Brilliant dark pink. My neighbor, Ruth grows them. Not because she eats the fruit (or the cactus "paddles") but because she likes cactus plants in general.

When I cut into the prickly pear...I was instantly reminded of beets.


But was happy to discover, they don't stain like beats (only a little). The fruit is almost slimy inside...and squishy. It reminds me of kiwi. Now the flavor...I don't even know how or what to compare that to. It's mild, slightly sweet...almost berry-ish. I drank a whole margarita just trying to pinpoint the flavor.  I finally gave up and accepted the fact that it is it's own fruit with it's own highly enjoyable flavor. And proceeded to pour myself a 2nd glass.

Once you have your prickly pears peeled and sliced, put them in your blender along with the 1/4 cup of water....and blend.

Strain into a bowl. You don't really want to "drink" the little seeds that are found inside


You might need to get a spoon and help smoosh the fruit through the strainer. The only thing you want to leave behind are the seeds.

Place crushed ice in the blender. Add the prickly pear puree, lime juice, limeade, tequila, triple sec and simple syrup. Cover and pulse ingredients.

Garnish the rim of your glass with salt. Pour in the margarita. Add a lime wedge and serve


If the color itself doesn't make you fall in love with this drink...then the flavor will. It's not too sweet. It's not tart. It goes down smoothly. I can't describe the flavor. If you've eaten prickly pears, then you know what I'm talking about. If you haven't....then you'll have to find out for yourself. Don't let the fact that you can barely taste the alcohol fool you. It's there. You'll know soon enough.

This post is part of the Muy Bueno Cookbook Spotlight & Cook-Off sponsored by Hippocrene and hosted at girlichef