Showing posts with label pie. Show all posts
Saturday, November 10, 2012
Apple Pear Pie in a Cast Iron Skillet (or two)
And the chef challenge continues.
First was Tyler Florence's Chicken Francese
Second was Ann Burrell's Braised Chicken with Tomatillos and Jalapenos
This week...Ina Garten.
I saw where someone had baked a pie in a cast iron skillet (thought that was totally cool!). Then I watched something about pie's on one of the cooking channels. By then pie was totally on the brain. Not only did I want to bake a pie...but I wanted to try my hand at making a lattice crust. A little research, a couple demos and I was ready to go.
Not trusting my pie crust skills (especially with the lattice experimenting)...instead of making one pie, I decided to make 2 small pies. One with a lattice top and the other just regular.
Safety net thing..ya know? In case the lattice top was a total fail, I'd still have one that looked...edible.
I have these two cute little cast iron skillets. They're about 5". Perfect for my two pies.
Well, guess what? I had so much fun with the lattice top, I ended up making them both the same
I went with the All American Apple Pie. Only...I didn't have enough apples. So I added pears. Plus, if I didn't use up my pears, they were going to go to waste. That was the only alteration I did to Ina's Deep Dish Apple Pie recipe.
The best thing about this recipe of hers is the crust! I absolutely loved, loved, LOVED the crust. (which is saying a hell of a lot cuz I'm not really into pie crust). Ina uses both butter and shortening. Plus she adds a bit of sugar. And....because of her....I now know how to make a crust, using my food processor. Homemade crust in a snap!
The pie itself is very good! However....I will make a few changes next time. Ina's a big fan of zest. I am too. It's just that....with the use of lemon and orange zest in the pie, it was a bit much. The apple and spice flavors were forced into the background. (pear isn't a strong flavor anyway....it was just a nice texture addition). I think a little less zest...or even none at all (but keep the orange juice)...would be a nice balance.
Or maybe the apples I used just weren't tart enough to carry the citrus flavors?
Apple Pear Pie in a Cast Iron Skillet
Printable Version
Perfect Pie Crust
12 TB very cold unsalted butter, diced
3 cups all-purpose flour
1 tsp salt
1 TB sugar
1/3 cup very cold vegetable shortening
6 - 8 TB ice water
Apple Pear Pie filling
2 lbs apples (I used honeycrisp) peeled, cored and chopped into chunks (or quarter or sliced)
2 lbs Bosc Pears (or some other type of firm pear), peeled, cored and chopped into chunks
1 lemon, zested
1 orange, zested
2 TB lemon juice
1 TB orange juice
1/2 cup sugar, plus more for sprinkling the top
1/4 cup all-purpose flour
1 tsp salt
3/4 tsp ground cinnamon
1/2 tsp ground nutmeg
1/8 tsp allspice
1 egg, whisked with 1 TB of water for the egg wash
Preheat the oven to 400' F
No prep-work needed for the cast iron skillets.
Note: I put my food processor bowl and blade in the refrigerator and chilled before using. The less opportunity your butter and shortening have to warm up, the better the crust.
Place the flour, salt and sugar in the food processor. Pulse a few times to mix it all up. Add the butter and shortening and pulse 8 - 12 times, until the butter is pea sized. While pulsing the machine, add in the ice water through the feed tube until the dough forms into a ball.
Turn the dough ball out onto a lightly floured surface and roll into a ball. Divide the dough in half and wrap each half in plastic wrap. Refrigerate for 30 minutes.
Just before the dough is done chilling, prepare your filling by combining the apples, pears, lemon and orange zest and juices, 1/2 cup sugar, flour, salt, cinnamon, nutmeg and allspice.
Take one half of the dough out (leaving the other in the fridge until you're ready to use). Because I used 2 small skillets, half of this dough will be for one little 5" pie, top and bottom crust. If I had used a 9" or 10" skillet, it would've been just the bottom crust.
Divide in half (set half aside for the top) and on a lightly floured surface, roll out the dough and drape it over the skillet. Gently fit the dough into bottom and sides of the pan and allow the dough to extend 1/2" over the edge, trimming the dough away as needed.
If you notice that your filling is very wet and moist, don't be afraid to sprinkle some corn starch on the bottom crust before adding the filling
Fill the pie with half of your apple mixture. Brush the edges of the dough with an egg wash.
With the other half that you just set aside, roll and place on top of the pie, trimming the edges to about 1" over the edge. Tuck and pinch and crimp the the two edges together. Make a couple of slits on top.
Or....Cut into 1" strips, laying them on top of the pie and weaving to make a lattice top. Here's a great demo on How to make a lattice pie crust
Repeat with the remaining dough and filling.
Brush the tops of your pies with the egg wash and sprinkle with sugar.
Take strips of aluminum foil and cover the edges of your crust (so they don't brown and burn too quickly). Place the pie on a foil line baking sheet (this will catch the messy juices that will bubble over).
Bake for about 45 minutes (if you made one large 9" or 10" pie, you will need to bake it for 1 to 1 1/4 hours), until the tops are brown and the juices in the pie begin to bubble out.
Serve warm, with a big scoop of vanilla ice cream.
What we have here is a nice flaky crust with a hint of sweet...firm yet tender apples, contrasting with the soft pears....and yes. I want to make these little pies again. And again.
I may never bake another full sized pie. They are the perfect size for sharing...and keeping, without being too committed to one flavor.
Tuesday, October 23, 2012
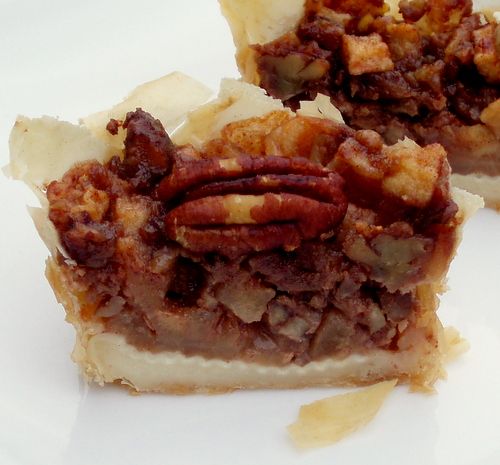
Apple Pecan Mini Pies with Brie Cheese
I'm not big on pies. Although I love pecan pie.
I'm not a fan of pie crust. But some aren't all bad.
Cooked apple isn't my thing. But I love a good Apple Betty.
So why did I make these Apple Pecan Mini Pies with Brie Cheese, you ask? Haven't you ever craved something that's not your favorite thing? Just to see if you can make it in a way that suits you? Well, that's kinda what I did. I saw the Honey Crisp apples (my favorite apples) at the store and had a weird craving to bake something with them.
I've had some filo dough in my freezer that I've been dying to use. When I bought it, I thought I had bought the filo cups. HA! Well...that's not the case. I had the sheets.
Let me tell you a little something about the sheets. Frozen sheets to be specific. IF you are able to find fresh filo dough....do yourself a favor and use it. If you can make your own filo dough...I'm totally envious. The frozen ones have a tendency to rip, tear, fall apart. And basically make things a little more.....challenging. I did survive...but next time, I'm going to the local Armenian market where I've been told has fabulous fresh filo dough.
So...bottom line? I replaced pie crust with filo dough. I made mini apple pies with brie cheese and pecans.
I loved it!
These little mini pies are perfect. They aren't too sweet. They aren't messy. The pecans were roasted prior to baking and add a great smokey flavor along with the nuttiness. The apple texture, with it's sweet tartness is the perfect offset to the brie cheese. And the filo crust? FABULOUS!!
Apple Pecan Mini Pies with Brie Cheese
Printable Version
4 apples, peeled, cored and diced (I used Honey Crisp apples) - about 3 cups
1 TB butter
1/4 cup granulated sugar
1 tsp cinnamon
1 TB cornstarch
2 TB fruit preserves (I used my Vanilla Fig and Pear Jam)
1 1/2 cups toasted pecans, chopped
16 toasted pecan halves to garnish
8 oz brie cheese, cut into 16 - 1/2 oz chunks.
Filo Dough (the amount of sheets will depend on the size of your sheets. You will need enough sheets to make 16 sets of 4 - 4x4 sheets)
melted butter for filo sheets
Preheat oven to 325' F
In a medium sauce pan, combine diced apple, 1 TB butter, sugar, cinnamon, cornstarch and preserves. Simmer over low heat for 5 mins.
Add the chopped pecans to the apple mixture and continue simmering for another 5 minutes. Not too long. You want the apples to still be crisp. Set aside
Prepare your filo dough as follows:
Take one sheet and brush the edges with melted butter (this keeps it in place), then continue to brush the whole sheet with butter. Place another sheet on top and brush it in the same manner.
Cut the two prepared sheets into 4x4" squares. Take two square sets and lay them on top of each other at an angel to form a star.
The sheets that are set aside, waiting for their turn to be used in greatness need to be covered with a damp towel. They dry out really fast.
Also....if you end up with a really rebellious sheet....
Don't stress too much. Forgive the little pita (sailor talk for "pain in the a$$"), it is frozen dough after all...and work with it. Gently. Sometimes rustic is beautiful. Be patient. Keep the goal in focus. The greatness is in the end result, made sweeter by the struggles.
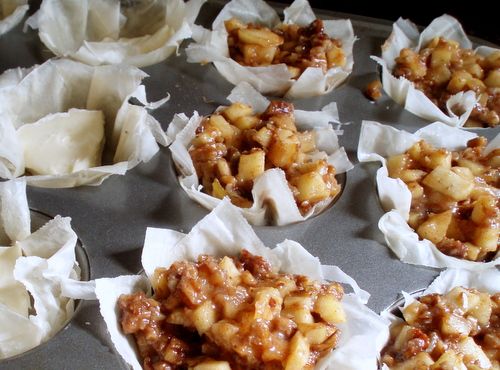
Now, take your filo star and place it over a muffin tin. Gently press down on the center to form a cup. Repeat
You should now have 16 prepared muffin tins. Place a chunk of brie cheese inside each muffin tin.
Divide the apple mixture evenly between each cup (this should measure out to about 1/3 cup each, depending on the size of your apples)
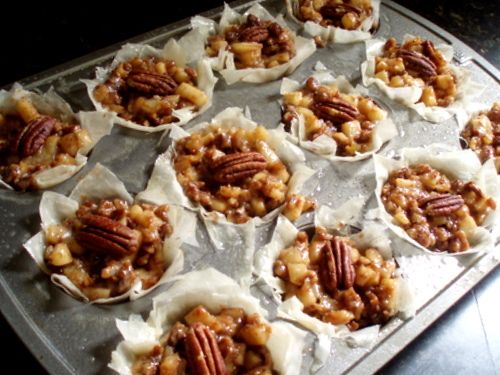
Top each cup with a pecan half
Bake for about 40 minutes or until the edges of your filo are golden brown. Let sit in the pan for a couple of minutes then gently remove with a butter knife and place on a cooling wrack.
Enjoy as soon as they're cool enough to eat or place in the fridge overnight and enjoy them even more the next day. These little condensed apple pies are just as good, if not better served cold as they are hot out of the oven.
Sunday, July 22, 2012
Dulce de Leche Banana Cream Pie
Dulce de leche, banana and peanuts.....'nuf said.
Ok, so I do have more to say (come on, you oughta know me better than that by now).
You know how when you "think up" a great combo in flavors, then you google it and of course it's already been done. A gazillion times over. Ya well....it happens to me all the time. I never get to think up anything new and original.
But that doesn't ever stop me from making it and enjoying it and loving it. Especially this pie. It's no-bake and easy peasy. Perfect for summer. Or anytime when you don't want to turn on the oven. You can even let the kids make this. Of course, you'll end up with a sticky mess in the kitchen...but hey, that's half the fun when you're a kid, right?
This particular recipe was found on FoodNetwork, courtesy of Marcela Valladolid and can be found here: Dulce de Leche Banana Cream Pie. I did make a few very slight changes and omissions. You can compare the two if you'd like and do what you want. (that's what I love about cooking....making it your own)
Dulce De Leche Banana Cream Pie
Printable Version
Crust:
5 oz graham crackers
1/2 cup roasted peanuts, plus more for garnish, (I used salted)
8 TB butter, melted
Cream Filling:
4 oz cream cheese, room temperature
4 TB butter, room temperature
2 TB powdered sugar
1 cup heavy whipping cream
1 cup of dulce de leche, plus more for garnish
3 medium bananas, sliced
Place the graham crackers in a food processor and process until coarsely ground. Add the peanuts and continue processing until finely ground. Pulse in the melted butter until well combined.
Transfer the crumbs to a 9.5" pie dish and press against the bottom and sides. Place in the refrigerator for 10 to 20 minutes.
While the crust is solidifying, whip the cream cheese and butter with a hand mixed on medium speed until fluffy and as lumpless as possible (there still may be a few but we want them to be minimal). Reduce the speed to low and add in the powdered sugar. Whip until just combined. (if you over whip, you might end up curdling the butter...not the result we're looking for). Add the cream and whip until you have soft peaks.
Take out your chilled crust and spread the dulce de leche on the bottom of the crust. If your dulce de leche is....too thick, you can warm it up a little in a pan first. Arrange your sliced bananas over the dulce de leche, overlapping as necessary.
Pour the whipped cream mixture on top of the bananas and spread evenly
(ok, so I didn't know how much filling I was making and apparently over extended my crust a bit)
Garnish with dulce de leche and chopped peanuts.
I'd show you a picture of the sliced product....but to be honest, I suck at slicing and serving pie. It was a mess. But absolutely delicious. The saltiness from the peanuts, the creamy caramel dulce de leche and of course the bananas......ok, so I kinda wanna stick my face in it and come up licking.
Sunday, January 8, 2012
Mini Strawberry Pies with Chocolate
Strawberries and chocolate go together like.... ham and eggs, peanut butter and jelly, pork chops and apple sauce (The Brady Bunch anyone?) or...cheese and wine. Both are wonderful on their own but when you put them together it's a whole new level and deliciousness.
In my mission to make mini pies, I searched high and low for mini pie pans. I couldn't find any. I know they're out there. I've seen them since making these but in my impatiences, I didn't want to order them online or wait another week for me to have a whole weekend to search another set of stores. Sooooo I decided to use my muffin pan. Which made perfectly sized little individual servings of pie. I thought about using my ramekins but they don't have an edge on them to be able to make the little crust edge designs. Not that my crust design is great but it has one at least. Which makes them truly look like mini pies.
Before I go into detail here, I want to explain something. I made the pie crust with cocoa powder in it. My intention of course was to create a chocolate flavored crust. It looks chocolaty....all brown and everything.
But the flavor isn't there. It ended up just tasting like any ol' crust. (but there's a fun surprise inside that makes everything wonderful so it wasn't a fail). I'm hesitant to add more cocoa to the my crust recipe in fear of breaking down the flakiness and making it more doughy. I could've used a chocolate cookie crust but then it would be a totally different kind of pie, wouldn't it? Any hints, tips or clues out there on how to make a flaky chocolate pie crust that actually tastes chocolaty?
With all that said.......(crap....I forget where I was going with this)
Well, never mind. Lets just get to it
For the pie crust...you can use your favorite recipe. If you want to try the chocolate version, rule of thumb...for every cup of flour, add 4 tsp cocoa powder and 4 tsp sugar. The recipe I used was from Mastering the Art of French Cooking:
This recipe makes 8 mini pies.
2 cups all purpose flour
1 tsp salt
1/4 tsp sugar
6 oz chilled butter, but into 1/2" bits
4 TB chilled shortening
a scant 1/2 cup of iced water (plus more if needed)
then I added:
8 tsp (2 TB plus 2 tsp) cocoa powder
8 tsp (2 TB plus 2 tsp) sugar
In a chilled mixing bowl, add flour, salt, sugar, cocoa powder, butter and shortening.
Using a pastry blender (or the tips of your fingers....working very quickly) work the butter and shortening into the flour mixture until you have pea sized crumbs.
Don't get too mental on this one. It doesn't have to be perfect. Everything will be worked in more thoroughly later.
Add the water and blend quickly with a fork, or your fingers slightly cupped and gather everything together into a mass. If needed, sprinkle more water by the droplets over anything that's not combining with the rest of the dough. Be careful. You want the dough to hold together and be pliable but not sticky. Press together into a rough ball.
Place onto a floured surface. Now...I tried a new method here. One I had never heard of until reading Julia Child's instructions. With the heel of your hand (not the palm, which is the warmest part of your hand) press the pastry, bit by bit away from you in a firm, quick smear of about 6 inches
until you've worked through the whole ball of dough. Scrape up the dough with a spatula and gather it into a mass. Knead it for a second into a smooth round ball. Lightly sprinkle it with flour, wrap it in plastic wrap and place in the refrigerator or about 2 hrs or over night.
While the dough was chilling, I prepared my strawberry pie filling.
2 cups of strawberries
1/2 cup sugar (plus more to garnish if desired)
2 TB balsamic vinegar
1 TB flour
3 TB butter, diced
2 oz dark chocolate divided into 8 - 1/4 oz pieces
I washed, hulled and sliced the strawberries. Stirred in the sugar and balsamic vinegar and let sit in the refrigerator, covered, until ready to use.
When the dough is ready, divide into 8 equal balls. As I worked with 1 ball, the remaining were stored in the fridge to keep cold.
Preheat the oven to 400' F
On a lightly floured surface, I divided 1 ball in half. Each half was rolled out into a circle. Use a 3" cookie cutter to cut the dough into uniform crusts. Place the circles in plastic wrap and stored them back in the fridge.
Once all the dough was rolled out and cut (you should have 16 dough rounds), line 8 muffin tins with half of the dough rounds. Carefully trim the edges of any excess dough, sprinkle the bottoms with a little flour.
Drain off any excess balsamic vinegar from the strawberries then divide them evenly between all 8 dough lined tins.
I had some wonderful sample sized pieces of dark chocolate from Scharffen Berger that were perfect for this! Take a piece of chocolate and bury it in the center of the strawberries, 1 piece per pie. Drop 2 pieces of diced butter on top of each strawberry mound.
Take the remaining rolled out dough rounds and cover each pie. With a fork, carefully press the edges of the pie crusts together to seal the tops to the bottoms. With a knife, slice two little 1/2 inch vents on top of each pie. Sprinkle the tops with a little sugar.
Place an empty cookie sheet on the bottom rack of the oven to catch any drips (there will probably be drips). Bake for about 30 minutes or into crust is brown and the filling is bubbly.
Let cool, then carefully remove each pie from the muffin tins. You may need a blunt knife to help loosen the edges of the crust.
Now, like I mentioned earlier, the crusts lacked the cocoa flavor completely. But....the little jewels of chocolate on the inside.....
So I think maybe the crust was just a tease....pretending to be chocolaty when in reality, the chocolate was hiding inside.
Labels:
chocolate,
Dessert,
pie,
strawberries
Tuesday, May 31, 2011
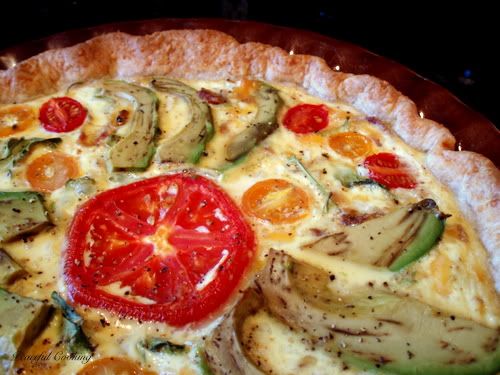
SoCal Quiche
A.K.A.....BLT w/ Avocado Quiche. For reals. All of the ingredients of one of the most popular sandwiches wrapped up in one pie plate.
Just for the record...my oldest child doesn't like quiche.
Except for this one.
She was amazed..."Mom! I don't even LIKE quiche, and this is really good."
Through the Taste Maker Program with Foodbuzz.com, I was one of the lucky recipients of a case of avocados from the California Avocado Commission.
Last week I received an email saying the avocados were on their way. I got home from work that evening and Poof! There they were....all snug in cozy, just waiting for me.
Being the avocado loving family that we are....I don't think I need to tell you how exciting this was.
The avocados were pretty hard when they arrived (which was last Thursday) and with Memorial Day weekend just around the corner, I wanted to showcase these babies. In order to speed up the ripening process, I popped them into a brown paper bag and sure enough....by Sunday, they were perfect for my BLT with Avocado Quiche.
SoCal Quiche
Printable Version
Pastry for 9" one-crust pie (I added some shredded Parmesan cheese to mine)
4 eggs
2 cups half and half
1 lb bacon, cooked and chopped
1 cup shredded cheddar cheese
1/3 cup chopped onion
1 handful arugula
1/2 tsp salt
1/2 tsp pepper
Pinch or two cayenne pepper
1 or 2 Avocados, sliced
1 tomato slice
1 handful grape tomatoes, cut in half
Preheat the oven to 425' F
Prepare your pastry and line your 9" pie plate with it.
Beat the eggs and half and half. Add the bacon, cheese, onion, arugula, salt, pepper and cayenne. Pour into your prepared pie plate.
Which reminds me...the pie plate I used, for the very first time, was one that I had received from CSNStores.com. It was a Paula Deen Stoneware Pie Plate. What a great addition to my kitchen essentials! Not only is it beautiful, but man...is that baby DEEP! No worries about anything spilling over the top as I was placing it in the oven. (have you ever had that happen? man, what a mess it can be!)
Decorate the top with the tomatoes and avocado slices.
If you don't want to do that...just chop it all up and mix it in with the rest of the goodies. Sprinkle the top with a little pepper if you'd like.
Bake for 15 minutes. Reduce the heat down to 300' F and continue baking for another 30 minutes or so. If the crust is getting too dark, just cover it with a strip of tin foil. To test for done-ness, insert a knife halfway between the center and the edge. If the knife comes out clean, then its done. If not...back in the oven it goes.
Allow the quiche to sit for 10 minutes before serving.
And there you have it....a great breakfast quiche. Perfect for a Sunday brunch, a family gathering...or a side for an afternoon bbq.
Saturday, October 10, 2009
The Galette Triplets
I've been thinking about Galettes (Rustic Tarts, Open-Faced Pies....what ever you want to call them)...The bottom line is, they've been on my mind. Every time I see one I think "Oh YA!!! I wanted to make one of those".
But I couldn't decide what flavor. And what if I chose one fruit and then wasn't happy with it...and I'd be stuck with this pie sized rustic tart thing.
Am I over thinking it? Probably. But in my defense .... I was really nervous. Being my first time and all. Plus...I have a confession...
I'm not a pie fan. It's the crust.
We'll blame it on those frozen pie crusts cuz to be honest, they don't really taste all that good to me.
But since I've overcome my fear of learned how to make pie crust dough....oh man, huge difference.
Well...anyway...in the end, I decided not to choose a fruit. I got 3 different fruits, divided the dough into thirds and made 3 mini galettes.
For the pie crust, use your favorite recipe. I wont give you the one I used...it's nothing special, really other than the fact that it uses both butter and shortening. I had to add a few more tablespoons of water to get the dough to come together. But it was good. If you don't have a favorite dough and you're interested in the recipe I used, just let me know and I'll send it to you. It's not a secret....just redundant for those who bake and make their own.
Now...on to the making of my galette triplets.
Strawberry Filling:
1 lb sliced strawberries (could probably use another 1/2 lb)
2 tablespoons sugar
2 teaspoons balsamic vinegar
(might want to add a tablespoon or so of cornstarch. I didn't but wish I had thought of it)
Peach Filling:
1 lb peeled, sliced peaches
juice from 1/2 lemon
1/4 cup sugar
1 1/2 tablespoons cornstarch
1/8 teaspoon nutmeg
1/4 teaspoon cinnamon
1 tablespoon cointreau
Apple Filling:
1 lb. peeled, sliced apples
2 tablespoons sugar
1 teaspoon cinnamon
juice and zest from 1/2 lemon
Combine the ingredients for each filling in separate bowls.
Tip: Before you attempt to peel and slice the peaches, bring a pot of water to a boil, and pouch the peaches for 20 seconds. Remove from boiling water and submerge them in a bowl of cold water. Once the cool off, you can easily peal the skins right off.
Preheat your oven to 400' F and insert a baking sheet on the middle rack, to heat up.
Take your divided dough out of the fridge...
On a lightly floured surface, roll out your dough...I dunno, maybe 8" diameter or something like that.
Now...an awful lot of liquid formed in the bottom of those little bowls, so I used a slotted spoon (I didn't want a soggy mess)...and I also sprinkled some cornstarch onto the dough before putting the filling on there.
Pile the filling in the middle, leaving about 1 1/2" around the edge clear of fruit. Fold in the edges and loosely crimp. It kinda reminds me of a duffle bag with a drawstring. Dot the tops of the fruit with some diced butter. Hmmm...I could've sworn I took a picture of the filling or crimping...but I guess I got caught up in the process.
Carefully transfer the galettes to the baking sheet. I used a pastry cutter and a spatula to support the bottom while I did the transferring.
Bake for about 45 minutes, until the pastry is golden brown and the fruit is tender. When there was about 5 or 10 minutes left in the baking, I brushed the pastry with melted butter.
In a small sauce pan, heat up a few tablespoons of honey and brush it over the fruit and pastry to glaze.
They say you can eat these hot or at room temperature. I recommend that you let them cool off a bit so the centers have a chance to firm up a bit.
I am thrilled with the results! They are so easy and taste great. I just love the rustic-ness of these little guys.
Sooo...what flavor would you have chosen? Maybe something I didn't think of? (btw...raspberries and blueberries did cross my mind for a split second then I remembered how expensive those berries are.)
I'd love to make a savory version or 2 or 3. Maybe a cross between pizza and a quiche? Oh, I wish I had thought of this before. I'm making Chicken Marsala for dinner tonight. How fun would it be to make a galette version of that?!
Tuesday, April 14, 2009
Strawberry Pie

Everyone has heard the saying; "A face only a mother could love!". Yep....thats me and my pies! They really are not pretty, but I still love them. If you saw one at a pie sale, you'd pretend you didn't see it and buy the one next to it. Wanna know something that I just learned? When a mom has a baby, there is an overabundance of that "motherly love" hormone surging through her system. No matter what, she will think little William Churhill is the most beautiful baby on this planet. Seriously... the saying is way truer than you'd think. Anyways...then there's that other saying..."It's not your looks that count, its what's inside that matters." (ya..tell that to Barbie, all beer and car commercials.....and the totally hot guy who never looked at you!). So...all this to say...if your mom says your gorgeous, get a second opinion!!
I absolutely love strawberries. Always have. But I really hate the traditional strawberry pie with that nasty glaze. ACK! (no offense Marie Calendars!) Therefore I was never a strawberry pie fan. UNTIL (dum da du dum!!!) I ran across this recipe on BakeSpace.com called Fresh Strawberry Pie. I read it and immediately new it was my dream come true (well, one of them anyway...I'm still waiting for that totally hot guy to look at me). Fresh strawberries baked in a pie just like any other fruit pie recipe! No fake, nasty glaze crap. YAY!! Thank you "sugarchic"!!!
Fresh Strawberry Pie:
4 cups strawberries (sliced, halved...whatever)
1 cup sugar
6 tablespoons butter (diced)
2 tablespoons flour
2 pie crusts
Preheat oven to 400'
Mix strawberries and sugar
Bake bottom pie shell, empty, for about 15 minutes or until dough bubbles. This will help keep the crust from getting soggy. (not a fan of soggy pie crusts...another major plus for this recipe)
Sprinkle flour over baked shell
Pour strawberry mixture over flour:
mmmm.....strawberries!!!

Arrange butter over strawberries
Use second pie shell to cover pie completely (with vent holes), or whatever you prefer to do with your top shell.

awww....cute little heart vents :)

Bake pie for about 30 minutes or until bubbly and brown (may want to put a cookie sheet underneath to catch the gooey drips.)
Ok....I'm not very experienced with this pie stuff. I made the crust from scratch. That took me 2 tries this time. My first attempt was a mess. It never got out of the bowl for rolling. Btw...I'd blog about making a pie crust, but I'm not good enough to give advice on that. I could probably do one saying "what NOT to do when making a pie crust" except I have no idea what I did that messed up the first crust. It was so wet...like modeling clay with too much water on it. When I was "cutting" the shortening into the flour, it stuck together instead of making those little pea sized balls. I must of totally f'd up and added something twice.
Anyways....the second attempt came out better. Nice and flakey (I've read that flakey is a good thing if you're a pie crust. Not so good if you're a person).
BUT WAIT!!! I have a question!!!
If you are reading this and you're considered by some, a pie crust making expert....I need some advice. When you partially pre-cook the bottom shell, how in the hell do you attach the top shell along the edges and make it all pretty and stick together?
Labels:
Dessert,
pie,
strawberries
Subscribe to:
Posts (Atom)