Yum Peaceful Cooking: 2015

Sunday, December 6, 2015

Slow Cooker Chili #StubbsCookingSauce


The holidays are here and time is precious. We have shopping to do, parties to attend and families to feed. This is the best time of year to break out the trusty ole slow cook (aka crock pot if you wanna get all old school on me).

This is where Stubb's BBQ can be your best friend. I know you're familiar with their bbq sauces, but did you know they also have Cooking Sauces?!


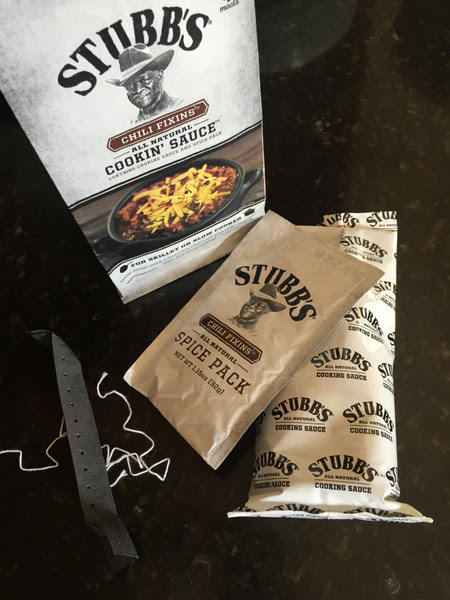
This is just 3 of the varieties that they offer. Look how cute the packaging is!!


The chili pack came with everything I needed, but the meat. Of course you can add extras, such as peppers, onions, whatever your favorite add-ins might be. I chose to keep it simple, although I did brown my stew meat before hand, and then added some onions.


After that, it was all up to Stubb! Pour in the spice pack (it's really spicy, just so you know) and the sauce


Can you see how rich those spices are?! And for those who need to know, it's gluten-free. 

With only a minimal amount of prep time, and 2 additional ingredients, I had a nice pot of chili waiting for me when I got home. Threw together some cornbread (I can't have chili without cornbread) and bam! Dinner is served. 


Let me just say.....wow. Rich, flavorful, and satisfying! It was better than any pot of chili I've ever made (for reals). 

Want some more ideas and information? Visit Stubb's BBQ . Also check out these wonderful holiday meal suggestions:

·         Stubb’s Smoked Turkey or Deep Fried Turkey
·         Black-Eyes ‘n’ Bacon


I was not compensated for this post, however Stubb's BBQ supplied me with coupons. All opinions are my own.

Wednesday, November 11, 2015

GF Berry and Cocoa Cereal Bars #VansSimplyDelicious


Back in the day, before we thought too much about what we put in our bodies and what we fed our families. Back in the day when we were inundated with commercials boasting convenience, sophistication, new and improved and, in an ignorant (maybe?) manner.... good taste and nutrition, complete with (wait for it.....wait for it.....) THREE vitamins!

We sure have come a long way in the past several decades. Especially in the most recent 10 yrs. Consumers voices and dietary needs are being heard and responded to.

Which is great!

But do you ever miss some of your childhood favorites? Even though you knooooow they weren't and still aren't good for you?

Well guess what....Van's Simply Delicious must've read our minds! They've just added two new whole-grain, gluten-free cereals to their already wonderful line-up,


Van's has given us adults a guilt-free way to enjoy the flavors from our childhood with Blissfully Berry and Cocoa Sensation cereals. Oh sure, you can also feed it to your children too. They won't even notice that the cereal they're eating doesn't contain artificial flavors or high fructose corn syrup. All they'll notice is how these cereals taste and wonder if  their parents have thrown their sense of good nutrition to the wind. Ha! fooled them, didn't we?!

One of my favorite treats as a child were those yummy, simple marshmallow treats. I could eat a whole tray of those babies. Almost did once. Well, maybe I did, but in my defense it took 2 or 3 days.

This time, I combined two of my favorite desserts into one. I have a love of berries and chocolate, and a love of banana splits. Although I didn't add banana chips to this tray, but the idea is still there. These delicious, gluten free cereal bars contain both the Blissfully Berry and the Cocoa Sensation cereals, along with peanuts and gluten free pretzel sticks. Sweet, salty and crunchy. Takes care of it all, doesn't it?

GF Berry and Cocoa Cereal Bars

5 oz Van's Blissfully Berry cereal
5 oz Van's Cocoa Sensation cereal
3/4 cup roasted, salted peanuts, roughly chopped
3/4 cup gluten free pretzel sticks, broken into pieces
1/2 cup butter
20 oz mini marshmallows
1 cup dark chocolate morsels

Melt the butter in a large sauce pan. Add the marshmallows and stir over low heat until the marshmallows are completely melted. Add the cereals, peanuts and pretzels and stir until combined.

Spray a 13 x 9 casserole dish with non-stick cooking spray. Spread the cereal mixture into the dish. Top with the chocolate morsels. As the morsels melt from the heat, spread even along the top.

Let cool completely before cutting into squares to serve.


Sunday, November 8, 2015

Italian Almond Tart


If you're looking for a decadent, simple to make, yet not too sweet of a dessert, or even a little something to accompany your coffee or tea, then look no further.

It's rustic form is charming in it's own right, but once you've tasted the sweet almond and slight orange tang, you realize there's much more to this tart than meets the eye.


Don't be fooled into thinking that a small chunk will be enough. Sure, you'll walk away satisfied but mark my words, it won't be long before you return for just one more bite. Then another.

And another.

Italian Almond Tart

Recipe found on Food and Wine

3/4 cup raw almonds
1 large egg yolk
1 tablespoon orange zest
1/4 teaspoon almond extract
1/4 vanilla extract
1 cup plus 2 tablespoons flour
6 tablespoons fine cornmeal (I used regular cornmeal)
1/2 teaspoon salt
7 tablespoons cold, unsalted butter, cut into 1/2 inch cubes
1/3 cup sugar
3 tablespoons brown sugar

Preheat the oven to 350' F
Butter a 9" springform pan

Spread the almonds on a baking sheet and bake for 10 minutes in the oven.

Leave the oven on.

Allow the almonds to cool a bit, then roughly chop. Set aside.


In a small bowl, combine the egg yolk, orange zest, almond extract and vanilla extract. Set aside


In a large bowl, combine the flour, cornmeal and salt. With a pastry blender, or a fork, cut in the butter until the mixture resembles a course meal (which means it's not a fine powder, it's not large lumps, and it hasn't yet come together like a dough). Stir in the sugars and chopped almonds. With your hands (yes, you're going to down and dirty for a minute), gently work in the egg yolk mixture. The resulting dough should be crumbly.


Loosely press the dough into the buttered springform pan. Don't get all 'perfectionist' on me here. Remember, this is a rustic dessert. The surface should be uneven and bumpy.

Bake for 40 minutes or until a golden brown.

Allow to cool completely before unmolding.


Break the tart into chunks.


Go ahead...have a bit of fun with it. Break off chunks in all different shapes and sizes. Forget about even trying to be symmetrical here. It seriously isn't gonna happen. And don't even think about breaking out the knife.

Now that you've been inundated with the aroma, you know you're going to have to give it a try. Why don't you make yourself a hot cup of tea to go with it. Put on an old movie (Breakfast at Tiffany's perhaps) and relax a bit. No matter what kind of day you've had, you deserve it.

Sunday, October 25, 2015

Creamy Stove-Top Alfredo with Bacon and Green Beans #SundaySupper


As the days get cooler (and I use that term lightly here in Los Angeles) we tend to seek foods that are comforting and warm.

Today's Sunday Supper is all about warming trends. With temps still in the upper 80's and 90's around here, I'm going to define "warming trends" as being warmed from the soul.

Alfredo seems to do that for me.

It took a while for it to dawn on me that my most favorite Italian dish is anything Alfredo. A nice warm plate of creamy Alfredo and pasta, with or without meat and vegetables just makes me happy. Add bacon to the mix and we have ourselves a whole new level of yum!

That brings me to this lovely, super easy, one skillet, soul warming dish.

Creamy Stove-Top Alfredo with Bacon and Green Beans #SundaySupper

Inspired by Better Homes and Garden magazine "One-Pan Recipes"
Printable Version

4 slices thick-sliced bacon, coarsely chopped
2 garlic cloves, minced
8 oz pasta, uncooked (recommended: rigatoni, penne, rotini)
1 cup green beans, cut into bite-sized pieces
14.5 oz chicken broth
1 cup water
1/2 teaspoon salt
1/4 teaspoon pepper
1/4 - 1/3 cup cream (I used half and half)
1/4 cup grated Parmesan cheese
Garnish:
grated Parmesan cheese
Crumbled, crisp-cooked bacon


Before I get started, I always like to get all of the ingredients prepared and measured. Makes the whole process of cooking run so much smoother.

In a very large skillet, cook the bacon over medium heat until nice and crispy. Add the garlic and stir for 30 seconds. Drain off the fat (I left a little in there for flavor) and add the pasta, green beans, chicken broth, water, salt and pepper.


Bring to a boil, reduce heat, cover and simmer for about 15 minutes or until the pasta is tender, stirring once. 

Stir in the cream and cheese. Cook and stir for 2 minutes to heat things through and get the cheese all melted. 

Garnish with more cheese and bacon crumbles if desired and serve. 


Below you'll find over 40 recipes that are sure to warm you up, whether its from the inside out, or from the soul.

Beverages
Desserts
Main Dishes and Soups
Sunday Supper MovementJoin the #SundaySupper conversation on twitter on Sunday! We tweet throughout the day and share recipes from all over the world. Our weekly chat starts at 7 pm ET. Follow the #SundaySupper hashtag and remember to include it in your tweets to join in the chat. To get more great Sunday Supper Recipes, visit our website or check out our Pinterest board. Would you like to join the Sunday Supper Movement? It's easy. You can sign up by clicking here: Sunday Supper Movement.

Saturday, October 3, 2015

Key Lime Cheesecake with Key Lime Custard


One of my chicas from work walked in with a huge bag full of what she called 'Mexican limes' (a.k.a. key limes). I'm not talking about one of those plastic bags from the grocery store. I'm talking about a huge thick plastic bag. I have no idea how many pounds it was (multiple) but I do know that I ended up with more than 6 cups of juice!

Her request? "Can you make a key lime cheesecake?"

I'm thinking....Ummm...sure. But I've never even tasted, let alone made a key lime pie. How will I know if it ends up right? I have nothing to compare it with.

There begins the challenge. I searched through several recipes. Read numerous reviews. Omitted any recipe that called for flour. Is that weird? I've just never made a cheesecake with flour. I don't understand why it would even be required. In my mind, something isn't right. Am I being a cheesecake snob? Do I need to be enlightened here? Please fill me in if I'm being ignorant about this.

Anyways....I came across a recipe that not only had a good solid cheesecake recipe, but included a delicious surprise inside.......

Key Lime Custard!! Yes, there is a layer of amazing key lime custard underneath all that cream cheese deliciousness.

There's also a layer of sour cream on top. In the reviews, several people whined about it. How it's not needed. They didn't understand why it was even in the recipe. I personally add this particular layer to just about every cheesecake I make. If it's not your thing...by all means, don't worry about it. just leave it off and bake the cheesecake an extra 10 minutes.

Key Lime Cheesecake with Key Lime Custard

Inspired by: Key Lime Cheesecake
Serves 10-12

Key Lime Custard
6 large egg yolks
3/4 cup sugar
6 TB key lime juice
1 tsp key lime zest

Crust
1 3/4 cups graham cracker crumbs
1/4 cup sugar
1/2 cup melted butter

Filling
2 - 8oz packs of cream cheese, room temperature
2/3 cup plus 3 TB sugar, divided
2 large eggs
3 TB key lime juice
1 TB key lime zest, plus more to garnish if desired
16 oz sour cream
Thin key lime slices to garnish


Key lime custard:
In a heavy sauce pan, over medium heat, whisk together all of the custard ingredients. Continue whisking until it boils and let boil, while whisking, for 30 seconds. This will take about 8 or 9 minutes.

I cannot stress enough how important it is to whisk! Not stir. Whisk!! You do not want the egg yolks to scramble. Scrambled custard would just be nasty.

Cool to room temperature, stirring occasionally, keeping in mind that it will thicken more as it cools. Set aside.

Crust:
Preheat the oven to 350'

Wrap the outside of a 8' or 9" springform pan with 3 layers of aluminum foil. You need the foil to go up the sides about 3".

In a medium bowl, combine the graham cracker crumbs and sugar. Stir in the melted butter until well combined.

Press the mixture inside your prepared springform pan, and up the sides about 2 inches.

Bake for about 5 minutes and allow to cool completely.

Filling:
Cream the cheese and 2/3 cup of sugar until almost smooth (don't stress about the lumps. They'll go away while baking). Mix in the key lime juice and zest. Add the eggs one at a time and blend until just combined. Don't over blend. You don't want air bubbles in your cheesecake. Air bubbles help create cracks.


Assembly and Baking:
Spoon the custard into your crust, making it as even as possible and smooth it over.

Spoon the filling over the custard, carefully.

Using a roasting pan that's big enough to hold the springform pan, place the springform pan into the roasting pan. Pour enough water in the roasting pan so that the water comes 1" up the sides of the springform pan.

In your already 350' heated oven, bake for about 45 minutes, or until just set. Just set means that it's still a slightly jiggly and the center is not all puffy.

While the cheesecake is baking, in a medium bowl, mix together the sour cream and 3 tablespoons of sugar.

When the 45 minutes is up, spoon the sour cream mixture over the top and bake for an additional 10 minutes.

Place on a cooling rack and let cool for about 10 minutes. Remove the foil and remove the springform pan siding. If needed, run a knife around the edge. Let cool completely then cover and refrigerate over night, allowing it to completely set.

Garnish with lime slices and zest if desired.


It is tart and sweet and absolutely delicious!

This was the first time I had done the whole foil with the pan in water thing. I almost didn't. I typically just place a pan of water on the rack below which creates steam and helps with the whole cracking thing. But because of the custard, I chose to do as I'm told. It worked and the 'mmmm' sound that came from my chica's as she ate it, told me that it was a success.


Thank you for the key limes, Nancy! 

Friday, July 3, 2015

BBQ Pork Tenderloin Stuffed with Pineapple and Cheese Curds


Happy 4th of July. 

I'm sure most of you are preparing for the biggest BBQ day of the year. Let me help you out a little with a deliciously tender BBQ Pork Tenderloin that I butterflied and stuffed with pineapple and cheddar cheese curds.

Yes, I said curds.

It wasn't planned. But became a must. I didn't realize my block of cheddar was gone (hate when that happens), but I did spy a packet of cheddar cheese curds. The substitution actually worked out better than I thought, and maybe better than the regular cheese would've. Surprisingly, the curds melted beautifully and just enough.

A recently received a couple of coupons for Stubb's BBQ Sauce. Stubb's is no stranger in my kitchen. I've been using it for a few years now, I love the consistency of their sauces. Not so thin that it runs right off your food, yet not so thick that you feel like you're applying a layer of frosting to your steak.
I usually buy the Original recipe, knowing I like and trust it for what I'm going to use it for. But when you get a couple of coupons for free stuff, you get to experiment with some abandon and try something new with no regrets.


That's how I came to fall in love with their Sweet Heat Legendary Bar-B-Q Sauce. There's a slight tang the rides along with the sweetness, and it's perfectly balanced. Then the heat joins in about a half a second later and takes it all to a new level. I'm not talking about the kind of heat that makes you grab for the nearest glass of water...I'm talking about a subtle warmth...just a few degrees, that accentuates the smokey under notes of chipotle and red chili.

Now picture this with the tangy sweet flavor of pineapple and creamy smooth melted cheese that's all pulled together with a juicy tenderloin.

And there you have it. My new favorite BBQ recipe.

Which really isn't much of a recipe, per-say. But I'll give you a list of what you need and what to do with it. How much you use of each ingredient will depend on the size of your tenderloin.

BBQ Pork Tenderloin Stuffed with Pineapple and Cheese Curds

1 pork tenderloin, butterflied (there are lots of videos on YouTube that can help you with this process much better than I can)
Cheddar Cheese Curds (or chunks of cheddar cheese)
1/4 cup or so of crushed pineapple
Stubb's Sweet Heat Legendary Bar-B-Q Sauce
Cooking twine

Get your coals started.

Place a good amount of cheese down the center of your tenderloin and then spoon some pineapple over the cheese.


Roll it up tight and tie it up with some twine, making sure everything is tucked in and can't get away.


Once the coals are good and hot, scoop them over to one side of your grill so that you have a direct heat side, and an indirect heat side. Place the rolled and trussed tenderloin over the side that's directly over the coals and seer it, turning as you go until all of the sides are good and brown.

Move the tenderloin to the other side of the grill where there are no coals, brush it with some bbq sauce, cover the grill and let it cook for about 15 - 20 minutes, turning occasionally.


Just before removing from the grill, brush on some more bbq sauce.

Let it rest for about 5 or 10 minutes before removing the twine and slicing


Don't worry if some of the stuff inside leaks out. Think of it as a tease...a sneak peek at what's to come.


Because you know it's going to be good. The acidic pineapple helps tenderize the meat. The cheese....well, 'nough said there. You can't ever go wrong when cheese is involved. And that bbq sauce. Well, let me just say it was the perfect compliment to everything going on, on my grill.


Serve it with a side of grilled corn and some homemade macaroni and cheese and you've got yourself a good ole down home American dinner.

Enjoy your celebration of our nations Independence Day!

Sunday, April 12, 2015

Longaniza Grilled Cheese Sandwich for #SundaySupper


April is National Grilled Cheese Month! Sunday Supper and Gallo Family Vineyards are helping us celebrate such an awesome month by providing you with 20....yes, I said TWENTY, recipes for grilled cheese sandwiches. Can you say (in your best soprano falsetto voice) ...heeeaven! When it comes to comfort food, I think grilled cheese sandwiches are right up there with mac and cheese. I have this sneaky suspicion that melted cheese is the main culprit.

Do you remember your first encounter with a warm, gooey grilled cheese? The first time you bit into that toasty, buttery bread and experience the melty goodness inside? I wonder how many of you are thinking about your lunch break at school and unwrapping a foiled sandwich, with the bread partly slid to the side. Those cafeteria assembly-line messes that somehow became a school lunch favorite, despite the fact that oftentimes part of the sandwich was hard, the cheese wasn't real, and they were barely warm. My point is, it's pretty hard to make a bad grilled cheese. Unless you burn it of course (been there, done that). Even then.....a little darkened bread is all good.

Grilled cheese is extremely popular across the world, in a variety of cultures and methods (i.e.: quesadilla, croque-monsieur) and has been around in some form or another since ancient times. The American version, which we're all so fond of, became popular in the 1920's, with the invention of processed cheese and its easy accessibility during WWII, and has grown in leaps and bounds in recent years. The mold has been broken, creating a limitless variety. And boy does that make me one happy camper. Have you any idea how fun it is to play with flavor combos all melted together with cheese, in between two slices of toasty bread?


Aaaaand....pair it with wine? Ooooh yes.....this wine pairing is going beyond the sliced cheese laid elegantly on a charming platter or rustic board. Today we are all about the ooey, gooey, melty, chewy cheese. Grilled cheese gone rogue is where it's at.

Let me tell you a little about my version. If you've been following me for any amount of time, you will be a bit familiar with my love of Latin foods. I am blessed with the numerous ethnic markets in my area. One of the major pluses of living in Los Angeles. Having many friends who are from a Mexican or South American descent has also contributed greatly to my knowledge and appreciation of their food. Making a grilled cheese with a Latin flair came naturally to me. Longaniza became the focus, along with a number of complementary flavors.


Longaniza Grilled Cheese Sandwich

Makes 2 to 4 sandwiches, depending on the size of the bread used

1/3 cup mayonnaise
1/4 cup chipotle sauce
Olive oil for sauteing
1/2 lb. longaniza
10 oz. jalapeno quesadilla cheese, shredded
10 oz. oaxaca cheese, shredded (this is very similar to mozzarella)
1/2 red onion, diced
1/4 cup chopped cilantro
4 - 8 slices of sourdough bread
1 or 2 limes sliced into wedges


In a small bowl, combine the mayonnaise and chipotle sauce and chill while preparing the rest of the ingredients.

Remove the longaniza from its casing and cook in a medium sized skillet coated with olive oil over medium heat until browned. This is a bit hard to tell since its red in color to begin with. But, it will get a little darker as it's cooked.

In a small skillet, saute the onions until tender and just starting to brown.

Mix the shredded cheese together.

Brush one side of the bread with the chipotle mayo and place it face down onto a medium to medium low heated skillet or griddle, keeping in mind that the mayo will tend to burn a little quicker than butter.

Cover the slice of bread with some of the cheese mixture. Evenly sprinkle with some cooked longaniza, some sauteed onions and a couple of pinches of chopped cilantro. Squeeze the juice of a lime wedge over it all and top with more cheese.


Brush one side of another slice of bread with the chipotle mayo and place it face down over the last topping of cheese and brush the exposed top with even more chipotle mayo.

Cover with a lid for a few minutes to help all that cheese melt.

I used a comal to make my sandwiches and had to use a high domed lid for this purpose.


Once the bottom is good and brown, carefully flip it over and press with the back of your spatula. It took two spatulas for me to safely flip this bad boy over without losing the insides. One spatula on the bottom, and one on top, upside down so that when I flipped it, the spatula was facing the correct way, making it less awkward to remove.

Watch it carefully. It always seems that if it's going to burn, it's gonna happen on the second side. Once that's done...remove from the skillet, slice and serve. With wine of course.

I chose a nice Hearty Burgundy to enjoy with my Longaniza Grilled Cheese. It happens to be Gallo Family's original red blend. It's wonderful with bold and layered flavors. A perfect match for everything going on in my sandwich. It had a way of blending the flavors into a creamy richness. If you're more inclined to enjoy a sweeter, less dry wine, then I recommend the White Merlot which pairs nicely with spicy foods.


For more information about Gallo Family Vineyards and the wines they have to offer, visit their website. There, you will also find the store locator. I recommend that you follow them on FacebookTwitterInstagram and YouTube for more ideas and updates.


Whichever wine you choose, you are bound to fall in love with this grilled cheese.


The bold and spicy flavors from the longaniza and chipotle mayonnaise, slightly offset by the sweet and tangy red onions, brightened up with the freshness from both the cilantro and lime juice. All of this enveloped by warm, melted cheese.

Pure bliss.

Don't forget to check out the other 19 Grilled Cheese Sandwiches as well as Gallo's Grilled Cheese Recipe blog post about today's cheesy goodness.
Sunday Supper MovementJoin the #SundaySupper conversation on twitter on Sunday! We tweet throughout the day and share recipes from all over the world. Our weekly chat starts at 7:00 pm ET. Follow the #SundaySupper hashtag and remember to include it in your tweets to join in the chat. To get more great Sunday Supper Recipes, visit our website or check out our Pinterest board. Would you like to join the Sunday Supper Movement? It’s easy. You can sign up by clicking here: Sunday Supper Movement.

Compensation was provided by Gallo Family Vineyards via Sunday Supper, LLC. The opinions expressed herein are those of the author, and are not indicative of the opinions or positions of Gallo Family Vineyards

Sunday, March 8, 2015

Raspberry Crunch for Retro #SundaySupper


Funny how food can take you back in time. So much so, that it seems my taste buds have a better memory than my mind does. Some good and some not so good.

Raspberry Crunch is definitely a good one. This recipe was handed down to me from Sir Sportsalot's grandmother many many years ago. She used to make it with cherry pie filling, I just happen to have a thing for raspberries. But when it comes right down to it, here's something about the crumbly cake topping that I just can't seem to get enough of.


I dunno if you've ever payed attention to what cake mix smells like before you bake it. Sweet, rich, enticing...demanding you to lick the bowl. But something happens in the oven and it changes. Maybe that's why cakes aren't my favorite dessert. They just don't taste the way the batter does.

Raspberry crunch fixes that.

This is one of the most simple recipes you'll find. It's versatile simply by changing the pie filling and has minimal ingredients. When I first started making it, I used a box of cake mix as instructed. However, you know how when something obvious just isn't noticed? Such as the ingredients in cake mix? There should only be a couple, yet if you were to look on the side of the box, there's a huge list of mostly unrecognizable ingredients.

My conscience began to nag me until I broke down and cried out for help. My buds on Facebook came to my rescue and introduced me to a wonderful Homemade Yellow Cake Mix recipe by iambaker.com. Basic ingredients, nothing too fancy...straight forward and delicious.

Raspberry Crunch


22 oz raspberry pie filling
1 cup plus 1 tablespoon flour
1 1/4 cup sugar
1 3/4 teaspoon baking powder
1/2 teaspoon salt
1/2 cup melted butter
1 1/2 teaspoons vanilla extract
1/2 cup chopped pecans or walnuts (optional)
1/4 cup melted white chocolate (optional)

Preheat the oven to 350'F

Pour the pie filling in the bottom of a 9" square or round baking dish. Set aside.

In a medium mixing bowl, whisk together the flour, sugar, baking powder and salt. Add the melted butter, vanilla and nuts, Stir until you have a crumbly texture. Sprinkle the crumbles evenly over the pie filling.

Bake for 40 - 50 minutes or until golden brown. 


Melt the white chocolate according to package instructions. (Please note that white chocolate does not melt the same as milk or dark chocolate). 

Drizzle over the top and let cool a bit before serving. 

Wish I had some ice cream right now. 

Since Sunday Supper is all about Retro food today, let your taste buds experience a blast from the past as you browse the these amazing, memory provoking recipes from decades ago. 

Bodacious Breakfasts and Appetizers:
Made in the Shade Main Dishes:
Swell Side Dishes:
Dreamy Desserts:
The Bee's Knees Beverages:
Sunday Supper MovementJoin the #SundaySupper conversation on twitter on Sunday! We tweet throughout the day and share recipes from all over the world. Our weekly chat starts at 7:00 pm ET. Follow the #SundaySupper hashtag and remember to include it in your tweets to join in the chat. To get more great Sunday Supper Recipes, visit our website or check out our Pinterest board. Would you like to join the Sunday Supper Movement? It’s easy. You can sign up by clicking here: Sunday Supper Movement

Sunday, March 1, 2015

White Bean and Basil Spread for #SundaySupper


It is a Bean-tastic Sunday and I've got a wonderfully easy, tasty and healthy spread for you that even a non-bean lover, like myself, would enjoy. I'm not saying I hate beans, but there are some that I really don't prefer. And there are some that are pretty darn good. I'm not sure if it's a texture thing or what but I have to say, I prefer bean spreads such as hummus and other dips over whole beans.

But...because beans are so good for you, being low in saturated fat, cholesterol and sodium and high in fiber, protein, folate, magnesium and iron, I do try to include them in my menu on occasion.

If I'm going to be honest, I must admit that beans are really versatile. They can go in soups and stews, salads, or just as a stand alone side. Why, they can even be an ingredient in a dessert (especially if you include the vanilla bean). Proof of this is in the line-up we have for you today, which you will find at the bottom.

I really love the combination of tomatoes and basil is this spread. They bring such a freshness to the palate that offsets the hardiness of the beans, while the olives have the supporting role of balance with their salty tang.

You will notice that the ingredients calls for the tomatoes to be seeded. Plum tomatoes have very few seeds and "juice" (which is also why they are preferred in salsas). If you don't remove the seeds for this spread, it will be too runny. So please, do not skip this simple step.

White Bean and Basil Spread

Recipe from: What Can I Bring by Anne Byrn

1 15 oz can great northern beans, drained
3 plum tomatoes, seeded and chopped, divided (about 1 1/2 cups)
1/3 cup pitted green olives, coarsely chopped
4 tablespoons extra virgin olive oil
1/4 chopped fresh basil, plus more to garnish
1 tablespoon minced garlic
1/4 cup crumbled feta cheese (I used a tomato and basil seasoned feta)
salt to taste, if needed
3 - 4 dozen toasted slices of french bread

Place the beans and garlic in a food processor and process until smooth. add 1 1/4 cups of the tomatoes (saving the rest to garnish with) olives, olive oil, and basil and pulse until everything is finely chopped but not completely smooth. Stir in some salt if needed.

This can be stored in the fridge for up to 2 days.

Just before serving, garnish with the cheese, remaining tomatoes and some basil. Serve with the toasted bread slices.


Beantastic Beginners:
Bean-a-rific Soups and Stews:
Bean-a-licious Sides:
Incredi-bean Main Meals:
Amaze-beans Sweet Endings:
Sunday Supper MovementJoin the #SundaySupper conversation on twitter on Sunday! We tweet throughout the day and share recipes from all over the world. Our weekly chat starts at 7:00 pm ET. Follow the #SundaySupper hashtag and remember to include it in your tweets to join in the chat. To get more great Sunday Supper Recipes, visit our website or check out our Pinterest board. Would you like to join the Sunday Supper Movement? It’s easy. You can sign up by clicking here: Sunday Supper Movement.