Yum Peaceful Cooking: August 2012

Saturday, August 25, 2012

Easy Garlic Chicken


As you may already know, I cook chicken way more than I cook beef. Not only is it usually less expensive but it's a lot more versatile. Over the years I've learned what I like, what works, and how to optimize my chicken dish. I think the most important thing I've learned (and I learned it from Julia Child) is not to overcook your chicken. It really makes all the difference in the world. When you can cut your chicken with a fork....and it melts in your mouth almost like butter....you know you've cooked it to perfection.

Julia Child from Mastering the Art of French Cooking: 'The flesh of a perfectly cooked [chicken breast] is white with the faintest pinky blush, its juices run clear yellow and it is definitely juice.......Press the top of it with your finger; if it is still soft and yields slightly to the touch, it is not yet done. As soon as the flesh springs back with gently resilience, it is ready. If there is no springiness, it is overcooked.'

With that said, I bring you this recipe. I saw it on Piniterest and knew I was destined to make it some day.  I mean....it was all about garlic....I couldn't pass that up. After reading the original instructions and the reviews (I highly, highly recommend that you always read the reviews whenever possible...even if the recipe is from a famous chef) I realized that a few changes were in order. The oven temperature was too high (not only would it overcook the chicken, but nothing ruins a dish like burnt, bitter, garlic), and even with all this garlic...."lacking something" was mentioned several times in the reviews. There was no way I was going to give up, though. I had a few tricks up my sleeve and I knew it would be a winner.

Easy Garlic Chicken (inspired by Easy Garlic Chicken)
Printable Version


4 garlic cloves, finely chopped
2 tsp plus 1 TB olive oil, divided
4 TB brown sugar
1/4 cup Extra Dry Vermouth (can use white wine or chicken broth)

2 boneless skinless chicken breast, butterflied in half
Salt and Pepper to taste

Preheat your oven to 375'

In a small saucepan over medium-low heat, saute the garlic in 1 TB of olive oil, until tender but not brown. This should only take a minute. Remove from heat and add the brown sugar and vermouth. Return to heat and simmer for about 10 minutes, until reduced, stirring frequently.


While that is going on, season both sides of the chicken with salt and pepper


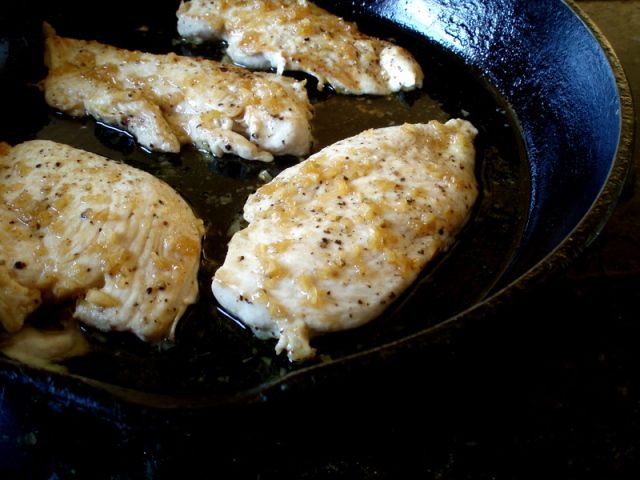
In an oven safe large skillet, heat 2 tsp olive oil over medium heat and brown the chicken on both sides, about 2 or 3 minutes per side. Keep an eye on it. Once it's lightly brown, turn it. The aim here is to brown, not cook.

Note: if you do not have an oven save skillet, after browning, place the chicken in a casserole dish.


Once the garlic sauce has reduced a bit, pour it over the chicken evenly...making sure that those bits of garlic get on each of your pieces of chicken. Place the skillet in the oven and cook for 6 - 8 minutes.


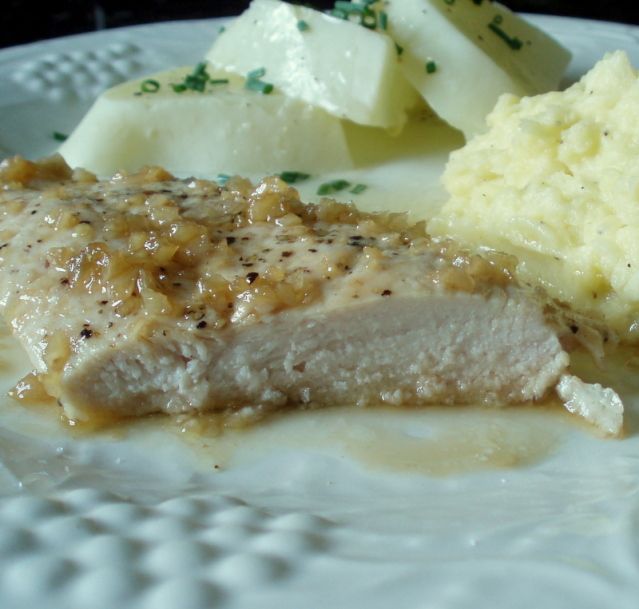
When you serve it, don't forget to spoon the juices in the pan over the chicken.

Tonight I had it with mashed potatoes made from Yukon Gold potatoes and steamed escalloped squash just picked from my garden, garnished with fresh chives.


The chicken is great...and very garlicy. The vermouth cuts the sweetness a bit but it still has the benefit of the brown sugar apparent, which goes nicely with all that garlic. And it is incredibly tender. I chose the potatoes and squash and kept them simple, allowing the chicken to be the star of the show. It was kinda fun eating a "white" dinner. I didn't miss the splash of color. It almost felt...clean.

Hmm....with all the cleaning I've been doing today...I s'pose I carried that theme to my dinner in way.

Saturday, August 11, 2012

Beef Tamales


This is a partial recipe post. I didn't make the beef filling. Just warning you....but, whatever shredded beef recipe you like, use it.

Let me back up here. Tamales have been on my I'd-really-love-to-learn-how-to-make-that list since forever. One of my childhood friends from school informed me recently that she makes them every year. (What?!) When she offered to show me how, I didn't care that it was the middle of the summer and was going to be 90 plus degrees outside. I wasn't going to pass this up for nothin. So, Bernie (that's what I've been calling her since we were pre-teens....having water fights in the puddles whenever it rained) gathered all the makings....and made the beef at home in her slow cooker (with chili powder and other seasonings) and even had the meat shredded when she showed up on my doorstep. All I had to get was lard. For some reason, the main stream markets around here don't carry it very often. But I knew I could find it in the Mexican market. Thats when I discovered that lard can be bought by the bucketful.

Good ole Farmer John

Ok, lard vs shortening. It's up to you. I rarely use lard. But my personal feeling on this is....for tamales, I vote for the lard. It adds flavor. If you're dead set against lard (what a name...lard. It even feels fat saying it) then use the shortening.

Plan on two days for making your tamales. The first day will be cooking the meat (beef, pork or chicken) and shredding it. The second day will be preparing the masa and assembling it. It's not hard. I know there are a lot of opinions out there about tamales and how to make them, what to do, what not to do, etc. If you're a tamales lover, you know what you like. If making tamales intimidates you....its like anything else. Just do it.  Once you've done it, you'll start to get a feel for what works for you, what flavors you like, etc...and you can adjust stuff for the next time.

Ok, so Bernies at my house in all her glory, arms loaded with a huge bowl of shredded beef, a bag or two of corn husks, and her bathing suit and beach towel in another bag. (Yes...a dip in the pool in that heat was a must). We didn't waste any time and got straight to work.

First thing we did was soak the dried corn husks in a sink full of water

(Remove the silk before assembling your tamales)

While all that is going on, prepare your masa

This makes about 4 or 5 dozen tamales

Masa
6 cups masa
5 cups liquid (water and broth from the meat)
2 cups lard (divided)
1 TB salt

Melt 1/2 cup of the lard


While that slab of fat is melting away (oh lord, if only it was that easy to melt away my own slab of fat)....put the remaining lard in a large bowl and beat with a mixer.


You want to whip this up good until its light and fluffy. The more you beat it, the more air that gets incorporated (hahaha...thats what I'll say....I'm not fat...I've just incorporated air into my mid section...so in reality, I'm fluffy). Umm...where was I? Oh...air. Yes....incorporate air into the lard...thus creating the foundation for a fluffy masa. 

Slowly beat in the masa and liquid and salt. I think we used about 3 1/2 to 4 cups of water and 1 to 1 1/2 cups of chile liquid from the shredded beef. And continue beating.


You might need to resort to using your hands after a while (my mixer is old and starts to sound a little puny after a while).

Finally, remember that melted lard in your pan? I hope you've been keeping an eye on it so it doesn't start smoking. Once it has cooled off, add it to the masa mix by making a well in the center of your masa and carefully kneading it into the dough. Adjust the masa or liquid until you have a soft dough (I read somewhere that it should be the consistency of peanut butter?)

Time to assemble.....(this is the fun part)


Lay out a soaked corn husk...take a ball of masa....spread it around by pressing it with your fingers and then dump a wad of shredded meat down the center of the masa dough.


Then fold the husk over the masa, fold it again and tuck in the bottom corner. This is when a lot of people get all fancy and tie it all together with a strand of husk. It's really not needed. I mean, it looks all cute and everything but when you're making several dozen of these things.....well, I'm lazy. Bernie apparently is too cuz she said she never ties them. So we didn't. We just pile them up as we made them.


Once we had a good amount prepared, I got out the largest stock pot that I own, inserted a steamer wrack and added water and then placed the tamales inside. Some people layer them, some stand them up on end....we layered them at varying angles.


And....they steamed away. And we got back to making more tamales...and piling them up on the counter for the next round.

Now, these babies take a while to steam. We made fairly small tamales, and they took about 1 1/2 hrs to steam. They were done when we poked at them with our finger and they were firm. The cooking time will vary depending on the size of your tamales.

Once we had finished preparing the remaining tamales, it was time to relax while we waited.

What does one do to relax while waiting for tamales in the heat of summer?


Why....we make a pitcher of margaritas of course. Then we slip into our swimsuits and take a dip in the pool. (I've spared you a pool side photo.....not to mention that one wasn't taken) Thus we are not affected by the steaming heat in the kitchen and are allowed some time to catch up and reminisce about the good ole days. Remembering how we met in the halls of elementary school because we noticed that we both wore the same shirt to school that day.


Once we are thoroughly soaked in pool water and alcohol, we check in on the steamy kitchen and discover our first batch is complete


We load up the second batch and back to the pool we head, glasses refilled of course, and continue our pickled pool party until Bernie decides its time to head home. I sent her home with the remaining lard (nothing says Thank you like a bucket of fat). And I was left with these delicious tamales and a very memorable afternoon spend with an old friend.

Dinner that night was wonderful!


I've eaten lots of homemade tamales. Some good...some not so good. These tasted just the way I like them. I can't wait to make them again (maybe next time when it's not so hot). I want to use shredded pork. And I think I want the masa a bit thicker. The masa is my most favorite part of a tamale.

Bernie....Thank you for teaching me how to make tamales!! I'm so glad we re-found each other after all these years. I can't wait until our Julia Child cooking theme and many more adventures in the kitchen to come.