Yum Peaceful Cooking: June 2012

Saturday, June 30, 2012

Carnitas and Tex-Mex Squash Casserole

Here you have some very basic, standard, simple ingredients. When you add a few spices and cooking techniques, they become exquisite.

I'm talking about two fantastic recipes from The Homesick Texan Cookbook by Lisa Fain. I swear...I just LOVE this book. It has become one of my favorites and for some reason, as the days get longer and sun gets hotter, I start cooking more Mexican and Tex-mex meals. They just seem to go with the season. I have a feeling that my new favorite cookbook will be getting a whole lot of use over the next couple of months.

Carnitas
Printable Recipe

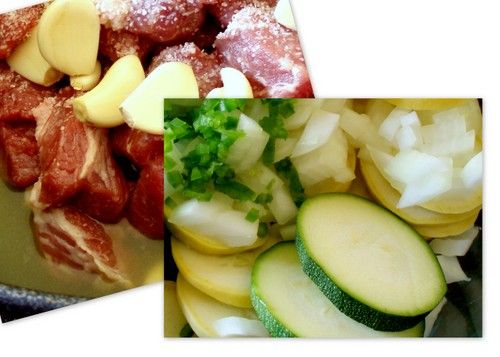
3 lbs boneless pork shoulder, cut into 2" chunks
1/2 cup orange juice
1/4 cup lime juice
4 cloves of garlic (wait...what? only 4 for all that meat? I used the whole damn head of garlic)
1 tsp ground cumin
1 tsp kosher salt, plus more to taste

In a large heavy pot, combine all of the ingredients


Add enough water to just cover the meat. Bring to a boil and then simmer, uncovered for 2 hours.

Don't touch, don't stir. Just let it be.

Once the 2 hours have passed, turn the heat up to medium-high and continue to cook, stirring occasionally for about 45 minutes or until all of the liquid has evaporated and the fat has rendered (which means that all of the fat has left the meat and is not sitting in the pot, which by the way, will not evaporate).

You will know that the pork is done when it has browned on both sides.

Serve with tortillas, salsa and avocados.

Now...while that is cooking, lets make the Tex-Mex Squash Casserole.

Tex-Mex Squash Casserole
Printable Version

2 TB butter
1 lb yellow squash, sliced
1 lb zucchini, sliced
1 medium yellow onion, diced
2 jalapenos, seeded and stemmed, diced
2 garlic cloves, minced
1 tsp ground cumin
1 tsp chili powder
1/2 tsp cayenne pepper
Salt and Pepper to taste
2 TB all purpose flour
1 cup chicken or vegetable broth
2 cups crushed canned tomatoes
1/2 cup half and half
1/2 cup sour cream
1/2 cup cilantro, chopped (more for garnish if desired)
2 cups tortilla chips, crushed
1 cup grated pepper jack cheese
1 cup grated cheddar cheese

Preheat your oven to 350' F and lightly grease a casserole dish (13" x 9")

In a large skillet, over medium heat, melt the butter. Add the yellow squash, zucchini, onions and jalapenos.


Saute until the squash is tender. This could take about 10 minutes or more.

Add in the garlic, cumin, chili powder, and cayenne pepper. Cook for a minute and add the salt and pepper to taste.

Add the flour and stir until you have a light brown paste. This takes maybe a minute or so. Stir in the broth and crushed tomatoes, stirring until everything thickens up. Add the half and half, sour cream and cilantro. Remove from heat.

In the bottom of your  prepared casserole dish, spread out the crushed tortilla chips. Pour the incredibly yummy squash mixture over the chips.


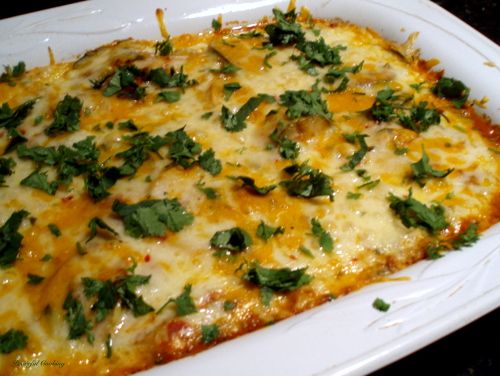
Cover the top with the grated cheese. Bake, uncovered for 30 minutes or until the top is brown and bubbly.

Garnish with more cilantro if desired


Serve along side your Carnitas


Let me tell how good this was. The meat had fantastic flavor and it was incredibly tender. The Tex-Mex Squash Casserole....wow! It reminded me of tortilla soup, only in a casserole form. Simple delicious.

Thursday, June 28, 2012

Banana Bars with Cream Cheese Frosting


If you like Banana Bread...you're going to absolutely LOVE Banana Bars. Light, fluffy...and yes, very moist! Very much like the consistency of cake.

I saw this recipe posted on a very dear friends blog. Her name is Cathy and she is the awesome publisher of The Dutch Baker's Daughter. When I originally saw the post, I was so excited to have something else to make with those overly ripened bananas. That was about a year ago. I came across the post in my saved recipes on my feeder and was thrilled all over again. Only this time...I really made them.

And I am so glad I did. (and I'm so irritated with myself for not making them a year ago). The banana flavor in these bars really pops! I mean....there's some serious banana flavor going on. You can smell it before you even get it in your mouth. You can't stop eating them. It's a good thing that it makes enough to feed a crowd (a 15" pan is used).....otherwise no one else would ever get to see them let alone eat them. Although, had I been given the chance, I'm sure I'd have been able to consume the whole thing.

Let's put it this way.....as much as I like banana bread...I may never make it again.

Banana Bars with Cream Cheese Frosting
Printable Version

1/2 cup butter, softened
1 1/2 cups sugar
2 eggs
1/2 cup plain yogurt (I used Greek yogurt. Use what you prefer...even low fat as Cathy used)
1/2 sour cream (Cathy used light sour cream)
1 tsp vanilla extract
2 cups all purpose flour
1 tsp baking soda
1/4 tsp salt
2 medium very ripe bananas, mashed (about 1 cup)
8 oz cream cheese, softened
2 tsp vanilla
3 3/4 to 4 cups powdered sugar

Preheat your oven to 350' F. Grease a 15" x 10" jelly roll pan or line with parchment paper.

Cream together the butter and sugar until light and fluffy. Add the eggs, yogurt, sour cream and vanilla. Combine well.

In another bowl, combine the flour, baking soda and salt. Whisk together.

Gradually beat the flour mixture into the wet ingredients until all mixed together. Stir in the mashed bananas.

Spread into your prepared pan and bake for 20 - 25 minutes until a toothpick, inserted in the middle-ish area comes out clean and your cake is a pretty yellowish golden color


While your cake is cooling (ya I know...they're suppose to bars but honestly...its super moist like a cake), make your cream cheese frosting by beating the cream cheese, vanilla and powdered sugar together until you have the right consistency that makes you happy.

Once the cake is cooled, spread on the frosting.


Yep....there you have it. And it's ok to try some right away. I give you my permission and blessings to do so. Go ahead....take a biiiiiig bite


And tell me if you don't want to eat this for the rest of your life.

Thank you Cathy for being the wonderful person you are and for sharing this recipe! I love ya man!!

Saturday, June 23, 2012

The Perfect P.M.S. Brownie


One night last week I was craving brownies. Which is odd for me. I'm not a "brownie" person (I maybe have mentioned this before). I enjoy brownies.....there's nothing wrong with brownies. But if I had to choose between brownies, cakes, cupcakes, pies, cookies or ice cream. I'd choose cookies. (at least that's my answer today). But I think sometimes, one needs chocolate. Copious amounts of luscious chocolate. Other than a chocolate bar....the only way to really get that desire filled is with a brownie.

Back to my night of craving. It was late. I was lazy so I didn't make them. The next day one of my fellow Brujas (there are four of us Brujas at work and sometimes we like to indulge in sinfully delicious fun) sent me a link to a Betty Crocker email that had a recipe for Salted Dulce de Leche Swirl Brownies. I think it was a sign from heaven. My craving was meant to be satiated.

You're going to want to start making this batch of brownies either early in the morning, or the night before. Why???!!!!! I know....when one wants brownies, one wants them now. But there's an important step that makes them extra rich....you have to make (term used lightly) dulce de leche.

Dulce de Leche
1 14oz can of sweetened condensed milk
1 tsp salt

Remove the label from the can. Place the can (unopened) in a very large pot and fill with water until the can is completely submerged. Cover, bring to a boil and then reduce the heat down to medium-low. Cook for 3 (yes 3) hours. Check every now and then to make sure the can is still completely covered with water....adding more water if necessary. Allow the can to cool completely.

Once cooled you can open it.

This is the part that's always frustrating for me. Opening of cans. I have yet to purchase a new can opener that works consistently and for more than a few weeks. I always struggle with the darned things. Something somehow malfunctions and the gears don't seem to line up or something...I dunno....but I struggle and cuss and swear until I toss the damn can opener aside and dig out my really super old, probably made for camping, can opener.


Works every time.

btw...don't get me started on electric can openers. I have one. I got it for Christmas about 10 or more years ago. It's still in the box. I think Sir Sportsalot forgot that he needs to install it. 

Soo.....you open your cooled can of sweetened condensed milk that has caramelized which is now dulce de leche


Scoop it into a small bowl and stir in the salt. Set aside.

For the bownies....use your favorite brownie recipe. Whether its from a box, or made from scratch. I often use the Baker's One Bowl Brownies recipe. Its easy...and it's good.

One Bowl Brownies

4 oz unsweetened chocolate
3/4 cup butter
2 cups sugar
3 eggs
1 tsp vanilla
1 cup flour
1 cup chopped nuts of choice (optional)

Preheat your oven to 350' F
Line a pan with parchment paper (makes for easy clean up) or grease a pan. One recipe says to use a 9" square pan....and another says to use 13 x 9. I think it might depend on your recipe and how thick you want your brownies. You might have to adjust the cooking time accordingly. Just let the toothpick be your guide. In this case...a semi clean toothpick.

In a large bowl, microwave the butter and chocolate on high for 2 minutes, or until the butter is melted. Stir until the chocolate melts.

Stir in the sugar


Blend in the eggs and vanilla....stir quickly at this point....so the eggs don't start to cook from the warmth of the chocolate mixture.

Add the flour and optional nuts. Mix well


It's a little tempting to just grab a spoon here and now, and dig in.

Spread half of your brownie mix into your prepared pan. Top with 1/3 of the delce de leche and swirl it around with a knife


Carefully spread the rest of your brownie mix on, and then top with the remaining dulce de leche...and swirl again.

Bake for 40 minutes or until a toothpick comes out almost...kinda, sorta clean.

With this brownie recipe...I did have to increase the baking time by about 10 minutes. If you're using a box mix....try the 40 minutes...and see how it goes from there.

Allow to cool completely.

Topping

6 oz dark chocolate, chopped
Coarse Sea Salt (I just used coarse kosher salt)

Melt the chocolate either in a double boiler, or by placing the chocolate in a bowl in the microwave and heating on high for 1 to 2 minutes, stirring every 30 seconds until melted and smooth.

Cut the brownies into squares (size is up to you). Spread the melted chocolate over each one. It helps if you just keep all the brownies together and you can just pour the chocolate over all of them with a little help from a spoon. Sprinkle with salt.

Get a nice tall glass of cold milk....and take a few minutes to enjoy these rich, extremely chocolaty, salty brownies.


In my opinion....these are perfect for....well....you know....those times when cravings must win.

Sunday, June 17, 2012

Cinnamon Roll Cookies


Yep...these are cookies. Not cupcakes. Cookies. Very delicious. Very big.....cookies. They're big like a cupcake but made like a cinnamon roll....with a cinnamon, brown sugar filling and icing on top and everything. Think....cookie falls in love with a cinnamon roll and has a baby. Does it get any better than that?

What makes it a cookie? The dough of course. It's not a bread dough. It's cookie dough. (mmmm....cookie dough)

Last weekend as I was looking through the food section of the Los Angeles Times,  the heading...'Sweet tooth satisfaction' caught my eye. And boy, they weren't lying. Of course I made them the very next day. When I told the girls at work that I was bringing them in, one said they were all for her. Another said she'd bring milk (which she did and quickly chilled the milk in the freezer). Before noon, all of the cookies were gone.


Note: this is a time consuming cookie to make. I made the cookie dough and got through to the assembling part one afternoon and baked them the next day. You can do it in one day but start early. 

Cinnamon Roll Cookies
Printable Version

Cookie dough
1 cup butter
1/2 cup sugar
1 cup brown sugar
1/4 cup powdered sugar
3 eggs
2 teaspoons vanilla extract
3 cups plus 1 tsp unbleached flour
1 tsp ground cinnamon
1/4 cup cornstarch
1 tsp baking powder
1/2 tsp baking soda
1/2 tsp salt

Filling
1 cup toasted pecans, chopped
1/2 cup brown sugar
1/4 cup butter, melted
1 TB cinnamon

Glaze
2 oz cream cheese, softened
2 TB butter, softened
1 cup powdered sugar, sifted
1 tsp vanilla (recipe said vanilla bean scraped, which I didn't have)
Zest of 1/2 orange, optional (I opted out)
3 TB milk

Make the dough:
In a large bowl, cream together the butter, sugar, brown sugar and powdered sugar. Beat in the eggs, one at a time until combined thoroughly. Beat in the vanilla extra. Set aside.

In another large bowl, whisk together the dry ingredients; flour, cinnamon, cornstarch, baking powder, baking soda and salt.

Slowly beat the dry ingredients into the wet ingredients that you had set aside. Mix until just combined but don't over mix.

Remove the dough from the bowl and wrap with plastic wrap. Place in the refrigerator to chill for at least an hour.

Make the filling:
Just before you remove the cookie dough from the refrigerator, mix together the ingredients for the filling (pecans, brown sugar, melted butter and cinnamon) in a small bowl until well combined.

Assembling the cookie:
Flour your work surface. Turn the dough onto the surface and roll out to a 10" x 10" square. Evenly spread the filling over the dough. Gently, and carefully roll the dough into a tight log. Wrap the lop with plastic wrap and chill for at least an hour. Overnight would be better.

Note: I used my bench cutter to help me roll the dough into a log. It was a hot day and the dough was softening up pretty quickly. Plus it wanted to stick to my counter, even with the flour. Also, once the dough is wrapped in plastic, I placed the log on a tray to support it as I carried it to the fridge.

Baking the cookies
When you're ready to bake your cookies, grease 2 muffin tins (12 cups each). You'll be making 24 cookies. I don't trust those cooking sprays for these types of things so I used shortening.

Preheat your oven to 350' F

Remove the dough from the refrigerator and cut into 1/2' slices. Place each slice into a muffin cup.


As you can see, my log didn't come out perfectly round. It was very....umm...oblong-ish. So I took each slice and kinda squished it's sides in, gently, to force them into some resemblance of a "round". Then placed forced them into the muffin cups. If you haven't figured it out by now...I'm not into "perfect". Or maybe perfect isn't into me. Either way....it rarely happens. Lets just say I've learned to embrace 'rustic'.

Bake the cookies for about 15 minutes or until slightly browned, rotating the pan once halfway through, for even baking.


Allow to cool in the muffin cups.

Making the glaze:
In a large mixing bowl, cream together the cream cheese and butter. Slowly beat in the powdered sugar. Beat in the vanilla. Add enough milk until the glaze is smooth and thick.

Use a knife if needed (to help release the edges and sides) and gently, carefully remove the cookies from the muffin cups. Use a fork to generously drizzle the glaze over the cookies.


Eating the cookies
Now, get out a tall glass of ice cold milk and grab one. Quick...before they're all gone.

Sunday, June 10, 2012

Provencal Vegetable Soup with Garlic, Basil and Herbs


Sometimes nothing but soup will do. A nice, simple soup. Nothing too heavy. In this case, that meant no meat. I rarely go meatless on anything.....but I knew my youngest daughter would thoroughly enjoy it.

I found the recipe for this amazingly delicious bowl of vegetable goodness in Julia Child's Mastering the Art of French Cooking. She explains that early summer in the Mediterraneans is the season for Soupe Au Pistou. Pistou is a Provincal pesto, made with garlic, basil, tomato, cheese and olive oil. It's added to the soup just before serving and provides a fabulous flavor. Think about it...all those herbs...freshly added at the last minute which means they are still bursting with flavor because they haven't been cooked away. The herbs aren't shuffled off into the background in this soup. They're aren't necessarily center stage either. What they do is effectively lift the fresh vegetables, supporting them in a way that lets you appreciate every simple ingredient that has come together in your bowl.

With all that said....this soup is best served and enjoyed immediately. It is at it's peak the day you cook it. It's still good as leftovers but it will no longer contain that "wow" factor.

Also, I recommend a good french baguette to go with your soup.


These are a couple of loafs I made using the master recipe from Artisan Bread in Five Minutes a Day. For those of you who are unfamiliar with ABin5, its a great book on no-knead bread.

Another note about this soup...use what ever fresh veggies you have on hand, or use frozen. For the beans, use your favorite. Don't stress. It's just soup.

Provencial Vegetable Soup with Garlic, Basil and Herbs
Printable Version

3 quarts water
2 cups diced carrots
2 cups diced potatoes
2 cups diced onion or the white parts of leeks
1 TB salt
2 cups white beans, cooked or canned
2 cups green beans, frozen veggies or what ever you have on hand (I had broccoli and cauliflower)
1/3 cup vermicelli (or broken speghetti. I used orzo which absorbed a lot of the broth)
1 slice stale bread, crumbled into crumbs (or use about 1/4 cup bread crumbs)
1/8 pepper
Pinch of saffron
4 garlic cloves, mashed
6 TB tomato puree (I used tomato sauce)
1/4 cup fresh basil, chopped (or 1 1/2 TB dried basil)
1/2 cup grated Parmesan cheese
1/4 - 1/2 cup olive oil

In a large pot slowly boil the carrots, potatoes, onions (or leeks) and salt for 40 minutes. Add more salt if necessary.

Add the green beans (or what ever fresh vegetable you're using) beans, the vermicelli, bread crumbs, pepper and saffron. Boil slowly for about 15 minute or until your vegetable is just cooked through. Correct seasoning again if necessary.

While the vegetables are cooking, prepare the pistou as follows: in a bowl blend the garlic, tomato puree, basil and cheese. Drop by drop, mix in the olive oil. When the soup is ready to serve, add a cup of the soup to the pistou and blend. Then pour this mixture into your soup. Serve with bread.

Sunday, June 3, 2012

Chambord Chocolate Mousse


I have discovered the wonderfulness of Chambord. Until a few short weeks ago, I had never even heard of it. A co-worker mentioned something about a Chambord Margarita and was shocked that I had never heard of it. Then she was excited that she got to introduce me to something new, food related. That night I bought a small bottle and was instantly in love. We've been playing ever since.

One of the results of my "playing" is this delicious Chambord Lemonade. You can find the recipe (along with lots and lots of great cocktail recipes) over at Cocktail Puppy


If you've never ventured over there...I highly recommend it.

Now, on with the show. My Chambord Chocolate Mousse. The inspiration was born from my love of chocolate and raspberries, but was not an instant success. The first recipe I tried was not mousse-like at all. It tasted good...but was way too firm, and overly rich. I had used a recipe that I tried last year hoping that the issue was the cook and not the recipe (my first attempt had the same results). After 2 tries I realized it was the fault of the recipe. Too much chocolate and not enough air (from eggs or cream or something). I'm not a professional by any means or even an expert. When I try a recipe and it fails, I assume its my fault. When I try it twice with the same failure...well, let's just say I feel better about myself.

This time, I consulted an expert. None other than Julia Child. I don't know why I didn't do this from the beginning. I mean, I've made Julia's Chocolate Mousse before and loved it! I guess one must remember that when one is searching for fabulous results, one must start with a fabulous recipe from a fabulous chef.

This recipe calls for strong coffee. Easy peasy. Then I remembered that I have a bag of Limited Edition Godiva Dark Chocolate Raspberry coffee in my cupboard. How perfect is that? If you don't have this....don't worry. Use regular coffee. This was just a perfect fluke.


I found a box of Tartelette cups in my cupboard that I decided to use at the last minute. Another perfect fluke. Of course those little cups couldn't contain the mounds of mousse that was made so I did use various dessert cups and ramekins to hold the rest.

Chambord Chocolate Mousse
Printable Recipe

4 eggs, separated
3/4 cup fine sugar (I used bakers sugar)
1/4 cup Chambord Raspberry Liqueur
6 oz semi-sweet baking chocolate
4 tablespoons strong coffee
6 oz unsalted butter, softened
pinch of salt
1 tablespoon granulated sugar
Whipped cream, raspberries and chocolate shavings to garnish
 In a large bowl (about 3 quart size), beat the eggs yolks and sugar together until the mixture is a pale yellow and a slow dissolving ribbon forms.


Add the Chambord and beat until combined. 
Place the bowl over a pan of water that is not quite simmering and continue to beat the mixture until it's foamy, which should take about 3 - 4 minutes. Now Julia says that the mixture should also be too hot for your finger. After 4 minutes it was foamy but not too hot for my finger. And I really didn't want to keep sticking my finger in it. And I really didn't want to burn my finger. So...once it was foamy, I was happy. 

Then, place the bowl inside a larger bowl of ice cold water and continue beating for another 3 - 4 minutes until the mixture is cool and once again forms the slowly dissolving ribbon. 

In a medium sized bowl, melt the chocolate and coffee over hot water, stirring constantly so you don't scorch the chocolate. Remove from heat and beat in the butter a bit at a time so you make a smooth creamy chocolate delight.

Beat the chocolate into the egg yolk mixture. Set aside.

In yet another bowl, beat the egg whites and salt until soft peaks form. Sprinkle in the granulated sugar and continue beating until stiff peaks form. 

Stir in 1/4 of the egg whites into the chocolate mixture. Then fold in the remaining egg whites. 

Place the mousse into your desired dessert cups and chill for at least 2 hrs or over night. 


Mmmm....I could tell just by the sheer fluffiness of the mousse that this is exactly what I had envisioned when I decided to combine the Chambord and chocolate


I really wish I had more of those little shortbread tartelette cups. I'm going to have to remember to pick up some more for future use.

When your mousse has set, garnish as desired and enjoy


The Chambord flavor wasn't over powering...the fresh berry really made the raspberry flavor pop.  The mousse is foamy and creamy and absolutely wonderful. I know there are several steps (and lots of bowls used) for this recipe. But trust me....it is worth every minute.

The tartelettes would be great for a dinner party....the perfect little taste bud teasers that they are. If you want the full mousse experience....grab the dessert cup....


You'll be much more satisfied.