Yum Peaceful Cooking: March 2013

Wednesday, March 27, 2013

Potage Parmentier - Leek and Potato Soup


Yesterday my daughter brought home a leek. A very large leek. My mind instantly went to an amazing Julia Child recipe: Potage Celestine. But what I needed tonight was simplicity at its finest (short of having it delivered). I had spent most of the day pulling weeds and prepping my little garden strip for planting. I'm exhausted to say the least.

After flipping through a couple cookbooks, I discovered that Potage Parmentier fit the bill. I mean...seriously. Soup doesn't get any more simple or easier than this.

And it's delicious. It's satisfying without being heavy. It has full flavor and a bit of richness without a dozen ingredients. Aaaaaaaand...it's a Julie Child recipe from Master the Art of French Cooking.

Can it get any better than that?

Did I mention that its vegetarian? And if you use vegetarian butter....it's vegan!

Side note: you may choose to drink a white wine with your soup. I had started the red a while ago....and kept with it. A nice Merlot. Which happened to sweeten up nicely with my dinner.

Potage Parmentier - Leek and Potato Soup
Printable Version

1 lb potato, peeled and dinced
1 lb leek, thinly sliced
2 quarts water
1 TB salt
Salt and Pepper to taste if needed
3 TB softened butter
3 TB minced chives

In a large pot, simmer the potato, leek, water and salt, partially covered for about an hour. Remove from heat. Puree with an immersion blender or blender..or a fork if you have to. Season with salt and pepper to taste (the salt may not be needed). Just before serving, stir in the butter a little at a time. Garnish with chives.

That's all she wrote.

Sunday, March 24, 2013

Thighs Spread Wide - Fifty Shades of Chicken


Thighs Spread Wide - Roasted Chicken Thighs with Mushrooms

There are some books you can't NOT buy. Fifty Shades of Chicken, a parody in a cookbook, is one of those books.


I couldn't help myself. I tried. I glanced, I picked it up...giggled to myself, put it down and walked away. I even got as far as leaving the bookstore and going home. Only to find myself thinking about it. Often. I cook chicken a lot. 90 percent of my dinners are chicken. I have friends who call me The Chicken Queen. So, I think it was meant to be. Destiny. A requirement for The Chicken Queen to possess this particular cookbook. 5 days. I put myself through 5 days of thinking about the book before I realized....YES! I must make it mine.

There are 50 chicken recipes. As if I need more, right? But honestly, is it possible to have too many recipes of any kind? Of course the main question is....are they quality recipes. The answer? Yes. Delicious. And so fun to read. I mean when a cookbook starts off with "How have I gotten myself into this? I glance around the the spotless, meticulously organized kitchen: trussing twine, skewers, mallets-is that a cleaver? Holy crap." Or a recipes reads: "I must have you now," he says breathlessly, throwing me down and opening my thighs on the first surface he can find. "On this?", I ask. "Isn't this a baking sheet?" "It'll have to do." (keep in mind this is from the chicken's perspective. And yes. We are talking about chicken. In this case, chicken thighs, to be more exact).

Anyway...It totally cracks me up. And this book contains wonderful, quality, recipes. You might blush while you're cooking dinner. Have some wine and blame it on that if it bothers you. Besides, there is a saying about food being sexy. If you ever doubted it, this is your proof. Food porn. On more levels than you may have imagined.

If Fifty Shades of Grey wasn't your thing (and I know there are a lot people who wouldn't read the trilogy), that's totally fine. I hope you can still at least enjoy the recipe for the ingredients alone.

Thighs Spread Wide (Roasted Chicken Thighs with Mushrooms)
Printable Version

1 1/2 lbs boneless, skinless chicken thighs, patted dry
1 tsp salt
1/4 cup chopped fresh oregano (I used 1 tsp dried)
2 TB fresh lemon juice
2 garlic cloves, minced
1/2 tsp pepper
8 oz cremini mushrooms, quartered
1/3 cup olive oil
2 - 3 tsp capers
2 TB white wine (or chicken broth)
Garnish: flat leaf parsley, chipped and lemon wedges

Sprinkle the chicken with salt. Set aside.

In a large bowl, combine the oregano, lemon juice, garlic, pepper, mushrooms and olive oil. Add the chicken and stir to coat. Allow to marinade for up to 4 hours (in the refrigerator). If you can't wait...then 15 minutes will do, at room temperature will do.

Preheat the oven to 500' F.

Arrange the thighs (spread open) on a 9x13 baking dish, scattering the mushrooms and capers over and around the chicken.

(I cut the recipe in half since Sir Sportsalot and I were the only ones eating dinner.)


Pour in the wine and roast for about 25 minutes, or until the chicken is cooked through (juices run clear).

Garnish with parsley and lemon if desired.


I didn't have the parsley but I did drizzle with lemon juice...just forgot to leave a pretty wedge on the plate. This dish is so simple. Full of flavor. And very tender..as is all thigh meat. Btw, I read that 3 oz of chicken thighs only have 40 more calories than 3 oz of breast meat. Your cooking method will of course effect the true outcome of that statement.

I have a lot of cookbooks dedicated to just chicken. Even if you took away all the Fifty Shades of Grey parody stuff.....I have to say, this is the best chicken cookbook I own.

Not to mention, the only one that contains the "F" word.

Saturday, March 16, 2013

Pistachio Muffins


I love pistachios. Actually, I love most nuts (this is not a reflection of my personality). Out of all the nuts out there, I wonder why the pistachio has it's own muffin? I mean...you never hear about peanut muffins, or almond muffins...or even cashew muffins. hmmm...interesting. (sorry, I don't have an answer for this. I can't even find anything about the origin of pistachio muffins. And yes, I did Google it).

It wasn't until very recently that I even tasted a pistachio muffin. I mean...within the past few months. You know when you hear about or see a certain food and you have a mental idea of what it's all about? And for some reason it just doesn't mesh with your mental taste buds? That's how it was for me. I thought it was odd that the muffin is green. Mentally, I assumed there were artificial flavorings involved. Some things, I just can't do artificially. Nut extracts are among them. Thank God that's not the case here. Once I tasted them...and discovered that the "green" is for looks only (induced by food dye), and not necessary, and the only nut flavor is from the actual nut itself...and some spices are added in there for a very nicely orchestrated pallet experience...well, my confounded predetermined opinion of pistachio muffins changed. 

I did a lot of searching to find a recipe that matches my culinary style/taste. I found a lot of them that start off with a cake mix. Then there were tons of them that included pistachio pudding mix (THERE it is! The artificial flavoring in full motion right there! Ya, it's a good thing those recipes were not my first experience). Ok, if that's not an issue for you...and you desire a stronger, bolder pistachio flavor...then maybe one of those recipes would be better for you. Anyway, the recipe I found, that inspired me was at ScarlettaBakes. I made a few changes. Going green was one of them. I almost didn't add the dye but since St. Patricks Day is tomorrow....well, I couldn't resist. If you don't want them green...leave the dye out. You might even "feel healthier" eating them in their natural state.

These muffins are nice and moist (is there another word I can use to get that point across?). I love the combination of pistachio, cinnamon and nutmeg. I used roasted pistachios. Raw would be perfectly fine too. Actually, I would've preferred raw but I didn't have any on hand. I think if you were to use the nut in the raw...you'd end up with more of the oils and a more pure pistachio flavor.


One of the things I like about this recipe is that you take some of the nuts and puree them into a paste...well...a nut butter actually, leaving the rest of the nuts to be roughly chopped. I believe this method infuses more of the natural flavor in the muffin rather then having to rely on....say.....pudding mix?  

Before I get into the whole recipe spiel, let me share what I did for the muffin cup. I just couldn't put these muffins in a little frou-frou paper cups. Besides...the firm crust, contrasting with the moist insides is one of the muffin qualities that appeals to me. And those store bought paper liners tend to peal off some of it. 

What I did was cut some parchment paper into 5 1/2" squares and then pressed them into the muffin tin with the bottom of a glass


Just a little heads up here....the paper doesn't stay down very well, so make them as you need them...one at a time. 


The weight of the dough will force the paper to the bottom of the cup then you can continue on to the next. 

Yes, it's a tiny bit time consuming, but the results are cool. And...if you find that you don't have any store bought liners on hand....bazinga! Now you can just make your own. And don't be surprised that the round shape is not perfect. You will end up with some grooves and indents and bulges. But hey, that just adds to its rustic appeal. (funny how imperfections are made acceptable..and oftentimes desirable just by calling them rustic. OMG...I AM RUSTIC!! HA! Oh wait...never mind. That just makes me sound old. Really, really old).

Somebody stop me now. 


Pistachio Muffins
Makes 24 standard sized muffins

2 cups white sugar
1 cup butter, room temperature
2 large eggs
3 cups all-purpose flour
1 tsp baking soda
2 tsp baking powder
1/2 tsp salt
1 tsp cinnamon
1/4 tsp nutmeg
1 cup buttermilk
3/4 cup pistachios, roughly chopped (more if you want to sprinkle some on top of the muffins)
3/4 cup pistachios, pureed (instructions below)
1 tsp vanilla extract
Green food coloring (optional)

Preheat your oven to 375' F
Line 24 standard sized muffin cups

In a food processor, process 3/4 cup of pistachios in 30 second increments until pureed, scraping down the sides as needed. This should only take 3 or 4 increments.

In a large bowl, cream together the butter and sugar. While the mixer is still running, add the eggs one at a time then add in the vanilla extract and green food coloring, if desired. I used a few squirts of the gel kind, eyeballing it until I liked the shade. Beat until just combined. Set aside.

Sift together the flour, baking soda, baking powder, salt, cinnamon and nutmeg. 


With the mixer on low, add the sifted ingredients to the creamed butter, alternating with the buttermilk. Beat until just incorporated. Beat in the pureed pistachio nuts. Fold in the chopped nuts.


Fill each muffin cup with the batter. I used an ice cream scoop for uniformity. If you have any left over pistachios, give them a rough chop and sprinkle them over the muffins.


Bake for 20 - 23 minutes or until a toothpick inserted in the middle comes out clean. 


Allow to cool slightly before enjoying

Happy St. Patrick's Day! 


Saturday, March 9, 2013

English Muffins


I post a rather wide variety of recipes here on Peaceful Cooking. It started out with recipes I was familiar with and made often. But as my interests grew....so did my range. Looking back, I can see how I've grown and changed in my cooking styles and food desires. Often times I post recipes that I've tried for the first time. Such as these English Muffins. Just because I post a recipe, doesn't mean I'm an expert at it. Far from it. It just means I've conquered a challenge. An inner challenge. I figure if I show that I can do it...someone out there with inner doubts will see that they can do it too.

With all that said, I feel like I've crossed something off my 'Bucket List' by making English Muffins. It's something I've been wanting to try for a very long time. What held me back was the lack of 3" ring molds to cook them in. Sure, I could've bought them online and spent more money in shipping than the actual product but that doesn't work for me. Someone had told me to use tuna cans with the bottoms and tops removed. My can opener couldn't remove the bottoms because of the rounded edge. Then a Bakespace.com buddy told me that the pineapple cans still have the old style bottoms that work with can openers. YAY!

Just to give you a visual of how the cans are different....


Anyways...with that dilemma solved...I was ready to roll. I used Alton Brown's English Muffins recipe. It's simple enough. And if you've watched his show about how to make them...well, it just makes one even more comfortable baking them. I know I watched that episode once. I just can't remember. I do wish that I had an electric griddle to maintain the temperature. And I wish I knew how big or small a #20 ice cream scoop is. But I'm getting ahead of myself. Let's get this recipe rolling.

English Muffins
Printable Version
Makes 8-10 muffins

1/2 cup non-fat powdered milk
1 TB sugar
1 tsp salt, divided
1 TB shortening
1 cup hot water
2 1/4 tsp yeast (or one packette)
1/8 tsp sugar
1/3 cup water, luke warm (about 110')
2 cups all purpose flour, sifted
Cooking spray

In a large bowl, combine the powdered milk, 1 TB sugar, 1/2 tsp salt, shortening and hot water. Stir until the salt and sugar are dissolved. Set aside to cool.

In a small bowl, combine the yeast, 1/8 tsp sugar and 1/3 cup of water. Stir to combine and let rest until the yeast has dissolved.

Add the yeast to the dry milk mixture. Add in the sifted flour and beat thoroughly with a wooden spoon. Cover and let rest for 30 minutes.

If you're using an electric griddle, preheat it to 300' F. If you're using a skillet on  the stove like I did, you'll want the skillet on a medium to low setting.

Add the remaining 1/2 tsp salt to the dough and beat thoroughly.

Place your metal ring molds on the griddle or in your skillet. Spray with cooking spray


Using a #20 ice cream scoop, place 2 scoops into each ring.

Note: My ice cream scoop isn't numbered. It had been my mother in-laws so who knows how old it is. In my case, I only needed to use one scoop. (I found that out the hard way. I'll share that embarrassment with you later.)

Cover the rings with a lid or if you're using a griddle, place a cookie sheet on top of the rings and cook for 5 or 6 minutes.


Remove the lid and flip the rings using tongs.

Note: When flipping the rings over to cook the other side of the muffin...have the tongs on the top and bottom of the ring, not the sides. This will hold the dough inside the ring and prevent a moment of stress as the dough tries to fall out of the ring.

Cover with the lid and cook for another 5 - 6 minutes, or until golden brown.


Place the muffins on a cooling rack, remove the rings and allow to cool.


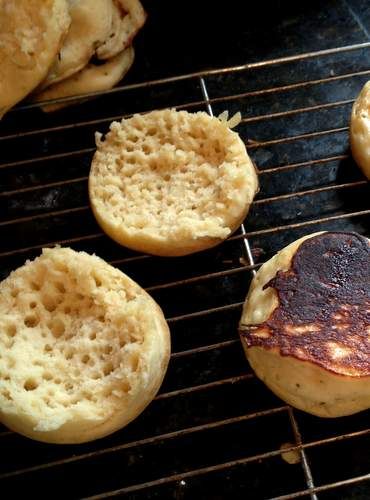
With a fork, split each muffin then peak inside and check out the success....

NOOKS AND CRANNIES!! 


Oh m'gosh! I actually made real English Muffins. And they were good! They were especially good toasted with peanut butter smeared all over them.

Whats your favorite way to eat an English Muffin?

Now for the confession of my stress and embarrassment. My success was on the second try. That means...I totally annihilated the first batch. I might have given up after that, but damn... I had worked so hard to get my ring molds!!

With the first batch, I mistakenly thought (assumed?) #20 was the standard ice cream scoop size. Apparently not. I over filled the rings. Mistake number 1.

I didn't properly convert the 300' griddle temp to the setting on my gas stove. Medium heat (5 or 6 setting) was way too hot. The setting needed to be medium low (setting 3, maybe 4). I burnt the little buggers. Mistake number 2.

Of course I didn't realize they were burning until I went to flip them. I took my tongs, grabbed the sides of the ring and flipped. Sounds easy enough. Until the dough falls out. And you find yourself struggles to get everything back in the ring and in it's proper place, without burning yourself, and all the dough wants to do is be FREE...and ooze out, all over the pan. Mistake number 3.

This is how my first batch turned out. Over sized, burnt and just plain funky. So why did I even bother to continue? I mean...the ring molds couldn't have been the only motivation. They're just pineapple tins, after all. And English muffins can be found and bought at any market.


I'll tell you why....cuz even though I had messed up that first batch in multiple ways, I still had to look inside to see if I was at least on the right track. Was it just going to be gooey dough? Or would 'they' be there.

The ever sought-after nooks and crannies.

So I took my fork and split a deformed, mangled muffin and opened it up....


And there they were...bold and beautiful in the midst of disaster. How could I not start a new batch and seek true success?

Now...I want to try my hand at Sourdough English Muffins. Guess they're back on my Bucket List, in a different format. 

Sunday, March 3, 2013

Angel Food Cake


I didn't wake up one morning and decide....'hay, I want to make Angel Food Cake'. As much as I enjoy this cake, I don't think of it very often (it's usually a strawberry season thought). Believe it or not, my decision to make Angel Food Cake stemmed from my desire to make English Muffins.

It's a weird, twisted path but I needed rings to make English Muffins. Sorta like cookie cutter rings, and I didn't want to order them online. I'd heard that small tuna cans, with both ends removed, works well. The only problem was, my can opener couldn't remove the bottom of the can. I guess, somewhere along the line, tin can manufactures started making the can bottoms rounded and a can opener can't wrap it's little gears around it.

Bummed me out.

So I sat on the idea for a while. Searching stores for 3" cookie cutters that are sold separately. Searching different tuna brands. I even got so desperate that I started looking at the cat food cans at the market. (honestly, it would've grossed me out. I'd probably imagine that the can smelled like cat food, forever. No matter how many times I'd wash it). Then a fellow cooking buddy informed me that small pineapple cans were still made the "old fashioned way".

YAY!!!

But....what do I do with all that pineapple?!

That's when the same buddy mentioned Pineapple Bavarian Cream. Which happens to go very nicely with this very fluffy, spongy cake, know as Angel Food Cake.

And now you see the connection. I am working my way back to English Muffins. The Angel Food Cake is the first step. Which by the way, I totally missed steps in this recipe and did things out of order (in my defense, the instructions are written in paragraph form instead of in steps. I missed a sentence, I guess). The cake still turned out wonderfully. But I'd like to make it again. Using a proper pan and preparing it in the proper way.

Then I will make the Bavarian Cream. Then I will have the rings to make my English Muffins.

This particular recipe is from a very old book (The American Woman's Cookbook), binding falling apart, with a copyright of 1948. In the book, the cake is simply called Angel Cake. Same difference. It calls for the use of both vanilla and almond extract. Next time I'm only going to use the vanilla extract.


Angel Cake
Printable Version

1 1/4 cups sugar - divided
1 cup sifted cake flour
1 cup egg whites (8 - 10 eggs)
1 tsp cream of tartar
1/2 tsp salt
3/4 tsp vanilla extract
1/4 tsp almond extract

Preheat oven to 275' F

Sift 1/4 cup of sugar and the cake flour, 4 times. (I sifted it onto a piece of parchment paper...then emptied it back into the sifter). Set aside.

In a large bowl, beat the egg whites, cream of tartar and salt into a stiff foam. Add the remaining sugar, a little at a time, beating it in. Add in the extracts.

Fold in the sifted flour mix, sifting yet again as you add it, a little at a time, into the egg white foam.

Pour into a large ungreased tube pan (I used a bundt pan. not highly recommended). With a butter knife of spatula, cut through the batter to remove large air bubbles.

Bake for 30 minutes.

Increase oven temperature to 300' F and bake 40 - 45 minutes longer.

Remove from oven, invert pan for an hour before removing.


Carefully run a knife around all of the edges and remove from pan.

As you can tell from the picture at the top of my post, I left a lot of the "crust" behind when I removed the cake. I blame this on the bundt pan.

I am going to make this again. Possibly today. In a proper tube pan. I don't think Angel Food Cake is difficult to make. I mean, mine turned out nice and fluffy (I admit, it would've been fluffier I'm sure, had I done the proper thing) in spite of my mistakes. Are you wondering how I messed up?

Let's see. I added the extracts into the egg whites before beating them into a stiff foam. Not so bad....I wasn't too worried.

This next flub...had me worried.

I missed the step when the last cup of sugar is beaten into the egg whites. I just went straight to the folding in of the flour. Damn. When I realized what I had done, I proceeded to fold in the sugar too. I didn't beat it in. That would've really messed up the integrity of the stiff egg whites. Then I baked and prayed.