Yum Peaceful Cooking: Breakfast
Showing posts with label Breakfast. Show all posts

Monday, October 31, 2016

Krusteaz Muffin Waffles & Giveaway


I know you've seen the boxes at the market. I mean, they've been around for longer than you and I have been alive.


(So glad I can say that. They may not card me at the market anymore, but I'm still younger than Krusteaz.)

Although, age is a huge plus when it comes to product. They must be doing something right.

Besides making a reliable product, they keep up with the times as well. They know what we like. They know that when the weather cools we like seasonal flavors such as pumpkin and cranberry.

They also know that we are more and more conscientious about what we eat. They have gluten free mixes as well as organic. Although I'm going to be specifically talking about the fun seasonal flavors, I did want to let you know that there are other options.

Not that long ago, a big ole package full of 10 boxes of Krusteaz mixes, a cool tote, an oven mitt and a selfie stick arrived at my door. Yes, I now own a selfie stick. I have to admit that I did need to read the directions to figure out how such a gadget works (another age reference? Hush).

Let me start by saying....it's been years since I've made pancakes. Everyone knows how good pancakes and muffins are and Krusteaz mixes are no exception. Simple, moist, fluffy....all those good things we expect. I had lots of fun making blueberry pancakes for breakfast. I only messed one of them up when I tried to flip the thing too soon, but we won't dwell on that.

What I really want to share with you is something totally cool! Did you know....that you can make waffles with muffin mix?

Ya!! For reals. You don't even have to do anything special to the mix. Simply follow the directions on the box and pour the mix into a waffle iron instead of a muffin pan.

How cool is that?!


What you see here is the lovely Cranberry Orange Muffin mix doing something so unmuffin like and she's totally loving it. A few minutes (3.5 - 4 in a Belgian waffle maker) and BAM! The aroma of sweet orange and tart cranberries begin to waif through the air and you find yourself counting the seconds until you can scoop her onto a plate.

Oh baby....let me introduce you to Mr. Maple Syrup.

Pumpkin Spice was just as nice. A side of basted eggs and bacon are a must. Next thing you know, you've got yourself a breakfast fit for a lumber jack because, of course, your eyes are much bigger than your stomach when you're anticipating something so delicious.


One bite....


Two bites....


Oh man. Such a fun Sunday morning breakfast.

Then.....if you have some of the mix left over? Just pour it into a muffin pan and bake them for later.

Nothing wasted. All's good in the world of Krusteaz.

(And I'm super stuffed!)

Now...you may have noticed the word GIVEAWAY in the title.

Guess what? You get a chance to try this out yourself. For free!

One lucky winner will receive the following Krusteaz products:

2 boxes of Buttermilk Pancake mix
2 boxes of Blueberry Pancake mix
2 boxes of Pumpkin Spice Pancake mix
2 boxes of Pumpkin Spice Muffin mix
2 boxes of Cranberry Orange Muffin mix
1 Krusteaz branded tote bag
1 Krusteaz oven mitt
1 Krusteaz selfie stick (it comes in instructions)

Just in time for the holidays!!!


a Rafflecopter giveaway


This giveaway is open to US residents only. This giveaway will run from Tuesday, November 1, 2016 through Friday, November 7, 2016 (11:59 pm PT). A winner will be notified within 48 hours of the close of the contest and given 48 hours to respond before a new winner is chosen. 

I was not compensated for this post, however Krusteaz supplied me with samples. They are also supplying the products for the giveaway.  
All opinions are my own.

Sunday, February 8, 2015

Strawberry Love Bombs for a #SundaySupper Valentine


I'm so excited to be teaming up with Sunday Supper and Gallo Family Vineyards to celebrate Valentine's Day.

This year Valentine's Day falls on a Saturday which is kinda fun. It can be an all day event and not limited to just a nice special dinner. Valentine's can start with a lazy morning of brunch in bed along with a glass of sweet wine.


I'm not talking about a full fledged brunch. Sometimes it's nice to have a delicate treat that doesn't require utensils. Finger food can make us feel indulgent and decadent. We all deserve to experience that every now and then.

These aren't doughnut holes and they aren't cream puffs. These little gems are deep fried biscuits, that once bitten into expose a delightful filling of cream cheese and strawberries.


When you deep fry biscuit dough, it becomes a wonderful thing indeed. Crispy, crunchy on the outside and delicious and puffy on the inside. The perfect little host for tasty surprises.

Strawberry Love Bombs 

makes 6
Printable Version

Biscuit recipe:
1/3 cup milk
1/8 teaspoon baking soda
1 cup shelf rising flour - sifted
1/4 cup shortening

Filling:
3 oz cream cheese, at room temperature
1/3 cup strawberries, finely chopped
about 1 teaspoon sugar

Garnish:
Powdered sugar
1 oz bittersweet chocolate - melted (I add a smidge of shortening to make it thinner and easier to drizzle)

Oil for frying.

Heat oil to 325' F in a deep fryer or tall, thick bottomed pot.

To make the biscuit dough, in a small bowl, combine the milk and baking soda.
In a medium bowl, cut the shortening into the flour until mixture resembles coarse crumbs. Stir in the milk mixture just combined.
Knead about 3 or 4 times or until dough forms.
On a lightly floured surface, roll the dough to about 1/4 thickness. Using a 3" cooking cutter, cut out 6 circles.

Now for the assembly:
Gently smear a heaping teaspoon of cream cheese in the center of each round. Heap a teaspoon or so of the strawberries in the center. Sprinkle with a pinch or two of sugar. (now wipe your fingers off if they're a little messy so they don't interfere with the next process). Pinch the edges together to form a half moon (you may need a bit of water run along the edges to help this happen) and gently roll into something that resembles a ball, without disturbing the pinched seam.


Repeat until all 6 balls are formed.

Carefully place the balls into the hot oil, but don't over crowd. You may need to do this is batches, depending on how large your fryer or pot is.

Fry for 2 - 3 minutes, until a deep golden brown.

Carefully remove to cooling rack. Dust with powdered sugar and drizzle with melted chocolate.


Let cool slightly before enjoying.

Tips for tubed biscuit dough: If you are biscuit challenged, time restricted or just aren't in the mood to make the dough yourself, you will need to make the following adjustments:

Reduce the heat of the oil to 300' as these take a bit longer to fry and will burn before the inside is fully cooked. The tubed dough puffs up more and you don't want the inside to be doughy.

Split the biscuit rounds in half, and smash them flat until they're about 3" in diameter.


Just to give you an idea of the difference between homemade and tube results: The tubed dough is on the top and the homemade is on the bottom.


I personally prefer the homemade. The crust is slightly crispier and the ratio of fruit, cheese and biscuit is a bit nicer as well.


Now let's pair our brunch with some wine to complete our morning of leisure:


The two I have in mind are Gallo Family Vineyard's Riesling and Sweet Red.

The Riesling has a hint of honeysuckle, peach and citrus.

The Sweet Red is fruity, with a fresh fruit acidity and a soft velvety finish.

Both wines are versatile and pair nicely with an array of dishes. I chose the Riesling for my Strawberry Love Bombs because of it's slightly effervescent charm and citrus notes. The dish isn't as sweet as it looks, which is perfect with this wine.

For more information about Gallo Family Vineyards and the wines they have to offer, visit their website. You will also find the store locator there.  I recommend that you follow them on Facebook, Twitter, Instagram and YouTube for more ideas and updates.

Did you know that GFV also has a blog? Check out their Valentine's Day post that includes the round-up of today's Sunday Supper recipe links.

I hope you enjoy this delightful treat on such an indulgent day. Whether or not you have a significant "other" in your life, make sure you spend Valentine's Day with someone you love, be it a spouse, your children, sibling, or best friend.

Be sure to check out the other Sunday Supper recipes for more inspiration to help make your day special.

Alluring Appetizers and Brunch:
Magnificent Main Dishes:
Dazzling Desserts and Sweets:

Sunday Supper MovementJoin the #SundaySupper conversation on twitter on Sunday! We tweet throughout the day and share recipes from all over the world. Our weekly chat starts at 7:00 pm ET. Follow the #SundaySupper hashtag and remember to include it in your tweets to join in the chat. To get more great Sunday Supper Recipes, visit our website or check out our Pinterest board. Would you like to join the Sunday Supper Movement? It’s easy. You can sign up by clicking here: Sunday Supper Movement.

Compensation was provided by Gallo Family Vineyards via Sunday Supper, LLC. The opinions expressed herein are those of the author, and are not indicative of the opinions or positions of Gallo Family Vineyards.

Sunday, March 2, 2014

Vegetarian Breakfast Burrito


Filling, tons of flavor and a very hearty breakfast. I love breakfast burritos but the ones I usually eat are loaded with potatoes. And meat. This time I went a different route (inspired by my very health conscious youngest daughter). There are more vegetables in this burrito than anything else.

I did not miss the potatoes (and I happen to love potatoes). Although there are sweet potatoes in that mass pile of veggies. I didn't even miss the meat. much. Well, if I think about it too much.....naaa. I'm not that bad.

This breakfast was perfect for another reason besides being a satisfying breakfast. It gave me the opportunity to clean out the crisper. And that's exactly what I did...I grabbed everything I could find that I thought would go well together and started chopping away...


Leeks, mushrooms, sweet potatoes, brussel sprouts, jalapenos. (I wish I had some zucchini). All thrown into the sizzling pan with olive oil....sauteed, then some minced garlic thrown in....oh, and a bit of rosemary. Of course salt and pepper were added in the end.

My daughter cooked up some meatless crumbles (odd little brown crumbles that look just like ground beef but aren't. They don't have much flavor, but they aren't bad) and fried up some vegan bacon. The vegan bacon had nice flavor....and it tries real hard to have that bacon texture but it doesn't quite get it done. I'm not opposed to it, but you won't find me giving up bacon in the long run. Or the short run. Once in a while...I don't mind eating better than I usually do. I should do it more often. Maybe some day.


Then there's this stuff...almond jalapeno jack style cheese alternative (that's a mouthful to say). Not bad. Texture is about right. The flavor isn't cheese...its more like...nothing. With the jalapenos and the cheesy texture, sure...it works.

So, you take all these goodies, pile it on a warm tortilla, pour some really good salsa over the whole mound of good-for-you yummy stuff, top with sliced avocado. If you're not a vegan, throw on a poached egg or two and garnish with cilantro.


I think the only trouble you'll have here is rolling up that bad boy. Work it, it'll happen. Almost. Then you shove it your face and think...(if you're not already one)....ya, I can be a vegetarian.

Once in a while.

I don't have measurements here. You just eyeball it. If you have leftover veggies (which I did) use them in your next meal. Toss them in a soup. Mix them with some quinoa and dinner is a done deal. No brainer.

After eating this, you might want to skip lunch. A nap wouldn't be out the question either. If nothing else, you'll feel better just for eating better.

Friday, February 28, 2014

Breakfast PB and Brie Panini and a Van's Natural Foods #Giveaway


If you love peanut butter and banana sandwiches, you will love this breakfast. If you love cheese, you will especially love this breakfast. If you love natural, non GMO, whole grain products, you will REALLY love this breakfast. If gluten-free is something you need or desire....got you covered in that option as well.

Let's talk about Van's Natural Foods for a minute here. Van's Foods are no stranger to this household. My daughters have been enjoying their gluten-free waffles for quite some time now (blueberry is a favorite). I love that I can pronounce every ingredient. Plus....they're kosher, all natural, egg free, dairy free, corn free. Getting samples and coupons for Van's Foods was so much fun! They have a whole line of gluten free snack bars and gluten-free crackers and chips (totally yummy!) and so much more.

Here's a reminder of what I did with the their snack bars...I Heart Chocolate

Are you pumped to possibly win coupons to help you discover the wonderfulness of Van's Foods? Hang in there...

Back to my breakfast panini. I chose whole grain (instead of the gluten-free) so that my daughters wouldn't eat them before I got a chance to use them (it happened with the gluten-free chips and snack bars that Van's sent me. I needed a safeguard of some sort. A mom's gotta do what a mom's gotta do). You can totally use the gluten-free product for this recipe.

Not sure if you can really call it a recipe actually. It's so simple. No measuring needed. Super easy and way good!


Breakfast PB and Brie Panini

2 Van's Natural Foods Whole Grain Organic Waffles (or any variety you prefer)
1 banana sliced thin
Peanut butter
Brie Cheese sliced thin
Butter


Take your frozen waffles (still frozen...do not defrost) and spread peanut butter on one (two if you prefer...no set rules here). Cover one with thinly sliced brie and then layer your bananas over the cheese.

Heat a skillet over medium high heat and melt a dab of butter.


Place your waffle sandwich in the pan (or if you have a panini maker, use that). place another skillet on the sandwich to press it down. Let sizzle for a couple of minutes, until golden brown and flip...covering again with the skillet.


Continue cooking until golden brown. Remove and enjoy!

If you want to really make it decadent, add some maple syrup......


All that melty brie with the peanut butter and banana...soooo good! And the healthy waffle just takes away any guilt you could possibly have from eating a breakfast treat such as this.

So, what am I giving away? 5 coupons for free Van's Natural Foods, dry and frozen products. The goal here is to help you continue your healthy eating goal for the year. If you haven't made that a goal, it's not too late to start!

To enter, leave a comment telling me which product you would get first with your coupons. This is a mandatory entry. There are lots of additional ways to enter to earn more chances.

Tell your friends (because you care about their health too).

a Rafflecopter giveaway


This giveaway is open to US residents only. This giveaway will run from Friday, February 28, 2014 through Tuesday, March 4, 2014 (11:59 pm PT). Winner will be notified within 48 hours of the close of the contest and given 48 hours to respond before a new winner is chosen. 

I was not compensated for this post, however Van's Natural Foods supplied me with samples and coupons for their product.  They are also supplying 5 coupons for free product (dry and frozen goods) for the giveaway.  All opinions are my own.

Sunday, January 5, 2014

Cinnamon Roll Style Bread Pudding


What do you do when your husband brings home Pandoro (traditional Italian sweet yeast bread) and you forget to eat, serve or otherwise do anything with it during the holidays?


You make bread pudding.

Crazy good bread pudding.


Maybe because you feel guilty for ignoring the Pandoro. Or maybe you think it might deserve to be treated a little special. Ooor...maybe you're just craving cinnamon rolls and are too lazy to make them.

Cinnamon Roll Style Bread Pudding
Inspired by Cinnamon Roll Bread Puddiing
Printable Version

10 oz of large dice Pandoro (about 7 cups)
2 tsp ground cinnamon
4 large eggs
2 cups milk
3/4 cup heavy cream
1/3 cup Amaretto or any nut flavored liqueur
1/2 cup sugar plus more for garnish
1 tsp vanilla extract
1/2 tsp salt
1 cup chopped pecans
Cinnamon Roll Glaze (recipe to follow if you don't have one)

Preheat your oven to 350' F.

Sprinkle the cinnamon over the diced bread and arrange in a 2 quart casserole dish.

In a large bowl, lightly beat the eggs. Add the milk, cream, Amaretto, 1/2 cup, vanilla extract and salt. Mix until combined.

Pour egg mixture evenly over the bread. Let everything soak together for at least 15 minutes.

Bring about 8 cups of water to a simmer.

Top the bread pudding mixture with pecans and sprinkle with about a tablespoon of sugar. Place the dish into a larger roasting pan and add enough hot water to reach about halfway up the side of the baking dish, creating a water bath.


Place both dishes in the oven and bake for 50 - 60 minutes, or until custard has set and the top is browned. Remove from water bath and allow to cool for about 10 minutes.


To make a simple glaze, combine 4 TB butter, 2 cups of powdered sugar and 1 tsp of vanilla. Beat until combined. Add 3 - 6 TB of hot water, 1 tablespoon at a time, until desired consistency. Drizzle over the top, reserving some for individual servings as desired.


I don't know if this is a dessert...or a breakfast....both? One and the same...depending on how late of a night you've just had? Which ever it is....you're gonna want more of this velvety smooth, cinnamonie, nutty, deliciousness.


Monday, October 28, 2013

Sonoran Honey Streusel Coffee Cake - The New Southwest Cookbook Giveaway!!!


Before we talk about the Giveaway, let me just

Do you ever have one of those days...where you wonder if you shouldn't have even stepped foot in the kitchen that morning?

Saturday ended up being a day of discoveries.

I discovered that my dishwasher door is being weird...it's sticking shut while the handle that you squeeze to unlock it just sorta disappears into itself.

I also discovered that my oven takes foreeeeeeeeeever to heat up to the proper temperature. As in, after the preheat phase....and the required 45 minute baking time, the temp was 100' below the needed 350'F mark. That happened as I was baking this delicious coffee cake. I opened the oven door as the timer went off...toothpick in hand, ready for the plunge (do you know that this is probably the only reason I own toothpicks?) and I stopped breathing...in total disbelief as I tugged on the rack and witnessed the soppy center sloshing around.

My mind raced....did I set the timer right? Forget to put in an ingredient? Did I measure everything correctly? Is my oven ON? (oh yes....the heat is steaming up my glasses, it's definitely on). I double checked the recipe...everything looks good there. So I got out my oven thermometer, pushed the rack back in, along with my mess and reset the timer (a few times)......

Aaaaand that's when I broke out the bourbon. It was well past 5:00pm, so it was an overdue action anyway. (But that's another story for a different post).

I could tell the cake was finally cooked when it smelled delicious as the aroma filled the house.

Anyways...the moral of this story is...when things aren't going right...don't just give up. Think a minute...try and salvage the situation before you toss in the towel. I mean...what's the worse that could happen? You might have to toss it anyway. But....maybe not....

Thank God that wasn't the case this time because the is one good coffee cake. Especially if you're a honey lover....as in Pooh bear kind of honey lover. I suggest you use your favorite honey for this recipe if you can't get Sonoran honey. But then again....is there such a thing as a honey that doesn't taste good? phhht....silly bear.

And the topping....oooh my oh my. It almost caramelizes and gets crunchy. This might be my favorite streusel.

Sonoran Honey Streusel Coffee Cake
Printable Version

for the cake:
1/2 cup unsalted butter, softened
1 cup white sugar
2 large eggs
1 tsp vanilla extract
2 cups all-purpose flour
1 tsp baking powder
1 tsp ground canela (or cinnamon)
1/2 tsp salt
2/3 cup Sonoran honey (or your favorite local honey)
2/3 cup buttermilk

for the topping:
6 TB cubed butter, chilled
1 cup packed brown sugar
1/4 cup all-purpose flour

Preheat oven to 350'F

Line a 9" square baking dish with parchment paper

Cream together the butter and sugar until light an fluffy, about 5 minutes. Add in the eggs and vanilla and continue to mix until incorporated.

In a medium bowl, whisk together the flour, baking powder, canela (or cinnamon) and salt.

Add the dry ingredients to the butter mixture gradually, alternating with the honey and then buttermilk. Mix until just combined. Pour into your prepared pan.

In a medium bowl, using your fingers, combine the chilled butter cubes, brown sugar and flour until you have uniform crumbles. Sprinkle over the batter evenly.

Bake for 40 - 45 minutes or until a cake tester toothpick inserted in the middle comes out clean. Allow to cool slightly before removing from the pan.

Slice and serve and totally enjoy the richness of this coffee cake.


I've only tried 3 recipes from this book, two of them were my choice (the first one was chosen for the group). It was really hard to pin down just two. There are so many more I have tagged for trying later....such as an almond-crusted pear tres leches cake (holy cow!!) and the stacked squash enchiladas...and and...roasted crema. Ok, I'll stop there (for now). My mouth is watering. You should see all these photos! And did I tell you? In the front of the book is a whole section dedicated to the southwestern pantry. What you should have, what it is, what it looks like, what you do with it. If you're just getting into making southwestern food....fear not, Megan will hold your hand right through the learning stage.

And now for some more good stuff.......

The contest! And I'm not the only one giving away The New Southwest Cookbook.


There are more than a dozen of us participating. And that means there are more chances for you to win. Woooo hoooo!!!

1. Mandatory Entry: Leave a comment on this blog post letting me know what your favorite Southwestern dish is.
2. Tons of optional entries in rafflecopter widget.

a Rafflecopter giveaway


Hippocrene will be supplying 14 copies of The New Southwest by Meagan Micozzi for this giveaway, in conjunction with The New Southwest Cookbook Spotlight. Contest is open to anybody with a shipping address in the USA. Submissions will be accepted via the rafflecopter widget through 11:59 pm ET on Sunday, November 3, 2013. Fourteen winners will be chosen by random draw, verified, and be notified by email (from Heather at girlichef) within 48 hours of the close of this contest. The winner should respond within 24 hours of notification, or a new winner will be drawn in their place. Good Luck!


This post is part of The New Southwest Cookbook Spotlight sponsored by Hippocreneand hosted at girlichef.


Thursday, October 17, 2013

Mushroom and Leek Migas


It's that time again....time to Spotlight a new amazing cookbook. I'm sure most of you are acquainted with the author in some form or another. She's a fellow blogger (I love when this happens!) by the name of Meagan Micozzi. She has an amazing blog (of course) called Scarletta Bakes

She's been giving away some amazing stuff lately so I highly, highly recommend that you give her visit and see if you can win something.

So...she has this new cookbook, The New Southwest


and I'm here to tall you about it...during the next 3 weeks. Aaaaaaand (this is a BIG and) during the 3rd week, I'll be giving this cookbook away to one of you lucky people.

But let's explore a little. See what's inside. I mean, you never buy a cookbook without browsing through the pages first, right?

So for this week, Mushroom and Leek Migas is on the menu. It's typically a breakfast dish but how many of you love to eat breakfast for dinner? I'm a huge fan, that's for sure. Which is why I chose to make this for dinner. It's quick, easy and delish! I had all of the ingredients on hand


...except for the leek. Oh...and the cheese. So I ran to the store...(because I needed a bottle of wine anyway) and picked them up. Not long after I got home, dinner was served. But honestly, if you don't want to run to the store...you can use any kind of cheese you want. If you don't have a leek on hand, use whatever onion you've got.

It's all good.

Talk about a great meal for those busy weeknights. Loaded with flavor and guaranteed not to send you to bed hungry. Do you have a vegetarian in the house? Peeeerfeeeeeeect! Can't go wrong there.

And one more thing, if dirty dishes aren't your thing...then you're going to love this even more. One pan is all you need.

Mushroom and Leek Migas
Printable Version

4 5" corn tortillas
1 1/4 cups oil (divided)
10 large eggs
1/4 heavy cream (milk will do if that's all you have)
salt and pepper to taste
8 oz crimini mushrooms (or whatever you prefer would be just fine)
1 leek, ends removed and sliced
2 TB minced garlic (or to taste)
1 cup shredded Manchego cheese (or whatever you have on hand)

Cut the tortillas in half then slice into thin strips (about 1/2"). Heat 1 cup of oil in a large heavy bottom saucepan over medium high heat.

Working in batches, fry the tortilla strips for 1 to 2 minutes or until browned, flipping as needed. Keep an eye on them. They go from golden brown to burnt real quick.


 Remove from pan to a towel lined plate or baking sheet.


(if you really really want to save time, you can buy tortilla strips from the market, but honestly they're not as good. Just sayin')

Whisk together the eggs and heavy cream. Season with salt and pepper. Set aside.

Once you're finished with the strips, rinse out the pan and heat up the remaining 1/4 cup of oil over medium heat.

Saute the mushrooms for about 3 minutes or until tender (ooooh they smell so good). Add the leek and saute for another 2 minutes. Then add the garlic.


The aroma level just jump up several notches! Seriously!

Saute for a minute before pouring in the egg. Stir constantly in a circular motion until the eggs begin to solidify then add those lovely crispy tortilla strips.


Continue cooking, stirring frequently, until the eggs are cooked through.

Remove from heat, top with the amazing, tangy Manchego cheese and serve. If you'd like, chop up some cilantro, avocado, maybe a little tomato and sprinkle on top as well

Holy moly....good stuff I tell ya! I can't wait to try something else from this book.

Stay tuned for the next feature....coming your way in the very near future.

There are about 15 of us playing around in The New Southwest Cookbook so by all means, check them all out. You can find us all listed here: http://www.girlichef.com/2013/10/TheNewSouthwest-CookbookSpotlight.html


This post is part of The New Southwest Cookbook Spotlightsponsored by Hippocrene and hosted at girlichef.


Sunday, September 15, 2013

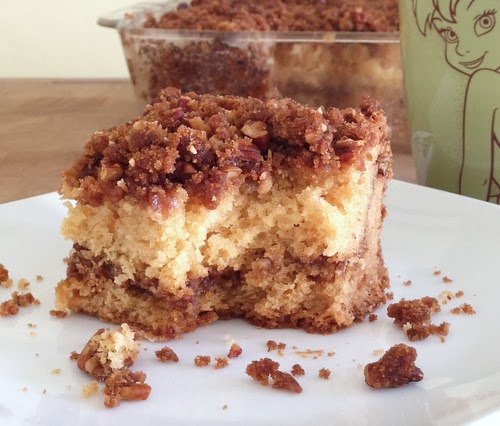
Mt.Gleason Junior High Home Ec. Coffee Cake


I went to school in a little town on the outer fringes of the Los Angeles County. Tucked into the foothills is a (what was called back then) junior high school named Mt. Gleason. I spent 7th, 8th and 9th grades there. Elementary school ended at 6th grade in those days. High school was a 3 year program and started at 10th grade, not 9th like it does now. In fact, if you were in high school for 4 years, it was because you screwed up and you'd get teased for being in the "four year program".

Anyways, back to jr. high. I loved the selection of electives....art, choir, play productions, stage crew, typing, drafting, etc etc. As in introduction to these electives, us 7th graders got a "sample" version of our chosen 4 classes throughout the year. I spent several weeks in each...Cooking, Sewing, Agriculture and Play Productions (or was it drafting? Maybe play productions came later). What fun! These were the classes I looked forward to each day. They made history, English, math, science, and geography bearable (although marine biology was pretty cool! especially when we went on a whale watching field trip).

But I'm here to talk about the cooking class in the home economics building (imagine that...a "middle school" with a whole building just for home economics). I can still picture the class room with the various cooking stations. And yes, there were boys in the class. Lord, I would not have wanted to be that teacher! Can you imagine a classroom full of 7th grade boys and girls....in the kitchen, with knives and FLAMES!! Amazingly enough, my class didn't experience any catastrophes. No fires, no amputated appendages. No food poisoning.

What we did experience that I can remember are Silver Dollar Pancakes and Pumpkin Bread. This is where I learned the proper way of measuring ingredients. I learned that brown sugar is packed. Flours are sifted. Liquids are measured on a flat surface...not in your hand, with the measuring cup held at eye level. This is where I learned that eggs are cracked into a separate bowl, individually, before adding to the ingredients in case it's bad. I truly believe that cooking should be a requirement for all students. Male and female. It's a basic life tool. Without this skill, if they don't learn it at home, they will initially rely on fast food and microwavable dishes until they decide to learn on their own....IF they decide to ever learn on their own. It breaks my heart to see families who eat out every night. Which means...those kids are growing up on fast food. (Don't get me started!!)

This recipe for coffee cake is one I don't remember actually making in class. Not that it didn't happen....it's just that my memory, for some reason did not retain the coffee cake. Which is weird. Everyone else that I went to school (with whom I'm currently still in contact) remembers making coffee cake. Someone, somewhere, shared the recipe that they still had (and I'd think that in itself was weird, except I still have the pumpkin bread recipe assignment, on the gold paper with the purplish ink...awww...memories of the ditto paper).

Its a wonderful recipe. Not only because of the history....but it truly is a delicious coffee cake. I made mine in a square dish. I had to bake it longer than if it were made in a tube pan (as instructed...I hope the teacher doesn't dock my grade) because the center took longer to cook. Even though I extended the cooking time...it was still (here comes one of the worst words used in the cooking world.....) moist. It's not stingy with the streusel topping either. Aaaaand....it's easy enough for the kids to make. I wonder...how many kids signed up for the cooking class...just to make this coffee cake.


Mt. Gleason Home Ec. Coffee Cake
Printable Version

Topping
1/4 cup all purpose flour
3/4 cup brown sugar, packed
1/4 tsp salt
1 cup chopped walnuts (I used pecans)
1/4 cup butter, cut into small pieces

Cake
1 1/2 cups cake flour
1/2 cup all purpose flour
1 tsp. baking soda
1 tsp. baking powder
1 cup granulated sugar
1/2 cup butter
1 large egg
1 tsp vanilla extract
1 cup sour cream

Preheat the oven to 350' F, grease and flour a 10" tube pan.

For the topping; mix together the flour, brown sugar, salt and walnuts. Add in the butter and with your hands, rub into the ingredients until crumbly. Don't over do it...you don't want a paste. Set aside.

For the cake: in a medium bowl, mix together the flours, baking soda and baking powder.

In a mixing bowl, cream together the butter and and sugar until fluffy. Add in the egg and vanilla and mix well. With the mixer on low, add in half of the dry ingredients and mix just until blended. Add in the sour cream, mix until just blended then add in the remaining dry ingredients and once again, mix until just blended, scraping down the sides as needed.

Spread half of the batter into the pan. Sprinkle half of the topping on the batter. Carefully spread the rest of the batter over the topping and then top it all off with the remaining topping.

Bake for 40 - 45 minutes or until a toothpick inserted in the middle comes out clean.

(note: the lack of salt in the cake ingredients is not a mistake)

Correction! Apparently I was wrong about where this recipe came from (no wonder I don't remember making it.) It's not from the home ec. class....it's from the cafeteria! The rest of the story stands true :)

Saturday, March 16, 2013

Pistachio Muffins


I love pistachios. Actually, I love most nuts (this is not a reflection of my personality). Out of all the nuts out there, I wonder why the pistachio has it's own muffin? I mean...you never hear about peanut muffins, or almond muffins...or even cashew muffins. hmmm...interesting. (sorry, I don't have an answer for this. I can't even find anything about the origin of pistachio muffins. And yes, I did Google it).

It wasn't until very recently that I even tasted a pistachio muffin. I mean...within the past few months. You know when you hear about or see a certain food and you have a mental idea of what it's all about? And for some reason it just doesn't mesh with your mental taste buds? That's how it was for me. I thought it was odd that the muffin is green. Mentally, I assumed there were artificial flavorings involved. Some things, I just can't do artificially. Nut extracts are among them. Thank God that's not the case here. Once I tasted them...and discovered that the "green" is for looks only (induced by food dye), and not necessary, and the only nut flavor is from the actual nut itself...and some spices are added in there for a very nicely orchestrated pallet experience...well, my confounded predetermined opinion of pistachio muffins changed. 

I did a lot of searching to find a recipe that matches my culinary style/taste. I found a lot of them that start off with a cake mix. Then there were tons of them that included pistachio pudding mix (THERE it is! The artificial flavoring in full motion right there! Ya, it's a good thing those recipes were not my first experience). Ok, if that's not an issue for you...and you desire a stronger, bolder pistachio flavor...then maybe one of those recipes would be better for you. Anyway, the recipe I found, that inspired me was at ScarlettaBakes. I made a few changes. Going green was one of them. I almost didn't add the dye but since St. Patricks Day is tomorrow....well, I couldn't resist. If you don't want them green...leave the dye out. You might even "feel healthier" eating them in their natural state.

These muffins are nice and moist (is there another word I can use to get that point across?). I love the combination of pistachio, cinnamon and nutmeg. I used roasted pistachios. Raw would be perfectly fine too. Actually, I would've preferred raw but I didn't have any on hand. I think if you were to use the nut in the raw...you'd end up with more of the oils and a more pure pistachio flavor.


One of the things I like about this recipe is that you take some of the nuts and puree them into a paste...well...a nut butter actually, leaving the rest of the nuts to be roughly chopped. I believe this method infuses more of the natural flavor in the muffin rather then having to rely on....say.....pudding mix?  

Before I get into the whole recipe spiel, let me share what I did for the muffin cup. I just couldn't put these muffins in a little frou-frou paper cups. Besides...the firm crust, contrasting with the moist insides is one of the muffin qualities that appeals to me. And those store bought paper liners tend to peal off some of it. 

What I did was cut some parchment paper into 5 1/2" squares and then pressed them into the muffin tin with the bottom of a glass


Just a little heads up here....the paper doesn't stay down very well, so make them as you need them...one at a time. 


The weight of the dough will force the paper to the bottom of the cup then you can continue on to the next. 

Yes, it's a tiny bit time consuming, but the results are cool. And...if you find that you don't have any store bought liners on hand....bazinga! Now you can just make your own. And don't be surprised that the round shape is not perfect. You will end up with some grooves and indents and bulges. But hey, that just adds to its rustic appeal. (funny how imperfections are made acceptable..and oftentimes desirable just by calling them rustic. OMG...I AM RUSTIC!! HA! Oh wait...never mind. That just makes me sound old. Really, really old).

Somebody stop me now. 


Pistachio Muffins
Makes 24 standard sized muffins

2 cups white sugar
1 cup butter, room temperature
2 large eggs
3 cups all-purpose flour
1 tsp baking soda
2 tsp baking powder
1/2 tsp salt
1 tsp cinnamon
1/4 tsp nutmeg
1 cup buttermilk
3/4 cup pistachios, roughly chopped (more if you want to sprinkle some on top of the muffins)
3/4 cup pistachios, pureed (instructions below)
1 tsp vanilla extract
Green food coloring (optional)

Preheat your oven to 375' F
Line 24 standard sized muffin cups

In a food processor, process 3/4 cup of pistachios in 30 second increments until pureed, scraping down the sides as needed. This should only take 3 or 4 increments.

In a large bowl, cream together the butter and sugar. While the mixer is still running, add the eggs one at a time then add in the vanilla extract and green food coloring, if desired. I used a few squirts of the gel kind, eyeballing it until I liked the shade. Beat until just combined. Set aside.

Sift together the flour, baking soda, baking powder, salt, cinnamon and nutmeg. 


With the mixer on low, add the sifted ingredients to the creamed butter, alternating with the buttermilk. Beat until just incorporated. Beat in the pureed pistachio nuts. Fold in the chopped nuts.


Fill each muffin cup with the batter. I used an ice cream scoop for uniformity. If you have any left over pistachios, give them a rough chop and sprinkle them over the muffins.


Bake for 20 - 23 minutes or until a toothpick inserted in the middle comes out clean. 


Allow to cool slightly before enjoying

Happy St. Patrick's Day!