Yum Peaceful Cooking: 2010

Friday, December 31, 2010

Pink Champagne Cupcakes and a few Celebrations


Happy New Year to you all!

Happy Birthday to me! (happy birthday to Sir Sportsalot in 2 days)

Happy 2nd Blogaversary! And this is my 300th post.

I woke up this morning with an email from Betty Crocker highlighting this recipe. With all the celebrations going on, it was a must that I make these!! Besides, I love pink. Look at that pretty soft pink color.....perfect for celebrating all sorts of things, don't you think?


When I checked my snail mail this afternoon....I had a Betty Crocker Calendar waiting for me...and the cover of the calendar has these cupcakes on them. It was another sign that these beauties were meant for me! And the recipe called for alcohol. How could I not?!

I'm going to share the link with you that has the recipe....and then tell you how I adjusted the icing because in the reviews, there were a few complaints about it. You know...it really helps to read the reviews of a recipe. Allows you to anticipate a possible issue and plan ahead to made adjustments. :)

Recipe link:

For the icing, I increased the butter to 1 cup and I decreased the powdered sugar to 3 cups. Worked wonderfully. 

I just piped it on in a messy mass of "ribbons"....and dressed them in pearls.


Thank you all for sharing and caring and being here and there! May your year be blessed with health, happiness, good food and great friends and family!

Cheers!!!!

Sunday, December 26, 2010

Linzer Sandwich Cookies


Ya, I know...it's after the fact. A day late, a dollar short. Too little, too late. But in my book, I like to think of it as better late than never. Because if I never shared this recipe with you, it would be a shame. Besides....they don't HAVE to have Christmas Trees in the center. Make them for New Years and cut out a star in the center. Or Valentines Day and cut out a heart. You get the picture.

I don't often watch Martha Stewart. However, when I saw her making these cookies...it really caught my attention. I went on the hunt for the recipe and found it here --->Linzer Sandwich Cookies<--- then went on another hunt for cookie cutters. Ooooh, sure...I have a gallon sized baggy full of cookie cutters but not a single one of them were round, with the cute little scalloped edges. I had such a hard time finding what I wanted. There's not a single kitchen specialty store in my town. Bed, Bath and Beyond had scallop edged cutters but they didn't have a Christmas Tree or any other Christmas shape that would fit in the center. Macy's didn't, The Great Indoors didn't either. And of course none of them had the specialized Linzer Cookie Cutters. After a weekend of failing, my daughter found a little cookie cutter kit at Michaels Craft store that had very small cutters and I ended up getting a 2 1/2" round fluted cookie cutter at Cost Plus World Market (I was hoping they'd have the special Linzer cookie cutters, but they didn't). All this just for cookie cutters. I felt like a dog with a bone...I wasn't letting go until I got what I wanted.

And it was so worth it! Although....the whole nut part of this recipe 'bout drove me nuts. I think next time, I'll use a nut that's already roasted and skinless.

Linzer Sandwich Cookies
(makes about 16 cookies)
Printable Version

1 cup unblanched hazelnuts
1 cup unsalted butter, room temp
1/2 cup sugar
1 lg egg
1 tsp vanilla extract
2 cups plus 2 tablespoons all purpose flour (plus more for the work surface)
1 tsp baking powder
1 tsp ground cinnamon
1/4 tsp ground nutmeg
1/4 tsp salt
2/3 cup of jam (I used my Pomegranate Jelly)
Powder sugar for dusting

Preheat the oven to 375' F.

Toast your hazelnuts on a cookie sheet for about 10 minutes. Immediately transfer the nuts to a clean towel and vigorously rub them in the towel to remove the skins.

It kinda worked. I got a workout. The nuts were not completely skinless or even halfway skinless. There has got to be a better way.

Anyways....set the semi-skinless nuts aside and allow to cool completely. Once cool, place in a food processor and grind them up until they are....well..... finely ground. Set aside.

In a large bowl, beat the butter and sugar on medium speed for about 2 minutes until light and fluffy. Add the egg and beat for another 3 minutes, until smooth. Beat in the vanilla.

In a medium sized bowl, whisk together the hazelnuts, flour, baking powder, cinnamon, nutmeg and salt. Add to the butter mixture (I added a little at a time), beat on low to combine.

Divide the dough in half and flatten into disks. Wrap them with plastic wrap and place in the refrigerator for at least an hour or overnight.

(I made a bunch of different kinds of dough over the weekend and put them all in the fridge and then was able to bake away during the week as time permitted)

When you're ready to bake:

Preheat the oven to 350' Prepare 2 cookie sheets with parchment paper. Get out a 2 1/2" round cookie cutter and a 3/4" theme cookie cutter.

On a lightly floured surface, roll out the dough to about 1/4". 

Well, if your dough is anything like mine, it might be a bit on the crumbly side and not very rollable.


What I did at this point was to form it into a ball first...and get that dough meshed together. Flattened it.... then it was very agreeable to being rolled out to 1/4" and then cut with the 2 1/2" round cookie cutter


Carefully transfer the cookies to one of the prepared cookie sheets. Using the decorative cookie cutter, cut out the centers of half of the rounds


Repeat with the rest of the dough and the scraps.

Bake for 12-15 minutes, rotating the sheets halfway through, until the edges are golden brown. Remove from the oven and place on wire racks to cool completely.

Once they're completely cooled off, you can dust the decorative tops with powdered sugar.


Spread a little jam on the bottoms (about a tablespoon)


Put the sugar dusted, decorative tops on and there you have the prettiest little tasty cookies ever.


These little gems were crumbly without falling apart, and buttery. You can use any kind of rollable cookie dough you prefer....along with your favorite jam, and of course your choice of decorative cutouts. Let your imagination go and enjoy.

I know it's a little late...but Merry Christmas!!

Tuesday, December 14, 2010

Chocolate Chip & Cookie Cheesecake and a Tate Bake Shop Winner!


This is a very busy time of year in my house. Not only do we Thanksgiving, Christmas and New Years, we have to fit in 3 birthdays. And this was the first on the time line. My baby daughter turned 19. Yes, no matter her age, she will always be my baby girl.

I bought my first ever (I think) Taste of Home magazine last week. I couldn't resist. The title is Cheesecakes and More! And it bragged 160 rich and creamy favorites. I didn't stand a chance. It was destined to be mine. Jacquie has a sweet tooth that was possibly positively inherited by me and so she went "birthday cake shopping" in my new magazine. Then informed me that she wanted a combo. I guess she couldn't make up her mind between the Frosted Chocolate Chip Cheesecake and the Chocolate Chip Cookie Cheesecake.

How could I not grant the wishes of the birthday girl?

(btw...yes, I will announce the Tate's Bake Shop Giveaway winner in a minute. Hold your horses. The birthday girl gets first billing)

So, without further ado....let me introduce you to a fabulous, rich but not too sweet, delicious Chocolate Chip & Cookie Cheesecake.....


(Ingredient picture only shows what's in the filling. Does not include crust and topping ingredients)

Chocolate Chip & Cookie Cheesecake
Printable Version

Preheat oven to 325' F

Crust
1 cup chocolate wafer crumbs (or chocolate graham cracker crumbs like I used)
1 cup chocolate chip cookie crumbs
6 tablespoons melted butter

Filling
3- 8oz packages of cream cheese, room temperature
1 cup sugar
1 teaspoon vanilla
3 eggs, room temperature, lightly beaten
6 oz mini semi-sweet chocolate chips
4 oz milk chocolate chips (or milk chocolate candy bar, chopped)

Topping
1 cup sour cream
2 tablespoons sugar
1 teaspoon vanilla
2 (or more) tablespoons chocolate chip cookie crumbs
6 chocolate chip cookies cut in half for garnish

In a small bowl, combine wafer and cookie crumbs with melted butter. Press into the bottom and up the sides 1 1/2" of a greased 9" springform pan. Chill in the fridge for 15 minutes.

Meanwhile, in a large bowl, beat the cream cheese, sugar and vanilla until nice and smooth. Add the eggs and beat on low speed until combined. Do not over beat. Stir in the semi-sweet and milk chocolate chips.


Pour into prepared crust


Place the cheesecake on a baking sheet (this is a must unless you want a mess), and bake for 55 - 60 minutes or until the center is almost set.

I recommend placing a roasting pan on another rack in the oven and pour a cup of water inside to create humidity which will help in preventing your cheesecake from cracking. You should also rotate the cake halfway through baking and add more water to the roasting pan.


Set aside while you mix together the topping: In a small bowl combine the sour cream, sugar and vanilla. Spread over the top of the baked cheesecake. Return the cheesecake to the oven and bake for about 8 minutes.

Cool on a wire rack.


Chill overnight. Just before serving, run a knife around the edge of the pan to loosen. Garnish with cookie crumbs and cookie halves if desired.


And serve to your favorite chocolate lover and watch them fall in love with this fabulous, fun, rich cheesecake.

Btw....can anyone tell me how to remove the bottom of the springform pan without messing up the cake? Or are you suppose to leave it there until it's all gone?

And noooooow.....the moment you've all been waiting for. The winner of the Tate's Bake Shop Cookbook and 3 boxes of delicious homemade cookies....is....

Rachel (Meeyeehere) from The Dalai Mama. Congrats!!! Send me an email and we're work out the details :)
One more thing...this is my entry this week in the Hearth 'n Soul Blog Hop

hearthandsoulgirlichef

Sunday, December 12, 2010

Teriyaki Chicken


Tried and True. An old favorite. Never fails. These are some of the descriptions that make recipes worth trying and to continue cooking from then on.

When Sir Sportsalot and I were first married, I bought a little Sunset Cookbook called Easy Basics for Good Cooking. When I saw Teriyaki Chicken...I thought 'wow! I can make something international!' And so I did. And brought some leftovers to work the following day, feeling extremely proud of myself for making an oriental dish from scratch.

That was when I learned a few things:

1. I was (and still might be) very naive.
2. Oriental food in the U.S. is far from "authentic". 
3. I can cook something new from a cookbook and it's good!
4. I needed new cookbooks with authentic oriental dishes and a wok.

Anyways...even after all these years, this little cookbook still comes in handy now and then. Although I now know that just because something is cooked and / or marinated in soy sauce or teriyaki sauce, and just because all the commercials and signs say "oriental food", doesn't mean it is.  I've been lied to all these years by advertisers. But it's ok. Because no matter what it really is...it still tastes good.

I just wish I'd remember to plan ahead more often. This is a fantastic recipe when prepared the night before.

Teriyaki Chicken
Printable Version

4 chicken legs
4 chicken thighs
1/3 cup soy sauce
2 1/2 tablespoons honey (oops, I think sometimes it becomes 3)
1 teaspoon fresh ginger, grated or 1/2 teaspoon ground ginger
1/4 cup vegetable oil
1 clove garlic, minced
2 green onions, thinly sliced

Tip: just before measuring the honey, coat the spoon with oil. Honey will slip right out.....no sticky mess

In a small bowl, combine everything except for the chicken. Place the chicken in a zip lock baggy and pour the marinade over the chicken. Refrigerate for at least 4 hours, turning occasionally. If you can do it over night....even better. If you only have an hour....that'll work too. The flavor just wont be as intense.

Preheat the oven to 350' F. Line a cookie sheet or shallow roasting pan with foil and spray with cooking spray. Place chicken skin side up, on foil, discarding the marinade. Bake for 1 hour or until done (meat near the bone is no longer pink, juices run clear......you know the drill).

Serve with some rice and stir fried veggies. See? Way easy. If I could do this when I was in my early 20's....anyone can.


Btw...there's still a couple of hours left (providing you are reading this before 11:59pm, Monday, December 13th) to enter my Tate's Bake Shop Cookbook and Homemade Cookies Giveaway!

Thursday, December 9, 2010

Baked Tortellini


 With Bacon. 

Yep....that's what seriously reeled me in with this little gem of a recipe. The bacon. Oh sure...the idea of making tortellini a different way than usual was appealing....but the bacon is what cinched it. 

Bacon. If it wasn't such a "bad" thing, I could easily scarf down a whole pack of nice crispy, greasy bacon. Not at one sitting....but like an all day graze sort of thing. It could so happen without me even realizing it. I mean....each trip through the kitchen (and there are lots of trips through the kitchen) would warrant a sneak-piece of bacon...break off that perfectly crispy piece that's just right, when no ones looking (not even yourself). Next thing you know, you have a paper towel lined plate with bacon crumbs. That you want to lick up. 

Now you understand why when I saw Baked Tortellini with Bacon in my little Everyday Food issue...I just couldn't not make it.


Baked Tortellini with Bacon
Printable Version

4 slices of bacon, sliced into 1/2 length pieces (I think I used more....by accident)
1 small onion, chopped
1 garlic clove, minced
Salt and Pepper to taste
1 tablespoon all purpose flour
2 cups of milk (a little may be needed to get desired consistency
1 lb of cheese tortellini (or your favorite) not cooked
1/2 cup grated Parmesan cheese, divided

Heat your broiler with the rack in the top position.

In a large skillet, cook the bacon down (brown and crisp). Transfer the bacon to a paper towel lined plate to drain (this is the danger zone....wandering fingers are lurking). Toss the onion and garlic into the pan and season with salt and pepper. Saute until the onion is soft. Add the flour and cook, stirring constantly for 30 seconds.

While whisking, slowly add the milk. Add the tortellini


Bring to a boil, stirring occasionally. Reduce heat to low and cook until liquid has thickened, stirring frequently.


Remove from heat....add the bacon and 1/4 cup of Parmesan cheese. Stir to combine.


Now....if you have this going on in a cast iron skillet (like I did), you can leave it in there. If not, you'll want to transfer it to a broiler proof baking dish. Top with the remaining 1/4 cup Parmesan cheese and place in the broiler for about 3 - 5 minutes or until golden brown.


I seriously enjoyed this. Everything about it. The flavors, the sauce, the texture. The cheese...and yeah....that bacon! This recipe is a winner in my book.

Speaking of winner....there's still time to enter my most recent GIVAWAY and win yourself a fabulous cookbook and 3 boxes of cookies from Tate's Bake Shop...AND you can get a discount with the "secret code" should you decide you want to purchase something from Tate's.

For details on the giveaway, go here:

Anadama Bread, A Winner, and a Giveaway....Triple Threat!!


You have until midnight, 12/13/10 to enter. You can enter as many times as you want by sharing on Facebook everyday or singing the twitter tune to all your friends as often as they can stand it

Tuesday, December 7, 2010

Anadama Bread, A Winner, and a Giveaway....Triple Threat!!


Have you ever heard of Anadama Bread? If not, then I feel much better cuz until the other day, I hadn't either.

Have you ever heard of Tate's Bake Shop? I hadn't until very recently. And now I wish there was one around the corner from my house.

The people over at Tate's Bake Shop were wonderfully sweet enough to send me a cookbook and 3 boxes of cookies. And I have thought of little else ever since I received my package of goodies. I was so excited to get it that when I got home from work the other day I did not change into my sweats and a tshirt, go through the mail, and start dinner as soon as I walked in the door. No. I did not take off my shoes,  poor myself a glass of wine and go through my email either. Instead I grabbed a paper cutter (aka, kitchen knife) and tore open that box and oooh'd and aaaaah'd over my gorgeous Tate's Bake Shop Cookbook


and lovingly placed the 3 boxes of cookies in a place of honor (center of my kitchen table) awaiting the moment when I could fully examine the contents and flavors of each box.


Then, and only then did I resume my nightly rituals, with much haste. You see, I had a cookbook to examine and explore and devour. And cookies to savor.

Soo...before I get any further here, let me announce the winner of my last giveaway....the one where I promised some lucky winner commenter a $50.00 Gift Certificate for CSN Stores. I have a question though....I see on other blogs where they've used the "random number selector thingy"....and that is so cool. I've even been to a site that had it and used it and it's wonderful simple and quick and painless. But I can not for the life of me get the picture of that random number selector thingy to download on my desktop where I can then upload it onto my blog and show you all how I got the comment number to announce the winner. It's a "frame" and doesn't download....right click, select, etc...worthless. How do you guys do it? Soooo....I've never been able to "use" it. And when there are lots and lots of comments, I'm not going to write down all the names on pieces of paper for the proverbial hat drawing. So I feel like I should come up with different ways to draw names. I once had Sir Sportsalot pick a number (unfortunately he will give me the same answer each time....being that he only has one favorite number). This time I did a rather random number drawing. At the expense of Facebook. I asked all my friends to pick a number between 1 and 74. I then added all their "chosen" numbers up and divided it by the number of Facebook responses I got....came  up with the "average" number  of 31....and thus I have a winner......

 Michelle from BigBlackDogs.net


Which is personally exciting for me (maybe not as exciting as it is for her since she now gets to spend $50.00 any way she wants from CSN Stores) but she happens to be the fearless leader of the online bread baking group that I've been participating in. It is because of this group, the wonderful leadership and fantastic members that I have enjoyed making bread so much with such joyful success. So...Congrats Michelle...and thank you for all you do!

And now back to what I was saying....

Tates and cookies. Cookies and Tates. I spent that first night, tucked away in my bed with my favorite blanket (yes, I have a favorite blanket. Yes, I know I'm an adult. And yes, I am admitting to this to all who happen to stop by), and read the Foreward, Preface and Acknowledgments of my new, autographed coobook. (How cool is this? My very first ever autographed cookbook!) I was on the hunt. What will I bake first? Cookies? Muffins? Scones?....a pie.....crisp or cobbler? What about a cake! Or even something healthy...whew....then the magic chapter spoke to me....(you see, this cookbook has all of these wonderful choices in it)...and it also has BREAD!!! I know...I bake bread. All. The. Time! But what I bake is no-knead bread. I figured it would be fun to make a kneady bread. You know? Something new and different.

One of the cute things that I enjoyed reading in this cookbook were the little paragraphs where Kathleen King gives a little story behind the recipe. When I came across Anadama Bread, it wasn't the name that got me. Although I have to admit it did catch my attention. But it was the story behind it that touched me. It became special to me instantly. And I knew that this was the recipe I needed to make. I don't think that I would've chosen it just based on the ingredients or on the fact that it's bread. It's the connection. The memories, the flavors, and aromas. And sometimes how it all links the past with the present.This is the kind of stuff that makes baking and cooking so wonderfully loving...an extension of who we are...and a way of sharing all that with others.

Anadama Bread. There is another story behind this bread that has nothing to do with Tate's Bake Shop or Kathleen King. A legend of sorts....a rather cute one at that. It's easy enough to find online so if you're intrigued...Google it. :)

As for the recipe....


Anadama Bread
Printable Version

2 cups boiling water
1/2 cup cornmeal
2 tablespoons butter
1/2 cup molasses
1 tablespoon salt
1 1/2 tablespoons yeast (or 2 - 1/4 ounce packages)
1/2 cup warm water
7 - 8 cups all purpose flour
1 tablespoon vegetable oil

In a large mixing bowl, combine the boiling water and cornmeal. Add the butter, molasses and salt. Stir until combine and butter has melted. Allow mixture to cool to lukewarm.


I was loving this deep rich color instantly! A promise of great flavors to come.

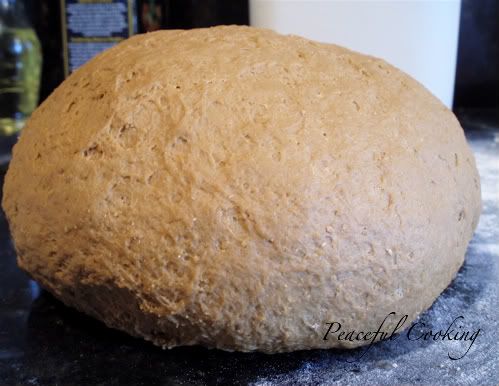
In a small bowl, dissolve the yeast in 1/2 cup warm water. Add to the lukewarm molasses mixture. Add the flour....enough to make it into a stiff dough. Lightly flour your board or counter (or where ever you plan on kneading this dough. Remember? I said it was a kneady dough) and knead the dough until smooth and elastic. That means....that its going to give, not tear when you stretch and work the dough. This will probably take you at least 10 minutes. Form it into a ball


Then place it into a large, greased bowl. Brush the top of the dough with a little oil. Cover loosely with plastic wrap and allow to rise until it has doubled in size


Punch down the dough. Turn it out onto a lightly floured surface. Divide the dough into 2 and shape into an oblong, then place each into it's own 9x5x3 greased loaf pan. Brush the tops with a little oil, cover again and allow to rise...until doubled in size.

One of the ways I check to make sure the dough is done rising, is I take 2 fingers and stick them into the dough about 1/2 inch. If the dough springs back when I remove my fingers, then it still needs some rising time. If the indent remains, then it's ready to bake


Now...the indent should bounce back after a minute or so...or, at least it usually does. But this time it didn't. I think I left them to rise a bit too long. I had gone to the grocery store and it took longer than I intended. Then I realized I hadn't preheated my oven...so the loaves had to wait yet some more.

Preheat the oven to 375' F (probably a good thing to do shortly after the second rise begins). Bake for about 40 - 50 minutes or until the center is about 205' (when inserted with an instant read thermometer).

Remove from the pans immediately and allow to cool on a wire rack.

And yes...I did allow my loaves to rise too long. Proof is in the crust....see? My finger indents are STILL there.


But no worries....because it's all about the flavor...and the crumb and ooooh eeeem geeee.


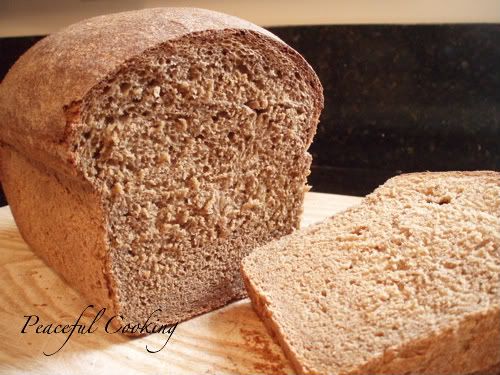
This is some damn good bread! It's not too sweet...the flavor isn't strong, it's just....nice. It's soft, and yummy. I will be making this again. I might even try a whole wheat version of it, with a little vital wheat gluten. I think it just might be the loaf that comes close to Sir Sportsalots favorite....Roman Meal.

After my successful bread experience, I rewarded myself with some Tate's cookies! And what a reward. I know some people like ooey gooey soft cookies. Some like crisp firm cookies. And I say, they all have their place. I enjoy the ooey gooey when they're hot out of the oven. But if I'm not getting them fresh out of the oven, I enjoy the crunch. The satisfaction of a good crisp cookie (not hard)....the kind that soak up that dip in the cold glass of milk. If you're on the same page as me here....you are sure to love Tate's Bake Shop cookies! Earlier I mentioned that I received 3 boxes of cookies: Chocolate Chip, Oatmeal Raisin, and Macadamia Nut. And I enjoyed all three. My favorite though is a toss up between the chocolate chip and the oatmeal raisin. You can smell them before they even get to your mouth. If the cookies didn't arrive in a box, I would've thought they were homemade. (By the way....the recipe for the Chocolate Chip Cookie is in the cookbook.)

How would you like to win your very own Tate's Bake Shop Cookbook AND your very own 3 boxes of cookies?! The people over at Tate's are going to send all that to one lucky winner!!

Rules:
Offer only good in the U.S.
Giveaway ends Monday, December 13th, 2010 at Midnight, PST. Winner will be announced Tuesday or Wednesday. 

To enter - leave a new comment for each extra entry:
Leave a comment and please include your email address if your comment doesn't already link to it.
Follow me
Share it on facebook (you can do this as often as you'd like, just leave a comment each time)
Become a fan of the Peaceful Cooking Fan Page on Facebook
Become a fan of the Tate's Bake Shop Fan Page on Facebook
Blog it, with a link to this page
Tweet it (you can do this as often as you'd like, just leave a comment each time)
Stumble it

FOR EVERYONE:  For all you foodies out there, if you purchase anything from Tate's Bake Shop, NOW through 12/31/2010, you will save 15% off by entering the discount code "cookie" on your order. How cool is that?!

I want to thank Kathleen King and the people at Tate's Bake Shop for giving me the opportunity to review their cookbook and experience their incredible cookies!

This is my entry for the Hearth and Soul Blog Hop this week!

hearthandsoulgirlichef

Saturday, December 4, 2010

Jalapeno Popper Dip for a couple of dips


I love dips and appetizers. I have been known to eat nothing else all day long....to just graze on dips and finger foods all day and be perfectly content. About a year or so ago....Tango (aka Laurie) shared this recipe with me. It's good, it's easy and during the holidays it's not fattening (but watch out for the remainder of the year....cuz it'll attack your hips with a vengeance....it's only safe during the holidays...I swear. No lie.). Anyways...I've been craving this dip since the day after Thanksgiving (I think I saw the recipe in my folder and realized that I had all the ingredients and instantly went into crave mode). I wanted something I could munch on all day without reheating or assembling....just reach, dip, insert in mouth and go Mmmmmmmmm. But I didn't have any crackers. I have to have crackers. Actually Jalapeno Popper Dip would probably be even better with those Frito Scoopables....but I like crackers.

Crackers were bought Sunday....and by midweek when no one was home for dinner, this rich, slightly spicy, filling, ooey gooey dip made it on my dinner plate. Solo. No sides. No main. As is...alone. And it was a wonderfully sinful dinner. I mentioned this on my Facebook page and next thing I knew, there was my sister's friend in Alabama asking (kinda reminded me of a 3 yr old....i think she was whining most audibly on Facebook) for the recipe, and then my cousin from up north begging for it.....which reminded me of the old days when we'd beg our parents to let us do something, with promises of being good beyond our control.

I stood firm and told them both they'd have to wait. (To my delight....I was accused of being Evil.)

Ok, so I mentioned that Tango shared this recipe. She's one of my BakeSpace.com buds. She has a blog titled Tangos Treasures (btw....she's having a giveaway if y'all are interested....ends 12/8/10). Tango's blog is a fun mixture of recipes, experiences and some great quilting!! This lady is truly talented. You can also see a ton of her recipes in BakeSpace Kitchen.

Speaking of Giveaways.....there's still some time....not a whole lot, but some...to enter in my CSNStores.com $50 Gift Certificate Giveaway. You have until midnight pst 12/5/10 to enter for your chance to win :-)

-------->CLICK HERE TO ENTER<--------

Now.....As promised to a couple of dips, here is the recipe for the dip. I did alter it ever so slightly from the original recipe that was shared with me...but hey....isn't that what recipes are for? Make it your own!!

Jalapeno Popper Dip
Printable Version

2 - 8oz packages of cream cheese - room temperature
1 teaspoon garlic powder
1/2 cup mayonnaise
1/2 cup sour cream
1 cup shredded cheeses (suggestions: cheddar, jack, Mexican blend. I used what I had...cheddar and mozzarella)
1/2 cup parmesan cheese
1 - 4oz can chopped green chilies
1 - 4oz can chopped jalapenos (if you like it hot...add more)

Topping (mmmm.....topping. Don't you just love toppings?)
1 cup panko bread crumbs
1/2 cup parmesan cheese
1/4 cup (half stick) butter, melted


(btw...I very rarely probably never measure cheese)

You can either do this in a food processor....or the old fashioned way (hand mixer and spoon).

Preheat your oven to 375'F. Lightly grease a 2 quart casserole dish.

***If you're using a food processor, just dump it all in (except for the topping ingredients) and process until smooth.

***If you're using a hand mixer and spoon (like I did cuz I was too lazy to wash the parts for my food processor)....in a large bowl, cream together the cream cheese, mayonnaise and sour cream with your mixer, until smooth. Stir in the remaining ingredients (except for the topping ingredients) until combined well.

Spread the dip into your prepared casserole dish.


In a small bowl, combine the panko and cheese. Add the butter and mix well....making sure everything is "wet". Sprinkle over the dip.


Bake in your preheated 375' oven for 25 minutes until a little golden brown on top.


Allow to cool a little before serving. Best when served warm or at room temperature. Get's a little "stiff" when cold....so you'll want to reheat it if you have leftovers. I was talking to my sister about this recipe and she had the great idea of adding.....

Wait for it....

Waaaaaait for it.....

BACON!!!!

Yep....next time I make this, I'm adding more jalapenos and some bacon. Can you say....HEAVEN!!!

Wednesday, December 1, 2010

Spuds Sweet Delight and a CSN Stores Giveaway


Spuds.....Sweet....Delight. Yep...thats' what it says and that's what it is. Basically, we're talking about a sweet potato in cupcake version with a sweet maple and brown sugar icing. I think the icing needs some work. Not in flavor...but texture. I have a lot to learn in this area. This was one of the cupcakes I baked for Cupcake Camp L.A. and the thing I really stressed out about the most was the decorating. In short...the icing. I mean...there's so much to consider.....the texure...too thin? too thick? and the whole execution. Omg!! I am sooooo not an icing / frosting person.

So, to make up for my lacking in icing making / applying skills, I'm going to give away a $50.00 USD gift certificate for CSN Stores. Sound fair?

Ok...picture a chilly winter morning. You're sitting in your living room with a cup of coffee and a Spuds Sweet Delight Cupcake...when you let out a big sigh as you once again notice that your coffee table is older than your first child and is in desperate need of retirement. Then you remember that CSN Stores has just about everything....including coffee tables! And not to mention great prices. So head on over and look at some coffee tables, do a little day dreaming and wishful thinking cuz we all know that times are tough for us all. But hey....it never hurts to dream. And who knows....you just might (and probably will) find something within your budget. Which means this little story has a very happy ending.

So take a quick minute to check out those coffee tables. Even if you don't need one right now. Who knows...maybe you'll need one in the near future.

(sshhhh....we'll get to the recipe in a second).

Sooo....how do you win this awesome $50.00 USD gift certificate? Please take 2 seconds to read carefully:

Rules:
This contest is for US  and Canadian residents only
Gift Certificate does not cover applicable shipping and handling charges (don't worry....CSN Stores has sooooo many items that are "free shipping")
Gift Certificate will be good for any and all CSN Stores
Leave a comment for each hoop you've jumped through

Ways to enter: (how many hoops do you want to jump through?)
1. Leave a comment (if you do not want to be entered in the giveaway...that's fine, leave a comment and say it's not for the giveaway. easy peasy)
2. Comment including what your favorite coffee table is
3. Follow me
4. Like my Peaceful Cooking Facebook Page
5. Tweet about my giveaway
6. 2  entries if you Blog about my giveaway

Don't forget.....I need a way to contact you!!! Especially if you're anonymous. If your blogger identity does not link to your email, please leave me your email address or email it to me: peacefulcooking at gmail dot com

Did I forget anything?

Oh yes....This giveaway will end on Sunday, December 5th, 2010 at 11:50 p.m. pacific standard time. I will announce the winner late Monday night or Tuesday.

Good enough? I mean... come on guys.....it's the holiday season. Think GIFTS!!! $50.00 to spend any way you wish. On a loved one or yourself. Not bad....eh? You gotta love free.

Ok...now for the recipe.

Spuds Sweet Delight Cupcakes (inspired by EvilShenanigans.com - Sweet Potato Cupcakes
Printable Version

Makes 24 cupcakes

2 1/2 cups flour
1 teaspoon cinnamon
1/2 teaspoon allspice
2 teaspoons baking powder
1/2 teaspoon baking soda
1/2 teaspoon salt
1 1/2 cups sugar
3/4 cup butter, room temp
1 14oz can sweet potatoes
2/3 cup buttermilk
2 eggs
4 teaspoons vanilla (1 TB plus 1 tsp)

Maple and Brown Sugar Icing (inspired by Joylicious.net)
 1 lb powdered sugar
1 cup brown sugar
1 cup butter, room temp
1 cup maple syrup
2 teaspoons vanilla

Preheat the oven to 350' F. Line 24 muffin tins with paper liners. 

Batter: Beat together the butter and sugar until light and smooth. Add eggs, sweet potato, buttermilk and vanilla. Beat until combined well. Set aside.

In a large bowl, sift the dry ingredients: flour, baking powder and soda, cinnamon and allspice. Gradually add to sweet potato mixture....stirring until combined and no lumps remain. Do not over mix.

Divide between the muffin tins (filling about 3/4 full, or a tad more). Bake for 18 - 20 minutes or until a toothpick entered in the center of a cupcake comes out clean. Cool for a couple of minutes. Remove from muffin tin and allow to cool completely before attempting to ice them.


Now....for the icing. I followed the initial instructions. If I were to do it again, I 'd try it differently. The instructions said to:

On low speed, stream the sugars, butter and salt. Stream in maple syrup. Add vanilla. Increase the speed to med and beat until light and fluffy.

My icing came out a bit grainy from the brown sugar....and it was very "wet". Which tells me it needed more powdered sugar? I think.

Anyways, I think next time I'll work the butter first: beat until creamy, approx. 2 minutes on med-high speed. Then reduce the speed to med. and add the powdered sugar 1/2 cup at a time. Add brown sugar and beat until fluffy. Stream in the maple syrup and vanilla...continuing to beat until light and fluffy again.

Maybe....just maybe, I'd end up with an icing with a little more body and the brown sugar will have smoothed out a bit.


 Either way...they had great flavor and they did have a bit of personality to them...kinda Shabby Chic. A little droopy but in pearls.

Monday, November 29, 2010

HBin5 Tabbouleh Bread, Kibbeh Burgers and a Winner!


Let's get the exciting news out first! I mean...it's not like it's a good news or bad news kind of thing....it's all good, but I wanna mix things up (I usually announce the winner at the end of a post)...Let me tell ya who won the $30 Willow House Giveaway....

Joanna from Go Ahead and Snicker!!!

Let's give Joanna a big round of applause! Woooo hooooo!!! (whistles, cheers, hurrays)

Send me an email or contact Michele from Willow House directly :) Congrats girlfriend!!!

I also want to thank Michele for allowing me to host such a fun giveaway!

And now for the other half...the food half of this post. I've been a little slow in the bread area of my cooking / baking. I haven't had the time or....energy to really dig into the past couple of assignments. Not that Healthy Bread in 5 Minutes a Day takes much time or energy but between the Pom Wonderful Dinner Party, Cupcake Camp LA and Thanksgiving, all within 3 weeks of each other....I had my hands full. Not that I didn't enjoy every minute of everything I was doing and created some great memories and awesome experiences. But, it just didn't leave much room for venturing into new bread. I mean, I did make some bread for the dinner party and in between...just nothing from the new assignments.

Btw...just in case you're new on the block....HBin5 is an online bread baking braid (group) that I participate in, hosted by Michelle over at Big Black Dogs. If you'd like to check it out and see what it's all about, (and please do, I highly recommend it. We still have a year to go in our baking adventures and you're all invited to join in, anytime) click ------>HERE<-----------


Oh boy...I just realized that this particular bread....Tabbouleh Bread with Parsly, Garlic and Bulgur is from a month ago and I totally missed the assignment from the 15th (not sure if I'll get to that or just begin on the Dec. 1st assignment next)....but either way...better late than never. I have to say, this bread was worth the wait. So glad it was late rather than never. I love the aroma....garlic, onions, and parsley, along with the earthiness of bulgur wheat...YUM! I have to say I was surprised that it didn't brown more. But, hey...with all those flavors, you don't sweat the little things, right?


 This dough made beautiful buns regardless.

I want to take a quick moment to say how useful Facebook can be. You see, this was my first experience with bulgur wheat and I really didn't need that much for the dough (I've got lots left over). I asked my friends on Facebook what I could make with bulgur (besides tabbouleh) and I got a whole slew of wonderful ideas! One of them being to make Kibbeh. Kibbeh? (I asked)....What's Kibbeh? After a shared recipe and a little research, I found that it is a Lebanese dish similar (though not exactly) to meatloaf...only more interesting.  Problem is, I'm not a meatloaf fan (I know, I know...so very unamerican of me). Or a fan of large masses of ground meat in any form. That's when I decided to make the meat recipe into burgers (though I did find out I'm not the first person to think of this). The results were wonderful! Flavorful! Delicious!

I'm not claiming that this recipe is authentic. It seems that Kibbeh recipes vary as much as meatloaf recipes do (with a few common threads)....I did adjust my version a bit to suit my families tastes. (I have to admit that I didn't tell anyone what they were eating until afterward....I hate preconceived taste bud notions). 

Kibbeh Burger
Printable Version

1 lb ground meat (I used 1/2 lb beef and 1/2 lb lamb)
1 cup soaked, drained, bulgur wheat
1/2 cup water
2 cups coarsely chopped onion
1 teaspoon salt
1/2 teaspoon pepper
1/2 teaspoon cumin
1/2 teaspoon allspice
1/4 cup lightly toasted pine nuts
1/4 cup chopped parsley
Cheese of your choice (I used a mediterranean cheese called halloumi)
burger buns

In a food processor, process the onions until finely chopped. Add the meat and 1/2 cup water, salt, pepper, cumin and allspice. Process until smooth. Add the bulgur wheat, parsley and pine nuts....mix briefly. Form into 6 patties and cook as you normally would any other burger.

Meanwhile, I mixed a little mayonnaise with some garlic, green onion and lemon juice to spread on my Tabbouleh Burger Buns, after they were toasted a bit of course


A little cheese, lettuce and tomatoes and you have a filling, tasty, if slightly different, kind of burger.


You see that cheese there? Like I mentioned earlier...it's called halloumi. Its a very mild, almost crumbly, a little dense, kinda soft, not so hard cheese made from a mixture of goats milk and sheeps milk (man....it's all over the cheese spectrum). It's suppose to be great for grilling and frying since it holds up to heat really well. Halloumi can be found in Middle Eastern markets in case you'd like to check it out. I like it...and am thinking it would be great for breading and deep frying instead of mozzarella cheese.

And don't go too far away. I have a couple more giveaways up my sleeve coming your way real soon.

This is my entry into Hearth and Soul Blog Hop this week. I hope you take a moment to hop around and see what everyone's been up to.

hearthandsoulgirlichef