Yum Peaceful Cooking: December 2012

Thursday, December 27, 2012

Granola Bars and a Smoothie


Oatmeal....

What do you think of when you hear that simple, nourishing, comforting food word?

Breakfast? Cookies? Childhood memories?

All of the above and more is what I say. I've been eating instant oatmeal for years. It's great for those busy mornings. It's great for those cold mornings. It's even great for a quick dinner on a hectic night.

I recently received some samples of Better Oats instant oatmeal to play with. And what a treat it has been!


The varieties they sent...I had such a hard time narrowing it down to which one I wanted to try first.

Better Oats


I always thought you had to use old fashioned rolled oats or steel cut oats for granola bars. That's what the recipes that I saw said. But I thought I'd give Better Oats a try. I'm not saying that every brand of instant oatmeal out there would work but I had a feeling that Better Oats would based on the quality of the oats.  The whole grain gave a promise of texture rather than mush. Well heck..lemme just show you a comparison: 


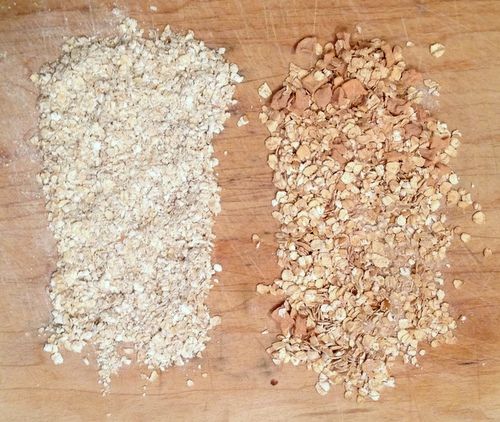
On the right...a well know, well loved brand of instant oatmeal. The the left...Better Oats instant oatmeal. You can see the difference before you even get to taste it. Now you can see why I'd assumed it would work. 

Did I mention how healthy Better Oats is? Flax seed is in there, some of their flavors are organic...and they contain other whole grains...well...just read the writing in red at the bottom to get the whole run down. And...most likely this product is already in your local stores. I saw it at Ralphs here in California over the weekend. SCORE!!

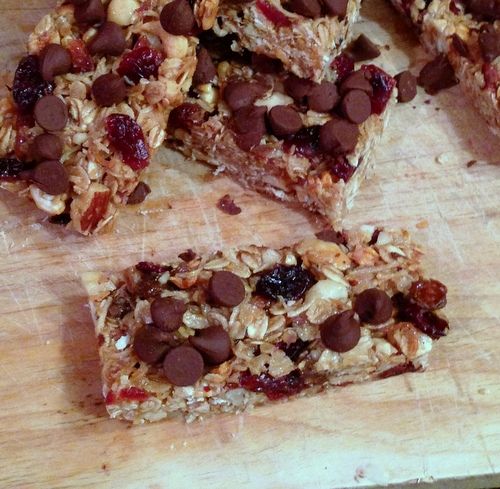
My granola bars were inspired by Ina Garten's Homemade Granola Bar recipe. 

Homemade Instant Oatmeal Granola Bars

3 punches of Better Oats Instant Oatmeal (mix and match which ever flavors you choose, I used 2 pouches of Oatmeal Raisin Cookie and 1 pouch of Apples and Cinnamon)
1/2 cup mixed nuts, chopped
1/2 cup sweetened coconut flakes
1 1/2 TB butter
1/3 cup honey
2 TB brown sugar
1 tsp vanilla
pinch of salt
1/2 cup craisins (or raisins)
1/3 cup chocolate chips

Preheat your oven to 350' F. Line an 8x8 square baking dish with parchment paper. 

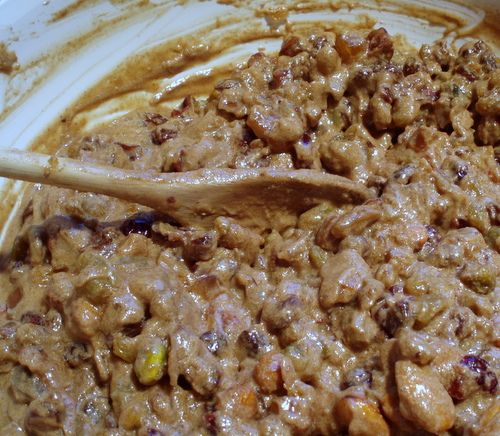
On a baking sheet, combine the oatmeal, nuts and coconut. Bake for about 10 minutes, stirring every few minutes until lightly browned 


Put the toasted goodies in a medium bowl. Reduce the oven temperature to 300'F.

In a small saucepan, combine the butter, honey, brown sugar, and vanilla. Bring to a boil over medium heat, while stirring. Cook and stir for a minute. Pour mixture over the toasted oat mixture. Stir in the craisins and chocolate chips. 

Pour mixture into your prepared 8x8 baking dish and press evenly. Bake for about 25 minutes or until golden brown. 

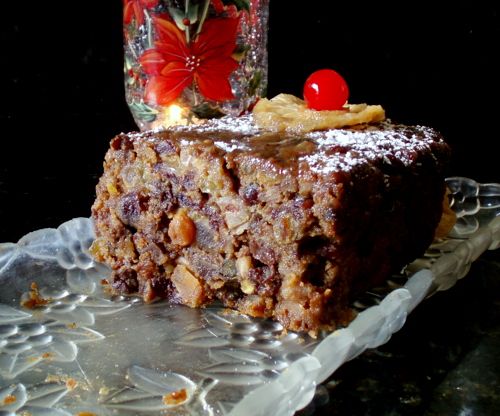
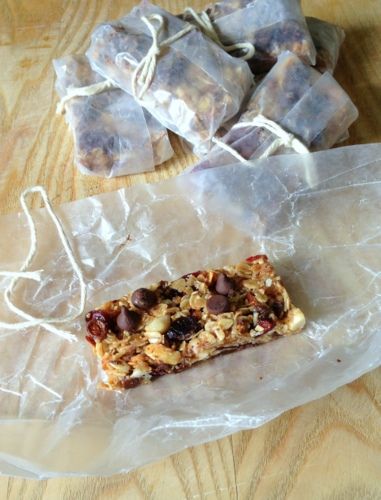
Allow to cool for a few hours...2 or 3, then cut into serving sizes. 


Store at room temperature. I cut mine into 8 rectangles and wrapped them individually in wax paper to store so they wouldn't stick together.


Omg...these are amazingly delicious! A tiny bit chewy and a tiny bit crunchy. Wonderful flavor. Next time, I'm going to double the recipe. My girls loved them. I loved them. Talk about a healthy snack on the go. 

Now....when my sample box arrived in the mail, I had a brief conversation with one of my daughters that went something like this

Me: What should I make with this oatmeal? 
Daughter: Hmm...how about a drink?
Me: A drink?! (my mind instantly went to alcohol)
Daughter: Ya...they put oatmeal in smoothies all the time!
Me: Oooooh...a smoothie? When you said "drink", I was thinking alcohol. Hmm...what if I added alcohol to a smoothie...?
Daughter: Hmmm...(shrug) that might work

Ok...so I took a perfectly good smoothie recipe and totally junked it up. Or...you could say, I took a healthy smoothie recipe and made if for adults only. Maybe this recipe will make you feel better about consuming some alcohol? 

Adult Raspberry Pomegranate Oatmeal Smoothie
Printable Version


1 pouch of BetterOats Pomegranate Organic Raw Pure and Simple Instant Oatmeal
1/2 cup Greek low fat yogurt
1 ripe banana (the riper it is, the more flavor you will have)
1/2 reduced fat milk
1 shot Chambord (raspberry liqueur)
1/2 shot orange liqueur

Combine all ingredients in a blender and blend until smooth. Garnish with pomegranate arils if desired.


This was just plain fun! And absolutely delicious. It's thick and creamy with a slight kick. Not that I'd start my day with this...but I just might end it that way. Who can complain about a quick dinner and cocktail in one?

Of course, if you're not in the mood for that "kick" just leave the alcohol out and enjoy a nutritious smoothie like a good girl (or boy).

Now that I've had my fun, let me tell you about this oatmeal as is. Instant oatmeal. It's a little fun on its own. The pouch happens to double as a measuring cup.

Can you say...convenient?!

Get out your large bowl....pour the oatmeal in it. Fill the empty pouch to the water line, pour into the bowl and microwave on high for 2 minutes. Poof. It's done.


Here's a little side note. When the manufacture says large bowl, don't assume they mean something on the small side. You see...when oatmeal in the microwave gets hot...it becomes a lava flow


And that's not what you want. Try something a little larger and be safe because between you and me...this oatmeal is too good to waste.

I have to say one more thing before I close. I'm not much on fruit flavored oatmeals...they usually taste too sweet and dessert-ish. Not BetterOats. You find yourself with a bowl of good taste and good for you food. Plain and simple.


*This sponsorship is brought to you by Better Oats's whom we have partnered with for this promotion*


Better Oats� instant oatmeal comes in many delicious varieties � 23 flavors in fact, including RAW Pure & Simple� Pomegranate and MMM... Muffins� Blueberry Muffin. Kids love Better Oats because it�s fun and delicious, and parents love it because it is not only nutritious, but also convenient. Better Oats uses up to 35 percent less packaging than traditional instant oatmeal boxes (so there�s more room on the pantry shelf), and the pouch doubles as a measuring cup! 

Made with 100% whole grain oats and flax seeds, this complete line offers a simple and healthy option when it comes to instant oatmeal. But it's not only a great breakfast (or lunch... or snack...) but also a better ingredient to spice up a cookie or other baked goods.

You've got to try Better Oats. If you've been settling for ordinary oatmeal, then you're in for a treat because Better Oats is just... better! Try us and see for yourself.

Better Oats offers 23 delicious flavors in several lines, including RAW Pure & Simple�, Oat Revolution�, and MMM...Muffins�.

RAW Pure & Simple: RAW Pure & Simple is a better way to eat. We start with the finest quality 100% organic, whole grain oats blended with organic whole grains and seeds, like flax, barley and quinoa, for a wonderfully wholesome and nutritious breakfast. You'll love all four thick, hearty multigrain texture and natural, robust flavors. RAW Pure & Simple is naturally good, straight from Mother Earth.

Oat Revolution: Raise your spoon and join us for an Oat Revolution! It starts with all natural 100% whole grain oats. We then add antioxidants and flax, a good source of Omega-3, and top it all off with a bold shot of flavor. All combine to create delicious oatmeal that keeps its rich, robust flavor all the way to your bowl. Take one bite and start your Oat Revolution!  

MMM...Muffins: Everyone loves waking up to hot, fresh muffins for breakfast.
MMM...Muffins gives you that same delicious muffin taste you crave in healthy and nutritious 100% whole grain oatmeal. Our thick and hearty oatmeal is also a good source of fiber and omega-3, so it's better than good, it's good for you. Start your day off right with the indulgent taste of real muffin flavor in every bite...mmm.

You can also visit them on their BetterOats facebook page 

Friday, December 21, 2012

Tropical Fruitcake


Ya think it's too late to make fruitcake?

HA!! Think again my friend. This one can be eaten right away, or it can be made in advance and sit in the fridge for up to 6 weeks. Your choice.

I'm not a fruitcake person. At all. But an old friend from high school by the name of Beth was raving about this recipe so I had to give it a try. My twist...(cuz there always is one...mostly) is the fruit that I used. And the kind of rum. One of the things that I turn my nose up on with fruitcake is the candied cherries. So I decided to use tropical fruit. And the alcohol? Coconut rum.

And yes, I know there are cherries on the top of this this one. I put them there cuz they look pretty. But...there isn't a single candied cherry in that cake.


Tropical Fruitcake
Printable Version

Dried Fruit:
1 lb raisins
1/2 lb golden raisins
1/2 lb craisins
1 lb dried tropical fruit mix
1 lb mixed nuts
1 - 2 750ml bottles of coconut rum

Batter:
1/8 cup molasses
1/2 tsp baking soda
1/2 lb butter
1 1/8 cup brown sugar
6 eggs
1/2 apricot jam (or whatever flavor you have in the fridge that you like...strawberry?)
6 TB apple jelly (or whatever flavor you have in the fridge that you like)
1/4 cup whipping cream
2 TB almond extract
2 cups flour
1/2 tsp nutmeg
1 TB cinnamon
1 tsp ground cloves

1 day in advance combine the fruits and nuts. If you like them in smaller chunks, give them a couple of pulses in the food processor. I didn't do it this time but next year I will. Put them in a large bowl and fill with enough rum to cover them (you won't need all of the rum...besides, you need to save some for the end, in order to soak these babies). Cover with plastic wrap and let sit for 24 hours (I've actually let them sit for 2 days and it was fine).

On baking day, drain the rum off the fruits and nuts (save that rum!!! It tastes sooo good as a little something to sip during the rest of the process. Or ever poured over a bowl of vanilla ice cream).

Preheat the oven to 275' F. Butter two or 3 loaf pans. Or get creative and use round pans or bundt pans...whatever floats your boat.

In a small bowl combine the molasses and baking soda until light in color and frothy


Ok, so my bowl was a bit on the small side.

In a large....very large bowl, cream together the butter and brown sugar. Add the eggs, jam and jelly and beat well. Add the frothy molasses mixture, spices, whipping cream and almond extract. Beat well.

Get the bowl of nuts and pour the flour in there and stir until combine. Add 1 1/2 cups of the nut mixture to your butter mixture and mix well. Then add the remaining but mixture and mix well until everything is fully combined.


Divide the mixture between your prepared loaf pans. You can fill them almost to the top. This stuff doesn't rise all the much.

Bake for 1 1/2 or 2 1/2 hours (time frame depends on the size of the pans) or until a toothpick stuck in the middle comes out clean.

Cool for about 10 minutes than carefully remove from the pans and all to cool completely.


Once cooled, take a skewer or something similar and poke holes all over the place


Using about 1/4 to 1/2 cup of your coconut rum, and pour over the cakes. Top, bottom, sides.


And watch all that rummy goodness soak right into that cake.

Now, carefully wrap each cake with plastic wrap. Then wrap them in foil and either place them in tins and store in the fridge until you're ready to eat them. Or give them away.


Note: I don't have tins. So I just put them in the fridge without the tins. When I give them away, they'll just have a bow on the foil.

When you're ready to serve them...if you have some whole dried pineapple slices....soak in some rum. Dust the top of your cake with some powdered sugar and decorate with the pineapple and maybe some cherries if you have them.


And there you have a gorgeous Tropical Fruit Cake to share for the holidays.

Loaded with fruit and nuts....


And drowning in rum.

Of course...if you're still not into eating fruitcake. No worries.....there's always the doorstop alternative. Or the continuously recycled one that keeps going from one family to another...you can just add it to the rounds. But if I were you, I'd give this one a try. I think the tropical twist is a plus and the coconut rum wonderful!

Thank you Beth!!


Merry Christmas and Happy Holidays my friends.


Tuesday, December 18, 2012

Gluten Free Pumpkin, Persimmon, Banana Bars


One of my daughters has decided to go gluten-free. It's not a medical necessity. Just a choice. In respect of her choice, I am trying to find recipes for her that she will enjoy (and because gluten free breads and desserts are so expensive at the stores)

Pinterest can be an amazing thing. Easy to categorize and share and search. Anyways....I saw a recipe for Gluten Free Pumpkin Bars and that's what inspired my version.

Btw, if you dont have a banana and a persimmon on hand....use all pumpkin as the original recipes uses. I did it the first time I made these bars and it is amazingly good.

These bars are moist and flavorful. If someone gave me one of these bars and didn't tell me, I'd have no idea that it's gluten free.

Gluten Free Pumpkin, Persimmon, Banana Bars
Printable Version

4 eggs, room temperature
1 1/2 cups sugar
3/4 cup vegetable oil (or a flavorless oil of your choice)
15 oz mashed very ripe banana, pureed persimmon and canned pumpkin combined (I found that 1 banana and 1 persimmon come to about 8 oz. I added pumpkin to make up the remaining amount)
1 tsp vanilla extract
1 cup oat flour (if you don't have oat flour, use rice flour)
1 tsp xanthan gum
1 cup potato starch (if you don't have potato starch, use corn starch)
2 tsp baking powder
2 tsp pumpkin spice
1 tsp cinnamon
1 tsp salt
1 tsp baking soda

Preheat the oven to 350' F. Grease a 13x10 baking dish.

In a large mixing bowl, using an electric mixer on medium speed, combine the eggs, sugar, oil, pumpkin, banana, persimmon and vanilla extract. Beat until light and fluffy, about 2 or 3 minutes. Sift together the remaining ingredients. Reduce the mixer speed to low and add the dry ingredients to the wet mixture. Mix until smooth. Pour into your prepared dish and bake for about 40 minutes or until a toothpick stuck in the middle comes out clean.

Allow to cool before cutting.


If you're anything like my daughter, you'll eat them as is.


If you're anything like me, you'll grab some icing and smother it before eating it as midnight snack


Note: I've done a small amount of research on oat flour. Often times it is not labeled as gluten free due to the fact that some oat flours are processed in a plant that processes wheat flours and may contain trace amounts of wheat. If this is of concern, please use an alternative flour or confirm that the oat flour you are purchasing is indeed gluten free.

Sunday, December 9, 2012

Green Bean Casserole - Alton Brown Style


I don't think Green Bean Casserole can ever really be considered "healthy". If you're gonna do it right, that is. Even if you use non-fat milk or some other milk alternative...it just won't be the same without those crispy French's French Fried Onions. I think I saw a low-carb or low-fat version at the market, but didn't pick them up. It seems that a lot of those altered products make up for the "low-this" and "non-that" by adding more sugar or sodium to boost the flavor. I once tried making the fried onions myself...in the oven. It didn't cut it. At all (sorry Alton).

Alton Brown has his Best Ever Green Bean Casserole recipe that is very very good. What I like about it most is that it doesn't use canned soup. You have fresh mushrooms, half and half, broth and other wonderful ingredients....without the MSG. Ya I know...those fried onions are loaded with MSG...but I just can't make this dish without them...so once in a while...I turn a blind eye. (a girls gotta do what a girls gotta do.)

For the past several years, I've been making Alton's Green Bean Casserole. It only takes a little more time than the "original" Campbell's Soup version. You can do it ahead of time and just stick it in the fridge (before adding the fried onions) until you're ready to cook it. If you've found that the sauce has thickened more than you like, just add a little broth or half and half and you're ready to go.

I know that most people either hate it or love it....but Green Bean Casserole has been a favorite of mine since I was a child and I can't imagine a holiday meal with out.

Green Bean Casserole - without the canned soup
Printable Version

1 lb fresh green beans, cut into 2" pieces, cooked
2 TB butter
12 oz mushrooms, thinly sliced
1 tsp salt
1/2 tsp black pepper
2 cloves garlic, minced
1/4 tsp ground nutmeg
2 TB flour
1 cup chicken broth
1 cup half and half
1 1/2 cups French's French Fried Onions (or more if desired)

Preheat oven to 375' F.

In a large 12" cast iron skillet (or other oven safe skillet) melt the butter over medium heat. Add the mushrooms, salt and pepper and cook, stirring occasionally, until the mushrooms start giving up some of their liquid, about 5 minutes. Add the garlic and nutmeg and continue cooking for another minute or so.


Add the flour, stir to combine and continue to cook for a minute. Stir in the broth and continue to cook for a minute.

Lower the heat to medium-low and pour in the half and half.


Cook for about 6 - 8 minutes, stirring occasionally until the mixture thickens. Remove from heat and stir in the green beans. (this is the point where I let it cool a little and place in the fridge until I'm ready to continue).

Note: If you put this dish in the fridge, the sauce may have thickened even more while sitting. If that's the case, just add a little (1/4 cup?) of broth until you have the desired consistency again.

Stir in 1/2 cup of French Fried Onions. Sprinkle the remaining onions on top.


Place in the oven and cook for about 20 minutes, until bubbly and the onions have browned a bit. 

And there you have it. Easy peasy. Better than ever.  


a vintage green bean casserole....just updated a little.

#CooksNetwork

Saturday, December 1, 2012

Black Russian Rye Bread


The Los Angeles Times use to have a great food section. It was a section all on its own that came out every Thursday. It contained several recipes, reviews of dining locations, great articles. It was all about food...from gardening, food trends to food history. Over the years I've made several wonderful dishes from that section of the paper. I miss it. Now? It's 3 little pages called Food & Dining that comes out in the Saturday Section which includes other articles within its 12 pages (Mind & Body and Home & Design). I was really disappointed when the newspaper made this change.

I still am.

I'm hoping that when the economy recovers, the Los Angeles Times will once again dedicate a complete section to Food!

Thank God I have recipes clippings that I've been wanting to try out, saved in my drawer. Black Russian Rye Bread being one of them. It's from the Los Angeles Times Food Section, dated almost 2 years ago....January 13, 2011.

Yes, it took me that long to get around to making this bread. I could say it's worth the wait but at the same time, I kick myself for not making it sooner.

It's delicious!

It's not the kind of rye bread you want to use for say...a Ruben or a Patty Melt. It's a side bread. One to eat along with your salad and dinner. There's a hint of sweetness to it from the molasses. It's rich, dense and just wonderfully flavored. Just give me a slice (or 2 or 5) and some butter, and I'll be perfectly content.

Don't be intimidated by the long list of ingredients. It's a lot easier to make then you'd think.

Black Russian Rye Bread
Printable Version

2 packets of active dry yeast (1/4 oz each containing 1 1/2 TB for a total of 3 TB)
pinch of sugar
2 1/2 cups warm water (about 105 - 115'F), divided
1/2 cup dark molasses (not blackstrap)
1/4 cup apple cider vinegar
1/4 cup butter
1 oz unsweetened chocolate
1/2 cup whole wheat flour
3 cups rye flour
3 cups unbleached bread flour plus 1 TB, divided
1 cup wheat bran
2 TB caraway seeds, plus 1 optional teaspoon, divided
1/2 tsp fennel seeds
1 TB instant espresso powder
1 TB minced shallots
1/4 cup cornmeal

In a small saucepan, over low heat, combine the remaining 2 cups of water, molasses, apple cider vinegar, butter and chocolate, stirring often. Once the butter and chocolate have melted, allow to cool to room temperature.

In a small bowl coming yeast, sugar and 1 cup of warm water. Let stand at room temperature for about 10 minutes. During this time it should get foamy.

In a large bowl whisk together the whole wheat flour, rye flour and all purpose flour (except for 1 TB of all purpose flour). Set aside.

In a large bowl for your stand mixer, fitted with a paddle attachment, combine 2 cups of the mixed flours, the bran, caraway seeds, fennel seeds, salt, espresso powder and shallots. Turn the mixer on low. Add in the yeast mixture and the chocolate mixture. Mix until smooth and then turn the mixer up to medium speed and continue mixing for 3 minutes.

Turn the mixer speed down to low. Add 1 cup of the remaining flour mixture at a time, just until the dough clears the sides of the bowl and begins to work its way up the paddle. This is a very sticky yet firm dough. Be careful not to add too much flour. When pressed, the dough will spring back. You might not use all of the flour mixture.

Place the dough onto a well floured surface and knead by hand until you have a smooth and springy, yet dense dough.

*if you prefer, add the dough hook to your mixer and knead over low speed for 2 or 3 minutes and then finish by hand with a few kneads.

Form your rich dark brown dough into a ball and place it into a large greased bowl, turning once to cover the dough with oil. Cover with plastic and let rise until doubled...about 1 1/2 to 2 hours.

Towards the end of the rising time, combine the cornflour, remaining TB of all purpose flour, the optional tsp of caraway seeds and set aside.

Preheat your oven to 350' F

When your dough is ready, line a baking sheet with parchment paper. Sprinkle the cornmeal mixture over the parchment paper. Gently deflate the dough and turn it out onto a floured surface. Divide the dough in half. Form each half into balls by pulling the edges down and around to the bottom of the ball and pinching to form a seam. Place each ball onto the prepared baking sheet, seam side down.


Loosely cover with plastic wrap and allow to rise until almost doubled in size and puffy....about 45 minutes to an hour. I do a two finger test by pressing 2 damp fingers into the dough a little. If the indent springs back right away, the dough is not yet ready. If it springs back very slowly...they're good to go.

With a serrated knife, slash an X in the top of each ball, about 1/4" deep.


Bake the loaves for about 45 - 50 minutes, until they are crusty and sound hollow inside or your instant thermometer reads 200 - 210'F. Because the loaves start out to be so dark, you will not be able to easily notice them browning while they're baking.

Allow to cool completely on a cooling rack before slicing.


*If you do not have a stand mixer, you can make it by hand by mixing the ingredients in a large bowl with a wooden spoon and knead on a well floured counter until springy and smooth. However, dough that is heave with whole grain flours, a stand mixer works best. Don't ask me why. I'm just telling you what the recipe article says. Maybe someday I'll investigate and see what that's all about.