Yum Peaceful Cooking: No-Knead
Showing posts with label No-Knead. Show all posts

Thursday, January 2, 2014

Bread Rolls made with No Knead Dough


Well, as of yesterday, it's been 5 years since my first blog post. Boy have things progressed. I started blogging without a purpose but over the years it has become a tool. Not only for recipes, but for edging me forward in my cooking ventures. Encouraging me to step outside of my comfort zone and spread my wings a bit.

I have tried many new things and have written about my journeys. I write about it, not because I have become an expert but because I want to encourage you to do the same. If you dream of making donuts or ice cream or....whatever, then do it. Follow a recipe and try it. I'm not a chef. Beyond home economics in junior high school, I have never taken a cooking course what so ever. There is nothing special about my abilities. I want to show encourage you....if I can do it, so can you.

Before blogging, I had dreams of baking beautiful loaves of bread (without the use of a bread machine) but I just couldn't do it. I tried several times, with less than adequate results. It actually stressed me out. The whole kneading and rising process was the worse part. How long? How much? Is it warm enough in the room? Has the dough doubled? I really got hung up on the 'time' issues. Through blogging and the friends I've "met" in the food blogging circuit, one of my greatest achievements over the years has been finding my comfort zone with yeast. I can now bake bread with confidence. Not that every loaf is perfect and beautiful, but at least I know what I'm doing.

If I can give you any advice on baking bread it would be....don't get hung up on the restraints of  the almighty clock. The dough will be ready when it's ready and not a moment sooner.

Here's a little tip: in order to find out if your dough is ready for the oven, gently poke it with two fingers. If the dough does not spring back quickly, then it's ready.

There are 4 basic ingredients that are the foundation for most breads; flour, yeast, salt and water. With these 4 ingredients you can make a basic loaf of bread in any shape. You can make a dough that requires kneading or you can make a dough that requires no kneading. The manner in which you bake it will affect the texture, whether the crust is soft or chewy. As long as you have those 4 ingredients, you're good to go.

I'm going to show you how I make most of my bread these days. I use a no-knead recipe. Why? Because of the convenience. You can mix up a rather large batch of dough and store it in the refrigerator for up to two weeks, using only the amounts you want.

And it's not an all day process.

You don't need any special tools or equipment. Just a large container that has a lid.

Most of the no-knead recipes that I use, I get from Artisan Bread in Five Minutes a Day. I do switch things up here and there, but you can search my blog for all that.

Basic No-Knead Dough

6 1/2 cups bread flour (or all-purpose flour)
1 1/2 TB yeast
1 1/2 TB salt
3 cups lukewarm water

In a large bowl that you can cover or a large container that has a lid, combine the flour, yeast and salt. Add in the water and stir until thoroughly combined. Cover loosely and let sit on the counter for 2 hours or more. If it ends up being several hours, no worries. It won't hurt anything. The main goal is for the yeast to activate and for the dough to double in size.


At this point you can place the container in the refrigerator. Do NOT secure the lid. It needs breathing room, otherwise with all the yeast gases dancing around in there, you'll end up with a minor explosion. I've heard that it creates quite a mess.

At any time during the next 2 weeks you are ready to bake bread.

Get out a baking sheet and either sprinkle it with corn meal (you can use flour but it burns quicker) or line it with parchment paper.

Dust your counter or work surface with flour.

Sprinkle the top of your dough with some flour and grab a handful of dough, about the size of a grapefruit


Form it into a ball by stretching the surface of the dough around to the bottom, rotating as you go until all four sides have been stretched and you have a nice little taunt surface. You can sprinkle the dough with a little more flour if needed in order to keep things from being too sticky.


With a bench scraper or serrated knife, divide the ball into 4 equal segments. Form each segment into a ball as you did before.


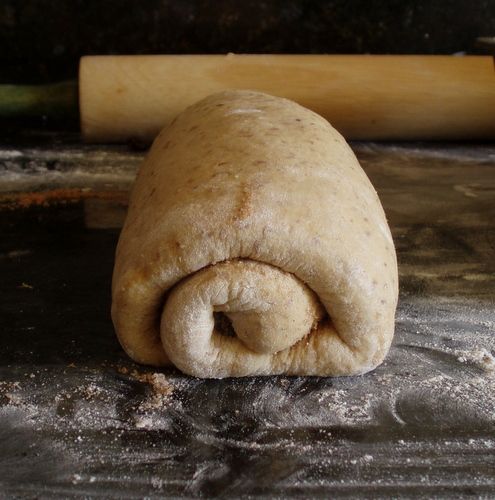
Working with one ball at a time, Flatten and elongate with your finger tips to form a rectangle, about 4 inches in length. Working with the long edge of the rectangle, fold 1/3 of the dough over as you would a letter, then fold the opposite end down to the edge, pinching as you go. You should now have a little baguette shape. Place it on your prepared baking sheet, seem side down, and continue with the remaining 3 balls.


Cover loosely with plastic wrap or a cotton tea towel and allow to rest for about 45 - 90 minutes, depending on the temperature of the dough and the room. Do the finger poke test I told you about earlier to see when it's ready for the oven. About halfway through the rest period, preheat your oven to 450' F.

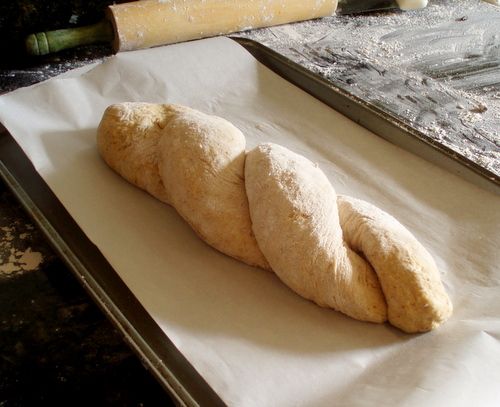
Once ready, there are two routes you can go. If you want a soft crust, just brush the tops with water (I then sprinkled them with flour for a "rustic" look) and slice the length with a serrated knife about 1/4" in depth.


Let me explain what happened here. Normally the surface is nice and smooth but I may have let them rest a bit longer than necessary because the plastic wrap I covered them with....well...it pretty much stuck to my dough. Which was a little challenging to peal off. Thus creating a nubbly surface. Let's just say...thank God, looks isn't everything.

Place in the oven for about 30 minutes or until a deep golden brown.


These were perfect for a non-traditional French Dip sandwich with alfalfa sprouts


If you want a more hardy, artisan surface that's chewy and crispy, when you pre-heat the oven, place a baking dish at the bottom of the oven and just as you're placing your dough in the oven, pour a cup of water in the dish to create steam. I didn't brush these rolls with water or anything. No reason other than I forgot.


This time I used a cotton tea cloth to cover them (no sticking) but the surfaces got a little firm which caused the dough to bust out a little during baking. I think the humidity in the air is really low right now. But the crusts came out nice and crisp and were great for my breakfast sandwich


Sauteed mushrooms, leeks and garlic, topped with bacon, eggs and cheddar cheese.

And there you have it. Both of these sets of rolls came from the same dough batch, yet turned out very different. And I still have enough dough to make another loaf of bread or set of rolls. Neither set came out perfect (due to the sticky plastic wrap and the dry air conditions) but both were worth every minute and tasted wonderful.

In 2014 I want this to be the year you conquer your fear. I challenge you to try something you've been wanting to do...whether its a technique, recipe, a particular ethnic cuisine. I think you'll be pleasantly surprised with the outcome and this in turn will give you the courage to try more.

If I can do it, anyone can.

Happy New Year everyone!


Saturday, November 24, 2012

Multi-Grain Cinnamon Raisin No-Knead Bread


The weather cooled down one weekend. The need to bake bread took over. The need to use some of the various flours I have stored in the fridge took over as well.

With this batch of no-knead bread, you can make about 5 1 lb loaves. But don't worry. You can either cut the recipe in half or, you can store the dough in your refrigerator for up to 5 days (the egg in the dough prevents it from being stored any longer). During that time frame, you can pull out a glob of dough and within a short time have yourself a fresh loaf of bread made with minimal effort.

(You can also store the dough in the freezer for up to 2 weeks, in 1 pound portions. When ready to use, thaw in the fridge for 24 hours then proceed as usual.)

The egg in the recipe makes this a nice, light bread. The agave gives it a sweetness and the multiple grains that I used give it a lot of flavor. Not to mention the delicious combination of cinnamon and raisins.


Of course the cinnamon and raisins can be left out since they are added just before the 2nd rise so you can  just make a nice loaf of bread. Which I did. And used it in my Thanksgiving stuffing.

Multi-Grain Cinnamon Raisin No-Knead Bread
Printable version

3 1/2 cups whole wheat flour
3 1/4 cups bread flour (or all purpose flour)
1 cup oat flour
1/2 cup flaxseed meal
1/4 cup wheat germ
1 1/2 TB yeast (2 packets)
1 TB salt
1/4 cup vital wheat gluten
3 cups lukewarm water
1/4 cup neutral flavored oil (ie: vegetable oil or unsalted butter)
1/2 c agave syrup (or honey)
3 large eggs
4 tsp barley malt syrup (optional)
1 tsp vanilla extract
Cinnamon sugar mixture (1/2 cup sugar & 1 TB cinnamon. You won't use it all. Save it for cinnamon toast or something)
Handful of raisins
Egg wash (1 egg beaten with 1 TB water)
Raw sugar (optional)

In a large container with a lid (about 5 quarts would be good), whisk together the whole wheat flour, bread flour, oat flour, flaxseed meal, wheat germ, yeast, salt and vital wheat gluten.

In a medium bowl, combine the water, oil, agave syrup, eggs, barley malt syrup and vanilla extract.

Add the liquid ingredients to the dry ingredients. Stir until combined. You might need to get your hands (wet them a little first) in there to fully incorporate the flour.


Cover loosely (not airtight...the gases need room to expand) and let set on the counter for about 2 hours. During this time, your dough will rise and begin to collapse a little.

At this point, you can store the dough, lightly covered, in your fridge to use later or you can begin making your bread. However, if you have time...I recommend letting it sit in the fridge for a little while. It's easier to handle this way. This dough is a bit wet and sticky.

When you're ready to get started, sprinkle a good dusting of flour on the dough and grab a grapefruit sized wad (or any desired amount). If needed, dust the piece with a little more flour and shape into a ball by pulling the sides down and around to the bottom, rotating the ball as your go.


Get out a loaf pan, and grease it. Using the pan as a guide, on a floured surface (you may need to flour the surface more as your go along), flatten and roll the dough into a rectangle, making the width just short of being the same size as the length of the pan. (The purpose is to make sure your loaf of bread fits into your pan when you're done rolling it up.)


Sprinkle with your cinnamon sugar mixture and desired amount of raisins.


Now...carefully roll your dough, starting with a short end


Press the finished end of the roll to the dough in order to "seal".


Gently place into your prepared bread pan. Cover with plastic wrap and let rest.


If you used your dough without refrigerating first, then the rest time will be about 40 minutes. If the dough had been refrigerated, the rest time will be longer....about 90 minutes. I test it buy pressing two wet fingers into the dough a little. If it springs back immediately, it needs more time to rest. If it springs back very slowly, then it's ready to bake.

This would be a good time to preheat your oven to 350' F

Note: your dough may not double in size during this rest period (it's sometimes the nature of the no-knead beast). Often times you will have what's called an "oven spring"...where you will see an increase in volume during the baking process.


Once its done resting, brush the top with an egg wash and sprinkle with raw sugar if desired.

Bake in a preheated 350' oven for about 45 minutes or until the inside temperature of your bread is 185' F.

Remove from pan and allow to cool completely on a rack.

DO NOT cut into the bread until it has cooled completely. I know...its sooo tempting. It smells so very good and the idea of fresh warm bread is drawing you in. But trust me. The bread needs to cool. If you cut into it while it's still warm, you will end up with a funky texture inside. Allowing the bread to cool completely will give it the best flavor and texture. Plus, it's easier to slice. Btw....an electric knife is a wonderful tool to use for slicing your bread.


Do you want to get a little fancier? Let's do a simple 2 strand braid.

Take the initial ball that you formed in the beginning and divide it in half, rolling each portion into wide ovals.


Sprinkle each oval with cinnamon sugar and raisins then roll, starting from the long end. Press the end to the dough to seal.


Take both "ropes" and carefully place them on a parchment paper lined cookie sheet (seem side down). Pinch together the top ends.


Gently twist the rolls together so they are intertwined then pinch the end together and tuck it underneath.


Cover with plastic wrap and allow to rest (40 minutes if used right away, 90 minutes if the dough had been stored in the fridge).

Brush with an egg wash and sprinkle with raw sugar.

Bake in a preheated 350' F oven for about 35 minutes, until the inside temperature is 185'.

Allow to cool completely on a rack before slicing.


You don't want to go through all this? You have some dough leftover? Make that initial ball of dough and allow it to rest as is on a parchment paper lined cookie sheet. Time frames are the same as above. Just before baking, dust the top lightly with flour, score the top with an X (about 1/4 deep slices) and bake as above.

If you want a firmer, crispier crust, put a baking pan in the bottom of your oven during the preheating time. When you put your loaf into the oven, pour 1 cup of hot water in the bottom pan...this will create a nice steam in your oven and give you a more rustic, artisan type of crust.