Yum Peaceful Cooking: Nuts
Showing posts with label Nuts. Show all posts

Tuesday, December 6, 2016

Krusteaz Shortbread Pecan Pie Bars and Giveaway


I'm going to try and make this short and sweet....although I've never been able to accomplish that in the past.

But I'll try.

This is another Krusteaz Giveaway....with some really cool things


8 boxes of cookie mix!! (2 - Shortbread, 2 - Butter Vanilla Sugar, 2 - Snickerdoodle and 2 - Triple Chocolate Chunk), Then....there is a tote bag, an E-Z Deco Icing Pen, Edible Markers (SO COOL!!!) and a set of Christmas cookie cutters.

This set-up is perfect! Especially for kids. But since my kids are adults now, I had to borrow one, just to prove how much fun kids will have with this stuff. I let him do it all...start to finish (I did help with rolling out the cookie dough a little) and he was busy all day. Loving it. From mixing to icing to drawing with the pens.


And he did a great job!

Of course an adult would have loads of fun too. And I did, Only I made other things.

Like these Thumbprint cookies, using the Shortbread mix. The recipe is on the back of the box.


And of course I made the Triple Chocolate Chip Cookies but those didn't last long enough to photograph.

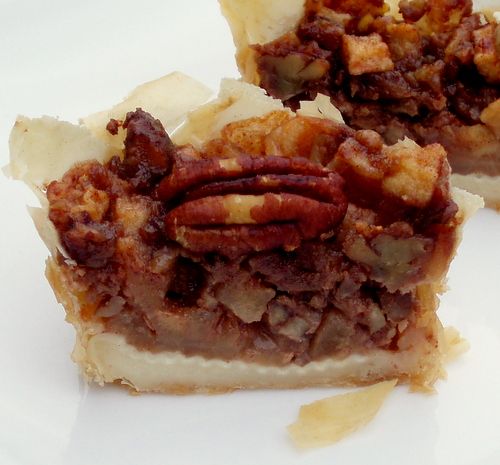
What I personally had the most fun doing, was making Shortbread Pecan Pic Bars.

Easy and delicious.

I started off by following the recipe for Krusteaz Shorbread. Instead of rolling it out and cutting it into rectangles, I placed the dough in a 13 x 9 casserole dish that was lined with parchment paper. I pressed it along the bottom, as evenly as possible, and up the sides a bit. This went into a 375' oven and baked for about 15 - 20 minutes, or until golden brown. 


What I didn't do...was prick the bottom with a fork. I didn't want holes that would allow the pecan mixture to escape through. Instead, once it was out of the oven, I let it cool some and then pressed the dough down. I does puff up....so in order to have a smooth surface for the pecan mixture...you will want to press it down with your hands.

But...make sure it's cool enough to the touch so you don't burn yourself.

Then I let it cool completely.

While the dough crust cooled, I prepared the filling:

Pecan Filling:

1/2 cup butter
1/2 cup brown sugar
2 TB honey
2 TB granulated sugar
2 TB heavy cream
1/4 tsp salt
2 cups pecan halves
1/2 tsp vanilla

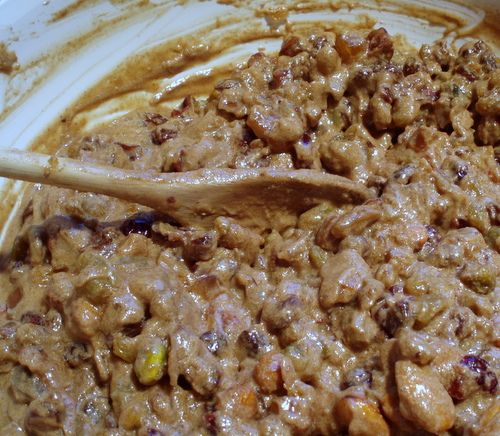
In a medium sauce pan over high heat, combine the butter, brown sugar, honey, granulated sugar, cream and salt. Bring to a boil, stirring constantly.

Boil for about 1 minute, or until the mixture coats the back of your spoon.

Remove from heat and stir in the pecans and vanilla. 

Pour into your crust.


Reduce the oven heat down to 325' and bake for about 40-45 minutes, or until the mixture is bubbly. If you want a crispier crust, you can bake it a bit longer. 

Allow to cool completely before cutting.


And *POOF* you have yummy little sweets to share with everyone. Along with all the other cookies you've baked.

Ok...now for the important stuff....

How do you get a chance at winning all these goodies? Look below and do what it says. The more entries, the better your chance! 


a Rafflecopter giveaway


This giveaway is open to continental US residents only. This giveaway will run from Wednesday, December 7, 2016 through Saturday, December 10, 2016 (11:59 pm PT). A winner will be notified within 48 hours of the close of the contest and given 48 hours to respond before a new winner is chosen. 

I was not compensated for this post, however Krusteaz supplied me with samples. They are also supplying the products for the giveaway.  
All opinions are my own.

Saturday, March 16, 2013

Pistachio Muffins


I love pistachios. Actually, I love most nuts (this is not a reflection of my personality). Out of all the nuts out there, I wonder why the pistachio has it's own muffin? I mean...you never hear about peanut muffins, or almond muffins...or even cashew muffins. hmmm...interesting. (sorry, I don't have an answer for this. I can't even find anything about the origin of pistachio muffins. And yes, I did Google it).

It wasn't until very recently that I even tasted a pistachio muffin. I mean...within the past few months. You know when you hear about or see a certain food and you have a mental idea of what it's all about? And for some reason it just doesn't mesh with your mental taste buds? That's how it was for me. I thought it was odd that the muffin is green. Mentally, I assumed there were artificial flavorings involved. Some things, I just can't do artificially. Nut extracts are among them. Thank God that's not the case here. Once I tasted them...and discovered that the "green" is for looks only (induced by food dye), and not necessary, and the only nut flavor is from the actual nut itself...and some spices are added in there for a very nicely orchestrated pallet experience...well, my confounded predetermined opinion of pistachio muffins changed. 

I did a lot of searching to find a recipe that matches my culinary style/taste. I found a lot of them that start off with a cake mix. Then there were tons of them that included pistachio pudding mix (THERE it is! The artificial flavoring in full motion right there! Ya, it's a good thing those recipes were not my first experience). Ok, if that's not an issue for you...and you desire a stronger, bolder pistachio flavor...then maybe one of those recipes would be better for you. Anyway, the recipe I found, that inspired me was at ScarlettaBakes. I made a few changes. Going green was one of them. I almost didn't add the dye but since St. Patricks Day is tomorrow....well, I couldn't resist. If you don't want them green...leave the dye out. You might even "feel healthier" eating them in their natural state.

These muffins are nice and moist (is there another word I can use to get that point across?). I love the combination of pistachio, cinnamon and nutmeg. I used roasted pistachios. Raw would be perfectly fine too. Actually, I would've preferred raw but I didn't have any on hand. I think if you were to use the nut in the raw...you'd end up with more of the oils and a more pure pistachio flavor.


One of the things I like about this recipe is that you take some of the nuts and puree them into a paste...well...a nut butter actually, leaving the rest of the nuts to be roughly chopped. I believe this method infuses more of the natural flavor in the muffin rather then having to rely on....say.....pudding mix?  

Before I get into the whole recipe spiel, let me share what I did for the muffin cup. I just couldn't put these muffins in a little frou-frou paper cups. Besides...the firm crust, contrasting with the moist insides is one of the muffin qualities that appeals to me. And those store bought paper liners tend to peal off some of it. 

What I did was cut some parchment paper into 5 1/2" squares and then pressed them into the muffin tin with the bottom of a glass


Just a little heads up here....the paper doesn't stay down very well, so make them as you need them...one at a time. 


The weight of the dough will force the paper to the bottom of the cup then you can continue on to the next. 

Yes, it's a tiny bit time consuming, but the results are cool. And...if you find that you don't have any store bought liners on hand....bazinga! Now you can just make your own. And don't be surprised that the round shape is not perfect. You will end up with some grooves and indents and bulges. But hey, that just adds to its rustic appeal. (funny how imperfections are made acceptable..and oftentimes desirable just by calling them rustic. OMG...I AM RUSTIC!! HA! Oh wait...never mind. That just makes me sound old. Really, really old).

Somebody stop me now. 


Pistachio Muffins
Makes 24 standard sized muffins

2 cups white sugar
1 cup butter, room temperature
2 large eggs
3 cups all-purpose flour
1 tsp baking soda
2 tsp baking powder
1/2 tsp salt
1 tsp cinnamon
1/4 tsp nutmeg
1 cup buttermilk
3/4 cup pistachios, roughly chopped (more if you want to sprinkle some on top of the muffins)
3/4 cup pistachios, pureed (instructions below)
1 tsp vanilla extract
Green food coloring (optional)

Preheat your oven to 375' F
Line 24 standard sized muffin cups

In a food processor, process 3/4 cup of pistachios in 30 second increments until pureed, scraping down the sides as needed. This should only take 3 or 4 increments.

In a large bowl, cream together the butter and sugar. While the mixer is still running, add the eggs one at a time then add in the vanilla extract and green food coloring, if desired. I used a few squirts of the gel kind, eyeballing it until I liked the shade. Beat until just combined. Set aside.

Sift together the flour, baking soda, baking powder, salt, cinnamon and nutmeg. 


With the mixer on low, add the sifted ingredients to the creamed butter, alternating with the buttermilk. Beat until just incorporated. Beat in the pureed pistachio nuts. Fold in the chopped nuts.


Fill each muffin cup with the batter. I used an ice cream scoop for uniformity. If you have any left over pistachios, give them a rough chop and sprinkle them over the muffins.


Bake for 20 - 23 minutes or until a toothpick inserted in the middle comes out clean. 


Allow to cool slightly before enjoying

Happy St. Patrick's Day! 


Friday, December 21, 2012

Tropical Fruitcake


Ya think it's too late to make fruitcake?

HA!! Think again my friend. This one can be eaten right away, or it can be made in advance and sit in the fridge for up to 6 weeks. Your choice.

I'm not a fruitcake person. At all. But an old friend from high school by the name of Beth was raving about this recipe so I had to give it a try. My twist...(cuz there always is one...mostly) is the fruit that I used. And the kind of rum. One of the things that I turn my nose up on with fruitcake is the candied cherries. So I decided to use tropical fruit. And the alcohol? Coconut rum.

And yes, I know there are cherries on the top of this this one. I put them there cuz they look pretty. But...there isn't a single candied cherry in that cake.


Tropical Fruitcake
Printable Version

Dried Fruit:
1 lb raisins
1/2 lb golden raisins
1/2 lb craisins
1 lb dried tropical fruit mix
1 lb mixed nuts
1 - 2 750ml bottles of coconut rum

Batter:
1/8 cup molasses
1/2 tsp baking soda
1/2 lb butter
1 1/8 cup brown sugar
6 eggs
1/2 apricot jam (or whatever flavor you have in the fridge that you like...strawberry?)
6 TB apple jelly (or whatever flavor you have in the fridge that you like)
1/4 cup whipping cream
2 TB almond extract
2 cups flour
1/2 tsp nutmeg
1 TB cinnamon
1 tsp ground cloves

1 day in advance combine the fruits and nuts. If you like them in smaller chunks, give them a couple of pulses in the food processor. I didn't do it this time but next year I will. Put them in a large bowl and fill with enough rum to cover them (you won't need all of the rum...besides, you need to save some for the end, in order to soak these babies). Cover with plastic wrap and let sit for 24 hours (I've actually let them sit for 2 days and it was fine).

On baking day, drain the rum off the fruits and nuts (save that rum!!! It tastes sooo good as a little something to sip during the rest of the process. Or ever poured over a bowl of vanilla ice cream).

Preheat the oven to 275' F. Butter two or 3 loaf pans. Or get creative and use round pans or bundt pans...whatever floats your boat.

In a small bowl combine the molasses and baking soda until light in color and frothy


Ok, so my bowl was a bit on the small side.

In a large....very large bowl, cream together the butter and brown sugar. Add the eggs, jam and jelly and beat well. Add the frothy molasses mixture, spices, whipping cream and almond extract. Beat well.

Get the bowl of nuts and pour the flour in there and stir until combine. Add 1 1/2 cups of the nut mixture to your butter mixture and mix well. Then add the remaining but mixture and mix well until everything is fully combined.


Divide the mixture between your prepared loaf pans. You can fill them almost to the top. This stuff doesn't rise all the much.

Bake for 1 1/2 or 2 1/2 hours (time frame depends on the size of the pans) or until a toothpick stuck in the middle comes out clean.

Cool for about 10 minutes than carefully remove from the pans and all to cool completely.


Once cooled, take a skewer or something similar and poke holes all over the place


Using about 1/4 to 1/2 cup of your coconut rum, and pour over the cakes. Top, bottom, sides.


And watch all that rummy goodness soak right into that cake.

Now, carefully wrap each cake with plastic wrap. Then wrap them in foil and either place them in tins and store in the fridge until you're ready to eat them. Or give them away.


Note: I don't have tins. So I just put them in the fridge without the tins. When I give them away, they'll just have a bow on the foil.

When you're ready to serve them...if you have some whole dried pineapple slices....soak in some rum. Dust the top of your cake with some powdered sugar and decorate with the pineapple and maybe some cherries if you have them.


And there you have a gorgeous Tropical Fruit Cake to share for the holidays.

Loaded with fruit and nuts....


And drowning in rum.

Of course...if you're still not into eating fruitcake. No worries.....there's always the doorstop alternative. Or the continuously recycled one that keeps going from one family to another...you can just add it to the rounds. But if I were you, I'd give this one a try. I think the tropical twist is a plus and the coconut rum wonderful!

Thank you Beth!!


Merry Christmas and Happy Holidays my friends.


Tuesday, October 23, 2012

Apple Pecan Mini Pies with Brie Cheese


I'm not big on pies. Although I love pecan pie.

I'm not a fan of pie crust. But some aren't all bad.

Cooked apple isn't my thing. But I love a good Apple Betty.

So why did I make these Apple Pecan Mini Pies with Brie Cheese, you ask? Haven't you ever craved something that's not your favorite thing? Just to see if you can make it in a way that suits you? Well, that's kinda what I did. I saw the Honey Crisp apples (my favorite apples) at the store and had a weird craving to bake something with them.

I've had some filo dough in my freezer that I've been dying to use. When I bought it, I thought I had bought the filo cups. HA! Well...that's not the case. I had the sheets.

Let me tell you a little something about the sheets. Frozen sheets to be specific. IF you are able to find fresh filo dough....do yourself a favor and use it. If you can make your own filo dough...I'm totally envious. The frozen ones have a tendency to rip, tear, fall apart. And basically make things a little more.....challenging. I did survive...but next time, I'm going to the local Armenian market where I've been told has fabulous fresh filo dough.

So...bottom line? I replaced pie crust with filo dough. I made mini apple pies with brie cheese and pecans.

I loved it!


These little mini pies are perfect. They aren't too sweet. They aren't messy. The pecans were roasted prior to baking and add a great smokey flavor along with the nuttiness. The apple texture, with it's sweet tartness is the perfect offset to the brie cheese. And the filo crust? FABULOUS!!


Apple Pecan Mini Pies with Brie Cheese
Printable Version

4 apples, peeled, cored and diced (I used Honey Crisp apples) - about 3 cups
1 TB butter
1/4 cup granulated sugar
1 tsp cinnamon
1 TB cornstarch
2 TB fruit preserves (I used my Vanilla Fig and Pear Jam)
1 1/2 cups toasted pecans, chopped
16 toasted pecan halves to garnish
8 oz brie cheese, cut into 16 - 1/2 oz chunks.
Filo Dough (the amount of sheets will depend on the size of your sheets. You will need enough sheets to make 16 sets of 4 - 4x4 sheets)
melted butter for filo sheets

Preheat oven to 325' F

In a medium sauce pan, combine diced apple, 1 TB butter, sugar, cinnamon, cornstarch and preserves. Simmer over low heat for 5 mins.

Add the chopped pecans to the apple mixture and continue simmering for another 5 minutes. Not too long. You want the apples to still be crisp. Set aside

Prepare your filo dough as follows:

Take one sheet and brush the edges with melted butter (this keeps it in place), then continue to brush the whole sheet with butter. Place another sheet on top and brush it in the same manner.
Cut the two prepared sheets into 4x4" squares. Take two square sets and lay them on top of each other at an angel to form a star.


The sheets that are set aside, waiting for their turn to be used in greatness need to be covered with a damp towel. They dry out really fast.

Also....if you end up with a really rebellious sheet....


Don't stress too much. Forgive the little pita (sailor talk for "pain in the a$$"), it is frozen dough after all...and work with it. Gently. Sometimes rustic is beautiful. Be patient. Keep the goal in focus. The greatness is in the end result, made sweeter by the struggles.


Now, take your filo star and place it over a muffin tin. Gently press down on the center to form a cup. Repeat


You should now have 16 prepared muffin tins. Place a chunk of brie cheese inside each muffin tin.


Divide the apple mixture evenly between each cup (this should measure out to about 1/3 cup each, depending on the size of your apples)


Top each cup with a pecan half


Oooooh....can you almost taste it? You might notice that your filo edges are starting to dry up. Brush them again with melted butter or spray them with butter cooking spray.

Bake for about 40 minutes or until the edges of your filo are golden brown. Let sit in the pan for a couple of minutes then gently remove with a butter knife and place on a cooling wrack.

Enjoy as soon as they're cool enough to eat or place in the fridge overnight and enjoy them even more the next day. These little condensed apple pies are just as good, if not better served cold as they are hot out of the oven.