

I've been wanting to try my hand at bagel making for quite some time. When I saw that it was part of the assignment this month in the HBin5 baking group, I was thrilled!!

Then I noticed that not only were we going to make bagels, but they were cinnamon raisin bagels!!! Now that really had me excited. There were a couple other breads on the assignment list that I haven't gotten around to yet. I'll let you know when I do.
Before I start...let me just say that these aren't whole wheat. I had some of the master dough from the Artisan Bread in Five Minutes A Day that had been in my fridge since last weekend so I decided to use that instead. If you'd like the recipe and instructions for the dough, you can check it out at the author's website: Artisan Bread in Five It really is a lovely no-knead bread that's simple to make and easy to work with.
Now that you have access to the recipe, I'm going to show you how to make bagels. Not that I'm an expert by any means. Especially since this was my first attempt. I just want to show you how easy they are. And if I can make them....so can you!
I had about 12 oz of dough, which made 4 bagels, each using 3 oz.
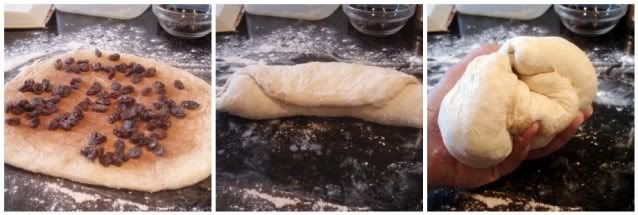
With my fingers and a rolling pin, I rolled the dough out and sprinkled it with cinnamon sugar and raisins. Then rolled the dough up as if I were going to make cinnamon rolls. But that wasn't the plan, now was it? So the dough got wadded up into a ball.
So far, not so difficult, right?
Now for the fun part!! Divide the dough into 3 oz wads. Dust the wad with a little flour and form each one into a ball by stretching the surface around to the bottom as you rotate the ball in your hand. (The peeps over at Artisan Bread in Five have a great demo on how this is done or you can watch this little video from YouTube of an interview about the basic dough with a quick little demo on how to form the ball)
Ok, so we have the ball formed....then stick your thumb through the middle and stretch it out with your fingers then place it on a flour dusted surface. Cover with plastic wrap and allow to rest at room temperature for about 20 minutes.

I have a pizza peel. Its not the most expensive or best one out there....but it works wonderfully. It's made of a light wood and I bought for about 10 bucks. Not bad. Especially since I use it constantly. I also have a baking stone. For the bagels, you don't have to use a baking stone if you don't have one. Use a greased cookie sheet.
While the bagels are resting, preheat your oven to 425' F. If you have a baking stone, preheat it in the oven on a middle rack. Also, place a tray on another rack. You will be pouring 1 cup of hot water in that tray when it comes time to bake your bagels.
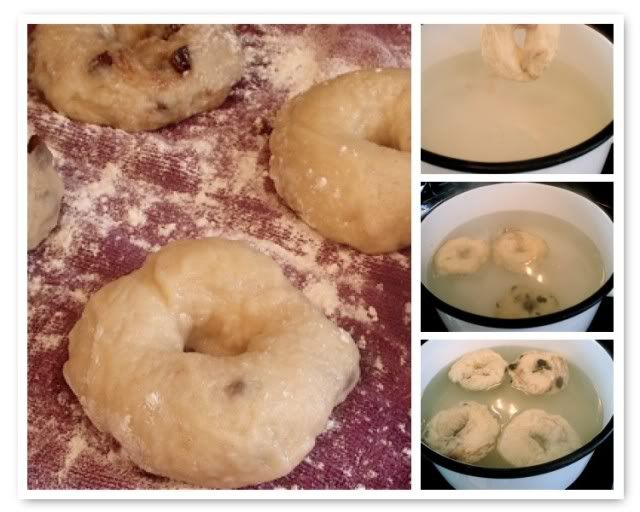
Get out a large pot and bring about 8 quarts of water to a boil. Reduce heat to a simmer and add 1/4 cup of sugar and 1 teaspoon of baking soda to the water.
Drop each bagel into the simmering water and watch them sink like a stone! Don't worry, they'll float to surface in a couple of seconds. Don't over crowd the pot....they need their room to float around without getting in each others way. After 2 minutes, flip them over with a slotted spoon and allow to simmer for another minute. With the slotted spoon, remove each bagel and place on a clean kitchen towel that has been lightly dusted with flour. This will help to absorb the excess water.

And here we have flesh, homemade, artisan style bagels. They're not perfect in shape but hey....they certainly are recognizable. Plus they smell incredible...

And how do they taste you're wondering? Fabulous! Because the dough I used was a week old, it had a bit of that sourdough flavor going on....and any bread with cinnamon and raisins is going to make me drool.
I had a blast making them. And the family likes them. I am absolutely thrilled with this whole bagel thing. I think my next batch will be jalapeno and cheddar bagels. Or onion and garlic. Or.....oh man...the possibilities are endless.
So...now that you've seen how easy it is, and I think you can probably use just about any bread dough after it's first rise......do you think you'll be giving it a try?


I havent' tried this one yet, but I am encouraged by your success. Your bagels look lovely. Wish I could taste them.
ReplyDeletewhat a great bagel!!! thats one thing I have never made, I have to try it!
ReplyDeletecheers
Dennis
wounderfull bake,luks very soft...Raisins r very tempting...
ReplyDeleteAnd I like the sourdough taste... and I love bagels, and cinnamon!!! These are really very very interesting... thanks for sharing...
ReplyDeleteBagels have gotten so expensive lately that this has got to be economical - not to mention better tasting.
ReplyDeleteWow look at you go girl!!
ReplyDeleteThey look great!
I'm still afraid of baking, lol.
ReplyDeleteThese look really good, just give me a schmeer of boursin cheese on one and I'll be a happy dude.
any kind of cinnamon-raisin bread is my absolute FAV!!! These look absolutely awesome chicky!
ReplyDeleteI've been dying to make bagels! All of your bread posts almost have me ready to try my hand at it!
ReplyDeleteThey look awesome!
This is a really nice post. The bagels look very authentic, and I like how you documented the process!
ReplyDeleteGreat tutorial! Those bagels look delicious- I'm a big fan of cinnamon and raisins too. YUM
ReplyDeleteI'm making bagels for sure this month...and ya know, the wine idea isn't so bad. Perhaps soaking the raisins in wine would be a good way to add it...I bet that would be nummy!! Hmmm...brain working overtime...belly is hungry ;) Your bagels look great!
ReplyDeletethis is your bagel debut? i'm impressed! i don't think you could've picked a finer batch with which to begin--cinnamon raisin is THE way to go!
ReplyDeleteWow, I am encouraged by your success! My bagels didn't come out well. I covered them with a towel and used a very small pot, one at a time. I will try your way next time, they look so delicious!
ReplyDeleteI have to agree your method and result is very encouraging. I will give it a go when next I have some spare dough.
ReplyDelete