
This is the second bread recipe from Healthy Bread in 5, the online Bread Braid hosted by Michelle from Big Black Dog The actual HBin5 thing doesn't start until January so this was kinda like a "test-run". Actually it's our second test-run, but who's counting.

You know...the best part of this whole thing is that all the breads are no-knead. The other best part is there are soooo many experienced people participating. Tons of things to learn and tons of peeps to help you in your time of crisis...errrr.....need.
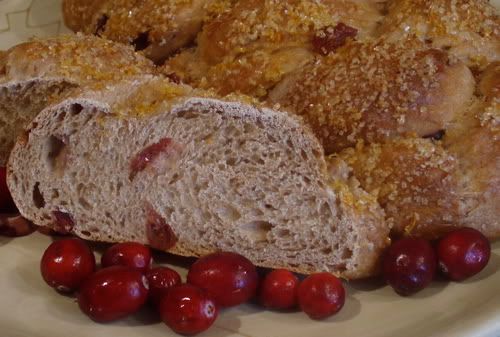
When it was announced that the recipe for December was a Challah (pronounced haalaa)...I had NO idea what that was. I've discovered that it is a Jewish yeast bread made with lots of eggs and often times braided.
Braided? yikes. Thats scary and exciting at the same time. So I watched a couple of the youtube video's that Michelle linked to and you know what? It wasn't as scary as I thought it was going to be. But then again, I stayed with the basic 3 strand braid...and not the 5! I mean, I know how to do a basic braid. And it's easier than braiding hair (you don't have all those loose strands of fly-aways to frustrate you)
Maybe someday I'll try the 5 strand, buuuuut not yet.
Anyways, if you'd like the recipe, you can find it ------->HERE<------------
I did make a slight change in my recipe. The original recipe called for wheat germ. I don't have any. My grocery store didn't have any and I didn't have the time to go elsewhere. So I just substituted it for more wheat flour. Other than that....I did as I was told.
I wisked the dry ingredients first (craisins and orange zest are not considered dry ingredients)

I then added the craisins and orange zest

Theeeeeeeen....I added the liquid

Oh ya...I forgot to mention...I halved the recipe. I wasn't sure if I'd be successful, and I didn't know if I'd actually like it. Plus my large bin (that I use for whole recipes of this sort) was in use so I needed to half the recipe so it would fit in this smaller bin and still have room to grow. Dough needs room to grow ya know.
And look....it grew :)

I just love that part. I had a before and after pic...but the before pic really sucked so I left it out.
Anyways....after letting it do it's thing on the counter for 2 hours, I stuck it in the fridge for a while. This is a very wet dough and since it needed to be handled more than other no-knead breads that I've worked with, it really did need time to chill and firm up a bit.
After a few hours I removed some of the dough and rolled and worked it into a long rope
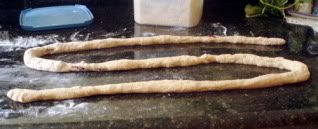
Divided it into thirds and started braiding it from the middle.

Thats what I was told to do so thats what I did. I don't know why.....so don't ask me. I'm sure someone out there knows.
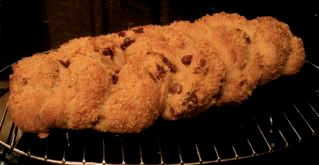
Anyways, when I was done with the one half....I flipped it over and braided the other half

I think the most challenging part of this braided bread thing is having the "ropes" all even in thickness.
Then I got a little more dough and made this figure eight looking thing (I'm sure it has an official name but I have no idea what it is. It just looked like fun in the demo so I tried it out)

Oh...bwt this pic is after 90 minutes of rise time after which I brushed each loaf with an egg wash...then sprinkled with an orange zest / raw sugar combo.
The bread was then cooked for 30 minutes. While it's cooking lemme explain a cool little trick (one that makes you go "duh") that I learned from my fellow HBin5 peeps....you see, the full recipe calls for 3 eggs. Several of us made half a recipe. Someone, brilliantly asked "how do you halve 3 eggs?" (I was wondering the same thing...thinking maybe we'd use 2 eggs?). Someone then responded...."mix the eggs together, pour into a measuring cup and use half. Save the other half to use for your egg wash." That is just to simple!
Now...I wasn't real happy with the initial rise of my bread. I thought that maybe it would pop up in the oven, and it did, kinda. I was hoping for a nice fluffy loaf...but I didn't get it. The flavor was awesome!!! But it was slightly on the dense side. Which is pretty typical of a lot of wheat breads. But...I have to say that the fridge where I keep my dough is out in the garage and runs colder than my house fridge. I thought maybe I didn't let it rise long enough...and maybe that was the problem? Also, it was suggested in the recipe to let the dough rest a few minutes before shaping it if it's resistant. Hmmm...maybe that was the problem? Or maybe it wasn't a problem at all. Maybe thats just how it's suppose to be.
Well...this is how my first loaf came out...

I still had some dough in the fridge...and a few days later, I decided to finish it off. Besides, it was close to the dough's "expiration" date and I needed to use it or lose it (so to speak). In all honesty, I think I was a day late....but I figured it was worth a try.
This time I let it rest on the counter for several minutes (10?) before I started playing with it. Instead of making one long rope and dividing it up, I divided the dough equally first then shaped it into ropes. Also, I let it rise for 2 hours instead just the 90 minutes, before baking

I think I got a fuller rise this time.
Everything else I did the same...egg wash, raw sugar sprinkles and 30 minute bake time.
The picture sucks (couldn't get rid of that awful orange glow.....argh)...but it's much fuller. And thats the loaf that is picture at the beginning of this post.
What I'm beginning to learn is....the time frames are guide lines....getting a feel for the desired outcome is the key to feeling comfortable with your dough. Not that one loaf tasted any better than the other....cuz both were great...but I think one is "prettier".
Soo...thats the story behind my very first ever Challah.
Is this where I'm suppose to say shalom?
(oy)


Danielle, you are over the top! I love reading your funny commentary. Oy, indeed and shalom while we're at it. Great to see all of these wonderful HBin5 recipes. This one looks awesome!!!
ReplyDeleteWow congratulations on making your first challah bread!
ReplyDeleteLooks great!
Mazal tov on your first challah! It's such a fun bread to work with, very versatile! I also let mine sit out longer...my kitchen hovers around 62 degrees, so I sometimes almost have to double the raise time. Good thinking on your part! Todah Rabah for sharing!
ReplyDeleteYou are so funny, Danielle! Your breads came out great!
ReplyDeleteGreat post! Your breads look fabulous!
ReplyDeleteOh, nice job!! Looks killer...and it's so long...LOL, I don't have anything that long to bake it on, plus I don't think my oven is long enough. :D
ReplyDeleteDani wow, you are really coming along with some mad bread skilz there chicky! I'm so impressed. Great pics too!
ReplyDeleteThat bread looks wonderful, Danielle!
ReplyDeleteGreat job thanks!!!
ReplyDeleteYour braids look so nice and your second braid does look like a better rise to me too! Glad you had a good time with Challah, it is a fun to braid bread.
ReplyDeleteI've seen so many great shots of this bread and yours is no exception!
ReplyDeleteCongratulations! Beautiful, beautiful bread. Loved the lesson in the braiding.
ReplyDeletethis bread is making the rounds today from all you talented bakers... WELL DONE. Yours looks great. I always enjoy hearing how new recipes are improved the second time, great to stick with it
ReplyDeleteGreat job on the braiding. I think you've got it down! I loved the play-by-play.
ReplyDeleteI don't know how you got your dough that long before you cut it to braid. It looks very even and turned out very pretty! Thanks for the help!
ReplyDeleteNice, it looks good to me! Your braiding is way better than mine, the one time I made challah it was embarrassing to post about.
ReplyDeleteExcellent job on your first braid! The crumb on your bread looks amazing. Looks like a perfect bread!
ReplyDeleteGreat!
ReplyDeleteThe flipping over is to help the braids stay even, especially in the middle.
Judy L, TN
That's a gorgeous looking challah, Dani.
ReplyDeleteI bet I'd love the taste, my husband would hate it, lalalala :)))
Your braid looks great and long! Thanks for sharing :)
ReplyDeleteFirst time challah and braid for me too! I didn't realize the pronunciation until I watched a YouTube video for braiding, either. I didn't get the starting in the middle thing, though, and the video I watched didn't do that. So neither did I. I was afraid it would make the middle look funky, but yours looks great!
ReplyDelete~Jenny~
This is my first braid as well! I have to admit though I got kind of tired of braiding by the time I made my fourth pound of dough...and I just ended up making rolls. Your braid looks super good though!
ReplyDeletevery, very impressive loaf! there are three things i love about challah--the braided aspect, the fluffy and flavorful result, and the pronunciation of its name. i appreciate an excuse to clear the phlegm from my throat. :)
ReplyDelete