

It's one thing to make great artisan type breads, baguettes, rolls, etc. I love them all. But the Frugal Franny in me (or maybe it's the Little House on the Prairie character in me.... and no, I refuse to be Nelly although Nelly was pretty hysterical as a stand-up comedian but that's a story for a different time) I have this desire to make sandwich bread. Loaves that look like the kind of bread I grew up on...only I made them. Something you wouldn't think twice about when grabbing a slice for toast in the morning.
In my hunt for soft sandwich sourdough bread, I found myself in a website called The Fresh Loaf. I poked around a bit and discovered a forum where I could introduce myself and ask questions.
So I did.
And I got a response that very day!
Ford and Amolitor were so kind in answering my questions. Ford even shared his recipe, and allowed me to share it with you. You can check out how the forum thread went --->Hello from Los Angeles<--- there's a lot of great information there regarding when a starter has reached its peak.
Just a quick FYI....
For a starter that is at 100% hydration, you measure the starter, flour and water by weight with a 1:1:1 ratio.
For a starter that is at 166% hydration, you measure the starter, flour and water by volume with a 1:1:1 ratio.
White Sourdough Sandwich Bread
makes 3 loaves of bread
Printable Version
3 - 5" x 8" loaf pans
2 3/4 cups sourdough starter at 100% hydration
3 3/4 scalded milk, cooled to below 115' F
10 1/4 cups bread flour
1 1/2 TB salt
1/4 cup melted butter plus more to brush the dough
Butter or shortening to grease pans
We're going to start off by making a poolish by combining your starter with milk and half of the flour, in a large bowl.

I just love that thick, bubbly starter.
Set aside for 1 hour.

Once that hour is up, add in 1/4 cup melted butter, salt and as much of the remaining flour as you can while still mixing with a spoon. Then turn it out onto a well floured surface and knead in more of that flour until you have a soft, non-sticky dough.
Oil a large bowl, place the dough inside

Cover with plastic wrap and allow it to double in size.
Prepare your loaf pans by brushing the insides with melted butter. Turn the dough out onto a floured surface
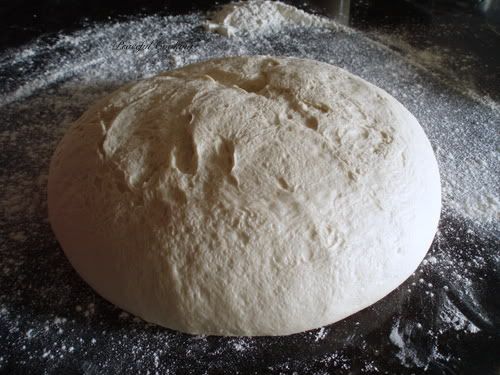
Divide into 3 equal parts and shape into loaves. Place them into your prepared loaf pans. Brush the tops with melted butter, cover with plastic wrap

Allow to rise for about 2 hours, or until the tops are above the rim of the pans (picture above is prior to rise).
Preheat your oven to 450' F. Place a large pan on the bottom rack in the oven and careful pour in a cup or two of boiling water.
If you'd like, slash the center of each loaf with a sharp knife, down the center (I forgot to do that...no big deal). Also, this next stage I didn't do which is to mist the tops of the loaves with water. (I don't have a water mister in my kitchen...silly me). Then spray them a few more times, every 2 minutes during the first 15 minutes of baking.
Place them on a rack that is positioned in the center of the oven. After the first 15 minutes, turn the oven temp down to 350' F and bake for 40 more minutes or until the inside temperature of the bread is 190-195' F.
Carefully take the bread out of the pans and allow to cool on a rack.


Ok....I just discovered another step that I totally missed in this whole process. As soon as you place the bread on the cooling rack, before it cools.....brush all the sides with melted butter. Cover with a damp paper towel and plastic wrap. THEN allow to cool. Hmm...I'm going to have to make more of these beautiful loaves of bread and see how that works out. I am very happy with how they turned out as is..but the addition of the butter brushing and steam cooling would probably make them even more soft.
I waited (as needed) until they had cooled completely before slicing. I use my electric knife to do this and it works wonderfully.
I then froze 2 of the loaves for later use, which works out very well.
This bread is wonderful! It makes fantastic sandwiches

It's soft yet holds together (unlike that store bought stuff)....and has that lovely sourdough tang.


I started my own sour dough starter over a month ago. I'm waiting to feel confident to get started. You just helped me. A lot! I'd say that you did a remarkable job and those loaves are gorgeous. There is NOTHING like homebaked bread. I'll bet this smells fantastic.
ReplyDeleteOooh....once you get started (and realize how easy it is)...you're going to be hooked! It smells and tastes amazing! (makes really good croutons for soups and salads too)
ReplyDeleteNow that the holidays are over, I hope Alexis gets back into her baking mode, I'm craving some great bread like this.
ReplyDeleteYour bread looks perfect! So, do you weigh your ingredients? I need to get a scale. I really, really want a nice soft bread like that.
ReplyDeleteI have a wonderful digital scale. it does oz, lb, g and kg. and it tares off (which is my favorite feature). I do weigh my ingredients sometimes...just depends on what i'm making. When I'm "feeding" my starter...I just eyeball it. Although I did initially weigh the water and flour when I changed my starter from 166% hydration to 100% and when I'm getting ready to use it next...for example..I weigh 8 oz of starter (in my case that was 1 cup). 8 oz of four was about 1 2/3 cup and of course 8 oz of water was 1 cup. LOVE MY SCALE
ReplyDeleteMy goodness, those are some gorgeous loaves of bread, Danielle! I have a digital scale that I find myself using more and more since I bought it. I need to get a sourdough starter going!
ReplyDeleteoh my gosh! your sourdough bread is absolutely perfect!!
ReplyDeletehave a great day,
mini baker
Just threw these babies in the oven! :)
ReplyDeleteLike you I LOVE LOVE LOVE my scale. It gives me that extra boost of confidence to try out new recipes because the weight is always going to be accurate. I did a test on my three sets of measuring cups and they were all off by about 5-10 grams of eachother! When you are measuring out 10 cups of bread flour that could really make or break it for you!
Thanks for sharing your recipe and pictures! :D
I don't have a kitchen scale, but decided to try this anyway. My loaves turned out amazing! It was the best batch of bread i have ever made!
ReplyDeletetried your recipe today and it tastes oh so yummy!
ReplyDelete