
What do you do when you have a little dough? Why....you make an Epi of course. If you don't know what an Epi is, no worries, I had no clue whatsoever until recently. It's bread that is shaped like a wheat stalk. It's beautiful, impressive and not difficult at all.
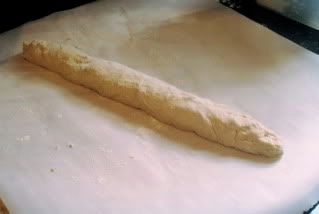
You start out with a 1/2 lb. ball of dough, about the size of an orange (I used the whole wheat "Master Recipe" from the Healthy Bread in Five Minutes a Day cookbook. Recipe can be found ----> here <----) Form the dough into a ball and gently stretch it into an oblong shape and then fold into thirds (the way you'd fold a letter)

Then pinch the "letter" closed

This is beneficial to the outcome of the shape of the dough. although my ends should be more tapered. As you can see, I still have to work on mastering this technique.
Gently stretch the dough into a thick rope, about 1 1/2" in diameter. I then placed my dough onto some parchment paper so that when I transfered it onto the stone, it wouldn't get distorted and ruin my "wheat stalk" effect. Anyways....Loosely cover the rope with some plastic wrap and allow to rest for about 40 minutes.
Now is the time to preheat your oven to 450' and heat up your baking stone for about 30 minutes.
Onto the fun part....sprinkle your rope with some flour and get out some kitchen shears and start snipping away...

I tried to keep the scissors at a 45' angle. As I snipped, I'd use the scissor blade base to "carry" the "stalk" off to the side, alternating sides. Be careful not to snip all the way through....maybe about 1/4" from the bottom.

Slide your loaf onto the stone (including the parchment paper). Pour a cup of hot water into a roasting dish or broiling pan that's somewhere in your oven...(below, above...whatever). This will create steam and make for a wonderful crust.
You're going to bake the loaf for about 25 minutes. Set the timer for 17 minutes. At that time, slide the parchment paper out, leaving the loaf in. Continue baking for another 8 minutes, until nice and brown and firm.

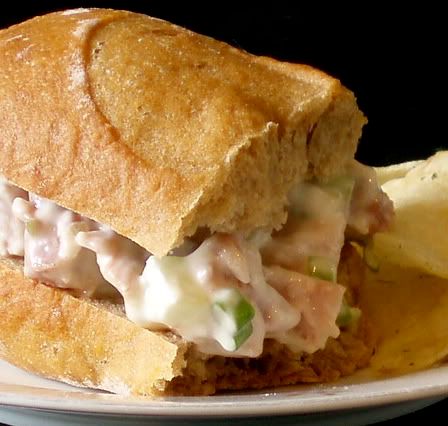
Now tell me.....if you saw this served at a dinner party, wouldn't you be impressed? And check out the inside

It's just so fluffy! (I'm sure there's a proper term for that LOL).
Oh, and btw...this was one of the assignments from our HBin5 group

Lead fearlessly by Michelle over at BigBlackDogs.net
Soo...this loaf went pretty quickly. Tasted great with just butter. I love the little wheat stalks. They're perfect for breaking off individually. I made a little ham salad and used one of the stalks for a quick little sammy....perfect for lunch.
FYI: For this loaf I did use white whole wheat flour for the milder flavor.


I love the looks of the wheat stalk bread....very elegant and perfect for company! I also tend to also use the white whole wheat for it's milder flavor.
ReplyDeleteI am so impressed with your beautiful epi! It does look like a big wheat stalk.
ReplyDeleteOMG!! That looks soooooo good!!!!
ReplyDeleteSo beautiful! Didn't know either about the name or the way to make the wheat shape. Thanks for wonderful explanation.
ReplyDeleteI am so impressed with your bread making skills! No fearing the yeastie beasties for you!
ReplyDeleteI've seen this bread on a bread book that I just got and was fascinated by the shape. That's how you do it. So nice! :)
ReplyDeleteNow I know what I did wrong with mine - I snipped it before the rise. So when it rose, the shape became very distorted.
ReplyDeleteVery nice!
thanks you guys! I think this is one of the more fun breads to make. :)
ReplyDeleteGwen....ya, you might wanna wait until after that last rise...you'll be much happier and so will your bread :) it still all tastes good no matter what shape though, doesn't it
Great job, that looks perfect! I've been wanting to make one of those since I saw it on a cooking show. I'm not sure I'm brave enough to try it, especially after the mess I made of challah...
ReplyDeleteI would indeed be impressed if i saw this at a party... hopefully my friends will as well, when i make this for them
ReplyDeleteBob - have your girlfriend teach you how to braid hair. once you have that down....a challah should be no problem! LOL
ReplyDeleteDave - I can't wait to see it. btw..I haven't been to your blog lately because it makes my browser crash (yours among a few others) not sure why that happens. maybe its cuz my laptop is old? Anyways.. I have to wait until I can steel my daughters or stay late at work.
If you ever did an asparagus bread, you can tell them the shape is the asparagus tip instead of wheat:)
ReplyDeleteGreat trick!
I'm scared of the epi, but yours looks fantastic! Great job.
ReplyDeleteWhat a gorgeous little loaf--it looks wonderful and I bet it made th perfect mini-sandwich.
ReplyDeleteTHAT is just slick! I love it... Thank you for the Epi Education... :) That would be awesome to pass around as a dinner roll...
ReplyDeleteIs that what those are called? I've had it, but never knew it was called an epi. I'd love to try this recipe. Must have been fun to make!
ReplyDeleteYour Epi turned out so nice and wasn't it fun to make!
ReplyDeleteI only had a small amount of dough left and was surprised how little dough the Epi took to make an impressive loaf!
danielle, this is so nifty! it's fun and impressive and undoubtedly tasty to boot. i've never seen anything like it but i'm inspired to make it myself!
ReplyDeleteWhat a cute epi! It reminds of a vine with thorns sticking out of it! It turned out perfect, so golden brown and yummy looking.
ReplyDelete