

Starter and all.
If you "like" my Peaceful Cooking fan page on Facebook, then you may have seen my daily posts of my starter adventure. For those of you who didn't see it, or who do not have a Facebook account, no worries...I'm going to give you a semi quick (because there is nothing quick about sourdough) version of how to make a sourdough starter and a loaf of bread. I'm going to share with you what I know (which isn't much) about the process. If you want more details and specifics (and I mean....scientific type specifics) then I highly highly recommend a wonderful series of e-books called Discovering Sourdough by Teresa L. Hosier Greenway. You can purchase the e-books (for a modest price...and I highly recommend each book. Soooo worth every penny) from http://www.northwestsourdough.
And without further ado....lets get to it!
Keep in mind that this is a process. It's not labor intensive. It's time intensive. It's a "labor" of love and worth every single minute and day.
Sourdough Starter

Day 1
1/4 cup bread flour
1/4 cup rye flour (or whole wheat...I used rye cuz I had some)
1/2 cup pineapple juice (or apple juice...I used pineapple juice)
In a very clean, non-metallic 32 - 48 oz container with a lid, mix thoroughly. Cover lightly and let set at room temperature.
Day 2
Stir. Cover lightly and let set at room temperature
(pretty complicated, eh?)
Day 3
Stir, pour 1/2 of your starter out and add
1/4 cup bread flour
1/4 cup rye flour (or wheat)
1/2 cup pineapple juice (or apple juice)
Stir will (a whisk works great! Incorporates a lot of air which is a good thing), cover lightly and let set at room temperature
Day 4
Stir, pour out half of your starter and add
1/4 cup bread flour
1/4 cup rye flour (or wheat)
1/2 cup pineapple juice (or apple juice)
Stir, cover and let set at room temperature
Day 5
Stir, pour out half of your starter and add
1/2 cup filtered water (do not use tap water)
1/4 cup plus 2 tablespoons bread flour or unbleached white flour
2 tablespoons rye flour (or wheat)
Stir, cover lightly and let set at room temperature
At this point, we're done with the pineapple juice and are weaning the starter off the rye / wheat flour. You may notice a layer of liquid at the top....that is called a hooch. Stir it in...don't pour it off. If the hooch is in the middle of the starter or at the bottom...somethings wrong. You'll probably want to start over. If you see mold....somethings wrong. If your starter turns pink or orange....somethings wrong. As long as you use clean utensils, filtered water and fresh flour....you should be good. If you want more details or explanations, I suggest getting the e-books or visit the authors website. You can email me too but keep in mind that I am by no means an expert. This was the first time I had ever attempted this whole "science project" in my kitchen. I will do my best to answer any questions you might have, though.
Days 6 - 14 (yes...it takes 14 days for a starter to be ready for bread making)
Stir, pour out half of your starter and add
1/2 cup unbleached flour or bread flour
1/2 filtered water
Stir, cover lightly and let set at room temperature.
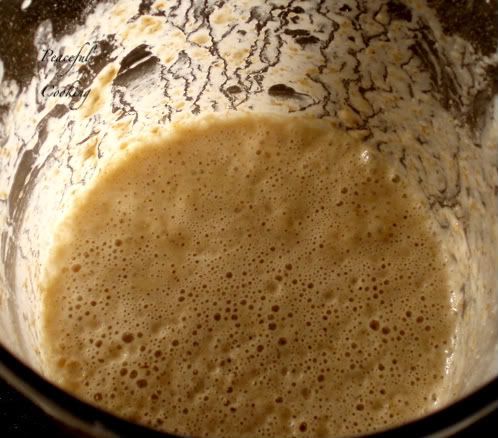
You will be doing the same thing for the remainder of this process. You may notice some odd smells coming from your starter....it's normal. Sometimes it probably won't smell too good at all. But by the time you get to the 14th day, it should smell tangy and yeasty...in a good way. Below are a few pictures at various stages....
Day 8:

You can see my hooch (that doesn't sound right does it?!) in the pic on the left as well as in the middle. These were taken before I stirred and "fed" my starter. The picture on the right is after the "feeding".
Day 9:

This was taken before the feeding.
Day 12:

Taken after the feeding
Day 14:
Before the feeding....

After the feeding....

I did my feedings in the morning. No particular reason. On the 14th day, I fed my starter as usual. That night I poured out some of my starter so that I had about 1 cup left and added
1 cup unbleached flour
1 cup filtered water
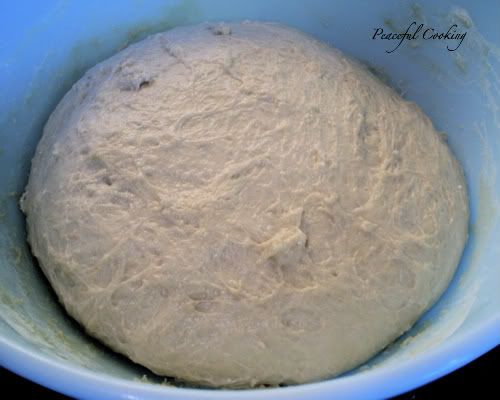
When I woke up, this is what I had.....

Me and my starter were ready to bake (I hoped). If I'm not mistaken, that is what is called a "vigorous starter".
I was nervous....not confident or secure in anything that I had going on here. Not even sure if I knew what I had and if it was what I
Sourdough Bread (this takes several hours.....start early in the morning)
1 cup vigorous starter
1 cup tepid water
2 teaspoons oil
4 cups bread flour
2 teaspoons salt
In a mixing bowl, combine the starter, water, oil and flour. Stir until well incorporated.
Allow the dough to rest for 20 minutes.
Sprinkle in the salt, stir for a couple of minutes (I used my hands).

Cover with cotton towel and allow to set at room temperature for 5 hours.
After the 5 hours is up, stir the dough and turn out onto a lightly floured surface.
Fold the edges to the middle, sprinkle a little flour on the dough and continue to fold in the edges, rotating until you have the dough in a ball. (Sourdough doesn't not need to kneaded heavily).
Turn the loaf over so that the "seam" is facing down. Allow to rest for 10 minutes.
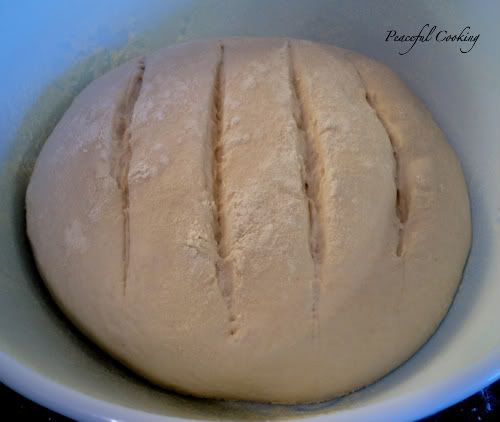
Cup the sides with your hands and jiggle it back and forth a couple of times as your rotate it in a circle. This will give the loaf a little "lift" and make it more of a dome shape.

Prepare an oven proof bowl or baking dish by greasing it will and sprinkling it with cornmeal. Sprinkle the top of the loaf with more cornmeal, cover and allow to rise for 2 hours.
1/2 hour before the 2 hours is up, preheat your oven to 450'F.
When the 2 hours is up, take a sharp knife and slash the top a couple of times about 1/4".
Here's a little trick I learned from the author here.....part of what makes a good sourdough loaf is humidity in the oven. So...I have a baking stone. If you don't have one, use a baking sheet. This is placed in the oven on a low rack. I got a deep, large roasting pan and a small ramekin dish. I placed my loaf on the baking stone with the ramekin next to it. I then covered them both with the bottom portion of the roasting pan....keeping it completely on the baking stone so that it sealing everything inside....steam and all.
I let the bread bake under the roasting pan for 20 minutes. Then I carefully removed the pan and ramekin, turned the heat down to 425'F and continued to bake for another 10 - 15 minutes. You're suppose to turn the loaf once so that it browns evenly but I forgot.
I then removed the loaf from the oven, careful removed it from the bowl and placed it back in the oven so that the bottom and side could get brown (since they were being shielded by the bowl). This took another 10 minutes. Your bread is done when the inside temperature has reached 200- 210'F. Remove from the oven and allow to cool before slicing. I know...it's hard but you really don't want soggy bread...especially after all the work you've put into it!!!
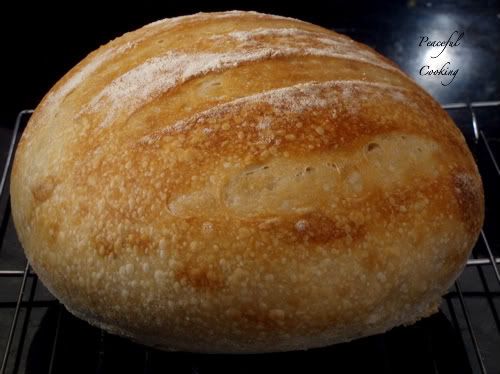
I mean....when you slice into this baby....isn't this what you want to see?

I can't wait for the weekend to come back around so I can make another loaf!


What a beautiful loaf! Working with a starter is so much fun. Your's looks great.
ReplyDeleteThis round loaf looks too pretty to cut, but I'm sure you're glad you did. That is a beautiful custary crumb. I used to have NWS's e books but I have somhow lost them. Could you e-mail them to me? Thanks so much.
ReplyDeleteYour efforts really paid off. Gorgeous! I'd love to have you send me the books. Thank-you!!!
ReplyDeleteThank you Elwood...I really am enjoying having a starter around. I can't wait to make more stuff with it.
ReplyDeleteBonnie....I just emailed you the e-books. let me know if for some reason you don't get them.
Julie, I need your email address. Send me an email: peacefulcooking at gmail dot com and I will be happy to send you the books :)
Beautiful! But such work and dedication.
ReplyDeleteYou are a better man than I, Gunga Din.
It's beautiful! I've nurtured my own starter recently, too...I love it! I think I'm gonna have to try out this bread recipe!
ReplyDeleteI would love the ebooks too, Danielle! I'd love to making a sourdough starter. The bread looks wonderufl!
ReplyDeleteWOW...WOW...WOW! What a gorgeous crumb!!! Love all the big yeasty holes!! Gorgeous crust too!
ReplyDeleteLooks like you had fun!!!
Absolutely perfect!
ReplyDeleteBeautiful! Thanks for such a detailed account of your adventure. I dabbled in sourdough for a short while--you have inspired me to try again!
ReplyDeleteI think I'll attempt this. Once you have the starter finished and ready to use, what do you do to keep it going week after week?
ReplyDeletePlease....I would love the ebooks too, Danielle! This all looks great... I will be starting this starter next weekend...just in time to make it for Thansgiving yummmmmy.....
ReplyDelete