Yum Peaceful Cooking: August 2013

Sunday, August 25, 2013

Cheesecake with Strawberry Balsamic Glaze Topping, and then some


Where to start with this one (besides with a fork).

Sometimes one random ingredient can be the catapult to multiple delicious results. That was the case when I received a bottle of Mandarano Balsamic Glaze & Sauce,

I love balsamic vinegar. Having a whole bottle of the glaze on hand? Oh yes....I was in a little bit of heaven. The tangy sweetness beckoned to me on so many levels. From sweet to savory and somewhere in between.

The first thing I did when I got home from work and opened the box was to make a drink. Not just any drink...I mean...a real drink. And yes, I used the Mandarano Balsamic Glaze & Sauce in it.


Think...Arnold Palmer gone wild.

Grab a shaker, filled almost to the top with ice. Fill half way with some good limoncello. Add a teaspoon or two (depending on your preference) of Mandarano Balsamic Glaze & Sauce. Shake vigorously. Strain into a cocktail glass and top off with some club soda. (If I had had a lemon on hand, I would've garnished my cocktail with a wedge.)

Repeat as necessary.

The balsamic cuts the edge off the sweetness of the limoncello and adds a little something extra while the club soda takes the intensity levels down (as both balsamic and limoncello have very strong flavors). It was interesting to see how they all worked together rather than fighting each other to see who would overpower whom. Mmmm mmmm mmmm. Good stuff!

Next up...since I was in the height of tomato picking and I had mounds of basil... my taste bud senses and cravings where on a caprese level. Of course I used Mandarano Balsamic Glaze & Sauce on a standard caprese salad. That's a no-brainer. But what about a pizza? With some chicken that's been marinating in balsmic? No you're talking!


Instead of a marinara sauce, just drizzle the dough with olive oil. Add lots of mozzarella cheese, some tomato slices, the chicken, throw in some red onions for good measure, sprinkle on some roughly chopped fresh basil and bake. Just before serving, drizzle some of that Mandarano Balsamic Glaze & Sauce over the top and there you go. 

Btw....did you know that you can buy fresh pizza dough from Whole Foods? Don't go looking in the refrigerator or freezer section. Go to the "food court" section...right up to the pizza counter and they'll bag up a nice ole wad of dough for you. For a price of course...but hey....if you're there already and you don't have time to make your own when you get home...its way better than anything you can get at the other markets. 

And now for the ultimate balsamic glaze application of all.....strawberries. There's just something deliciously...I dunno, complete? that happens when you combine those two. Take it to another level by injecting a bit of scotch whiskey blend....then heap that whole hot mess on top of cheesecake....and......I have no words. 

I'll just tell ya what to do....

My cheesecake recipe is always the same as this is "the best cheesecake ever!" All I do is change the topping to whatever fits the mood. 

Cheesecake

Preheat your oven to 325'. Place a baking dish on the rack below where you plan on baking your cake. 

Crust:
1 1/4 cup graham cracker crumbs
4 - 5 tablespoons melted butter
4 tablespoons sugar
Filling:
3 - 8oz packs of cream cheese at room temperature
4 eggs
1 cup of sugar
2 tablespoons vanilla
1/2 teaspoon lemon juice
Sour Cream Topping:
16 oz sour cream
1/3 cup plus 1 tablespoon sugar
1 tablespoon vanilla

For the crust:
Combine ingredients. Pat on the bottom of a spring form pan and up the sides a little. Place in the refrigerator while mixing the filling together.

For the filling:
Beat the cream cheese until smooth. Blend in remaining ingredients. Pour into your graham cracker crust. Place in the middle rack in your oven. Pour 1 cup of hot water into a dish (such as a roasting pan) on a rack below your cheesecake. Bake for 1 hour, turning the cake 180' halfway through. If needed, add another cup of hot water to the baking dish. This helps prevent big cracks by providing a humid atmosphere within your oven.


For the Sour Cream Topping:
Combing the ingredients and pour on top of the cheesecake. Bake for an additional 10 minutes. Cool and refrigerate for several hours or over night.

A few hours before serving, make the ultimate Strawberry Balsamic Glaze as follows:

1 1/2 TB cornstarch
1/2 water plus 3 TB
2 TB scotch whiskey blend
1 TB orange liqueur 
2 TB sugar
2 cups crushed strawberries
1 TB Mandarano Balsamic Glaze & Sauce
Whole strawberries for garnishing

In a small bowl, dissolve the cornstarch in the 3 TB water.

In a saucepan, over medium heat, bring the remaining 1/2 cup water,  the scotch whiskey blend, orange liqueur and sugar to a boil.  Stir in the cornstarch mixture and heat, stirring constantly until everything thickens.  If too thick, add a bit of water (1 TB at a time). If too thin, add a bit of cornstarch (1/2 tsp at a time). Stir in the crushed strawberries and balsamic glaze. If you want a stronger balsamic presence, add another TB. 

Pour everything into a bowl and set the bowl inside a larger bowl that contains ice water. Stir to cool. Spread over the top of your chilled cheesecake. Chill an additional 2 hours.

Or....just pour the whole thing over the top...and serve as is....one big beautiful hot nirvana-ish mess. 


And there you have it. Balsamic Glaze all over the place....from cocktail, to pizza to cheesecake. Hmm...I wonder how it would taste to have the balsamic glaze directly in the cheesecake. Well shoot...after all this...and my daughters dipping into the goods...I have none left to test that out. 

I think I need more. 

I want to thank Mandarano for sharing their delicious Balsamic Glaze with me. It has been a pleasure to play with and enjoy.  

Sunday, August 18, 2013

Crabless Cakes


When my Food & Wine magazine arrived, boasting 25 vegetable dishes, my daughter was on it like bees on honey.

"Mom, we should go through this magazine and make all of the recipes!" Thank God she didn't mean, all of them on the same day. I mean, I like my vegetables and all, but for some reason they're kinda high maintenance. Lots of prep work. All that washing, drying, cutting.

I know...I am can be very lazy sometimes. I try not to be. But I can't help it.

This recipe does have quite a bit of prep work. Of course I did increase that a little by grilling the corn before using it. I figured since there was so much corn in these cakes, that the flavor would be a plus. Which it was. And I can say that the added step was worth it.


I didn't fire up the grill or anything. I just took a gas grill grate that I bought from the hardware store and plopped it on the stove top, over the flame...and grilled away. (works great for grilling peppers and such indoors as well).

Once they cooled off, I cut the kernels off the cob, and ended up with a little more than the needed 2 1/2 cups.


Crabless Cakes
Inspired by the August 2013 addition of Food & Wine magazine

1 TB Extra Light Olive Oil, plus more for frying
2 1/2 cups fresh corn kernels (about 4 ears of corn)
1/4 cup minced onion
1/4 cup minced roasted red bell pepper (I used it from a jar)
15 oz can whole hearts of palm, drained, thinly sliced and diced
2 tsp Old Bay seasoning
2 TB chopped fresh flat leaf parsley
1/4 vegan mayonnaise
2 tsp Dijon mustard
1/4 cup plus 2 TB plain dry gluten free bread crumbs, plus more for coating
Salt and Pepper

In a non-stick skillet, heat 1 TB olive oil over high heat. Add the corn, onion and bell pepper. Cook for about 4 minutes, until crisp tender.


(I could've used the green bell pepper as called for in the recipe, but I love the color variation.)

Take 1 cup of the sauteed mixture and pulse it in a food processor to create a course puree. 

Put the hearts of palm in a medium sized bowl. Using a fork, mash them into shards. Add the pureed corn mixture and the remaining sauteed corn mixture along with the Old Bay seasoning, parsley, mayonnaise, mustard and bread crumbs. Season with salt and pepper to taste (yes, you can taste it...its all veggies). Stir to combine so that everything is evenly moist. 


(Until making this recipe, I had no idea how good veganaise really is. I'm a Best Foods kind of gal, and I would not turn my nose up to the jar of Follow Your Heart Soy Free Veganaise that my daughter brought home. Good stuff!)

Line a baking sheet with parchment paper (no, you are not going to be baking these). Fill a pie plate or shallow, wide mouthed bowl with bread crumbs. Season the crumbs with a little salt and pepper. 

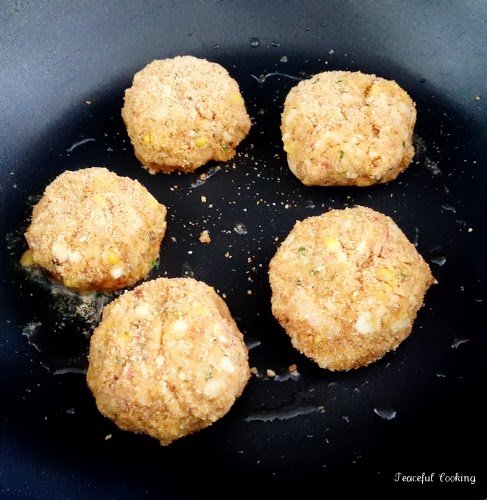
Scoop about 1/4 cup of the mixture, roll it in the bread crumbs to coat and then flatten it just a little to form a nice little fat 2" mound. You'll have about 18 cakes in the end (and very messy hands). 

(the cake in my daughters hand is too thin. Read the "tip" at the end of this post to see why that's an issue)

Using the same non-stick skillet, wiped clean and filled with 1/8' of oil, fry the cakes in batches over moderate heat.


Cook for 2 minutes per side, until golden brown. Be careful when flipping them, as they are a little on the fragile side. Remove them to a paper towel lined plate.

Wipe the skillet clean and use fresh oil for each batch until all the cakes are cooked.


Serve hot, over a nice bed or fresh greens.


These are a delicious alternative to crab cakes. Since my daughter is vegetarian and I'm allergic to shellfish, this was a great middle ground dish for the two of us. Because they are all vegetable, no meat, no egg, there were no worries about under cooking.

But let me give you a tip: I had originally envisioned flatter cakes that are a little crispy on the edges (kinda like potato pancakes). Don't go there. These are very delicate cakes and fall apart easily. Maybe adding a bit more veganaise would help? Or pureeing more of the corn mixture, instead of only 1 cup? Anyway, I highly recommend making the cakes fat rather than thin. My first batch, were thin. And looked beautiful.....until I tried to flip them


Thats when they fell apart and became a sort of hash. They still tasted great...but thats not what I was going for.

I eat the crumbs anyway.

Wishing I had some crumbled bacon to mix with it.

Saturday, August 10, 2013

Photobucket

Apparently I exceeded my allotted bandwidth with PhotoBucket. The pictures will return in 3 days. I apologize for any inconvenience this might cause anyone. In the feature, I will be removing the photos of my most popular posts from PhotoBucket to another source to hopefully prevent this from happening again. My other option is to upgrade my account, which I'm not too keen on doing (cuz I'm too cheap). Please feel free to contact me in the meantime at peacefulcooking@gmail(dot)com

For now....Cheers!


Sunday, August 4, 2013

Stuffed Zucchini Blossoms


Whether you're growing zucchini in your own garden or buying them at markets, you've no doubt come across the beautiful big yellow blooms of a zucchini plant. They may not be fragrant but they sure do taste good.

I had heard of people eating zucchini blossoms several years ago but I wasn't in a hurry to give them a try. It takes me a while to warm up to a new idea. Even in fashion (and I am by no means a fashionista), I'm just beginning to like a style as its on its way out.

The other day I was walking through the farmers market and saw some blossoms. Apparently both the male and the female blossoms are edible. I don't know why I'd think otherwise but this was the first time I'd seen them with baby zucchinis still attached....a.k.a. female blossoms. I usually just see the males (fruitless blossoms).


The above female blossoms were $1.25 for the 6 of them.


I then learned from a chef on Facebook that if you are growing your own zucchini, you can pick all but one of the male blossoms. Not only will you have something delish to play with in the kitchen and eat, but it will also promote more growth in your plant.

I suggest that you prepare and eat the blossoms the same day you get/pick them. I read somewhere that you should pick them in the morning while they are still open so as not to discover any little buggies that were trapped inside the closing flower. (isn't nature just so much fun....).


The blossoms are a bit delicate...work gently with them if you plan on stuffing them. If you don't plan on stuffing them....never mind. It's a moot point.

Let's talk about the flavor. Mild. Nothing about the flower itself stood out...but then again I had stuffed it with cheese, garlic and lemon zest, which are pretty strong flavors in themselves. Because I was using the female blossoms, I did get that zucchini flavor at that end. But even when I bit the tips of the fried flower, I was not hit with an overwhelming flavor of any kind. I think I'd have to eat it raw to really give you an accurate opinion. But it is a great vessel for a delicate and memorable appetizer. (even Sir Sportsalot ate one....which shocked the hell out of me). Now I've heard that pumpkin flowers taste like wild mushrooms. Makes me want to rush out and buy a pumpkin plant for my garden just so I can try them.

Ricotta Stuffed Zucchini Blossoms
Printable Version

vegetable oil
6 zucchini blossoms
1/2 cup ricotta cheese
1 garlic clove, mince
1 green onion, finely chopped
pinch of lemon zest
1 1/4 cups of flour
good pinch of salt, plus more before serving
12 oz beer

Heat a large saucepan or pot with 2" of vegetable oil over medium - high heat.

Combine the cheese, garlic, green onion and lemon zest in a small bowl.

Carefully open the pedals of the flower and work about 1-2 TB of the cheese mixture into each blossom.

In a medium bowl, combine the flour, pinch of salt and beer. Whisk until almost smooth. The batter should be like pancake batter, with a few lumps. Don't over mix...you'll lose the body that the beer provides. Feel free to add more flour or beer if needed to get the desired consistency.

Working in batches, carefully dip and roll the stuffed blossoms in the batter. allowing excess to drip off before placing into the hot oil. ***BE very careful as the oil will spit and splatter due to the wetness from the ricotta cheese.

Fry for 2 - 3 minutes, turning once, until golden brown. Remove from oil and let drain on rack. Sprinkle with salt.

Serve warm.