Yum Peaceful Cooking: 2013

Saturday, December 28, 2013

Gluten-Free Pumpkin Bread with Chia Seed binder


This recipe wasn't originally gluten-free. To be honest, I've had this recipe long before I knew that Celiac existed. Long before I knew what "gluten" was. In fact, I've had this recipe since I first started to learn how to bake.

Let me "date" myself....this recipe sheet was not printed from a computer, or copied on a photocopy machine. It was printed from a ditto machine. And yes, the ink is purple. And if you know what I'm talking about....you can probably almost smell the ink.

Way back when....(think...That 70's Show) I took a cooking class in middle school as part of the home ec "wheel". And we baked Pumpkin Bread. I kept the recipe (and the quiz that's on the bottom half of the paper) all these years but had not baked it since.


Although it looks like I've used it numerous times. I did bake it for Thanksgiving that year and apparently at the tender age of 12? 13? I was an extremely messing little baker.

Fast forward to the present. My daughter asked me to bake this as a gluten-free version. I couldn't pass up the challenge. I was, however...nervous. I don't enjoy the aftertaste, nor the texture of g.f. breads. My daughter doesn't seem to mind (she's earthy like that).

Anyway, just to make sure I wasn't messing anything up, I poked around the internet to see how other's were making gluten-free pumpkin breads, and that's when I came across a really great blog Gluten Free Girl and where I learned what was causing my g.f. dislike. Xanthan gum.

And that's where I learned about the wonderful chia seed replacement. I got excited cuz I actually had chia seeds in my cupboard!

Here's the basic chia seed replacement rule:


Grind up some chia seeds. Mix it with boiling water at a 1 part chia, 2 parts water ratio. This will form a gooey mixture. When a recipe calls for xanthan gum, replace it with an equal amount of the gooey chia seed mixture. If you are converting a recipe, use 1 tsp for every cup of "flour".

Note: you may have to increase the baking time due to the added moisture.

I'm going to share my converted gluten-free version. Of course you can just use all purpose flour and omit the chia seeds, and that's the original recipe.

Gluten-Free Pumpkin Bread
(adapted from Mt. Gleason Jr. High home economics class)
Printable Version

1 1/4 c. sugar
1/2 c. vegetable oil
2 eggs
3/4 cup pumpkin
1/4 cup applesauce
2 tsp premixed chia seed and water mixture as instructed above
2 cup sifted oat flour
1/2 tsp salt
1 tsp baking soda
1/2 tsp cinnamon
1/4 tsp nutmeg
1/4 tsp ginger
1/3 cup chopped walnuts or raisins (optional, I did not add either of these)
1/3 cup water

Preheat your oven to 350' F. Grease and flour 2 bread pans or line them with parchment paper.

In a large bowl, combine the sugar and oil. Set aside.

In a medium bowl, beat eggs until fluffy. Stir in the pumpkin, applesauce, and chia seed mixture. Set aside.

Sift the dry ingredients together, 3 times.

If using walnuts or raisins, add them to the dry ingredients.

Starting with the dry ingredients, alternately add dry ingredients and water to the pumpkin mixture, starting and ending with the dry ingredients.

Divide the batter between the two prepared bread pans and bake for about 45 mins to an hour (or so). I can't give you an exact time because that part of the recipe is illegible. Plus the time needed to be increased due to my chia seed mixture addition. Just keep checking it. The recipe does say that it's done when the top of the bread springs back when lightly touched with your finger tip. I used the toothpick method.


The results? Delicious and very moist. Still a little crumbly but not in a dry, corn bread sort of way. And check out the mound! To me, that is a beautiful sight. If you'd like, you might increase the spice measurements for a stronger flavor, as they are mild as is. 


Let me make a statement here: I am not required to have a gluten free diet, nor are any members of my household. I do have a very dear close friend and an aunt who have Celiac disease. I am not fluent in the ways of hidden gluten in common foods. I am not a source of medically accurate advice on the subject. I am aware of the negative affects that gluten has in our diets. I enjoy experimenting in my kitchen. My girls are very health conscious and on occasion prefer to eat gluten free. This is where my dabbling comes to play. Any misinformation is purely accidental and due to ignorance on my part. Please feel free to point out anything that I have misinterpreted. 


Wednesday, December 11, 2013

Winter Blush and an Uncommon Goods Giveaway


I have a little something, and then some, to add to your Holiday Cheer!!

I'm giving away a 
$50 Gift Certificate to 

and I have a great little cocktail recipe for you as well.

You see that pink marble looking glass in the above photo?

No, it's not a candle holder.

No, it's not marble.

It's a shot glass. And it's been carved out of Himalayan Salt! I don't know about you, but I think that's ingenious! And yes...when you take a shot, you taste the salt.


This little gem (it's one of four gems. I mean, honestly, who wants to take a shot by themselves?) was a gift from Uncommon Goods. I'm really looking forward to using these for the holidays, especially the New Year. Cheers!!!


Actually, they have a lot of great gifts and items to brighten up your holidays. If shot glasses aren't your thing, don't worry, you can choose from an incredible variety of items from gifts for 'her' to gifts for 'him', household items, stuff for kids, your office...decor and accessories for your bar. Seriously, their products are very unique and fun. 

But when I saw these shot glasses, they spoke to me. Rather loudly. You could almost say they were screaming my name! 

Almost as loudly as this beautiful cocktail.


Winter Blush
makes 6 cocktails

1 1/2 cups cranberry juice
1/2 cup ruby red grapefruit juice
1/2 cup silver tequila
1/2 cup orange liqueur
1/2 simple syrup (equal amounts of sugar and water heated to a boil, stirred until sugar dissolves)
Sprite to top off served cocktails
Candies cranberries (recipe to follow) to garnish
Orange slices to garnish

Combine the cranberry juice, grapefruit juice, tequila, orange liqueur and simple syrup. When ready to serve, pour some in a shaker filled with ice, shake until chilled and strain into a glass. Top off with Sprite and garnish.

Refreshing, sweet and a little tartness that's controlled by the Sprite. And dangerous. You can't taste the alcohol much so you better watch it. 

As for the candied cranberries...so beautiful and so easy to make:

1 cup of sugar and 1 cup of water, boiled while stirring until sugar dissolves. (this is simple syrup). Poor hot simple syrup over a cup or two of cranberries. Cover and refrigerate a few hours or over night. Strain the simple syrup out (save for using in a cocktail or other recipe). Roll the berries in fine sugar (also known as bakers sugar)


Allow to dry and use as desired.


Don't forget to enter for your chance to win the $50 Gift Certificate below! 

Good Luck and Happy Holidays


I was not compensated for this post, however Uncommon Goods supplied me with the Himalayan Salt Shot Glass.  They are also supplying the gift certificate for the giveaway.  All opinions are my own.

Tuesday, November 26, 2013

Pesto Mac N Cheese with Italian Sausage


Who doesn't love pesto? (If you're one of them...just don't tell me and we'll remain friends). Every summer, I have mounds of fresh basil from my herb garden that beg to be made into pesto. If you need a recipe, here's mine: Garlic and Basil Pesto

I fill some jars for friends and myself, I then freeze some in ice cube trays (later place in freezer bags) and store it all in freezer, giving me a complete supply for the year.  Besides using it as the usual spread and enjoying it straight up with pasta...what are some ways you enjoy pesto?

I decided to spice up my mac n cheese the other night. This idea was born at the grocery store as I was literally pacing the meat department, trying to spot something that would spark some interest with my taste buds. Italian sausage caught my eye....and a delicious dish was thus born.

Pesto Mac N Cheese with Italian Sausage
Printable Version

8 oz cooked pasta (you want to use something with ridges or holes. I used Riccioli)
8 oz crumbled and cooked Italian sausage (I used hot Italian sausage)
2 TB butter
2 TB all-purpose flour
1 1/2 cups half and half or milk (a bit more if sauce is too thick)
1/2 cup garlic and basil pesto
Salt and pepper to taste
4 oz muenster cheese, shredded
4 oz mozzarella cheese, shredded
1/4 cup Parmesan cheese,shredded (or more if desired) for topping

Preheat the oven to 375' F. Spray a 1.5 quart oven safe dish with cooking spray. Pour the cooked pasta and the cooked sausage into the dish. Stir to combine and set aside.

In a sauce pan, melt the butter over a medium low heat. Whisk in the flour and continue whisking for a few minutes. Don't let the flour get too brown. Slowly whisk in the half and half (or milk if that's what you're using). Continue to whisk until the sauce thickens. Don't let this happen too quickly...you want to cook out the flour taste. Add the pesto, muenster and mozzarella cheeses and stir until melted. Season with salt and pepper to taste.

Pour the sauce over your pasta and sausage, stir just a bit to make sure it's everywhere. Top with Parmesan cheese


Bake for about 30 minutes or until bubbly and slightly browned on top. Let cool for a few minutes before serving. 

This dish can easily be doubled and is sure to please any pesto lover! It's satisfying, flavorful and is bound to ease that oohie-gooie cheese craving that strikes every now and then. 


While you're here....don't forget to enter for your chance to win 1 of 3 


that we're giving away. Check out my previous post for details: 


Friday, November 22, 2013

Homemade Coffee Liqueur for #HandcraftedHolidays


Once upon a time...long, long ago (in a land not so far away)....during a time when I tried so hard to hang onto Santa Clause (well beyond the norm), I remember my aunt giving gifts to the adults that I wasn't allowed to enjoy. She made homemade coffee liqueur.

When no one was looking, I'd sneak a sip here and there....and then again. It tasted so good! My parents would save it for special occasions and that tempting bottle would be in the cupboard for months.

Thus started my love affair with Kahlua.

As an adult, I have always wanted to try my hand at making coffee liqueur. My aunt refused to share her recipe and has now lost it (the recipe, not her mind). I found myself on my own and a bit intimidated.

I was invited to participate in this fun little Handcrafted Holidays round-up, where I got to choose whatever kind of container I wanted and make whatever I wanted to go inside. This was the push I needed to get me feet wet in making coffee liqueur. The hardest part was choosing the container. Freund Container has some really beautiful bottles and jars and just about any kind of container you could possibly need. And they have a lot to choose from.

After searching and looking, you can see I made a beautiful choice. I fell in love with the Clear Glass Art Deco Bottle, Corked. It's festive, fun, and just the perfect size I needed.

Next came the recipe. There are a lot of them out there. Some use a vodka base. Some use a rum base, while others use Everclear. As I researched and compensated and altered...and finally produced, I discovered that coffee liqueur is flexible. The original recipe I had planned didn't quite do it for me. That's when I grabbed the bottle of Kahlua out of the cupboard and started sipping and comparing.

Maybe not such a good idea. For two reasons. One...replicating Kahlua is a high standard to reach, but it helps guide you in the right direction. Two...well, after so many sips back and forth, it's bound to affect you.

You can be the judge on whether or not it's a good idea.

Anyways, I added, altered and changed up as I went...all for the better in the end. And once the finished product was placed in my new beautiful jars...ooooh, I got so excited! I can't wait to hand these out as gifts.

Homemade Coffee Liqueur
Printable Version

1 1/2 cups white sugar
1 1/2 cups water
6 cups espresso (I used instant)
4 TB instant espresso powder
3 cups vodka
3 cups dark rum
3 TB vanilla extract
8oz piloncillo (or brown sugar if you don't have access to piloncillo)

In a small saucepan, combine the white sugar and water. While stirring, bring to a boil. Continue to stir and boil until it begins to thicken and caramelize (this could take several minutes). Combine hot espresso, the espresso powder and the caramelized simple syrup. Stir.

If the espresso isn't hot, don't reheat it....just pour in the caramelized simple syrup anyway. It'll harden instantly


And will look all pretty in a weird sort of way...and it might concern you. But don't worry. Drop it back in and it will slowly dissolve.

Add in the remaining ingredients, including the solid hard mass of piloncillo. It too will melt. In time.


Just stir occasionally and check on it. Not because it needs to be checked on, but it goes through a pretty cool transformation.

Once everything has melted all together, pour your newly made coffee liqueur in your beautiful bottles. Tie a bow around the neck and you have yourself one impressive, sure to please holiday gift.

I mentioned that this is part of a Handcrafted Holiday round-up. Below are the links to several gift ideas for the upcoming season. With the holidays upon us, if you're looking for that special gift that speaks volumes because it was handmade by you....this is the perfect place to start!


Handcrafted Holiday ideas for making gifts from your kitchen using products from Freund Container:


  • Candy Cookies in a Jar from Alida's Kitchen 
  • Chai Tea Blend from Curious Cuisiniere 
  • Flavored Sea Salts {DIY} from girlichef 
  • Homemade Bailey's Irish Cream from That Skinny Chick Can Bake 
  • Homemade Coffee Liqueur from Cooking for My Peace of Mind 
  • Homemade Crunchy Granola from Magnolia Days 
  • Homemade Flavored Simple Syrups from The Girl in the Little Red Kitchen 
  • Homemade Mexican Hot Sauce from Juanita's Cocina 
  • Homemade Steak Sauce from The View from Great Island 


  • And to make the gift making and giving season even better.....We are giving away gift certificates!!! Three....$100 GIFT CERTIFICATES to be exact! Tell me, in a comment, which Freund container you would love to use, and what you would make to put it in. Then take advantage of all the different ways you can enter more chances to win!

    a Rafflecopter giveaway
    This giveaway is for three $100 gift certificate to Freund Container & Supply. Gift certificate will expire on February 28, 2014. Gift certificate is a one-time use certificate and must be used in its entirety; any leftover monies on the gift certificate will be forfeited. This giveaway is open to both US and Canadian residents. However, it should be noted that due to current International shipping rates, any Canadian winners will pay higher shipping costs for orders. This giveaway will run from Friday November 22, 2013 through Saturday November 30, 2013 (11:59 pm ET).  Winner will be notified within 48 hours of the close of this contest, and given 48 hours to respond before a new winner is chosen.


    Freund Container & Supply has been helping build businesses since 1938 as the largest distributor of glass bottles, containers and wholesale packaging supplies online. Freund offers over 5,000 items in stock every day, 98% same day shipping and low-price guarantees. Take a look at
    Freund’s wide selection of jars, tins, bottles and vials for all your crafting and food related needs!

    I was not compensated for this post, however Freund Container supplied me with a case of jars/bottles for making this project.  They are also supplying the gift certificates for the giveaway.  All opinions are my own.

    Saturday, November 16, 2013

    Blueberry Freezer Jam with Rosemary and Shiraz


    For the past week I've had 'blueberry' on the brain.

    Not because they're so good for you. Not because they contain antioxidants. Not because they're loaded with vitamin C, manganese, and fiber. And the fact that they're low in fat and calories and are just so dang tasty, has nothing to do with why blueberries have been on my mind either. I buy them every week so whats so special now?


    Well, ever since I attended A Very Blueberry Thanksgiving last weekend, I can't stop thinking about these Little Blue Dynamos.

    So I decided to hit the kitchen and make something that was meant to last. Longer than a side dish or a smoothie.

    Freezer jam!!  I'm a huge fan of freezer jam. Not only is it easy but it's worry free (no concern about canning and lids sealing or the chance of botulism). And the fresh fruit flavor in freezer jams just can't be beat. That's right..fresh fruit as in....not cooked. There is a very different flavor going on between canned jams and freezer jams. I'm not saying canned jams aren't good. I'm just saying....they're different.


    Speaking about 'different flavors going on'...are you wondering about the rosemary aspect here? Believe it or not, rosemary could quit possibly be blueberry's new best friend. (Sorry lemon, make room for a new member of the group). Lemon still has it job as "flavor brightener" but rosemary adds a new dimension and depth, and it's a mutual experience. Blueberry helps define the sweetness of rosemary and the rosemary balances the tang of the blueberry while adding this almost.....I dunno...cocktail, mixology level. Peppery, sweet, sappy, yet sill all blueberry. It's just delightful!


    Btw...this jam is all grown up. Not only is it packing some earthy sweetness, but it's packing vino. Shiraz to be more specific.

    Sorry kids, but this batch will not be found with the peanut butter in your lunch pails.

    Blueberry Freezer Jam with Rosemary and Shiraz
    Makes about 7 8oz jars of jam

    Prepare 7 or 8 8oz jars and lids for canning by cleaning, then rinsing with boiling water and drying thoroughly.

    3 cups frozen blueberries, thawed
    5 1/4 cups white sugar
    zest from 2 lemons
    1 pack of pectin
    3/4 cup Shiraz wine
    Leaves from 1 4" fresh rosemary stem, minced

    In a food processor or blender, pulse the blueberries 3 or 4 times, just enough to break them up without pureeing. If you do not have a blender or food processor, you can mash them with a potato masher. You might have more obvious pieces of blueberry skin as a result.

    In a large bowl, combine the 'mashed' blueberries, sugar, and lemon zest. Allow to sit for 10 minutes, stirring occasionally.

    In a small saucepan, combine the pectin, wine and minced rosemary. Heat over high heat, bringing to a boil while stirring constantly. Boil and stir for 1 minute, or until pectin has dissolved. You will notice the pectin mixture turn a foamy pink. Keep going...it'll quickly become a beautiful clear, deep red.

    Add the pectin mixture to the blueberry mixture and stir for 3 minutes.

    Fill your prepared jars to about 1/2 below the rim. Clean up anything that may have spilled on the rim or the sides. Cover with lids and allow to rest out on the counter for 24 hours.

    Once set, store in the freezer for up to a year. After a jar has been opened, keep refrigerated and use within 3 weeks.


    If you can put the spoon down and stop eating it as is for just a minute, try it over a block of cream cheese, smeared all over a slice of fresh baked bread. If you're inclined to share, you might want to present this at your next party. The holidays are just around the corner. Then send your guests home with their own jar.

    For more information and recipes, visit the U.S. Highbush Blueberry Council and see what all the buzz is about Little Blue Dynamos.

    Monday, November 11, 2013

    A Very Blueberry Thanksgiving


    It works. Blueberries with your Thanksgiving feast. I swear! If you're not much of a cranberry fan, then go for the little blue dynamos! If you LOVE blueberries, then just do it! You get that slight tartness with a little sweet, of course, but blueberries also work in savory dishes.

    I promise!

    Until yesterday, I had no idea that blueberries were so versatile.

    I attended A Very Blueberry Thanksgiving luncheon with Food Bloggers of Los Angeles, hosted by Erika of In Erika's Kitchen, sponsored by Blueberry Council and Rioja Wines.


    Every dish had blueberries in it, from the appetizers to the main course and last but not least, the dessert. The courses were magnificently paired with 6 different Rioja Wine varieties.

    One thing that stuck in my head, as I listened to the Little Blue Dynamos guys talk about blueberries, was the quality of produce that comes from Chile. For some reason I have always thought that imported produce wasn't as regulated as domestic. Well, Chile is an "export powerhouse" and in order to sustain that, they need to maintain a high level of quality and safety standards. Not just US standards but also Canadian, South Korean and European, just to name a few. What that means is the quality is just as good, if not better than what we get domestically. And since their harvesting time is opposite of ours (due to that south of the equator thing) we have the benefits of obtaining various fresh fruits during our winter months.

    Our Rioja Wine representative had so much to say (and I realize even more, how little I know about wine). I thoroughly enjoyed each selection that was presented (I even won a bottle!). Here's a nice little tip: if you have a bottle of wine and the tannin is just a little too strong for you, place the bottle in the fridge for about 15 minutes or so and the flavor will soften and you'll have a nice smooth wine to enjoy.

    If you follow me on Instagram (PeacefulCooking), twitter (ImStuffed) or facebook (Peaceful Cooking) you will have seen previews of the following amazingly delicious dishes on Sunday. All of which contained blueberries. Every single dish was fantastic. I'm going to share photos and links to the recipes since there are several, rather than make this post 2 miles longs (instead of just 1 mile).

    First up we had.... 

    Pre-feast nibbles:
    Paired with Muga Blanco 2012

    Mashed Potato Pops with Blueberry "Not Ketchup"
    Printable Recipe


    These little pop-in-your-mouth morsels were very good with that little crispy-crunch on the outside. But what made them beyond good, was the Blueberry "Not Ketchup"! Seriously people, you have to try it. It's not too sweet, very smooth with a slight tang. If it were socially acceptable, I would've been eating the dip with those skewers once the potato balls was gone. It's that good!

    Pumpkin Soup Shooters with Dried Blueberry Dust
    Printable Recipe


    Light, subtle flavors, not too thick or heavy. Just enough to keep you from fainting due to starvation while waiting for the big meal! (you know how it is....you don't eat all day because you want to save your appetite) Adding the fun little dusting of blueberries gives this soup shooter that special festive touch.

    First Course:
    Paired with: Cune Rosado 2012

    Butternut Squash Salad with Blueberry Balsamic Vinaigrette
    Printable Recipe


    Oh my goodness! This is one dish I wish I had taken more of. And a definite addition to my table this year! I'm not much of a salad person but when the flavors and textures blend so wonderfully, I just couldn't help myself. I love this salad. I'm not sure which ingredient won me over...of course the blueberries...but then the pepitas spoke to me....and then...I think the Blueberry Balsamic Vinaigrette started singing to me. Yes! That's what it was. (Nothing like a private serenade)

    Side Dishes
    Paired with: Cune Rosado 2012
    Vina Herminia Tempranillo 2012
    Torre  de Ona Finca San Martin 2010
    Conde de Valdemar 2010

    Chili Roasted Sweet Potatoes with Dried Blueberries
    Printable Recipe


    Sweet potato fans...here's your chance to get out from under that sweet potato casserole! Healthy, quick and easy and look how beautiful that is. Talk about back to the basic with a new twist. Delish!!

    Pulled Turkey Sliders with Blueberry Chutney
    Printable Recipe


    This is actually a great idea for turkey leftovers. Or maybe a little something to hold over those football fans until the feast is served. If you're an early Thanksgiving Feast eater...then how about a quick bite before you go to bed. Whatever you choose, it's gonna work. These are easy, delicious and fun to eat!

    Blueberry Stuffin' Muffins
    Printable Recipe


    Baking stuffing in a muffin tin? YES!! Little individual servings and everyone gets the best of both worlds....the moist center and the crunchy top. I'm sure you've seen people add cranberries, apples, grapes..etc to their stuffing. Why not blueberries? This whole dish is ingenious! (and look how cute they'd be next to the Pulled Turkey Sliders above!)

    Brussels Sprouts with Blueberry Balsamic Glaze
    Printable Recipe


    If you struggle to find that vegetable side dish that can stand up to the main course, look no further! Brussels sprouts are roasted in a blueberry balsamic glaze yet they maintain their cabbage like integrity that so many enjoy.

    Main Course:
    Paired with: Lan Edicion Limitada 2008 (my personal favorite of all the wines offered)

    Boneless Roasted Turkey Breast with Blueberry Salsa
    Printable Recipe


    I'm sorry I didn't get a picture of the turkey this was served with but we all know what that looks like. I went back for seconds and all that was left was a little of this salsa....and I was totally fine with that. The combination of blueberry, green apple, and red onions is phenomenal! If you're going to skip the gravy, for whatever reason, then this is the perfect compliment for your turkey.

    Last but not least.....

    Dessert
    Paired with: Blueberry Mulled Cider
    Printable Recipe
    A lovely refreshing yet comforting cider to finish with. (I don't know why I failed to take a picture. Maybe I drank it before thinking about it)

    Pumpkin Blueberry Triffle
    Printable Recipe


    What a way to end the day! This is truly a delightful dessert. It's not heavy, it's not too sweet. It doesn't make you groan at the end as if you ate so much and wished you hadn't. I should've brought some home though, because now as I'm looking at it, I really want some. It has all the right holiday spices and flavors rolled up in perfect harmony.

    If you're looking to switch things up a bit, or introduce a new dish....maybe you have the privilege of enjoying more than one Thanksgiving dinner....the dishes above come highly recommended, by yours truly.

    Thank you Blueberry Council and Rioja Wines for sponsoring such a lovely spread.

    And Thank you again Erika for a wonderful afternoon, for your hospitality and your expertise in the kitchen!

    Wednesday, November 6, 2013

    Curry Butternut Soup


    Here's a quick one. Not much story behind it other than I got the recipe from.....


    Delicious Disney.

    I love soups. I love creamy soups. I especially love squashy creamy soups...and that's why I chose it.


    If you can purchase (and eat) Thai Red Curry Paste, then this soup recipe will be a lot quicker than how I made it. Thai Red Curry Paste contains fish sauce and shrimp sauce, which I can't eat. In this case, I made my own. A vegan version. It was easy enough and the ingredients were simple enough but there are a lot of ingredients which made the soup making process longer than it could've been. I'll give you the recipe for the Thai Red Curry Paste at the end.

    This soup is delicious. The flavors are strong and subtle at the same time. Smooth yet lasting. Rich and comforting. Each bite brings out a new dimension. I'm eating a bowl of leftovers as I type and the flavors really pop after mingling for a day or two.


    Curry Butternut Soup
    Printable Version

    2 TB butter
    1 medium onion, chopped
    1 clove garlic, chopped
    1 tsp ground cumin
    1 tsp ground coriander
    Juice from 2 lemons
    2 tsp Thai red curry paste
    1 lb butternut squash, peeled, seeded and cut into chunks
    2 cups vegetable stock
    Salt and pepper to taste
    2 cups milk
    4 TB sour cream
    Fried wonton strips, cilantro and pickled ginger to garnish (optional)

    In a large, heavy bottomed pot, melt butter over medium-high heat. Add the onion and garlic and saute until tender (about 5 minutes).


    Stir in the cumin, coriander, lemon juice and curry paste. Add the squash and vegetable stock. Reduce heat to simmer and cook for about 20 minutes or until the squash is fork tender.

    Puree with an immersion blender, or in batches in a blender. Add salt and pepper to taste.

    Return to heat. Stir in the milk and sour cream and heat through without boiling.

    Garnish with fried wonton strips, cilantro and pickled ginger.

    That simple....and that good!

    When reheating, I added a little bit of coconut milk to thin it out....mmmm.


    Vegan Thai Red Curry Paste
    Inspired by: Thai Food

    1 shallot, chopped
    2-3 tsp chili sauce
    4 garlic cloves
    1 thumb sized chunk of fresh ginger, sliced
    2 TB ketchup or tomato paste
    1 tsp cumin
    3/4 tsp coriander
    1/4 tsp pepper
    2 TB soy sauce
    1 TB Thai Golden Mountain Sauce *
    1 tsp sugar
    2 TB chili powder
    3 TB thick coconut milk
    2 TB lime juice

    Combine all ingredients and puree.


    *I couldn't find Thai Golden Mountain Sauce so I mixed 2 TB soy sauce, 2 TB vegetable stock and 1/4 tsp sugar. (yes, all that and I only used 1 TB of the stuff).

    Since I've never tasted real Thai Red Curry Paste, I do not have a comparison as to how close of a substitute this is. All I can say is that the flavor is fantastic!

    I'm entering this in the Souper Sunday round-up at Deb's place Kahakai Kitchen Head on over there and see what wonderful soups, salads and sandwiches she's gathered


    Sunday, November 3, 2013

    Arnold Julep starring Owl's Brew


    There's a new kid in town. A little mysterious yet familiar. Quite pure but with a wild agenda. And this new wild child just landed on the west coast. 


    Fresh, spicy, fruity, herb-y. Natural, pure...what you see is what you get. Tea, water and agave, micro-brewed specifically for cocktails. 

    I recently attended the West Coast Launch of Owl's Brew. The posh Riviera 31 Lounge in the Sofitel Hotel in West Los Angeles was the perfect setting with a cozy outdoor patio, complete with pumpkins, bones, a ouija board.

    And cocktails. 

    Tea for cocktails. Why not just make your own? Well, this tea is unique in the fact that it's micro-brewed in small batches creating a unique blend of spices, fruits and herbs. The resulting flavor is intense yet pure, giving it the ability to hold it's own when mixed with your favorite alcohol. If I were to try to brew a tea this strong at home, I'd end up with something rather bitter.

    Not so with Owl's Brew


    I was introduced to their 3 blends;

    Coco-Lada: Black tea, chai spice, pineapple and coconut. This was paired with vodka and was my personal favorite

    Pink and Black: Black tea, strawberries, lemon peel and hibiscus. A very nice blend with beer.

    The Classic: English breakfast tea and lemon peel. This is the blend I brought home to play with....

    Arnold Julep
    Makes 2 drinks

    4 oz Bourbon
    6 oz Owl's Brew, The Classic
    2 oz lemon-lime soda
    10 - 15 mint leaves plus more for garnish
    1 tsp sugar

    In the bottom of a large cocktail shaker, muddle the mint leaves with the sugar.

    Fill the shaker half way with ice. Add the bourbon and Owl's Brew. Shake vigorously for a minute.

    Strain into 2 ice filled cocktail glasses. Top off each glass with about an ounce of lemon-lime soda. Garnish with a small prig of mint leaves.

    Want another quick one?


    Owl's Brew Sangria

    Mix equal parts of your choice of Owl's Brew blends and your favorite wine. Add a little simple syrup (to taste) and a splash of club soda.

    Voila...instant Sangria!

    Monday, October 28, 2013

    Sonoran Honey Streusel Coffee Cake - The New Southwest Cookbook Giveaway!!!


    Before we talk about the Giveaway, let me just

    Do you ever have one of those days...where you wonder if you shouldn't have even stepped foot in the kitchen that morning?

    Saturday ended up being a day of discoveries.

    I discovered that my dishwasher door is being weird...it's sticking shut while the handle that you squeeze to unlock it just sorta disappears into itself.

    I also discovered that my oven takes foreeeeeeeeeever to heat up to the proper temperature. As in, after the preheat phase....and the required 45 minute baking time, the temp was 100' below the needed 350'F mark. That happened as I was baking this delicious coffee cake. I opened the oven door as the timer went off...toothpick in hand, ready for the plunge (do you know that this is probably the only reason I own toothpicks?) and I stopped breathing...in total disbelief as I tugged on the rack and witnessed the soppy center sloshing around.

    My mind raced....did I set the timer right? Forget to put in an ingredient? Did I measure everything correctly? Is my oven ON? (oh yes....the heat is steaming up my glasses, it's definitely on). I double checked the recipe...everything looks good there. So I got out my oven thermometer, pushed the rack back in, along with my mess and reset the timer (a few times)......

    Aaaaand that's when I broke out the bourbon. It was well past 5:00pm, so it was an overdue action anyway. (But that's another story for a different post).

    I could tell the cake was finally cooked when it smelled delicious as the aroma filled the house.

    Anyways...the moral of this story is...when things aren't going right...don't just give up. Think a minute...try and salvage the situation before you toss in the towel. I mean...what's the worse that could happen? You might have to toss it anyway. But....maybe not....

    Thank God that wasn't the case this time because the is one good coffee cake. Especially if you're a honey lover....as in Pooh bear kind of honey lover. I suggest you use your favorite honey for this recipe if you can't get Sonoran honey. But then again....is there such a thing as a honey that doesn't taste good? phhht....silly bear.

    And the topping....oooh my oh my. It almost caramelizes and gets crunchy. This might be my favorite streusel.

    Sonoran Honey Streusel Coffee Cake
    Printable Version

    for the cake:
    1/2 cup unsalted butter, softened
    1 cup white sugar
    2 large eggs
    1 tsp vanilla extract
    2 cups all-purpose flour
    1 tsp baking powder
    1 tsp ground canela (or cinnamon)
    1/2 tsp salt
    2/3 cup Sonoran honey (or your favorite local honey)
    2/3 cup buttermilk

    for the topping:
    6 TB cubed butter, chilled
    1 cup packed brown sugar
    1/4 cup all-purpose flour

    Preheat oven to 350'F

    Line a 9" square baking dish with parchment paper

    Cream together the butter and sugar until light an fluffy, about 5 minutes. Add in the eggs and vanilla and continue to mix until incorporated.

    In a medium bowl, whisk together the flour, baking powder, canela (or cinnamon) and salt.

    Add the dry ingredients to the butter mixture gradually, alternating with the honey and then buttermilk. Mix until just combined. Pour into your prepared pan.

    In a medium bowl, using your fingers, combine the chilled butter cubes, brown sugar and flour until you have uniform crumbles. Sprinkle over the batter evenly.

    Bake for 40 - 45 minutes or until a cake tester toothpick inserted in the middle comes out clean. Allow to cool slightly before removing from the pan.

    Slice and serve and totally enjoy the richness of this coffee cake.


    I've only tried 3 recipes from this book, two of them were my choice (the first one was chosen for the group). It was really hard to pin down just two. There are so many more I have tagged for trying later....such as an almond-crusted pear tres leches cake (holy cow!!) and the stacked squash enchiladas...and and...roasted crema. Ok, I'll stop there (for now). My mouth is watering. You should see all these photos! And did I tell you? In the front of the book is a whole section dedicated to the southwestern pantry. What you should have, what it is, what it looks like, what you do with it. If you're just getting into making southwestern food....fear not, Megan will hold your hand right through the learning stage.

    And now for some more good stuff.......

    The contest! And I'm not the only one giving away The New Southwest Cookbook.


    There are more than a dozen of us participating. And that means there are more chances for you to win. Woooo hoooo!!!

    1. Mandatory Entry: Leave a comment on this blog post letting me know what your favorite Southwestern dish is.
    2. Tons of optional entries in rafflecopter widget.

    a Rafflecopter giveaway


    Hippocrene will be supplying 14 copies of The New Southwest by Meagan Micozzi for this giveaway, in conjunction with The New Southwest Cookbook Spotlight. Contest is open to anybody with a shipping address in the USA. Submissions will be accepted via the rafflecopter widget through 11:59 pm ET on Sunday, November 3, 2013. Fourteen winners will be chosen by random draw, verified, and be notified by email (from Heather at girlichef) within 48 hours of the close of this contest. The winner should respond within 24 hours of notification, or a new winner will be drawn in their place. Good Luck!


    This post is part of The New Southwest Cookbook Spotlight sponsored by Hippocreneand hosted at girlichef.


    Thursday, October 24, 2013

    Navajo Tacos


    Navajo Tacos. Say what?

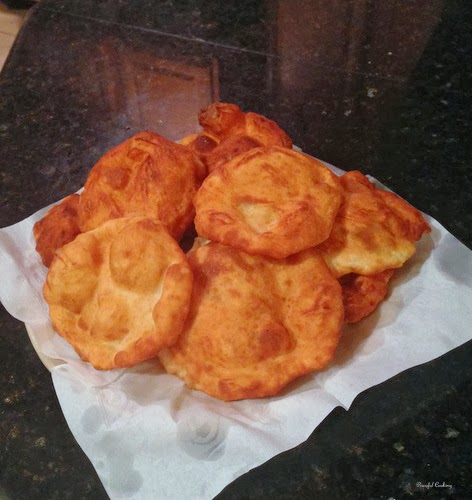
    Say....mmmmmm. This is one amazing dish! What we have here is a great infusion. Navajo Fry Bread topped with New Mexico Green Chile Stew.

    Now don't go thinking you can pick this baby up with your hands and eat it like a traditional taco. Unless you're into totally messy food! Not that there isn't great totally messy foods to do that with (burgers, burritos, traditional tacos) but I think you'd probably end up with most of that stew back on the plate. At best. Just get out your fork and knife and go to town on this baby. And use that last bite of fry bread to sop up any juices that might be left over cuz seriously, you won't want to leave anything behind.

    This is another great recipe from Megan Micozzi's (of ScarlettaBakes.com) cookbook, The New Southwest. If you missed it, I posted a recipe last week of hers, Mushroom and Leek Migas. At the time, my copy of the cookbook hadn't arrived yet. When I got home from work on Friday, I was thrilled to see the little (somewhat worn) package on the table. Apparently it went to the wrong address first. So I grabbed the book as I raced out the door, headed to my friends house. Once there, I curled up on her couch with a little sip of something (much needed at the end of a long week) and thoroughly browsed the lovely pages.


    Gorgeous, hard cover...lots of amazing photos to make anyone drool...even if they aren't hungry.

    I'm not sure exactly what made me choose Navajo Tacos. I think part of it had to do with the fry bread. I have 3 different American Indian tribes running through my blood yet I've never eaten American Indian food. Although Navajo is not among the three....I couldn't help but being pulled in.

    So, I'm going to be sharing two recipes with you here. One for the Navajo Fry Bread and one for the New Mexico Green Chile Stew.

    Important Note about the Navajo Fry Bread: Before I begin, I need to let you know that there is a type-o in the cookbook regarding the fry bread. Megan was contacted and it has been confirmed. The book lists 2 cups of water, which is incorrect. Please adjust the amount to 1/2 cup water.


    Navajo Fry Bread
    Printable Version

    2 cups all-purpose flour, plus more for dusting your hands
    2 teaspoons baking powder
    1 TB powdered milk
    1/2 tsp salt
    1/2 cup very warm water (corrected amount)
    1 quart vegetable oil for frying

    In a large bowl, whisk together the dry ingredients. Pour in the warm water (water should be as warm as possible but not so warm that you can't comfortably work with it). Using your hand, mix the water into the dry ingredients, moving in a circular motion until all of the dry ingredients have absorbed the water. This is a very dry dough. If you can't get the dough to come together, add a tiny bit more water...1 TB at a time. Be careful though, you don't want the dough to be too wet.

    Cover the dough with a damp cloth and let rest for 30 minutes.

    Heat the oil in a large pot to 350' F.

    Pull off a plum sized piece of dough and using your hands, dusted with flour, flatten the dough into a disk, about 1/4" thick


    Carefully place into the hot oil and fry for about 60-90 seconds per side, until puffy, crisp and cooked through. Place on a paper towel lined plate and continue with the remaining dough. This makes about 12 pieces of bread.

    Now, for the New Mexico Green Chile Stew. I made two changes. One by choice. The other by necessity. Instead of using pork and beef stock, I used boneless, skinless chicken thighs and chicken stock. The other change was in the actual usage of chilies. I only had about 1 cup or so of Hatch chilies so I roasted some Anaheim chilies to fill the gap. Only apparently 12 Anaheim chilies do not yield 2 cups. So I added some canned diced green chilies of unknown kind. It was still amazingly delicious!

    New Mexico Green Chili Stew
    Printable Version

    6 TB olive oil, divided
    2 lbs boneless pork loin, cut into 2" cubes (I used boneless, skinless chicken thighs)
    1 large yellow onion, diced
    1 TB minced garlic
    1/4 cup masa harina
    3 cups beef broth (I used chicken broth)
    1 TB ground cumin
    1 TB ground coriander
    1 tsp ground oregano, Mexican oregano if possible
    3 cups Hatch green chilies, roasted, peeled, stemmed and *seeded (I used a combination of Hatch, Anaheim and canned)
    Salt and pepper to taste

    *if you like heat, leave the seeds in.

    In a large, heavy bottomed pot such as a dutch oven or bean pot, heat 3 TB of olive oil over medium-high heat. Working in batches so that the meat is in a single layer, brown all sides of your meat. Remove from pot and set aside. Continue until you have all the meat browned.


    Reduce the heat to medium and add the onions to the now empty pot. Cook until tender, caramelized and very fragrant, stirring occasionally, for about 10 minutes. Add in the minced garlic and stir for 2 minutes. Add the masa harina and the remaining 3 TB of olive oil, stirring together and cooking for an additional 2 minutes.


    Stir in the broth, de-glazing the pan if necessary. Add the cumin, coriander, oregano, chilies and chicken. Bring to a boil. Reduce heat to low, cover and simmer for 40 - 50 minutes. If you find that the pot is too hot for a simmer, pull the lid slightly to side to allow a crack for some of the heat to escape while cooking.


    Stew is done when the meat is tender and the stew has thickened. It will thicken more as it cools. Season with salt and pepper to taste. I did add some salt but I didn't think it needed the pepper.

    To serve, place Navajo Fry Bread on a place and top with the stew.


    Garnish if desired. I used Queso Fresco. Avocados and cilantro would also be wonderful choices.

    There are about 15 of us playing around in The New Southwest Cookbook so by all means, check them all out. You can find us all listed here:

    Last week we all made the same thing...with some delicious variations. This week, we all got to choose what we wanted to make. Aaaaand....next week we'll be hosting a MEGA GIVEAWAY! Lots of copies of this gem being given to lots of lucky people.


    This post is part of The New Southwest Cookbook Spotlightsponsored by Hippocrene and hosted at girlichef.