Yum Peaceful Cooking: August 2010

Saturday, August 28, 2010

Chile Rub-a-dub dub


A long day, poor planning, laziness....whatever the case may be, a rub could be the answer you're needing. When you don't have time to plan a meal or marinate your meat....rub it in instead. There are so many varieties out there. I'm sure you have your favorite or will find one in no time.

One of the rubs we enjoy was inspired by a recipe I got out of the Everyday Food magazine, the July / August issue back in 2004. I only added two additional ingredients....garlic powder and onion powder. I don't understand how garlic was left out of this recipe to begin with. We're talking about GARLIC here people! Most everything (and I say most because I haven't wrapped my head around garlic as a dessert ingredient yet) is better with garlic. What was Martha thinking? As I look at several other rub recipes in the little magazine...none of them contain garlic.

I don't get it.

Anyways...this recipe is simple. Doesn't make a huge amount, so you don't have to worry about having to cook with it everyday for the next several months before the spices deteriorate. I think you can get about 2 - 4 uses out of, depending on how much you use. Me? I like to use a lot of it. And you probably have all of the ingredients in your spice rack. Can't get much better then that, can it? Of course if you want to stock up, double or triple the recipe.

Chili Rub
makes about 11 teaspoons
Printable Version

1 tablespoon plus 1 teaspoon chili powder
2 teaspoons ground cumin
2 teaspoons brown sugar
1 teaspoon dried oregano
1 teaspoon coarse salt
1 teaspoon garlic powder
1/4 teaspoon onion powder

Combine all the ingredients and mix well. Store in an airtight container for up to six months.


Feel free to adjust the spices to suit your taste. I might even add a bit more garlic next time.

Anyway....I drizzle a tiny bit of olive oil on my chicken breast. Then I massage the rub in before cooking (you can also rub it in hours before hand).


I've found that if I don't add a bit of oil before hand (to chicken breast....thighs and beef have been no problem)....the rub tends to stay on the dry side during cooking. Just for a starting point....Martha says to use about 1 teaspoon of rub for every 3/4 lb of meat.


I like that nice caramelization that happens. Especially with the brown sugar that's in this recipe. I had butterflied these breasts before adding the rub...and they cooked wonderfully, quickly, evenly and were so flavorful! Served with a quick side of rice (made in a rice cooker of course while I was messing with the chicken) and a few veggies and / or salad, and you have a satisfying dinner that you put together in no time. For us working moms and moms of kids in school.....you gotta love a meal like this.

Monday, August 23, 2010

Purple Peas, Peachy Cobbler and Southern Hospitality


When this is what you wake up to every morning and where you spend your days and evenings....it sure does make it hard to go home and get back to work. I just got back from spending 10 wonderful days at mom and dads in the good ole hot sticky humid south. And I loved every minute of it.

Mosquito bites and all.

95% of my family lives in Alabama. Where it's always green, the food comforts the soul, and hospitality is a way of life. And my daighters and I enjoyed it all while Sir Sportsalot stayed home and held down the fort. (hmmm...I wonder who had more fun....us girls or a temporarily bachelored (is that a word???) sports nut?)

Before I give you a taste of some of the food we chowed on, let me show you some of the ways we experienced true southern living.....

A little live entertainment at a local club called Boondocks. Where the parking lot disappears into the lake, margaritas are served in plastic disposable cups, a bartender breaks horses by day, and my brother serenades a lively crowd


Where else can you be greeted like a friend and treated like a family member (nope, I'm not talking about the old man in suspenders talkin to dad....I'm talking about the 2 dogs .....carryin' on)


A trip to 'Bama wouldn't be the same without the wildlife. There's something comforting about sitting on the porch, listening to a forest filled with the song of the cicada


And how can you fully experience the south without a pageant? My little niece (shown in the middle) participated in her second pageant. It wasn't one of those big time, full fledge pageants. It was a fund raiser for a local high school band. She did wonderfully. All the girls did, whether they won anything or not.


And last but not least....the food! I looooove me some southern cooking! My baby sister, Nicki made us a full fledged southern meal, complete with cornbread, coleslaw, and fried okra.

She had gone to the farmers market that morning and bought a couple pounds of Purple Peas


I think this is the most beautiful bag of peas I've ever seen. So the two of us sat on the back porch with our tall glasses of sweet tea, in true southern fashion and shelled this bag of peas


They shelled easily enough so it didn't take us all that long. Thank God cuz maaaaaan, was it hot outside! But in no time at all we had ourselves a good amount of peas shelled and ready to wash and cook.


Look at how perty them peas are! I think of them as a girlie version of black eyed peas. My sister cooked them the same way she cooks black eyed peas...in a pot of water with a ham hock. The flavor was fabulous! More mild....not as earthy tasting as black eyed peas. I think out of the two kinds, I prefer the purple ones. I can't wait to hit the farmers market in Hollywood to see if I can find me a few pounds. How would you cook yours?

And for dessert, we were treated with a Peachy Peach Cobbler. Well....that's what it was suppose to be according to the directions....only a little adjustment was made. Instead of just peaches, Nicki added some raspberries.

Peachy Peach Raspberry Cobbler
Printable Version

Crust:
1 1/2 cups sifted all purpose flour
1/2 tsp salt
1/4 tsp baking powder
1/2 cup well chilled vegetable shortening, cut into small bits
3 tablespoons well chilled unsalted butter, cut into small bits
3 tablespoons ice water (or more if necessary...it usually takes my sister 5 tablespoons)

Sift flour, salt and baking powder together into a large bowl


Add the shortening and butter and toss to coat the pieces of fat with flour. With a pastry blender, cut the fats into the flour until the mixture resembles coarse meal.

Sprinkle water over crumbs and toss with a fork. Do not mash! Gradually the crumbs will form into clumps. With floured hands, form dough into a mass by pressing the mixture against the side of the bowl. All of the crumbs should adhere to the dough and clean the bowl. If not, add a few more drops of water. Form the dough into a flat rectangle if you are using an oblong dish or shape into a flat disk. Cover with plastic wrap and chill in the fridge for at least 1 hour.

Cobbler:
8 - 9 cups fresh peaches (or 2 lbs of peaches, or a combo of peaches with cherries, raspberries or blueberries)
3/4 cup plus 1 tsp sugar
1/4 cup cornstarch
1/2 tsp ground cinnamon
1 tablespoon lemon juice
2 tablespoons unsalted butter, cut into pieces

Preheat oven to 425' F. Butter your dish. (it doesn't say what size....I think something around 11x7?)

Cut the peaches into 1 inch slices. In a large bowl, combine the peaches (and raspberries if desired), 3/4 cup sugar, cornstarch and cinnamon.


Toss to coat. Empty mixture into prepared dish and spread evenly. Sprinkle fruit with lemon juice and dot with butter.

On a floured surface, roll out the pastry about an inch or 2 larger than your dish


Place it loosely over your fruit. Press edges against the side of the dish with a fork or fingers. Prick the top in several places with a knife or fork to make steam vents. Sprinkle the top with the remaining 1 tsp sugar. Nicki likes to brush the top with an egg wash first.....I recommend doing the same. She knows what she's talking about.

Bake the cobbler for 40 - 45 minutes, until the juices begin to bubble and the top is golden brown. You might want to place the dish in a foil lined cookie sheet or drip pan to prevent a sticky mess in your oven.

Serve warm with ice cream.


Let me tell you...as full as I was after eating dinner, I found room for this fabulous dessert. DISLISH!!!

This is my entry into entry into this weeks Two For Tuesday Blog Hop Carnival. Check out Heather's place over at Girlichef.blogspot.com to see what that's all about

TwoforTuesdays@girlichef


Tuesday, August 10, 2010

Mesquite, Mesquite, Mesquite


Yep...you're in the right place. Yes, I've titled this post Mesquite. And yes, that is a cupcake. Stick around for a few minutes and it'll fall in place.

I promise.

In the beginning of this month, when I posted about my Four Leaf Clover Broccoli and Cheddar Buns, I mentioned that I was not able to make the assigned Mesquite Bread from HBin5 because I couldn't find the Mesquite Flour.

That night I received the nicest email ever!!!

Peter from 
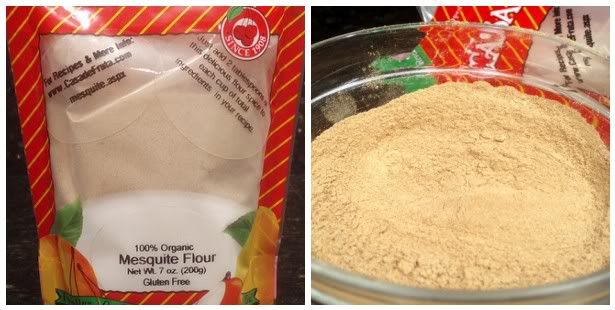
Casa de Fruta emailed me to inform me that he was going to send me a sample of Mesquite Flour so that I could make the bread.

WOW!! I was ecstatic, let me tell you. Within a couple of days I had in my possession a wonderful 7oz bag of Mesquite Flour.

Fragrant, intense, flavorful, wonderfully amazing Mesquite Flour.


It was love at first sight....and taste.

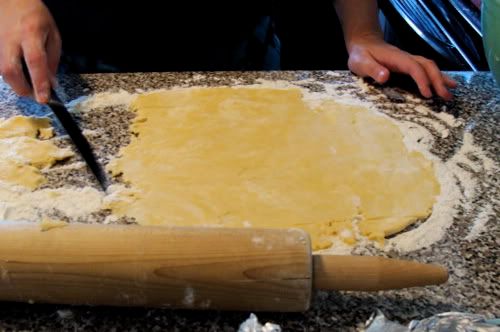
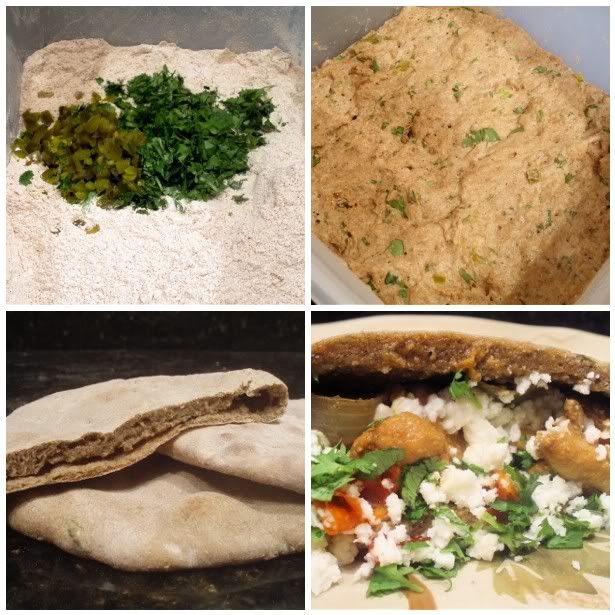
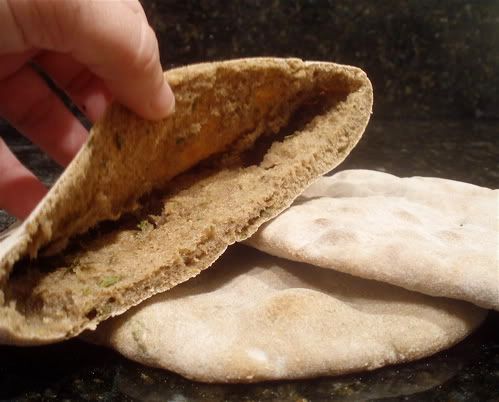
Is soon as I got home that night, I put together my HBin5 Mesquite bread dough, which included jalapenos and cilantro. (sorry, can't share the recipe. You'll have to find it elsewhere or buy the book). After allowing the dough to rest in the fridge for 24 hours, I decided to make pita bread with it and fill them with chicken fajita goodies


There really is something very satisfying about making pita. It's amazingly simple, quick and makes that little pocket in the middle all by itself


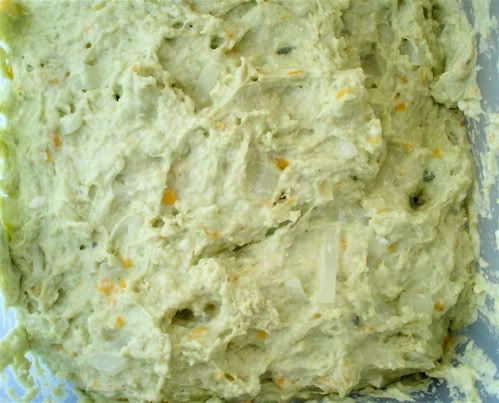
Look at that deep rich color the dough has. Yes, thats from the Mesquite Flour.

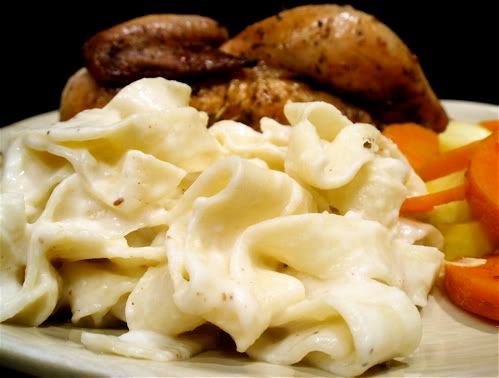
I have to say one thing though....this wasn't my favorite bread. I think there were too many flavors going on. At least with the fajita goodies inside. It did taste good just dipped it in the a little oil though. At this very moment, I have a loaf in the oven. I think I'm going to pick up some hummus and eat it for lunch tomorrow.


Head on over the Michelle's at BigBlackDogs.net and see what the others did with their assignments.


Let me tell you something about Mesquite Flour. When you think of Mesquite, instantly you think of the smokey flavor that you get when you bbq with mesquite wood. The flour is a whooooole different kind of animal. It's made from the been pods of the mesquite bush, not the wood. And it has a sweet spiciness about it. Reminds me of cinnamon / cayenne pepper combo without the heat. Very hispanic in nature.

Peter from Casa de Fruta had also sent me a brochure with some recipes. I noticed a lot of dessert recipes and my wheels started turning.

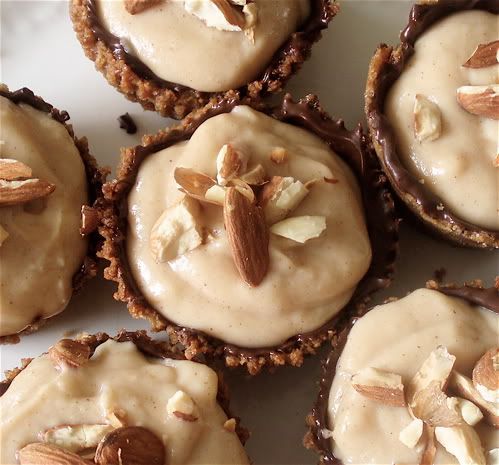
Allow me to introduce you to my Mocha Mesquite Cupcakes with Mesquite Frosting.

Now we're talking.

These are amazing in flavor. They're moist. They're vegetarian. No eggs even. I didn't do that on purpose. It just happened to be. Do you remember how fun it was as a kid to lick the bowl after mom made a cake? Then all this hype about salmonella started and "Oh nooo, don't lick that bowl! It has raw egg in it!!" Well, guess what? You can lick this bowl clean and not have a single worry. And to be honest, you'll probably want to. Forget giving it to the kids.....hell, you're gonna wanna keep that bowl all to yourself!

Mocha Mesquite Cupcakes
Printable Version

1/3 cup cocoa powder
1 c hot strong coffee
3/4 cup sour cream
1/4 cup mesquite flour
1 teaspoon vanilla
2 cups cake flour
1 cup sugar
1 1/4 teaspoon baking soda
1/2 teaspoon salt

Mesquite Frosting
Printable Version

1/2 cup plus 1 tablespoon butter
3/4 cup plus 2 tablespoons powdered sugar
1 tablespoon mesquite flour
1 tablespoon cocoa powder
1 1/2 teaspoons vanilla

Preheat the oven to 375' F and line 12 muffin cups with baking cups

In a bowl, whisk together the cocoa powder and coffee. Set aside and let cool completely.

In a medium bowl, mix together the sour cream, mesquite flour and vanilla until well combined. Whisk in the coffee mixture until smooth.

In a large bowl, combine cake flour, sugar, baking soda and salt. On medium speed, beat in the mesquite mixture and beat for one minute.


At this point, I pour some of the batter into a measuring cup for liquids (the one with the pour spout). This makes it sooo much easier to fill the muffin tins, which you will almost to the top


 Bake in your preheated 375'F oven for about 20 - 25 minutes, or until a toothpick inserted into the center comes out clean.

You'll probably have some batter left over. Make a few more cupcakes. Or, like I did....just lick the bowl


Allow to cool on a rack


I think those faults are becoming my signature. O'well...it's going to be covered with frosting anyway.

Mix together your frosting as follows:

Cream the butter. Add the powdered sugar, mesquite flour and cocoa powder and beat until fluffy. Add the vanilla and mix until smooth.

Bam Boom, it's done.

Frost your cupcakes....


Hopefully you'll do a much better job than I will. Maybe one of these days I can take a class or something cuz seriously....it looks like an 8 yr old did it.

But oh my goodness....are these good!! The Mesquite, chocolate and coffee flavor combo is heavenly. Thank you so much Peter for allowing me to experience and incredible product!

I think I will be ordering more of this Mesquite Flour. There are so many other things I'd like to try.

As for the cupcakes...I still have a couple left. My girls and I are heading to 'Bama for a bit of a vacation and long overdue time with the family. Am I allowed to bring food on the plane? I want to bring these babies with me to share with my sisters and their kids.

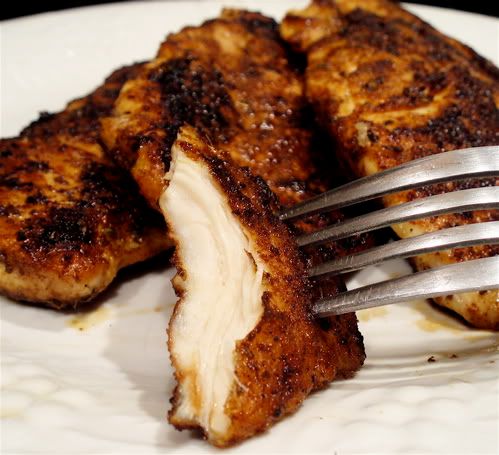
***Update on Mesquite Bread (8/24/10): With the leftover mesquite dough that I had, I made a simple loaf of bread and brought it with me when I visited my family. We simply sliced it and spread on some butter or dipped it in a butter garlic sauce....and it was fantastic!!!

Saturday, August 7, 2010

Almond Butter Pudding Cups and Archway Cookies


Not too sweet. A bit on the rustic side. Easy to make.

And this is my entry for the Archway Cookies "Take a Sweet Bite out of Summer" contest. Anyone can enter...if you're interested, the contest runs through August 15, 2010

It all started a few weeks ago when I won a box of Archway Cookies on BakeSpace.com. I was thrilled!! But I had to do a little research. I had never had an Archway Cookie. I looked in my local markets. Nothing. All  my east coast buddies were all talking about their favorite Archway Cookie they grew up on. Did I live on another planet? Wth?! Well, come to find out that Archway Cookies are not sold in California. But they are the sister company to Mother's Cookies...and I grew up on those babies!!!

Not long afterward, I received a HUGE....box full of cookies. A dozen different kinds. All from Archway.


The mission: bake, make, create something...

The wheels start spinning. I have a destination...sorta. Vague. I knew I had to create something with the cookies....but I didn't know what. It's hard to come up with stuff when you don't have a specific guide line. But somehow it happened.

Btw..I wasn't the only one who had copious amounts of cookies sent to them. Several other BakeSpace members won the cookies as well. And they too had to come up with something created with Archway Cookies. We all posted recipes and pictures of our cookie adventures in the BakeSpace Forum: Calling all Cookie Tastemakers | Archway Cookie Giveaway Go check it out and see the amazing stuff these people came up with...I mean, not just desserts but you'll find bbq sauce, meatballs and casseroles too.

I made a few things...but this Almond Butter Pudding Cup is my favorite so that's what I'm sharing with you for now.

Almond Butter Pudding Cups
Printable Version

10 Archway Classic Oatmeal Cookies (one package)
1/4 cup sugar
6 tablespoons melted butter
8 oz melted chocolate
12 paper cupcake liners

1/2 cup sugar
2 tablespoons cornstarch
1/4 teaspoon salt
2 1/2 cups milk
1/2 cup Almond Butter
1 teaspoon vanilla extract

For the cookie cups:

Preheat the oven to 375' F

First, let's get the cups out of the way. Toss your cookies, hmmm...let me rephrase that... Place your cookies in a food processor and pulse and grind until crumbled. Or you can place them in a baggy and beat the crap out of them with your rolling pin until you have the same results.

Let your mood be your guide.

Mix in 1/4 cup sugar until combined. Pour in the melted butter and mix until all the crumbs are moistened. Line 12 muffin cups with cupcake liners. (note: I was going to just spray the pan with cooking spray, but I was afraid I'd crumble the cup trying to remove it.)

Evenly divide the crumbs between the muffin tins and press against the bottom and up the sides to form the cup.

Bake for 5 minutes. Allow to cool for a bit then store in the fridge while you're preparing the rest of the stuff.


Melt the chocolate according to the directions on the package. I just put mine in a bowl over a small sauce pan with a bit of boiling water (a make-shift double boiler) and stir until smooth.

Carefully remove the crust from the pan and spread some chocolate inside the cups.


Return to the fridge and allow the chocolate to set. Oh ya...I dropped an extra dollop of chocolate in the middle of each one. Don't ask me why. I'm sure you'd have done the same thing. Cuz seriously, is there such a thing as "enough" chocolate?

For the pudding:

Ah yes...the pudding. My original plan was to make peanut butter pudding. Which would be great. But when I saw a jar of Almond Butter, Creamy with Sea Salt, at Trader Joes....I knew I had to do it. Trade out the peanut butter for almond butter.

Oooooh yaaaaaaaaa.

Combine 1/2 cup sugar, the cornstarch and salt in a heavy bottomed sauce pan. Gradually stir in the milk. Cook over a medium heat, stirring constantly (and I mean CON STANT LY) until the mixture comes to a boil. Be prepared to stand there for a while. It aint gonna happen quickly. But you don't want to stop that stirring, not even for a few seconds. Lumps and pudding do not go together. Once it begins to boil, reduce the heat to low and cook for 2 minutes, stirring occassionally....but regularly. You don't want the bottom to burn.

Add the almond butter and vanilla and stir to combine. Remove from heat. Place the pan on a cooling rack. Cover the pudding surface with a piece of plastic wrap (thus preventing pudding skin from developing) and cool.

You don't want to fill the cups with warm pudding and melt the chocolate. Once cool, fill each cup. Garnish with chopped roasted almonds


Chill well before serving and store in the fridge.

Tuesday, August 3, 2010

Ravioli, Pasta and OMG my arms are killing me!


So innocent. So unassuming. So.....misleading!! Look at that soft, fluffy mound of flours. Run your fingers through it and feel it's powers to soothe. But when it's around a certain crowd of "friends", it's whole character changes. I don't even recognize it. It becomes stubborn and unyielding. It's almost as if it loses it's identity.

Or does it?

Maybe it becomes something better, stronger. Something with substance. Substantial . More enjoyable and actually versatile.

Something that can kick my butt!

Let me tell you the sequence of events that led to my ass kicking. It started out so pretty (that's how you get sucked in you know). I had won a $100 online Gift Certificate for CSNStores.com from a giveaway over at BigBlackDogs.net (Thank you sooooo much Michelle!!!) Oh man, can you say Excited?! I had some stuff tagged on CSNStores.com that I'd been wanting for a while and here was my chance.

I have to say, my experience with CSNStores.com was wonderful!

So...I bought a Belgian Waffle Maker, a Double Sided Grill / Skillet and

this Ravioli Tray:

(photo is not one I took....and those are not my ravioli's either)

I've been flirting with the idea of making pasta for quite some time. Now was the perfect opportunity. Only I don't have a pasta rolling machine thingy. But I watched lots of videos. I found one in particular that was wonderful! I just couldn't find it again (and still can't) when it came time to begin.

I did come across a recipe (found here)...although I'd like to try a different one next time (oh shit...did I say "next time?"). One that uses olive oil.

Pasta Dough

2 1/2 cups all-purpose flour (un-bleached)
1/2 cp semolina flour
1 teaspoon salt
4 eggs

Combine the flours and salt and make a nice "soothing" mound on the counter or whatever work area you'll be using. Make a "well" in the center of your flour mixture and crack the eggs into the center. With a fork, break the yokes and gently beat while carefully incorporating the flour into the mixture, gradually. Keep the walls of the flour in tact as you work your way around, clock-wise, incorporating the flour, being careful not to break through the walls, until you have a ball of dough that holds together and is not longer soupy.


Now for the work out.

Knead the dough until you have a nice smooth ball, adding flour if the dough is sticky but being careful not to add to much dough. In one of the videos I watched, they said that the kneading process would take about 5 or 10 minutes. For this novice....it took more like 20. Or maybe it took that long cuz I added a little too much flour? I dunno....I'm new to all this pasta making stuff.

Cut the dough into 4 equal pieces, wrap with plastic wrap and allow to rest for 20 minutes. Then on a lightly floured surface, evenly roll out one piece of dough until you have a nice thin sheet


Turn and roll and turn and roll....and discover something wonderful. As tired as you are....and your arms might feel like they're about to fall off.....pasta dough is amazing! It's not sticky like pastry or bread dough. It holds it's shape and even though you have to really "work" it....it does what it's suppose to....and you get this beautifully thin dough


Never did I dream that I could do that! See my hand through dough without my fingers poking through? OMG...I love this stuff!!

So...at some point (most likely while the dough was "resting), make a ravioli filling. I had some Roasted Winter Squash from a soup recipe that I had tried of Michael Chiarello (awesome stuff!!). Thats what I had decided to put in the center of my raviolis


So I put a sheet of dough over my floured ravioli tray...pushed the little "pockets" in and then filled each pocket with a teeny tiny amount of roasted squash. Applied a second sheet of dough and then rolled over the top with a rolling pin to cut through the dough and separating the raviolis. Only....Something went terribly wrong. Squash squished everywhere and I ended up with an awful wad of yuck.


omg....all that work and the dough is a slimy mess!!!

Ok, ok....pull youreslf together. Maybe a teeny tiny amount of squishy squash was too much. Thank God I still had a couple of balls of dough. I tried it again and used even less squash. Only this time I didn't really roll the rolling pin over the top, except for a little. Oh ya, and this time I wet the dough around each ravioli and along the edge to "glue" the two sheets of dough together. I then angled the rolling pin along the edge to cut the excess dough off. Then I dumped the tray over, releasing the sheet of 24 ravioli....grabbed a handy dandy steak knife and cut the them apart


After all that, I still had some dough left but by now I was so over the squash. I think next time I need a different filling....something that holds together really well. And doesn't squish.

With the remaining dough, I made some sort of noodle.


I fried the ravioli as an appetizer


(which puffed the ravioli and shrunk the squishy squash?)

They tasted really good. But like I said, next time they need a different filling

For the noodles, I just made a Mornay Sauce and poured that over them


Loved the noodles!!! I'd make the pasta dough all over again, just for the noodles.

This is my entry this week for the Two For Tuesday Blog Hop....Click on the photo below to visit Heather's place and see all the Real Food that the others are cooking up

24TbadgeGIRLICHEF

Oh, and about my arms....3 days later...they're still attached. And I think the soreness is almost gone. 

Sunday, August 1, 2010

HBin5 Four-Leaf Clover Broccoli and Cheddar Buns


It's that time again! Time to play with bread and challenge ourselves to try, or think up, new exciting things. I really looked forward to this HBin5 assignment. Not that I don't enjoy them all, but I love broccoli. And cheese in bread is just one of those naturally yummy combinations.


The other half of the assignment I was not able to accomplish. We were suppose to make Mesquite Bread. How delish does that sound? But I could not find Mesquite Flour at any of the local markets. I really do not want to buy it online and have to pay for shipping. Oh wait...hmmm....I realized that I didn't check the Hollywood Farmers Market. Well, if I find some there, I will report back because I sure would like to try this out. I mean......check out some of these ingredients: Mesquite Flour, Mesa, Jalapeno Peppers, Cilantro...ya, this baby is right up my alley. I can just see myself making pitas out of the dough and stuffing 'em with all sorts of fajita goodies.

A couple of weekends ago I grilled focaccia to be made with a Moroccan Grilled Chicken Sandwich. I'm not by any means experienced with grilling. Sir Sportsalot was away and I was left to my own means. This resulted in a very low heated charcoal bbq. The focaccia took at least twice as long to cook, although in the end, the results were wonderful. Last weekend I decided I wanted to try it again, only I wanted to use the Broccoli and Cheddar dough. Sir Sportsalot fired up those coals and had the thing blazing hot within 15 minutes. I dutifully place my roasting pan upside down on the grates and placed my baking sheet on top with my focaccia.

Let me make a little side note here. The reason for using the roasting pan is to raise the dough up a little to prevent burning. The reason I place the roasting pan upside down is to prevent the heat building up inside, causing a mini explosion and having the baking sheet and dough fly into the air. That would be a bummer.

Anyways....my broccoli and cheddar focaccia was a fail. The grill was too hot. The bread cooked too quickly on the outside, which stunted the "oven spring", and the inside was doughy. I tried to "save" it by sticking it in the oven...which helped with the insides but it was still very flat.

One of these days I'll figure it out. It will be worth it because the smoky flavor that the bread picks up is just wonderful.

I'm going to back up a little and tell you what I did with this dough. I used only all purpose flour. I have found that when working with "flavors" the whole wheat and even the white whole wheat tends to overpower just about any flavor that is added. Well, except for beets. Which I don't even like. Anyways.... I also doubled up on the cheese and then added some sauteed diced onions.


Before adding the broccoli to the dough, it is cooked and pureed, giving the dough a wonderful color. I was just thinking how nice it would be to us asparagus or even zucchini as well, or instead of the broccoli. This puree method really opens up a whole lot of possibilities.

After the initial rest period, I put the dough in the fridge. It is a lot easier to work with once it has chilled. The dough was then formed into a ball and divided into 4 equal portions, about the size of a plum. Each plum portion was then cut into fourths. Those were then formed into little balls. Four balls were placed into a muffin tin and allowed to rest, covered, for about 40 minutes.

I do not have pictures of this process because....well, I couldn't find the camera.

I then topped each "cluster" with some shredded cheese and baked them in a preheated 450' F oven for about 20 - 25 minutes, until they were browned and firm.


They came out beautifully. Light and flaky on the inside with a mild broccoli flavor, and bursting with cheddar both on the initial bite and then throughout the whole bun.

Michelle from BigBlackDogs.net is our HBin5 Bread Braid Host / Leader. Pop on over to her place and not only will you see her versions of Healthy Bread in Five Minutes a Day, but you will also find links to the other members experiences.

Hopefully I'll be able to find some Mesquite Flour soon so I can complete that portion of this weeks assignment.