Yum Peaceful Cooking: July 2010

Friday, July 30, 2010

Fresh Tomato Salad


No matter what the signs say. No matter what the claims are. You will never find a tomato as fresh and beautiful as one picked from someone's backyard. The grocery stores can shout and scream "organic", "hot house", "local" all they want. It just doesn't even come close.

My dear sweet neighbor (a.k.a. surrogate grandmother) grows the best tomatoes every year (I chalk it up to her dedication to composting). Since I haven't been able to plant my own small garden for a few years now, she has been very generous with the vegetables she grows.

I believe what I have here are Black Pear Tomatoes. I think. What ever they are...they have thin skins that slice oh so easily. A good firm meatiness that keeps them together. And a flavor that is mild, light on the acid and almost sweet. Plus, they are just so beautiful.

Some of you may already know...this has been a trying week for me. I came home Monday night and discovered a letter from Maytag. I almost through it away. I get so tired of being asked if I want to extend or buy a warranty for my appliances. But something caught my eye...probably the word "RECALL"! Thought it would be a good idea to see what the issue was and with which appliance.

Unfortunately it was a serious issue.

With my dishwasher.

That couldn't be resolved for another week.

Are you kidding me? Don't you know that I cook daily? Don't you know that I rely heavily on my dishwasher? Don't you know how much I HATE washing dishes? You can't do this to me!!

I was not a happy camper when I was finished with that phone call.

I was even less happy when Sir Sportsalot instructed informed me that I would not be cooking like I normally do if the dishwasher was going to be out of commission.

Have I ever mentioned how often he ends up cleaning up after me?

I have not turned on the oven all week. I've only made one-dish meals. I even considered serving peanut butter and jelly sandwiches on paper towels for dinner one night. That way I'd only have to wash one knife, right?

Needless to say, I'm going through withdrawals. I need to make something GOOD! I need to get in that kitchen and make a huge mess and come out satisfied with a great big dinner.

Monday....and I would never have dreamt that I'd be saying this....can't come soon enough.

Meanwhile, I'm keeping it simple.

Real simple

So simple that this isn't even a recipe. It's just good.

Slice a nice fresh homegrown tomato.
Dice a fantastic avocado
Chop a sweet red onion


Sprinkle with freshly ground sea salt, freshly ground pepper medley (you know the one with black, white, red, green pepper corns). Drizzle a little extra virgin olive oil and a squeeze of lemon or lime. Mix gently


Serve and experience the gentle combination thats refreshing, simple and satisfying. Sometimes I add a little cilantro or basil. Just to season it up. But often, it hits the spot just as it is. A perfect, unpretentious little salad.

This weekend though, I just might throw caution to wind and cook up a storm like a mad lady...getting every... single .....dish.....pot and pan dirty. That I own. I feel like a pressure cooker thats about to blow it's lid.

And it's not going to be pretty.

Do you think the dishwasher repair person will clean up the mess?

Monday, July 26, 2010

Moroccan Grilled Chicken Sandwich on a Grilled Focaccia


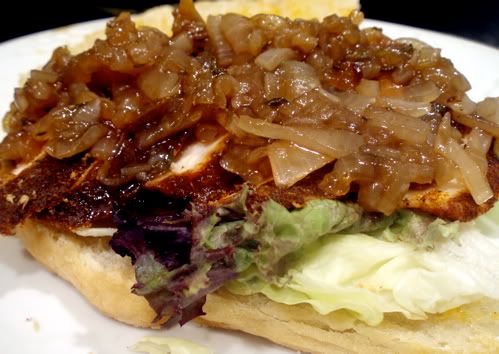
What you're looking at here is a Moroccan Grilled Chicken Sandwich with Onion Marmalade on a Grilled Olive Oil Focaccia brushed with a spicy garlic and cayenne oil. 

I think this is the best sandwich I've ever had in my life! I wish I could say that it's my idea. And that I came up with this incredible recipe all on my own.

But I'm not that good! 

I may have referenced in the past that in certain circles, I am known as the "Chicken Queen". With that said, I saw a magazine simply titled "Chicken". How could I not buy it? It might as well have said...Danielle, this is for you. Buy me!!!

So I did. 

It's a Fine Cooking magazine....packed with chicken recipes. 

I'm in heeeeeeeeeaven!!  

This particular weekend, Sir Sportsalot went out of town. (can you say Girls Weekend?!) And I decided I wanted to make this sandwich from my new "Fine Cooking CHICKEN" magazine. And some bread. On the grill. 

Have I mentioned that I'm not real familiar with grilling? And I've never started a charcoal grill on my own? We have one of those really cool charcoal chimney coal starter thingies. And I thought...cool. Piece of cake. Until I looked at it.

Which end do the coals go in? Which end does the newspaper go in? How many coals do I put in there? Oh lord....what have I gotten into? After much fretting and calling out on Facebook, I got it figured out.

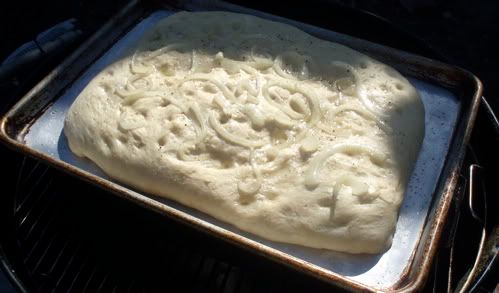
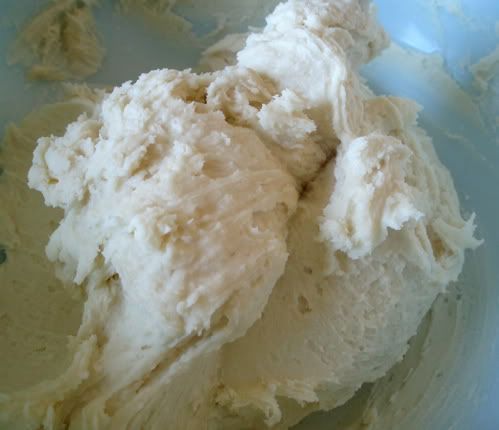
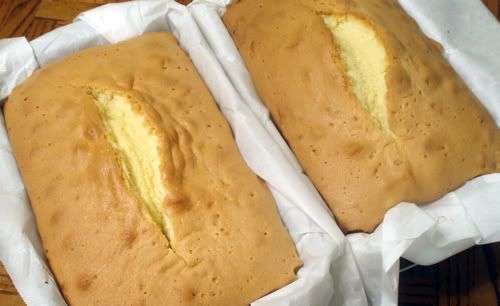
First thing I did was put together a nice Olive Oil bread dough from Artisan Bread in Five Minutes a Day. I sauteed a few slices of onions and placed them on top of the focaccia just before its last rise. I turned a roasting pan upside down and placed that on the hot grill, and then put a pastry pan with the bread on the roasting pan. My idea was to keep the bread a little further away from the heat so the bread wouldn't burn on the bottom before it was cooked through. 


But something went weird. I think I left my coals in the "chimney" too long. The bread was taking FORVER to bake. Or maybe I didn't have the little air vent thingy on the grill lid opened the right amount?...I dunno. But the top wasn't browning and it had been like...45 minutes. So I ended up flipping the damn thing just to get the top brown


That seems to do the trick. The onions got a a little crispy but hey...whatever works. I set it aside to cool at room temperature until everything else was ready.

Onion Marmalade (this takes a little while...just warning you)
3 medium yellow onion, sliced into thin half-moons
1 cup sherry vinegar or white wine vinegar
1/2 cup dry white wine
1/2 cup water
1/4 cup sugar
1 tablespoon chopped fresh thyme
Salt and Pepper to taste

In a 4 quart nonreactive saucepan, combine the onions, vinegar, wine, water, sugar and thyme.


I'm not a "thyme" fan but I decided to go with it this time. I have to say, fresh thyme is sooooo soooooo soooooooo much nicer than the dried stuff. Who'da thunk it?!

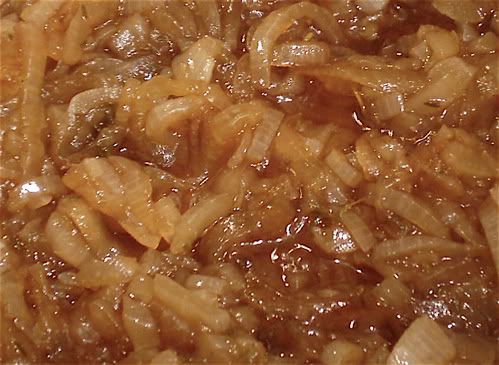
Bring to a boil over high heat. Reduce heat to medium low and simmer slowly, stirring occasionally until the onions are very soft and the liquid has cooked down to a syrupy consistency. This will take somewhere between 45 minutes to 1 hr 15 mins. 

I was a little worried while this was going on. All I could smell was the vinegar and I was thinking...oh crap...I'm making an onion version of Sauerkraut! (I don't like Sauerkraut.)

What I actually ended up with was a pan of soft onions that were not swimming in syrup that tasted wonderful. I added a small amount of salt and pepper. 


The recipe said that if the acid level is too high that you can add more sugar so that you have a sweet and sour flavor. DELISH!!! 

Allow to cool.

Now...for the 

Moroccan Grilled Chicken

4 boneless, skinless chicken breasts, slightly pounded so the thickness is even. (I butterflied 2 chicken breasts but in hind sight, the original recommendation is probably better).
2 tablespoons paprika
1 teaspoon sugar
2 teaspoon salt
1/2 teaspoon pepper
1/2 teaspoon ground ginger
1/2 teaspoon ground cardamom
1/2 teaspoon ground cumin
1/4 teaspoon ground cloves
1/4 teaspoon ground cinnamon
1/4 teaspoon ground allspice
1/4 teaspoon cayenne pepper

Combine all of the spices in a small bowl and then spread it all out on a plate. Lightly rub the chicken breasts with oil and press each breast into the spice mixture to thoroughly coat just one side of the meat. 


Hmmm....either I had too many glasses of Sangria that day and I don't remember, or I completely missed the "lightly rub the chicken with oil" part. Or both. 

Grill the chicken over a medium-hot fire for about 4 minutes on each side, starting with the rub side down first. If you want to get fancy schmancy, place the chicken at a 45-degree angle to the bars on the grill grate and rotate 90 degrees after 2 minutes. Flip and repeat. 


Somewhere along the line, things got a little messy and I ended up with some wandering moroccan rub. 

When the chicken is done, allow to cool on a platter until barely warm. Slice thinly crosswise, holding the knife at a 45-degree angle. 


Now I KNOW that I missed the "oil the chicken" part. Because if I had oiled the chicken as instructed...I think the rub wouldn't look so dry. Well....the flavor was awesome, either way.

Ok...ready to assemble? Oh ya...hold the phone!! Get some lettuce or arugula or some mixture that you like. I think I used butter lettuce? 

Get out a little bowl and pour about 1/4 - 1/3 cup of olive oil in there. Mince a garlic clove and it along with about 1/4 - 1/2 teaspoon (I didn't measure) of cayenne pepper to the olive oil. Mix together.


Nooow we can assemble these beauties. 

Slice the focaccia horizontally and brush each slice with the olive oil mixture. Put some lettuce on the bottom slice. Top with some sliced chicken and then a good spoonful of onions 


and another layer of lettuce. Cover with the top piece of focaccia...


And treat yourself to an array of flavors that each stand on their own and then somehow mix together into something wonderful....and then miraculously each one finding itself again before you know it, all taking turns playing patty cake with your taste buds. 

And the grilled bread...I must say was incredible. Totally by accident because there is no way it should've been, after all that time it took to bake. But let me tell you...the smokey flavor it had was worth every worried minute on the grill. 

This is my entry this week into the Two for Tuesday Blog Hop Carnival. Hop on over there and see what's cookin!

24TbadgeGIRLICHEF

Saturday, July 24, 2010

Raspberry White Sangria


What do you mean it's not white?!

I know...I know. In my defense, the wines I used were white. It was the fruit juice that made it not so white. Ya...let's blame the juice! It was the juices fault.

We're on the last leg of our Sangria experience over at BakeSpace.com where the unpretentious Community Wine Tasting beeps (thats short for BakeSpace Peeps...ya, it's a fun lovin, corny bunch. I fit right in) have been playing with Sangria since mid June. You're more than welcome to join us!

Warning: This recipe makes quite a bit...perfect for pool parties and bbq's. Or if you must, just halve the recipe and keep it for yourself.

Typically, when I've made a sangria that is focusing on a particular fruit flavor, I've incorporated some sort of fruit flavored alcohol to enhance the fresh fruit of choice. But not with this batch. No siiiiireeeeee. I really like raspberries. But I have an aversion to raspberry flavored alcohol. It ends up tasting like cough syrup. (shivers).


What I have here, as you can see in the photo are some frozen fruits. I have a lot of fresh strawberries that I recently froze, and fresh raspberries were kind of expensive so I bought a bag of frozen. Plus...when you use frozen fruit....no ice is needed :). Also....if you can chill all the ingredients before hand, you'll already be ahead of the game. If you are making this ahead of time, don't prepare or add the fruit until you're ready to serve. Or, prepare the fruit and store it in the freezer in a freezer bag.

Raspberry White Sangria
Printable Version

1 orange, peeled and chopped into chunks
1 pear, peeled and chopped into chunks
1/2 lb raspberries
1/2 lb strawberries
1 bottle Moscato
1 bottle White Zinfandel
3 cups cran-raspberry juice
3 cups gingerale
1 cup white rum
1/2 cup simple syrup

Combine fruit and set aside

In a large stock pot, combine all the liquid. Save the wine bottles!

Put the fruit into a large pitcher. Pour in as much of the sangria as will fit.


Get out a funnel and fill up the empty wine bottles with the remaining sangria for easy keeping


Stick a stopper in them and put them in the fridge. As the sangria pitcher empties, replenish with more. Repeat as necessary.

Now...put on your bathing suit. Turn on the radio or whatever method of music entertainment you use. Pour yourself a nice glass, and enjoy your sangria while you float around the pool.


Be careful though. This stuff likes to sneak up on ya. Because of it's unassuming alcohol content...you tend to suck it down like juice and next thing you know, you're dancing on the table. In your bathing suit. In your backyard. With a lamp shade on your head. Using your bottle of sunscreen as a mic.

Just don't do that move where the singer throws his head back and the mic is in the air as he holds onto that last note for emphasis. You might end up with a mouthful of Banana Boat SPF 30.

Wednesday, July 21, 2010

Texican Burger


I'm not sure what makes this "Texas". I was going to call it a tex-mex burger but that just seems...I dunno....over used? Texican came to mind and it stuck. I guess the Texas part can be in the size. You could make it bigger if you want, but contrary to popular belief, my mouth isn't really that big.

What makes it Mexican? I was hoping you'd ask. The seasoning. The spread. And the cheese.

Cheese?

Yes cheese. You can't see it yet...but I promise you....the cheese is there. (hmm...reminds me of that book..."Who moved my cheese?").


Nope, it's not pepper jack. But it's similar. And I am drawing a blank. I can not remember the exact name or brand. I found it at the mexican market. It's quesadilla cheese with jalapenos in it. It melts wonderfully and is really flavorful...with a little bite to it. Well, if you don't know what I'm talking about or you can't get it, just use pepper jack cheese.

I shredded some cheese and formed 4 little cheese balls with it


Take some ground sirloin (cuz it was on sale and super cheap!) and form a patty, placing one cheese ball in the center


Fold the edges up and around and moosh together in the center. Sprinkle the patties with salt, pepper and cumin


I'm not a grill master so I can't give you details, but grill for about 5 minutes on each side. Do NOT smash them with a spatula. Be careful that you don't over cook them and end up with cheese oozing out like a mini lava flow. But don't undercook them either...unless you're into that raw meat thing.


While those rest for a few minutes, in a mini food processor, mix together about 1/2 cup or so of mayonnaise, and a green onion or two and a handful of cilantro


Spread on a couple of wonderful Nature's Pride Premium Harvest Country White Bakery Buns, toasted of course


These were the last of the batch that I had received. I have to say...I loved them all!! I received them as part of the Foodbuzz Tastemaker Program and have had such a wonderful time experimenting with fun recipes to use on these buns and rolls.

Nature's Pride Premium Harvest 100% Whole Wheat Bakery Buns
Nature's Pride Premium Harvest Country White Deli Rolls


Ok, back to your regularly scheduled program....


Garnish your burger with lettuce, tomato, red onion and avocado. 


Now you can smash it a little and cut it in half to make it more manageable..


And expose all that gooey cheese!


Monday, July 19, 2010

Old-Fashioned Pound Cake. Even by 1948's Standards


When you get a flat of strawberries, fresh from the grower, who happens to be an award winning local grower...what do you do?

First, you thank your co-worker who happens to be related to said award winning strawberry grower. Then you wash off a strawberry and pop it into your mouth.

And you wonder and bask in it's incredible flavor! If I didn't know better, I'd have sworn these strawberries were soaked in sugar, they are that sweet! OH MY Gaaaawd!

I already have a ton of jam in my freezer. Strawberry season is quickly coming to an end (so sad)...and I know that I cannot, no matter how good these babies are....consume over 8 lbs of strawberries before they start to turn.

Freezing them is the next best thing. Just so you know...this is ONE HUGE bowl! It's one of those tupperware super duper sized bowls with the little handle for your thumb on the side (not shown in picture...sorry).


They do need some prep work though. I mean, I don't plan on freezing the green tops. This could take some time....ya know?

Never fear....I have a wonderful little gadget that was given to me by a close friend. She's actually one of my favorite people to cook with. We just mesh so well together in the kitchen. And she's a wonderful cook.

I have discovered that I cannot whip cream without her guidance. It just doesn't work (as seen in the top photo). Anyways....she gave me this fun little kitchen toy that quickly and easily removes those little green stems from strawberries.


And it works wonderfully

You insert, twist and remove


Then you push the end and release


In less than 15 minutes, I had completely de-stemmed 8 lbs of strawberries


Most of which ended up in freezer bags, while some were saved for one of my favorite summer desserts....

Poundcake, topped with strawberries and whipped cream. It's one of those desserts that I have been enjoying for as long as I can remember. Only, never homemade. Always store bought.

I have this really old cookbook, "The American Woman's Cookbook"


My mom gave to me back when I was 19 (the book was really old then too...I swear!!). The book was originally published in 1938. Mine was published in 1948.

I found a recipe for poundcake. Old-Fashioned Poundcake to be exact. Made me wonder how old-fashioned it could be back in 1948?! Well, apparently poundcake first came around in the early 1700's. So I s'pose a 60  yr old recipe can still refer to it as old-fashioned.


Old-Fashioned Poundcake
Printable Version

1 lb butter
1 lb sifted cake flour
10 eggs, separated
1 lb sugar
1 teaspoon vanilla

Preheat oven to 325' F

Cream the butter. Work in the flour until mixture is mealy.


In a separate bowl, beat egg yolks, sugar and vanilla until thick in fluffy.


Add butter mixture to the egg mixture gradually, beating thoroughly. In another bowl, beat egg whites until stiff. Fold egg whites into butter mixture. Beat vigorously 5 minutes.


Prepare 2 loaf pans by lining them with parchment paper. Bake for 1 1/4 hours.


And there you have it....2 loaves of pound cake. One to eat, and one to share.

What's your favorite way to eat a fresh slice of pound cake?


This is my entry in this weeks Blog Hop Carnival, Real Food for Two for Tuesday. 


Head on over to Girlichef.blogspot.com so see what else is happening in the Blog Hop


Sunday, July 18, 2010

Buitoni Ravioli - Fried with Sauce Mornay


Not that long ago I received a coupon from Buitoni for a free package of their Riserva refrigerated pastas, thanks to the Tastemaker program at Foodbuzz. I have tasted many of their pastas and the family has always like them. I particularly like the Wild Mushroom Agnolotti. 

Even though it was suggested that I try the Quattro Formaggi Agnolottie, I chose Spicy Beef and Sausage Ravioli. 


I wanted something meaty...and wasn't in the mood for a marinara sauce, which naturally leads me to a creamy cheese sauce. Quattro cheese + Sauce Mornay = to much cheese. I know...normally there is no such thing as too much cheese...but in this case, I thought it would be a little too rich. The Spicy Beef and Sausage Ravioli was the perfect match. 

With that in mind, and with a desire to make the ravioli in a non traditional way, I came across Giada De Laurentiis Fried Ravioli recipe. It was simple, quick and very satisfying. A fulfilling meal when served with some fantastic Cheesy Garlic Bread and a simple spring lettuce mix salad with sliced red onions, red grapes and topped with shredded parmesan cheese. Or serve them as a delightful appetizer. Either way, they're going to be a hit! Crispy on the outside and a wonderfully slightly spicy meatiness on the inside. 


Fried Raviolis

Oil for frying (about 2 inches in a medium sized sauce pan)
1 cup buttermilk
2 cups Italian-style bread crumbs
1 package Buitoni Spicy Beef and Sausage Ravioli
Sauce Mornay for dipping (recipe to follow)

Heat oil to about 325'. 

I have a confession to make. I had started out by heating my oil in one of my cast iron skillets (don't aske why). When I was about to fry the raviolis, I got a little nervous. You know how the oil bubbles up when you drop stuff in it? Well, I was concerned about having the oil spill over the side...thus causing an oil fire. I decided that the oil needed to be "carefully" transfered to a sauce pan (which is much deeper than a skillet...still not sure why I started with the skillet). I placed the sauce pan in the kitchen sink (to catch any oil that might spill). I noticed something unknown had dripped into the sauce pan, so I quickly rinsed it out and dumped out the water. I then proceeded to pour in the hot oil....which spit and splattered upon hitting the slightly wet surface of the sauce pan. So I backed up a bit to be on the safe side and waited for it to settle. Thinking that the water had all splattered away....I began pouring the remaining bulk of the hot oil....it started spitting again, I think some oil must've spilled into the sink...and boy did it get angry then!!! I backed away about 5 feet to wait for it to settle down. All of a sudden, the oil exploded!! I had an oil fountain spurting up from my sink into the air!!! It was a rather spectacular sight. I'm sure my eyes were huge and my moouth was gaping open. Thank God, not a drop landed on me. But I can't say the same for my kitchen. Oil was everywhere!! The ceiling, window, counter tops, clean dishes that were off to the side, dripping down the fronts of the cabinets...and puddles of it on the floor. What a mess! What a lesson! WOW.

Ok...so, you are safely heating your oil in a deep...DRY sauce pan with about 2" of oil.

And your raviolis are ready for their journey


Pour the buttermilk into a shallow dish and pour the bread crumbs into another shallow dish.

Dip the raviolis into the buttermilk...allowing the excess to drip off. Then coat with bread crumbs. 

Working in batches, fry the raviolis for about 3 minutes, turning occasionally, until golden brown. Remove and drain onto a paper towel lined plate and proceed with another batch until complete.


Giada shredded parmesan cheese over these little nuggets of goodness while they were still hot. Since I was serving them with a cheese sauce, I passed on that little step.

While those are cooling, make your Sauce Mornay, a.k.a. Cheese Sauce. For the cheese sauce I went to Julia Child's MtAoFC. Let me tell you something...I have been trying to make cheese sauce for years. I have followed several recipes. I have tried various cheeses. And I always ended up with something that really wants to be a creamy cheese sauce but somehow falls short. Sometimes the cheese wasn't right but always...the flour was detectable. 

Very frustrating.

Very demoralizing. 

Always a failure. 

Until now. 

Julie Child ROCKS!!! Her instructions, thought they are not typically laid out in the manner in which we are use to, explains in such a way that you know what you're looking for....not just doing. It doesnt just say "stir continuously for 2 minutes" but it says "stirring until the butter and flour froth together for 2 minutes without coloring".  That one simple word....Froth....spoke volumes to me. That was the point where the flour had truly dissolved and was no longer detected. Not only in flavor, but in texture. And what I ended up with was the most amazing creamy cheese sauce I have ever made or ever hoped to make. 

Sauce Mornay begins with a simple Sauce Bechamel, which is a basic white sauce. What makes it a Mornay are the simple ingredients that are added directly afterwards.

Sauce Mornay (Cheese Sauce) 

2 tablespoons butter
3 tablespoons flour
2 cups milk
1/4 teaspoon salt
Salt and Pepper

1/4 cup coarsely grated Swiss cheese
1/4 cup finely grated parmesan cheese
Salt and Pepper
Pinch of nutmeg
Pinch of cayenne pepper (optional)
2 tablespoons butter (optional)

In a small saucepan, heat to just a boil, while stirring, the 2 cups of milk and 1/4 teaspoon of salt. Remove from heat and set aside.

Melt 2 tablespoons of butter in a heavy-bottomed saucepan, over low heat. Blend in the flour and cook slowly, stirring continuously until "the butter and flour froth together for 2 minutes without coloring," thus creating a roux.

Remove from heat. As soon as it stops bubbling, pour in your hot milk all at once. Immediately start beating with a whisk, vigorously. Make sure you gather all of the roux from the sides, bottom and edges of the pan.

Return to a moderate heat and stir until the sauce comes to a boil. Boil and stir for 1 minute.

Remove from heat and beat in salt and pepper to taste.

Beat in the cheese until they have melted and are well blended into the sauce. 


Season with nutmeg, cayenne and salt and pepper (if needed). Stir in the butter a bit at a time until melted and blended.

Serve immediately.


Thank you Buitoni for the coupon and giving me a chance to review your wonderful Spicy Beef and Sausage Ravioli! I have served Buitoni refrigerated pastas several times and will continue doing so. They're tasty, convenient and the whole family (especially Sir Sportsalot) really likes them.