Yum Peaceful Cooking

Sunday, October 20, 2013

Tortellini with Pumpkin Alfredo Sauce


I have a new found respect for pumpkin.

And that's saying a lot for someone who doesn't really like pumpkin pie.

I recently discovered a group of bloggers in my area who meet once a month. I have never met another food blogger, face to face. That I know of. (or that I can remember) Do you know how excited I was to attend my first meeting...and meet real live people who are just as obsessed with food and pictures and writing about it all, as I am?

Oh man...I felt like I was going to my first ever party.

Then I found out that everyone needed to bring a dish.

Ok, that's cool.

A pumpkin dish.

Oh...that's....errrrr....challenging.....

Then the nerves set it. What can I bring that will live up to whatever expectations other bloggers have? I certainly don't want to bring the same dish as someone else. I considered my Pumpkin Cheesecake but pushed it to the back of my mind for a bit. Then decided to experiment and see what my other options were.

One of the many dishes that I considered and reviewed was this Tortellini with Pumpkin Alfredo. Although I was skeptical. I mean...I imagined pumpkin pie tossed with tortellini. Not a good visual, or mental taste test. Upon noticing that it only contained 1/2 cup of pumpkin...my reservations lifted a bit and I went for. As in...test run for dinner.

I wonder if my family realize how often they're used as guinea pigs. Or if they care.


(do you see how few ingredients there are?!)

Tortellini with Pumpkin Alfredo Sauce
inspired by Food Network
Printable Version

2 9oz packages of cheese tortellini (I only used a 14oz package. worked fine)
1 TB butter
1 small shallot, finely chopped
1/2 cup pumpkin puree
Pinch of nutmeg (freshly ground if you have it)
1 1/4 cup heavy cream (ya ya, I used whipping cream)
1/4 parmesan cheese plus more for garnish
Salt and pepper to taste
Chopped sage for garnish (ooptional)

Cook the tortellini according to package directions.

In a skillet, over medium-high heat, melt the butter. Add the shallots. Cook and stir until tender, about 2 minutes. Add the pumpkin and nutmeg and continue cooking for another minute, stirring constantly.

Pour in the cream, stirring to blend and bring to a low boil.


While still stirring, reduce heat and continue to cook for another 5 minutes or until slightly thick. Stir in the cheese and cook for another minute, until thick. Season with salt and pepper to taste.

Add the tortellini and garnish with cheese and sage if desired.


Oh man...this dish is subtle in flavor yet rich. Each bite leaves you wanting more. It's so good that I made it again. Less than a week later.

Another bonus: you know how you have that little bit of pumpkin puree leftover from making all your holiday desserts? Well this is the perfect dish for using that up.

But I did not bring this to the food blogger meeting.

Not because it wasn't amazing and delicious. Not because it would shame me in any shape or form.

I didn't bring it because....I had a slight hangover and it didn't sound like it would be very good for brunch. So I brought pumpkin cheesecake which I had made the day before (as a backup plan...just in case).

Thank god no one else brought the same thing. And yes...the food was amazing, as one would expect. I just wish I could've fit everything on the table is this one photo.


Thursday, October 17, 2013

Mushroom and Leek Migas


It's that time again....time to Spotlight a new amazing cookbook. I'm sure most of you are acquainted with the author in some form or another. She's a fellow blogger (I love when this happens!) by the name of Meagan Micozzi. She has an amazing blog (of course) called Scarletta Bakes

She's been giving away some amazing stuff lately so I highly, highly recommend that you give her visit and see if you can win something.

So...she has this new cookbook, The New Southwest


and I'm here to tall you about it...during the next 3 weeks. Aaaaaaand (this is a BIG and) during the 3rd week, I'll be giving this cookbook away to one of you lucky people.

But let's explore a little. See what's inside. I mean, you never buy a cookbook without browsing through the pages first, right?

So for this week, Mushroom and Leek Migas is on the menu. It's typically a breakfast dish but how many of you love to eat breakfast for dinner? I'm a huge fan, that's for sure. Which is why I chose to make this for dinner. It's quick, easy and delish! I had all of the ingredients on hand


...except for the leek. Oh...and the cheese. So I ran to the store...(because I needed a bottle of wine anyway) and picked them up. Not long after I got home, dinner was served. But honestly, if you don't want to run to the store...you can use any kind of cheese you want. If you don't have a leek on hand, use whatever onion you've got.

It's all good.

Talk about a great meal for those busy weeknights. Loaded with flavor and guaranteed not to send you to bed hungry. Do you have a vegetarian in the house? Peeeerfeeeeeeect! Can't go wrong there.

And one more thing, if dirty dishes aren't your thing...then you're going to love this even more. One pan is all you need.

Mushroom and Leek Migas
Printable Version

4 5" corn tortillas
1 1/4 cups oil (divided)
10 large eggs
1/4 heavy cream (milk will do if that's all you have)
salt and pepper to taste
8 oz crimini mushrooms (or whatever you prefer would be just fine)
1 leek, ends removed and sliced
2 TB minced garlic (or to taste)
1 cup shredded Manchego cheese (or whatever you have on hand)

Cut the tortillas in half then slice into thin strips (about 1/2"). Heat 1 cup of oil in a large heavy bottom saucepan over medium high heat.

Working in batches, fry the tortilla strips for 1 to 2 minutes or until browned, flipping as needed. Keep an eye on them. They go from golden brown to burnt real quick.


 Remove from pan to a towel lined plate or baking sheet.


(if you really really want to save time, you can buy tortilla strips from the market, but honestly they're not as good. Just sayin')

Whisk together the eggs and heavy cream. Season with salt and pepper. Set aside.

Once you're finished with the strips, rinse out the pan and heat up the remaining 1/4 cup of oil over medium heat.

Saute the mushrooms for about 3 minutes or until tender (ooooh they smell so good). Add the leek and saute for another 2 minutes. Then add the garlic.


The aroma level just jump up several notches! Seriously!

Saute for a minute before pouring in the egg. Stir constantly in a circular motion until the eggs begin to solidify then add those lovely crispy tortilla strips.


Continue cooking, stirring frequently, until the eggs are cooked through.

Remove from heat, top with the amazing, tangy Manchego cheese and serve. If you'd like, chop up some cilantro, avocado, maybe a little tomato and sprinkle on top as well

Holy moly....good stuff I tell ya! I can't wait to try something else from this book.

Stay tuned for the next feature....coming your way in the very near future.

There are about 15 of us playing around in The New Southwest Cookbook so by all means, check them all out. You can find us all listed here: http://www.girlichef.com/2013/10/TheNewSouthwest-CookbookSpotlight.html


This post is part of The New Southwest Cookbook Spotlightsponsored by Hippocrene and hosted at girlichef.


Sunday, October 13, 2013

Millet with Asparagus and Mushrooms


Many, many moons ago I raised and bred birds (at one point I had about 80) and millet was no stranger to me. I'd buy it by the bags full.

And feed it to my birds.

During my last trip to the farmers market, I asked a gal that had a nice spread of dried beans and grains if she had any quinoa. Her response was "I only sell stuff that's grown in the USA and quinoa isn't". I had never thought of that. Her next statement went something like this..."but I have millet. It's very similar to quinoa and is cooked the same way with just a bit more water. It has the same nutrients and a lot of people like it better because it doesn't have that 'soapy' taste that quinoa has." (well...if you rinse quinoa before cooking it, it will not have that undesirable hint of soap when cooked)....but I remained quiet and let her sell me a small amount of millet).


After some research on my part, I found out that millet doesn't have the same nutritional value as quinoa so don't get overly excited, although it is very good for you. I'd say it lies somewhere between quinoa and brown rice.  I do like the fact that it's grown in the USA. I think. Let me rephrase that. I like that it provides jobs here in the USA because it's grown here. Other than that, where food is concerned..."made in the USA" doesn't make me feel better about eating it.

But, I digress.


When cooking millet (btw, millet is not a grain. It's a seed.) the ratio to liquid is 3 to 1 (unlike quinoa and rice which is 2 to 1).  But, Just like the other two, if you want it dryer or wetter, just adjust the liquid ratio. Millet has a more earthy flavor to it and is actually quite good.

Especially when it's sauteed and cooked with veggies.


And I kinda liked the idea of feeding my family..."bird food".

Millet with Asparagus and Mushrooms
Printable Version

1 cup whole millet
3 cups chicken broth
2 tsp olive oil
4-6 crimini mushrooms, sliced
1/4 lb asparagus cut into 1-2" pieces (green beans are a great alternative)
Salt and pepper

In a dry sauce pan, over medium heat, brown the millet to give it a more nutty, toasty flavor. (this step is optional).

Pour 3 cups of hot chicken broth into the pan with the millet. Bring to a boil. Once boiling, reduce heat to a simmer, cover and cook for about 20 - 25 minutes or until all of the liquid has been absorbed.

While the millet is simmering, in a medium skillet heat the olive oil. Add the sliced mushrooms and asparagus and saute until crisp tender or to your desired tenderness.

When the millet is cooked, fluff with a fork and toss in the cooked mushrooms and asparagus. Season with salt and pepper to taste.


Wednesday, October 9, 2013

Bifteck Hache a la Lyonnaise - Ground Beef with Onions and Herbs


Leave it to Julia Child to make ground beef sound special! Or maybe it's just the French language. But since my introduction to this dish was from Mastering the Art of French Cooking, I'll give Julia the credit.

My trip to the Hollywood Farmers Market over the weekend was different than most. I was not zoned in on vegetables. My mission was to check out raw milk and grass fed beef. With all the scares and concerns out there, I really wanted to do some research and see what my doable options were. The opinions and concerns out there are all very real on various levels. I personally think its a crime shame that eating healthy (ie: organic, grass fed, free range, etc etc) is so expensive. I still don't understand how pesticides, antibiotics, hormones and such can be less expensive than growing the product the way it's meant to be....as is.

And that's just the tip of the iceberg. I'll leave it at that.

I found some wonderful pasture-grazed ground beef for about $5.00 lb. (the price will be going up by $2.00 per pound later this month). I splurged and bought some.


As I continued to wander around the market, my mind was trying to decide what to do with it. Of course spaghetti and meatballs came to mind...as did sweet and sour meatballs, and a number of other common menus. None sounded right. I didn't want to hide the flavor of the beef....I felt it needed to shine, center stage in order for me to really taste the difference.

Luckily, in a moment of silliness, when I got home I decided to check Mastering the Art of French Cooking, As I opened the book, I thought "surely the French don't eat something as mundane as ground beef!"

Oooooh, how wrong I was.

This delicious patty would make an amazing hamburger! (what do you think of them apples?) Simple, few ingredients and lots of butter. Seems to be a huge theme in MtAoFC. I don't know why I never realized this before but...Julia Child was the queen of butter. Paula Deen has nothing on her!

Ground Beef with Onions and Herbs
(Bifteck Hache a la Lyonnaise)
Printable Version

1/4 cup minced yellow onion (I used what I had...white)
7-8 TB butter, divided
1 1/2 lbs lean ground beef
1 1/2 tsp salt
1/8 tsp pepper
1/8 tsp thyme (I used savory)
1 egg
1/2 flour
1 TB oil
1/2 cup beef stock, beef bouillon, dry white wine, dry white vermouth, red wine or 1/4 cup water (I used dry white vermouth)

In a heavy skillet, melt 2 TB butter. Cook the onions in the butter until tender but not browned, about 10 minutes.

In a medium bowl, mix together the onions, beef, 2 TB softened butter, salt, pepper, thyme and egg. Mix until thoroughly blended. Form the mixture into 6 patties, about 3/4 inch thick.

At this point you can cover them and place in the refrigerator until ready to cook.

Just before sauteing, lightly coat each patty in flour, shaking off any excess flour.


Over medium-high heat, melt 1 TB butter along with the oil. When the foam from the butter begins to subside (this indicates that the pan is hot enough to sear the meat) saute the patties for 2-3 minutes per side or more, depending on how you like your meat, rare, medium, well done.


Mine were on the well done side but the searing was perfect!

Remove and keep warm while making the sauce.

Pour the fat out of the skillet. add in the liquid of your choice and rapidly boil down until it has reduce to an almost syrupy consistency, scraping up the delicious nuggets from the bottom of the pan.

Remove from heat and gently stir in 2 - 3 TB of butter, 1/2 TB at a time. Pour over the patties.


So good. So simple. And as far as the beef goes? Well, it has a fuller flavor...a bit richer. But then again, this was ground top sirloin. I'm not saying that none of the generic ground beef isn't. I've heard chefs say that often times, ground beef is made from left over bits of chuck. This farm happens to make theirs with sirloin...and nothing else. No bits and pieces of leftover anything.

Honestly, I shouldn't complain too much about the cost. I mean, I spend more for my favored rib-eye steaks. But beef in this household is not cooked as often as chicken. Ground beef even less. Next time I decide to buy ground beef, I will think twice when at the supermarket. If it was a staple....I don't think I'd be able to afford to do so.

Reliving this recipe is making my stomach growl. Wish I had some leftovers but those were quickly consumed the next day....


BON APPETIT! 

Saturday, September 21, 2013

Curried Apple Chutney


It's canning season. Summer is ending today and fall begins tomorrow.

August 12th was Can it Forward Day. What an exciting day that was. Really...fun, informative, and inspirational. Ball had a fun filled day of live online canning seminars....FREE!! With lots of giveaway opportunities.

It was through one of those many opportunities that I won a Ball Home Canning Discovery Kit from Debby over at A Feast for the Eyes Thank you so much Debby!!!


Can I tell you how thrilled I was? That cool little basket was the biggest score for me. I don't have any special tools or anything for my canning adventures so having this basket that gets submerged into the boiling water along with the jars was a huge plus! No more dropping jars into the water cuz they slipped from the tongs that I've always used that aren't for holding jars. No more spilling near boiling water on me as I take the jars out cuz there's always just a little bit of water on the lid. And it's not like the basket is a pricey item, far from it, but I just don't shop online much. Soo...my lovely kit came with all this stuff in the picture...plus a coupon for a free case of jars! Talk about inspirational! How can you have all this cool stuff and not want to can something!

As I browsed through my newly acquired Blue Book Guide to Preserving, I spotted a lovely sounding recipe for Chutney. The ingredients were handy. I think all I had to do was buy enough apples and raisins. Everything else was already in my pantry.

I'm going to share just the recipe with you, not much of the whole canning process. If you're not experienced in preserving and canning (or you need a refresher), I highly highly insist recommend browsing through Ball's website, Fresh Preserving where you'll find instructions on how to get started, along with video tutorials, recipes, products, and an online community with discussion boards.

Canning and preserving is not difficult but there are important precautions and procedures that need to be followed.

This chutney was made using the boiling water method. Besides the jars, all you really need is a large, deep stockpot. One that's deep enough to be able to cover the jars with about 2 inches of water, once submerged. You don't need anything fancy. Of course if you have fancy, or you want fancy....then go for it. It does make things a little bit easier.

One more thing before I get started....this was suppose to yield about 10 pints. I don't know what I did...but I got a little more than 5 pints out of it. I'm thinking....maybe I cooked the chutney down too much before canning? Who knows....its fine...because 5 pints of chutney will last us quite a while. I think. hmmm...maybe not, because this stuff is so very good. It's only been a week and I've already gone through 1/2 a pint.


Curried Apple Chutney
Yields about 10 pints

2 quarts of chopped, peeled, cored apples (about a dozen large or 16 medium)
2 lbs raisins
4 cups brown sugar
1 cup chopped onion
1 cup chopped sweet pepper
3 TB mustard seed
2 TB ginger
2 tsp allspice
2 tsp curry powder
2 tsp salt
2 hot red peppers, chopped
1 clove garlic, minced
4 cups vinegar

In a large saucepan, combine all of the ingredients. Simmer until thickened, stirring frequently.

I let this simmer for a good hour. I wanted the chutney to be on the soft side, yet chunky. I didn't want a relish type consistency....ie: crunchy.

Ladle the hot chutney into hot jars (this prevents the jars from possibly cracking), leaving about 1/2" headspace (this would be the measurement from the top of the jar to the top of the food).

Using a nonmetallic spatula, run it around the inside of each jar, pressing slightly to remove air bubbles.

Using a clean cloth, wipe the edge of the rim and side of each jar. Place the two-piece lids on the jars and process in boiling water for 10 minutes.

Turn the heat off and let sit for 5 minutes before carefully removing the jars from the hot water.

Repeat as necessary until you have processed all of your jars of chutney.

Allow to sit at room temperature for 12 to 24 hours. Test the lids to make sure they have sealed (the center of the lid should be concave).

At this point you can should remove the outer band. Actually, I highly recommend it. You see, I learned something on that special Can it Forward day. Since its the flat lid that seals and keeps your newly preserved vegetables and fruit fresh, if the canning process has failed at any level, bacteria begins to grow inside the jar causing a build-up of gases. These gases will break the seal and mold will form...thus warning you that what's inside is not edible. If the bands are left on, the seals are forced to stay shut, despite the havoc inside and there will not be that easily defined visible warning.

Store for up to a year.


Need a little idea on what do use it for? Try one of my new favorite dishes:


Pork Tenderloin would also be wonderful. Or just spread it on a cracker with some cream cheese. Maybe a bagel? You could just lick it off the spoon...I won't tell. 

Thursday, September 19, 2013

Chutney de Poulet


Who wants a quick, easy, bursting with flavor to the point of almost being gourmet, meal that can be made during the week?

ME!!

Well, we're in luck because this just so happens to be one of those dishes.

Chutney de Poulet
Printable Version

4 boneless skinless chicken thighs
1 TB butter, plus more for parchment paper
Juice from 1 lemon, divided
Salt to taste
Pepper to taste
1/4 cup Extra Dry Vermouth
1 pinch poultry seasoning
1/4 teaspoon paprika
1 garlic clove, minced
1/2 cup chicken broth
1 cup of your favorite chutney (I used curried apple chutney....recipe will post this weekend)

Melt butter in a large skillet over medium heat.

Drizzle half of the lemon juice over the chicken. Season with salt and pepper to taste.

Place chicken in the skillet and cook for about 1 minute per side.

Cut a piece of parchment paper slightly smaller than the pan. Rub some butter on one side. Place parchment paper, butter side down, over the chicken, roughly, carefully, tucking in the sides. Cover the skillet with a tight fitting lid, or tin foil. Cook over medium low heat for 10 minutes or until chicken is done.

Remove chicken from skillet and place on a warming platter, or a plate covered with foil.

Turn flame off and add the vermouth. Turn flame back on to medium. Stir the vermouth into the butter left over from the chicken, scraping the bottom to deglaze. Add in the poultry seasoning, paprika and garlic. Cook for about 1 minute.

Stir in the chicken broth and chutney. Continue cooking until warm, stirring often, about 3 minutes.

Return chicken to skillet to reheat.

Serve with a side of veggies and rice if desired.


Sunday, September 15, 2013

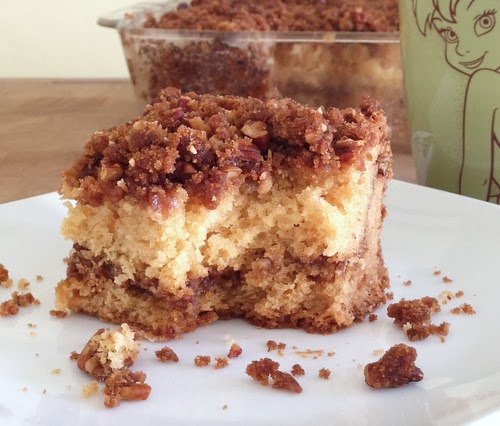
Mt.Gleason Junior High Home Ec. Coffee Cake


I went to school in a little town on the outer fringes of the Los Angeles County. Tucked into the foothills is a (what was called back then) junior high school named Mt. Gleason. I spent 7th, 8th and 9th grades there. Elementary school ended at 6th grade in those days. High school was a 3 year program and started at 10th grade, not 9th like it does now. In fact, if you were in high school for 4 years, it was because you screwed up and you'd get teased for being in the "four year program".

Anyways, back to jr. high. I loved the selection of electives....art, choir, play productions, stage crew, typing, drafting, etc etc. As in introduction to these electives, us 7th graders got a "sample" version of our chosen 4 classes throughout the year. I spent several weeks in each...Cooking, Sewing, Agriculture and Play Productions (or was it drafting? Maybe play productions came later). What fun! These were the classes I looked forward to each day. They made history, English, math, science, and geography bearable (although marine biology was pretty cool! especially when we went on a whale watching field trip).

But I'm here to talk about the cooking class in the home economics building (imagine that...a "middle school" with a whole building just for home economics). I can still picture the class room with the various cooking stations. And yes, there were boys in the class. Lord, I would not have wanted to be that teacher! Can you imagine a classroom full of 7th grade boys and girls....in the kitchen, with knives and FLAMES!! Amazingly enough, my class didn't experience any catastrophes. No fires, no amputated appendages. No food poisoning.

What we did experience that I can remember are Silver Dollar Pancakes and Pumpkin Bread. This is where I learned the proper way of measuring ingredients. I learned that brown sugar is packed. Flours are sifted. Liquids are measured on a flat surface...not in your hand, with the measuring cup held at eye level. This is where I learned that eggs are cracked into a separate bowl, individually, before adding to the ingredients in case it's bad. I truly believe that cooking should be a requirement for all students. Male and female. It's a basic life tool. Without this skill, if they don't learn it at home, they will initially rely on fast food and microwavable dishes until they decide to learn on their own....IF they decide to ever learn on their own. It breaks my heart to see families who eat out every night. Which means...those kids are growing up on fast food. (Don't get me started!!)

This recipe for coffee cake is one I don't remember actually making in class. Not that it didn't happen....it's just that my memory, for some reason did not retain the coffee cake. Which is weird. Everyone else that I went to school (with whom I'm currently still in contact) remembers making coffee cake. Someone, somewhere, shared the recipe that they still had (and I'd think that in itself was weird, except I still have the pumpkin bread recipe assignment, on the gold paper with the purplish ink...awww...memories of the ditto paper).

Its a wonderful recipe. Not only because of the history....but it truly is a delicious coffee cake. I made mine in a square dish. I had to bake it longer than if it were made in a tube pan (as instructed...I hope the teacher doesn't dock my grade) because the center took longer to cook. Even though I extended the cooking time...it was still (here comes one of the worst words used in the cooking world.....) moist. It's not stingy with the streusel topping either. Aaaaand....it's easy enough for the kids to make. I wonder...how many kids signed up for the cooking class...just to make this coffee cake.


Mt. Gleason Home Ec. Coffee Cake
Printable Version

Topping
1/4 cup all purpose flour
3/4 cup brown sugar, packed
1/4 tsp salt
1 cup chopped walnuts (I used pecans)
1/4 cup butter, cut into small pieces

Cake
1 1/2 cups cake flour
1/2 cup all purpose flour
1 tsp. baking soda
1 tsp. baking powder
1 cup granulated sugar
1/2 cup butter
1 large egg
1 tsp vanilla extract
1 cup sour cream

Preheat the oven to 350' F, grease and flour a 10" tube pan.

For the topping; mix together the flour, brown sugar, salt and walnuts. Add in the butter and with your hands, rub into the ingredients until crumbly. Don't over do it...you don't want a paste. Set aside.

For the cake: in a medium bowl, mix together the flours, baking soda and baking powder.

In a mixing bowl, cream together the butter and and sugar until fluffy. Add in the egg and vanilla and mix well. With the mixer on low, add in half of the dry ingredients and mix just until blended. Add in the sour cream, mix until just blended then add in the remaining dry ingredients and once again, mix until just blended, scraping down the sides as needed.

Spread half of the batter into the pan. Sprinkle half of the topping on the batter. Carefully spread the rest of the batter over the topping and then top it all off with the remaining topping.

Bake for 40 - 45 minutes or until a toothpick inserted in the middle comes out clean.

(note: the lack of salt in the cake ingredients is not a mistake)

Correction! Apparently I was wrong about where this recipe came from (no wonder I don't remember making it.) It's not from the home ec. class....it's from the cafeteria! The rest of the story stands true :)