Yum Peaceful Cooking: Beef
Showing posts with label Beef. Show all posts

Sunday, December 6, 2015

Slow Cooker Chili #StubbsCookingSauce


The holidays are here and time is precious. We have shopping to do, parties to attend and families to feed. This is the best time of year to break out the trusty ole slow cook (aka crock pot if you wanna get all old school on me).

This is where Stubb's BBQ can be your best friend. I know you're familiar with their bbq sauces, but did you know they also have Cooking Sauces?!


This is just 3 of the varieties that they offer. Look how cute the packaging is!!


The chili pack came with everything I needed, but the meat. Of course you can add extras, such as peppers, onions, whatever your favorite add-ins might be. I chose to keep it simple, although I did brown my stew meat before hand, and then added some onions.


After that, it was all up to Stubb! Pour in the spice pack (it's really spicy, just so you know) and the sauce


Can you see how rich those spices are?! And for those who need to know, it's gluten-free. 

With only a minimal amount of prep time, and 2 additional ingredients, I had a nice pot of chili waiting for me when I got home. Threw together some cornbread (I can't have chili without cornbread) and bam! Dinner is served. 


Let me just say.....wow. Rich, flavorful, and satisfying! It was better than any pot of chili I've ever made (for reals). 

Want some more ideas and information? Visit Stubb's BBQ . Also check out these wonderful holiday meal suggestions:

·         Stubb’s Smoked Turkey or Deep Fried Turkey
·         Black-Eyes ‘n’ Bacon


I was not compensated for this post, however Stubb's BBQ supplied me with coupons. All opinions are my own.

Wednesday, January 15, 2014

Cherry Chipotle Meatloaf - The Best Meatloaf I've Ever Had


Just for the record here, let me tell you that I have never been a fan of meatloaf. Not even meatloaf sandwiches.

Until now.

And...just for another record, let me tell you that when it comes to ketchup, I can take it or leave it (most often I leave it).

This is a Not Ketchup meatloaf.

And when I say Not Ketchup....I literally mean Not Ketchup


My friend and fellow blogger Erika from In Erika's Kitchen, has launched an amazing new product called Not Ketchup Dipping Sauce. There are currently 3 flavors: Cherry Chipotle, Blueberry White Pepper and Smokey Date, with the promise of 4 more flavors to come. You can see which two bottle Erika sent me...and I couldn't be more thrilled! Not only is Not Ketchup a great alternative to ketchup, but it's made with fresh ingredients (fruit, not tomatoes), natural sweeteners, no artificial flavors or colors, no processed sugar and no preservatives. And....its gluten free.

Aaaaaaaaaaaaand, it's delicious!

I haven't figured out what I'm going to make with the Blueberry White Pepper yet, but I have thoroughly enjoyed the spicy tang of Cherry Chipotle.

Let's talk about meatloaf for a minute. People either love it, or hate it. And most who love it, only love the kind they make. I never knew how particular people are about meatloaf. I guess when it comes down to it, if it's not made right, it's not good.

I learned something the other night....part of what makes or breaks a meatloaf, is how you mix up the ingredients. DO NOT squish everything in your hands, making it ooze out between your fingers (cuz I know...that is part of the fun, right?) Well, it makes for a bad meatloaf. Just kinda stir everything together with your hands. I beat the egg before adding it, which made me feel better about not over mixing it.

And here's an amazing tip: instead of using bread crumbs, puree some garlic croutons in your food processor!

Use a meat thermometer. You want the inside to be 155' F. The temp will rise once removed, while it's resting. Using the thermometer will prevent you from ending up with a dried out meatlog meatloaf.

Ingredients make a difference too, of course. Swap things around...if you know you don't like bell pepper, swap it for something else. If you're not into garlic, use extra onions or something. Get it?

Cherry Chipotle Meatloaf
Inspired by: Good Eats Meatloaf
Printable Recipe

3 oz garlic croutons
1/4 tsp black pepper
1/4 tsp cayenne pepper
1/2 tsp chili powder
1/2 tsp summer savory (if you prefer thyme, then use that)
1/4 of an onion, chopped
1/2 carrot, chopped
1/4 of a bell pepper (I used yellow)
2 cloves garlic, chopped
1/2 tsp salt
1/2 egg (beat an egg and measure out about 1 1/2 TB. Gets a little tricky, but don't stress, you don't have to be exact on this)
1/4 cup Cherry Chipotle Not Ketchup, plus more for serving
1/2 lb ground chuck
1/2 lb regular ground beef

Preheat the oven to 325' F. Line a baking sheet with parchment paper.

In a food processor, combine the croutons, black pepper, cayenne pepper, chili powder and summer savory. Process until the croutons have becomes fine crumbs. Place in a medium sized bowl.


Put the onion, carrots, bell pepper and garlic in the food processor and pulse until finely chopped, but not pureed. Add to the bread crumbs.


Add in the salt, egg and meat. Combine without squeezing everything together.

Place the mixture on the parchment paper lined baking sheet and form into a loaf, pushing it all together into a solid loaf shape.


Place in the oven and bake for 10 minutes. Pour the glaze of the top and down the sides. Place the thermometer in the meat loaf and bake until done. The length of time will depend on how thick your meatloaf is, which is why I believe the thermometer is really needed here. You want the reading to be 155'. Once temp has been reached, remove from the oven, cover lightly with foil and let it rest for about 10 minutes.


Serve with you're favorite sides (mashed potatoes seem to be top on that list) and a little extra Cherry Chipotle Not Ketchup to drizzle over your slice.

And....this folks, is the meatloaf that won me over. I can now say: Yes, I like meatloaf. But only the kind I make.

Psst....Stop by Not Ketchup for a list of stores that carry this new yummy sauce, or place your order direct.

Wednesday, October 9, 2013

Bifteck Hache a la Lyonnaise - Ground Beef with Onions and Herbs


Leave it to Julia Child to make ground beef sound special! Or maybe it's just the French language. But since my introduction to this dish was from Mastering the Art of French Cooking, I'll give Julia the credit.

My trip to the Hollywood Farmers Market over the weekend was different than most. I was not zoned in on vegetables. My mission was to check out raw milk and grass fed beef. With all the scares and concerns out there, I really wanted to do some research and see what my doable options were. The opinions and concerns out there are all very real on various levels. I personally think its a crime shame that eating healthy (ie: organic, grass fed, free range, etc etc) is so expensive. I still don't understand how pesticides, antibiotics, hormones and such can be less expensive than growing the product the way it's meant to be....as is.

And that's just the tip of the iceberg. I'll leave it at that.

I found some wonderful pasture-grazed ground beef for about $5.00 lb. (the price will be going up by $2.00 per pound later this month). I splurged and bought some.


As I continued to wander around the market, my mind was trying to decide what to do with it. Of course spaghetti and meatballs came to mind...as did sweet and sour meatballs, and a number of other common menus. None sounded right. I didn't want to hide the flavor of the beef....I felt it needed to shine, center stage in order for me to really taste the difference.

Luckily, in a moment of silliness, when I got home I decided to check Mastering the Art of French Cooking, As I opened the book, I thought "surely the French don't eat something as mundane as ground beef!"

Oooooh, how wrong I was.

This delicious patty would make an amazing hamburger! (what do you think of them apples?) Simple, few ingredients and lots of butter. Seems to be a huge theme in MtAoFC. I don't know why I never realized this before but...Julia Child was the queen of butter. Paula Deen has nothing on her!

Ground Beef with Onions and Herbs
(Bifteck Hache a la Lyonnaise)
Printable Version

1/4 cup minced yellow onion (I used what I had...white)
7-8 TB butter, divided
1 1/2 lbs lean ground beef
1 1/2 tsp salt
1/8 tsp pepper
1/8 tsp thyme (I used savory)
1 egg
1/2 flour
1 TB oil
1/2 cup beef stock, beef bouillon, dry white wine, dry white vermouth, red wine or 1/4 cup water (I used dry white vermouth)

In a heavy skillet, melt 2 TB butter. Cook the onions in the butter until tender but not browned, about 10 minutes.

In a medium bowl, mix together the onions, beef, 2 TB softened butter, salt, pepper, thyme and egg. Mix until thoroughly blended. Form the mixture into 6 patties, about 3/4 inch thick.

At this point you can cover them and place in the refrigerator until ready to cook.

Just before sauteing, lightly coat each patty in flour, shaking off any excess flour.


Over medium-high heat, melt 1 TB butter along with the oil. When the foam from the butter begins to subside (this indicates that the pan is hot enough to sear the meat) saute the patties for 2-3 minutes per side or more, depending on how you like your meat, rare, medium, well done.


Mine were on the well done side but the searing was perfect!

Remove and keep warm while making the sauce.

Pour the fat out of the skillet. add in the liquid of your choice and rapidly boil down until it has reduce to an almost syrupy consistency, scraping up the delicious nuggets from the bottom of the pan.

Remove from heat and gently stir in 2 - 3 TB of butter, 1/2 TB at a time. Pour over the patties.


So good. So simple. And as far as the beef goes? Well, it has a fuller flavor...a bit richer. But then again, this was ground top sirloin. I'm not saying that none of the generic ground beef isn't. I've heard chefs say that often times, ground beef is made from left over bits of chuck. This farm happens to make theirs with sirloin...and nothing else. No bits and pieces of leftover anything.

Honestly, I shouldn't complain too much about the cost. I mean, I spend more for my favored rib-eye steaks. But beef in this household is not cooked as often as chicken. Ground beef even less. Next time I decide to buy ground beef, I will think twice when at the supermarket. If it was a staple....I don't think I'd be able to afford to do so.

Reliving this recipe is making my stomach growl. Wish I had some leftovers but those were quickly consumed the next day....


BON APPETIT! 

Friday, October 5, 2012

Lengua Entomatada (Beef Tongue with Tomato) and Giveaway!


Yes, you heard right. Beef Tongue. It's in there. It's good. I swear.

And you're talking to someone who went waaaaaaaaaay beyond hercomfort zone on this one.

Before we go there, let me say a few things here. And I think you'll wanna hear them.

First off, for the past 3 weeks, I've been participating in the Muy Bueno Cookbook Spotlight & Cook-Off sponsored by Hippocrene and hosted at girlichef  


This cookbook is truly Muy Bueno. Here's a list of the recipes I've cooked during these wonderful three weeks:


You can go to girlichef's site and see what everyone else made. After all, I'm not the only one reviewing it.

When the Muy Bueno Cookbook arrived, of course I instantly started browsing through the recipes. The first thing I thought was....wow, I've either made or eaten a lot of these recipes! Do you know why that is? No, not because I have a lot of Mexican friends. No, not because I live in Southern California where every other corner has a little Mexican joint or restaurant. (although those reasons do have a lot to do with it) but....the recipes in Muy Bueno are for authentic, Mexican home cooked meals.Ones we all know and love and wish we could make. They have been passed down from generation to generation to generation. The 3 women that make up Muy Bueno the cookbook and blog are a family team...a mother (Vangie) and her 2 daughters (Veronica and Yvette). All of whom have been greatly inspired by the grandmother, Jesusita. When you open this cookbook, you feel a sort of reverence. You can sense how important heritage is and how food really brings this family together.

Muy Bueno Cookbook has just about every Mexican dish you can think of (and more) and provides easy to follow directions, beautiful photographs and a touching story or memory that makes it all the more special. With all the cooking I do, and a lot of it is Mexican (because this white girl and her family loves Mexican food), this is the first true Mexican cookbook I've owned. And I cannot tell you how thrilled I am with it.

You have a chance to be thrilled to own your own copy of Muy Bueno Cookbook as well.

I'm giving a copy of Muy Bueno Cookbook away! 

I'll give you the details after we talk about beef tongue.

Beef tongue. I've seen it. I've ignored it with a shiver.
I never ever thought that my kitchen would see one of these on its counter.

Silly me asked one of my daughters to pick out a recipe from Muy Bueno for me to cook. A special recipe  just for this giveway.

Jacquie decides on beef tongue. "Mom, [with a grin on her face] this is really out of your comfort zone, isn't it?!"

"Um, ya. really?"

Jacquie: "Beef tongue is really good! I swear! I've had it before. You'll like it".

"Ya? [long pause] Ok. I guess."

So...I took the challenge. Off to the market I go. The butcher offered a 3 plus lb tongue. I opted for the much smaller 2.5 lb thing. And started my adventure the following morning. Way before anyone else in the house was awake.
I knew this baby needed to be in the crockpot before it was seen by the local population (ie: family, especially Sir Sportsalot).


Funny thing. I posted the above photo on Facebook and you should read the reactions! "WTH?!"
"OMG!! No Way!!!", "Gross that looks like a large finger", "I hope it looks better cooked", "I'll be there for dinner. So good!"

When I asked if anyone had eaten cow tongue, I received extreme responses from both ends of the spectrum: "Yes, very good sliced very thin...", "Makes yummy tacos!", "....it was like it was tasting me - while I was tasting it. ::shudder::", "Eating that will be like French kissing a cow! No thanks!!"

Well....I guess I had to just find out for myself.

Lengua Entomatada (Beef Tongue with Tomato)
Printable Version

2.5 - 3 lbs of beef tongue
3 cups water
1 small onion, quartered
5 cloves garlic
2 tsp sea salt
1 - 14.5 can peeled or diced tomatoes
1 TB olive oil
1/3 cup chopped white onion
1 TB all purpose flour
1/4 tsp black pepper
1/2 tsp garlic powder

Place the beef tongue, water, small quartered onion, and sea salt in a crock pot. Cook on low heat for 6 to 8 hours, until tender.

Once it's done, remove the tongue from the crockpot. Strain the stock and set it aside or refrigerate it if you have time so you can easily skim the fat.

While the tongue is still warm but not too hot to touch, peel off the outer layer of skin.

Under that skin, there was another layer....that was......nubbly. It kinda bugged me in a way that food shouldn't bug you....so I trimmed that off too.

Dice the tongue into 1/2" cubes and set aside.

In a food processor or blender, puree the tomatoes. Set aside

In a large skillet, over medium heat, heat up the oil. Add the diced onion and saute until translucent (about 2 minutes). Add the flour and stir for another 2 minutes. Add in the pureed tomatoes and let come to a boil.

Add the cubed tongue, 1/2 cup of the beef tongue stock, black pepper and garlic powder. Reduce the heat and simmer until the sauce thickens, about 5 minutes or so. You want the sauce to be thick, not runny.

Especially if you're going to do something fun with it....like....fill gorditas.


Well, let me tell you something.

YUM! Really. Honestly....beef tongue is good. As I diced it up, I picked up a cube and slowly brought it to my mouth. Paused....contemplated my action....nostrils were flared in anticipation of...I dunno...thinking it would taste like liver? (I'm not a liver fan). I then popped the cube into my mouth...tentatively chewed in slow motion...stopped. Waited for the negative, involuntary reflex. Nothing. Thought about it. Realized that it is indeed, very tasty. Tender. Not liver or organ like at all. Good beef flavor. Not stringy like roasts. Not fatty like ground beef. And best of all...it no longer resembled a tongue!!

I did it! I made it! I ate it! I loved it!

Now, if you want the recipe for the gorditas that I spooned the lenqua into, you'll either have to wait until I post it, search the various websites....

OR

Win yourself a copy of Muy Bueno Cookbook.  

Rules:

  • Entries must be made by Monday October 8th (Happy Columbus Day) 12:00 PM, pacific standard time.
  • Must be 18 or older to win
  • Must reside in the continental U.S. to win 
  • Must post comment on this blog (no facebook, twitter or email entries will be accepted)


Lots of ways to enter:

  • Post a comment. (If you are posting anonymously, please include your email address.) If you do not wish to enter the contest, but would like to post a comment, just say you're opting out. 
  • Follow me on Twitter (post a comment saying you are)
  • Tweet about the giveaway (post a comment saying you did)
  • Follow me on Facebook (post a comment saying you are)
  • Post this giveaway on your Facebook page (post a comment saying you did)
  • Follow me on Pinterest (post a comment saying you are)
  • Pin this page (post a comment saying you did)
  • StumbleUpon this age (post a comment saying you did)
That's 8 ways to enter. Good luck!!

Saturday, August 11, 2012

Beef Tamales


This is a partial recipe post. I didn't make the beef filling. Just warning you....but, whatever shredded beef recipe you like, use it.

Let me back up here. Tamales have been on my I'd-really-love-to-learn-how-to-make-that list since forever. One of my childhood friends from school informed me recently that she makes them every year. (What?!) When she offered to show me how, I didn't care that it was the middle of the summer and was going to be 90 plus degrees outside. I wasn't going to pass this up for nothin. So, Bernie (that's what I've been calling her since we were pre-teens....having water fights in the puddles whenever it rained) gathered all the makings....and made the beef at home in her slow cooker (with chili powder and other seasonings) and even had the meat shredded when she showed up on my doorstep. All I had to get was lard. For some reason, the main stream markets around here don't carry it very often. But I knew I could find it in the Mexican market. Thats when I discovered that lard can be bought by the bucketful.

Good ole Farmer John

Ok, lard vs shortening. It's up to you. I rarely use lard. But my personal feeling on this is....for tamales, I vote for the lard. It adds flavor. If you're dead set against lard (what a name...lard. It even feels fat saying it) then use the shortening.

Plan on two days for making your tamales. The first day will be cooking the meat (beef, pork or chicken) and shredding it. The second day will be preparing the masa and assembling it. It's not hard. I know there are a lot of opinions out there about tamales and how to make them, what to do, what not to do, etc. If you're a tamales lover, you know what you like. If making tamales intimidates you....its like anything else. Just do it.  Once you've done it, you'll start to get a feel for what works for you, what flavors you like, etc...and you can adjust stuff for the next time.

Ok, so Bernies at my house in all her glory, arms loaded with a huge bowl of shredded beef, a bag or two of corn husks, and her bathing suit and beach towel in another bag. (Yes...a dip in the pool in that heat was a must). We didn't waste any time and got straight to work.

First thing we did was soak the dried corn husks in a sink full of water

(Remove the silk before assembling your tamales)

While all that is going on, prepare your masa

This makes about 4 or 5 dozen tamales

Masa
6 cups masa
5 cups liquid (water and broth from the meat)
2 cups lard (divided)
1 TB salt

Melt 1/2 cup of the lard


While that slab of fat is melting away (oh lord, if only it was that easy to melt away my own slab of fat)....put the remaining lard in a large bowl and beat with a mixer.


You want to whip this up good until its light and fluffy. The more you beat it, the more air that gets incorporated (hahaha...thats what I'll say....I'm not fat...I've just incorporated air into my mid section...so in reality, I'm fluffy). Umm...where was I? Oh...air. Yes....incorporate air into the lard...thus creating the foundation for a fluffy masa. 

Slowly beat in the masa and liquid and salt. I think we used about 3 1/2 to 4 cups of water and 1 to 1 1/2 cups of chile liquid from the shredded beef. And continue beating.


You might need to resort to using your hands after a while (my mixer is old and starts to sound a little puny after a while).

Finally, remember that melted lard in your pan? I hope you've been keeping an eye on it so it doesn't start smoking. Once it has cooled off, add it to the masa mix by making a well in the center of your masa and carefully kneading it into the dough. Adjust the masa or liquid until you have a soft dough (I read somewhere that it should be the consistency of peanut butter?)

Time to assemble.....(this is the fun part)


Lay out a soaked corn husk...take a ball of masa....spread it around by pressing it with your fingers and then dump a wad of shredded meat down the center of the masa dough.


Then fold the husk over the masa, fold it again and tuck in the bottom corner. This is when a lot of people get all fancy and tie it all together with a strand of husk. It's really not needed. I mean, it looks all cute and everything but when you're making several dozen of these things.....well, I'm lazy. Bernie apparently is too cuz she said she never ties them. So we didn't. We just pile them up as we made them.


Once we had a good amount prepared, I got out the largest stock pot that I own, inserted a steamer wrack and added water and then placed the tamales inside. Some people layer them, some stand them up on end....we layered them at varying angles.


And....they steamed away. And we got back to making more tamales...and piling them up on the counter for the next round.

Now, these babies take a while to steam. We made fairly small tamales, and they took about 1 1/2 hrs to steam. They were done when we poked at them with our finger and they were firm. The cooking time will vary depending on the size of your tamales.

Once we had finished preparing the remaining tamales, it was time to relax while we waited.

What does one do to relax while waiting for tamales in the heat of summer?


Why....we make a pitcher of margaritas of course. Then we slip into our swimsuits and take a dip in the pool. (I've spared you a pool side photo.....not to mention that one wasn't taken) Thus we are not affected by the steaming heat in the kitchen and are allowed some time to catch up and reminisce about the good ole days. Remembering how we met in the halls of elementary school because we noticed that we both wore the same shirt to school that day.


Once we are thoroughly soaked in pool water and alcohol, we check in on the steamy kitchen and discover our first batch is complete


We load up the second batch and back to the pool we head, glasses refilled of course, and continue our pickled pool party until Bernie decides its time to head home. I sent her home with the remaining lard (nothing says Thank you like a bucket of fat). And I was left with these delicious tamales and a very memorable afternoon spend with an old friend.

Dinner that night was wonderful!


I've eaten lots of homemade tamales. Some good...some not so good. These tasted just the way I like them. I can't wait to make them again (maybe next time when it's not so hot). I want to use shredded pork. And I think I want the masa a bit thicker. The masa is my most favorite part of a tamale.

Bernie....Thank you for teaching me how to make tamales!! I'm so glad we re-found each other after all these years. I can't wait until our Julia Child cooking theme and many more adventures in the kitchen to come.


Wednesday, May 18, 2011

Beef Tortilla Soup


I am fairly new to the whole tortilla soup thing. As a matter of fact, I've only recently had my first ever bowl. (recently means....within the past year.) So you'd think, being so new and all, that I'd stick to the rules.

Think again.

When I looked in my freezer for dinner ideas, I found a big ole bag of beef broth and a beef tenderloin. Both needed to be used pretty quickly. Now mind you, I normally wouldn't use a beef tenderloin for soup.....but I was in the beginnings of a yucky head and chest cold. I needed soup. That I could taste. And with all the flavors and spices and heat in tortilla soup....it fit the bill.

What threw me for a loop was....when I Googled 'beef tortilla soup'...all I found were recipes that used ground beef.

I don't know about you....but the idea of ground beef in my soup did not appeal to me in the least. Maybe if they were made into meatballs or something.....but my mind was set in "shred" mode. So...I closed Google. Referred to My Tortilla Soup recipe for guidance and went for it.

Fever and all.

Results? Wonderful! Lots of flavor that even my congested-self could enjoy.....and it totally hit the spot. It was just what the doctor ordered.

What I have below is an extensive recipe...not hard. But the extra steps, I believe, add an incredible depth to the soup itself. There are some short cuts that you can use. If that's what you prefer, than I totally encourage you to do so. I'd rather you take a few short cuts and enjoy the soup than not at all. After I give the how-to's, I'll tell you how-to cut the steps down.

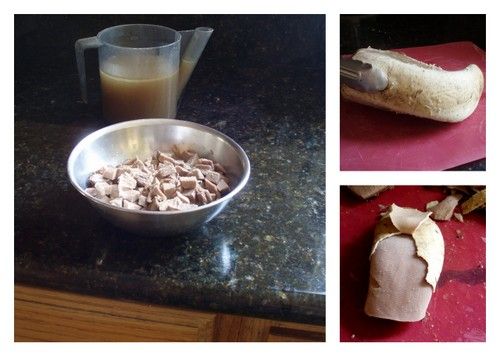
Well...let's start with the beef. If I had a roast, leftover or otherwise, I totally would've used it. But I didn't. What ever cut of beef you have on hand (about 2 lbs is enough)...make a rub as follows: 

1 tsp salt
1 tsp pepper
1 TB garlic
1 tsp cayenne pepper
1 tsp paprika
1/2 tsp onion powder
1 tsp cumin
1 tsp Mexican oregano (or regular oregano)


Mix together, rub all over the meat and cook as appropriate for the cut. Keep in mind that the above measurements are not exact or set in stone. Alter according to your own taste. 

Once the meat has cooled enough to handle, use a fork to shred


Shredded Beef Tortilla Soup
Printable Version

1 large onion (I used vidalia) cut into large chunks
6 roma tomatoes cut in half
2 jalapenos (left whole)
1 poblano chili (left whole)
Oil
Salt and Pepper
5 cloves garlic, chopped
1 tsp cumin
1 tsp chili powder or ground pasilla (I used ground pasilla)
1 tsp dried Mexican oregano (or regular oregano)
8 cups beef broth
1 - 14 oz can diced tomatoes
Juice from 3 limes
2 corn tortillas, cut into strips
1 cup corn (or a 14 oz can of whole corn kernels, drained)
1 - 14 oz can black beans, drained and rinsed.
2 lbs shredded, pre-cooked beef

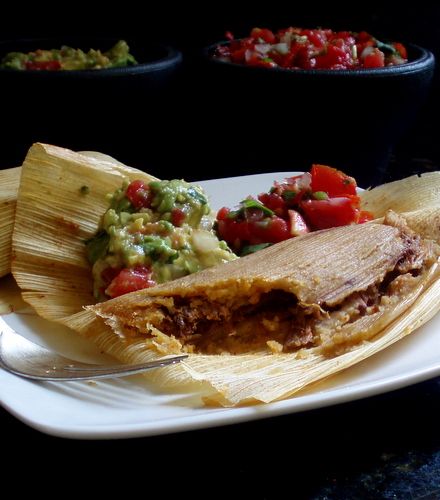
Recommended garnishes: avocado, cheese, fried tortilla strips or chips, chopped onions, sour cream or Crema Mexicana, cilantro

Preheat your oven to 400' F. Place the onion, roma tomatoes, jalapenos, and poblano chili on a cookie sheet. Drizzle some oil over the veggies, sprinkle with a bit of salt and pepper and roast for about 30 minutes.

Remove from oven and allow to cool enough to handle.

Puree the tomatoes in a food processor and set aside.

Remove the stems and seeds from the jalapenos and poblano. Chop roughly, along with the onions.

In a large, heavy bottomed pot, heat about 2 tsp or so of oil and saute the jalapenos, poblano, onions, and garlic.

Add the cumin, chili powder and oregano. Continue to saute for another minute or so, stirring often so as not to burn.

Pour 1 cup of the broth into the pot, stir to de-glaze. Pour in the remaining 7 cups of broth, along with the can of diced tomatoes, the pureed tomatoes (that you set aside earlier), lime juice and tortilla strips. Allow to simmer for about 30 minutes.

If you have an immersion blender, put it use and puree the crud out of what's in the pot. Otherwise, work carefully as you puree it in batches with a blender.

Add the corn and beans, and heat through.

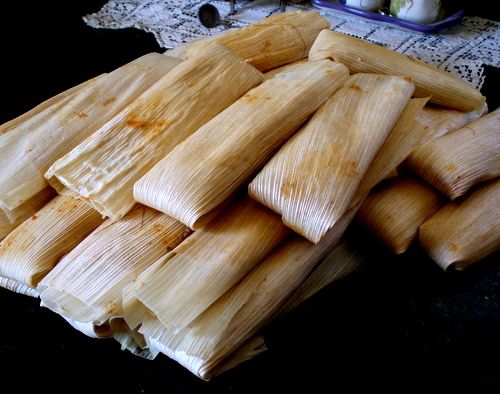
Now you're ready to serve it. Place the meat in the bowl, spoon the soup over the meat and garnish as desired.

Enjoy the heat. The layers of flavors...the smokey, the spicy....and everything that screams South of the Border....all in one bowl of delicious goodness.

And nooooooow...I promised a few short cuts for those of you who are not interested in spending the day in the kitchen or who just don't have the time.

Skip the whole roasting of the veggies section. Just saute them in the pan. If you don't want to saute the 6 roma tomatoes....then just add another can of diced tomatoes. That right there cuts out about 45 minutes of time. Use leftover beef. You know how hard it can be to figure out what to do with that leftover roast. Just shred it up.

Tip: If you can't find (or don't like) the store bought tortilla strips (they usually have them in the crouton section of your supermarket) then slice up some corn tortillas and deep fry them until crispy. It's one of my favorite garnishments for tortilla soup.

This recipe is being shared with Heather at Girlichef.com for the final days of her year long quest to explore all the different variations of Tortilla Soup

tortillasoupchallengegirlichef

as well as the Tuesday Hearth and Soul Blog Hop

Hearth and Soul Hop at Premeditated Leftovers

And last but not least...I'm sharing this with Deb over at Kahakaikitchen.blogspot.com for her Souper Sunday extravaganza (which will post this coming Sunday).

SouperSundays

Saturday, February 5, 2011

Shrooms and Weed


I fed it to my children. As well as the children of others. Without guilt. Or fear. Any trepidations were from the unknown of whether it would taste good or turn out right. As is with most if not all new recipes.

As it turns out, shrooms and weed is a very pleasant combination. I shall make a point of thanking my suppliers....Ralph and Kirk. In some circles, they're known as Kroger and Costco. 

Yes...I'm talking about mushrooms and dill weed. What else would it be? 


(Disclaimer: I would like to take a moment to stress that I am in NO way shape or form, recommending or endorsing the use of narcotics or anything that is illegal or dangerous to the health of others)

I'm going to share the recipe for the meatballs. Not only were they very basic, but they were extremely tasty....much to my surprise and delight. I'll also share the recipe for the mushroom sauce. Although in my opinion....as much as I like mushrooms, I think there were too many.

The pasta....I won't share the recipe. I didn't like the dough at all. It was really crumbly and horrible to work with. But if you're curious, you can find the recipe here ----> Fresh Dill Noodles.

I really had to work the dough, more so than I have had to with other recipes. Although the results eventually were passable as pasta...


I didn't like the texture from the all purpose flour. You see....I was watching Melting Pot on The Cooking Channel that morning and was loving the idea of the dill. I decided to make the whole meal. But I was hesitant on using the all purpose flour for the pasta. Later that same day, I saw Giada making pasta and she too used all purpose flour. So I figured, 'what the hell! It must work'....and went with it.

Not a good idea. It was...for lack of a better word....mooshy? Without being soggy. Doughy? Looking...but not too doughy texture wise. If the noodles were thicker, I imagine they would be really weird. All in all....it was just not the same.


I will tell you that whatever pasta recipe you do like to work with, give yourself a treat and add about 4 tablespoons of chopped, fresh dill for every 2 cups of flour (semolina is what I recommend). The flavor is nice and mild and I think it enhances the dish without even the slightest hint of overpowering.

The meatballs and mushroom sauce is called Hungarian Style Swedish Meatballs

So, lets talk about these shrooms. I found this wonderful tub of mixed gourmet dried mushrooms at Costco...


Oh how much fun I'm going to have with this bunch of shrooms!! There are so many kinds in there...Porcini, Morels, Brazilian, Ivory Portabellas, Shitake and Oyster! And it all cost about $10.00! BINGO!!

Now, lets see what we can do with these babies.

Hungarian Style Swedish Meatballs

1 oz dried mushrooms (recipe says porcini....I used my new found gourmet mix)
3 cups beef broth
1 lb. ground beef
1 medium onion, minced
4 slices white bread (thin cut), cut into 1/4" cubes
Salt and Pepper
12 oz crimini mushrooms
2 tablespoons all purpose flour
1 cup heavy cream (diet conscious peeps, use milk)
1 tablespoon paprika (Hungarian paprika if you have it)
1 cup sour cream (once again, diet conscious peeps, use plain yogurt)
Pasta

Simmer the dried mushrooms in the beef broth for 15 minutes. Remove from heat and allow to sit for 30 minutes.

While that is going on, start on your meatballs. Combine the ground beef, onion, bread cubes, and salt and pepper to taste


Get your hands in there and mix it all up. Form into 1" balls (don't over work the meat. You don't want dense balls). Brown them in a large skillet. You will have to work in batches. Try not to overcrowd them....you want them browned, not tan from steaming.

No mater how hard I try....and how round they are when they hit the pan....they always flatten in some way. I usually end up with a 3 dimensional triangle. Go figure.


Set them aside while we start on the sauce and the shrooms.

(Somewhere along the line here, you're going to want to boil what ever pasta you're going serve this all on. Now might be a good time to get that started)

Drain and rinse the soaked mushrooms, reserving the beef broth.


Squeeze out any excess liquid, then dice em up. And set them aside along with the broth.

Toss the fresh crimi mushrooms in flour. If they're large....cut them in half or into quarters first. Saute them in the same pan you cooked the meatball in.


Here's a peak at my work station as I'm gearing up for the final steps....

 
I've got it all there....meatballs, sour cream, paprika, chopped dried mushrooms, cream, the broth is in that black sauce pan. Oh yes...and I have two very important items on hand.....Can you guess what they are?

Ok, let's get this dish completed....

Add the soaked, chopped gourmet mushrooms along with the reserved beef broth and the cream. Cook for about 3 minutes or so.

Just before serving, add the paprika and sour cream and serve over pasta and meatballs.  Garnish with more sour cream if desired. I didn't think of this until just now...but I bet a nice little sprinkle of chopped dill would be rather pleasant as well.


And there you have it. When I make this again, I will no doubt reduce the amount of mushrooms. And I will slice the crimini mushrooms instead of leaving them so big. In my opinion, they competed with the meatballs.

It was a fun and easy recipe to make. The flavors are simple yet rich. All in all, I'd say this was a satisfying meal. With a little adjustment here and there....it's going to a winner in my house.