Yum Peaceful Cooking: cake
Showing posts with label cake. Show all posts

Sunday, June 1, 2014

Double Chocolate Strawberry Shortcake @Driscollsberry #Strawshortcake


Fresh berries are everywhere. I love them all. But I have to say, strawberries are my favorite.


Every since I was a young child, I knew this to be a fact.


And not just anything strawberry. I mean..none of that strawberry 'flavored' stuff. I need the real thing. Fresh, ripe red, sweet strawberries.

I found a recipe for Old-fashioned Strawberry Shortcake in a really super old cookbook called The American Woman Cookbook. Its a wonderful book, and fun to have around. I did make a few revisions, but kept the basics as they have been for over 70 yrs.

Double Chocolate Strawberry Shortcake

2 cups sifted flour
4 teaspoons baking powder
4 tablespoon dutch cocoa powder
1/2 teaspoon salt
1 tablespoon sugar
1/3 cup shortening
6 oz chocolate chips
3/4 cup milk
1/2 teaspoon instant coffee
2 tablespoons butter, melted
3 cups sliced strawberries
1 teaspoon vanilla (optional)
Whipped Cream
powdered sugar to garnish


Preheat oven to 450' F

Warm the milk just enough to dissolve the instant coffee in. Place in the fridge to cool. 

Sift the flour. Then sift the flour with the baking powder, salt, sugar and cocoa powder. With a fork or pastry blender, cut the shortening into the dough to form crumbles. Stir in the chocolate chips. Pour the chilled coffee and milk mixture gradually into the flour crumbles to form a soft dough. 

On a lightly floured surface, form dough into a ball. Roll out to about 1/2 thick and cut into desired sized circles. Place on an ungreased cookie sheet. Brush the tops with some of the melted butter (reserve the rest for serving). 

Bake for 15 minutes. 

Meanwhile, wash, hull and slice your fresh strawberries. Mix with the vanilla extract and set aside until ready to serve. 


Once the "muffins" are ready, let cool just long enough to handle without burning your hand. With a fork, split the muffins in half. Generously brush each side with melted butter.


Fill with whipped cream, strawberries, and dust with powdered sugar.


What's so timeless about this dessert isn't because it's been around for a long time. Not because there are cartoon characters named after it. Nor is it because it's quick and easy to make.

It's because the muffin, even though in this case is loaded with chocolate, remains a supporting character. It's not sweet and it's not over bearing. It allows the strawberry do with it does best. Shine. With it's natural beauty and sweetness that confirms to all that spring and summer are among us.


Monday, October 28, 2013

Sonoran Honey Streusel Coffee Cake - The New Southwest Cookbook Giveaway!!!


Before we talk about the Giveaway, let me just

Do you ever have one of those days...where you wonder if you shouldn't have even stepped foot in the kitchen that morning?

Saturday ended up being a day of discoveries.

I discovered that my dishwasher door is being weird...it's sticking shut while the handle that you squeeze to unlock it just sorta disappears into itself.

I also discovered that my oven takes foreeeeeeeeeever to heat up to the proper temperature. As in, after the preheat phase....
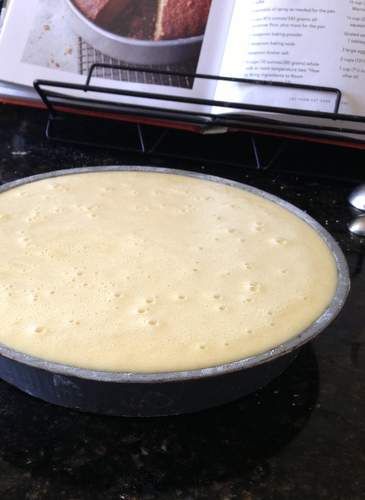
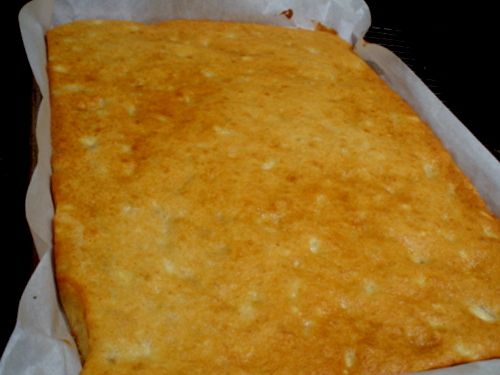
and the required 45 minute baking time, the temp was 100' below the needed 350'F mark. That happened as I was baking this delicious coffee cake. I opened the oven door as the timer went off...toothpick in hand, ready for the plunge (do you know that this is probably the only reason I own toothpicks?) and I stopped breathing...in total disbelief as I tugged on the rack and witnessed the soppy center sloshing around.

My mind raced....did I set the timer right? Forget to put in an ingredient? Did I measure everything correctly? Is my oven ON? (oh yes....the heat is steaming up my glasses, it's definitely on). I double checked the recipe...everything looks good there. So I got out my oven thermometer, pushed the rack back in, along with my mess and reset the timer (a few times)......

Aaaaand that's when I broke out the bourbon. It was well past 5:00pm, so it was an overdue action anyway. (But that's another story for a different post).

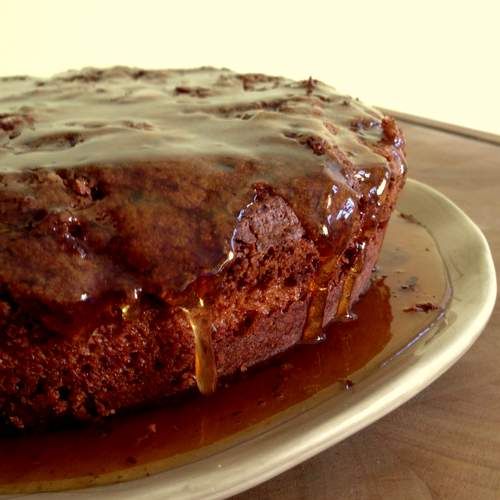
I could tell the cake was finally cooked when it smelled delicious as the aroma filled the house.

Anyways...the moral of this story is...when things aren't going right...don't just give up. Think a minute...try and salvage the situation before you toss in the towel. I mean...what's the worse that could happen? You might have to toss it anyway. But....maybe not....

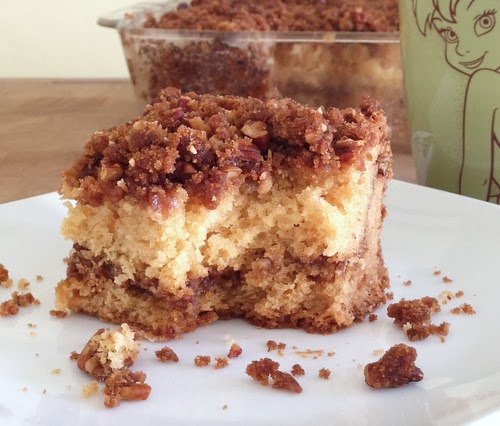
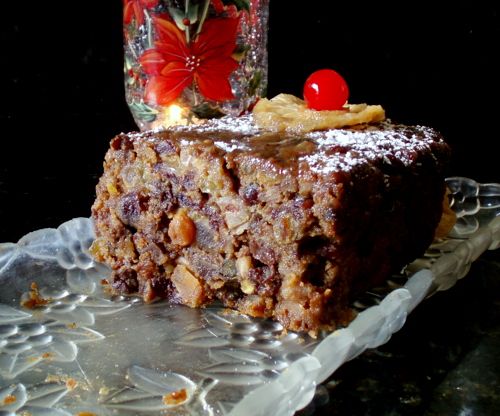
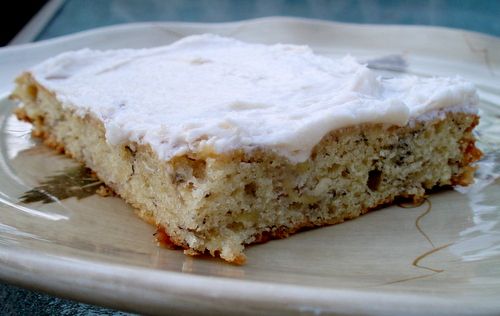
Thank God that wasn't the case this time because the is one good coffee cake. Especially if you're a honey lover....as in Pooh bear kind of honey lover. I suggest you use your favorite honey for this recipe if you can't get Sonoran honey. But then again....is there such a thing as a honey that doesn't taste good? phhht....silly bear.

And the topping....oooh my oh my. It almost caramelizes and gets crunchy. This might be my favorite streusel.

Sonoran Honey Streusel Coffee Cake
Printable Version

for the cake:
1/2 cup unsalted butter, softened
1 cup white sugar
2 large eggs
1 tsp vanilla extract
2 cups all-purpose flour
1 tsp baking powder
1 tsp ground canela (or cinnamon)
1/2 tsp salt
2/3 cup Sonoran honey (or your favorite local honey)
2/3 cup buttermilk

for the topping:
6 TB cubed butter, chilled
1 cup packed brown sugar
1/4 cup all-purpose flour

Preheat oven to 350'F

Line a 9" square baking dish with parchment paper

Cream together the butter and sugar until light an fluffy, about 5 minutes. Add in the eggs and vanilla and continue to mix until incorporated.

In a medium bowl, whisk together the flour, baking powder, canela (or cinnamon) and salt.

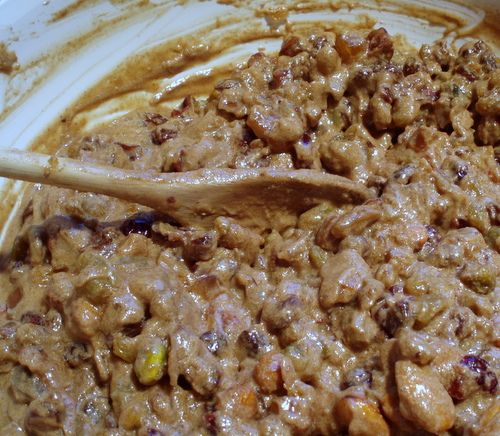
Add the dry ingredients to the butter mixture gradually, alternating with the honey and then buttermilk. Mix until just combined. Pour into your prepared pan.

In a medium bowl, using your fingers, combine the chilled butter cubes, brown sugar and flour until you have uniform crumbles. Sprinkle over the batter evenly.

Bake for 40 - 45 minutes or until a cake tester toothpick inserted in the middle comes out clean. Allow to cool slightly before removing from the pan.

Slice and serve and totally enjoy the richness of this coffee cake.


I've only tried 3 recipes from this book, two of them were my choice (the first one was chosen for the group). It was really hard to pin down just two. There are so many more I have tagged for trying later....such as an almond-crusted pear tres leches cake (holy cow!!) and the stacked squash enchiladas...and and...roasted crema. Ok, I'll stop there (for now). My mouth is watering. You should see all these photos! And did I tell you? In the front of the book is a whole section dedicated to the southwestern pantry. What you should have, what it is, what it looks like, what you do with it. If you're just getting into making southwestern food....fear not, Megan will hold your hand right through the learning stage.

And now for some more good stuff.......

The contest! And I'm not the only one giving away The New Southwest Cookbook.


There are more than a dozen of us participating. And that means there are more chances for you to win. Woooo hoooo!!!

1. Mandatory Entry: Leave a comment on this blog post letting me know what your favorite Southwestern dish is.
2. Tons of optional entries in rafflecopter widget.

a Rafflecopter giveaway


Hippocrene will be supplying 14 copies of The New Southwest by Meagan Micozzi for this giveaway, in conjunction with The New Southwest Cookbook Spotlight. Contest is open to anybody with a shipping address in the USA. Submissions will be accepted via the rafflecopter widget through 11:59 pm ET on Sunday, November 3, 2013. Fourteen winners will be chosen by random draw, verified, and be notified by email (from Heather at girlichef) within 48 hours of the close of this contest. The winner should respond within 24 hours of notification, or a new winner will be drawn in their place. Good Luck!


This post is part of The New Southwest Cookbook Spotlight sponsored by Hippocreneand hosted at girlichef.


Sunday, September 15, 2013

Mt.Gleason Junior High Home Ec. Coffee Cake


I went to school in a little town on the outer fringes of the Los Angeles County. Tucked into the foothills is a (what was called back then) junior high school named Mt. Gleason. I spent 7th, 8th and 9th grades there. Elementary school ended at 6th grade in those days. High school was a 3 year program and started at 10th grade, not 9th like it does now. In fact, if you were in high school for 4 years, it was because you screwed up and you'd get teased for being in the "four year program".

Anyways, back to jr. high. I loved the selection of electives....art, choir, play productions, stage crew, typing, drafting, etc etc. As in introduction to these electives, us 7th graders got a "sample" version of our chosen 4 classes throughout the year. I spent several weeks in each...Cooking, Sewing, Agriculture and Play Productions (or was it drafting? Maybe play productions came later). What fun! These were the classes I looked forward to each day. They made history, English, math, science, and geography bearable (although marine biology was pretty cool! especially when we went on a whale watching field trip).

But I'm here to talk about the cooking class in the home economics building (imagine that...a "middle school" with a whole building just for home economics). I can still picture the class room with the various cooking stations. And yes, there were boys in the class. Lord, I would not have wanted to be that teacher! Can you imagine a classroom full of 7th grade boys and girls....in the kitchen, with knives and FLAMES!! Amazingly enough, my class didn't experience any catastrophes. No fires, no amputated appendages. No food poisoning.

What we did experience that I can remember are Silver Dollar Pancakes and Pumpkin Bread. This is where I learned the proper way of measuring ingredients. I learned that brown sugar is packed. Flours are sifted. Liquids are measured on a flat surface...not in your hand, with the measuring cup held at eye level. This is where I learned that eggs are cracked into a separate bowl, individually, before adding to the ingredients in case it's bad. I truly believe that cooking should be a requirement for all students. Male and female. It's a basic life tool. Without this skill, if they don't learn it at home, they will initially rely on fast food and microwavable dishes until they decide to learn on their own....IF they decide to ever learn on their own. It breaks my heart to see families who eat out every night. Which means...those kids are growing up on fast food. (Don't get me started!!)

This recipe for coffee cake is one I don't remember actually making in class. Not that it didn't happen....it's just that my memory, for some reason did not retain the coffee cake. Which is weird. Everyone else that I went to school (with whom I'm currently still in contact) remembers making coffee cake. Someone, somewhere, shared the recipe that they still had (and I'd think that in itself was weird, except I still have the pumpkin bread recipe assignment, on the gold paper with the purplish ink...awww...memories of the ditto paper).

Its a wonderful recipe. Not only because of the history....but it truly is a delicious coffee cake. I made mine in a square dish. I had to bake it longer than if it were made in a tube pan (as instructed...I hope the teacher doesn't dock my grade) because the center took longer to cook. Even though I extended the cooking time...it was still (here comes one of the worst words used in the cooking world.....) moist. It's not stingy with the streusel topping either. Aaaaand....it's easy enough for the kids to make. I wonder...how many kids signed up for the cooking class...just to make this coffee cake.


Mt. Gleason Home Ec. Coffee Cake
Printable Version

Topping
1/4 cup all purpose flour
3/4 cup brown sugar, packed
1/4 tsp salt
1 cup chopped walnuts (I used pecans)
1/4 cup butter, cut into small pieces

Cake
1 1/2 cups cake flour
1/2 cup all purpose flour
1 tsp. baking soda
1 tsp. baking powder
1 cup granulated sugar
1/2 cup butter
1 large egg
1 tsp vanilla extract
1 cup sour cream

Preheat the oven to 350' F, grease and flour a 10" tube pan.

For the topping; mix together the flour, brown sugar, salt and walnuts. Add in the butter and with your hands, rub into the ingredients until crumbly. Don't over do it...you don't want a paste. Set aside.

For the cake: in a medium bowl, mix together the flours, baking soda and baking powder.

In a mixing bowl, cream together the butter and and sugar until fluffy. Add in the egg and vanilla and mix well. With the mixer on low, add in half of the dry ingredients and mix just until blended. Add in the sour cream, mix until just blended then add in the remaining dry ingredients and once again, mix until just blended, scraping down the sides as needed.

Spread half of the batter into the pan. Sprinkle half of the topping on the batter. Carefully spread the rest of the batter over the topping and then top it all off with the remaining topping.

Bake for 40 - 45 minutes or until a toothpick inserted in the middle comes out clean.

(note: the lack of salt in the cake ingredients is not a mistake)

Correction! Apparently I was wrong about where this recipe came from (no wonder I don't remember making it.) It's not from the home ec. class....it's from the cafeteria! The rest of the story stands true :)

Sunday, August 25, 2013

Cheesecake with Strawberry Balsamic Glaze Topping, and then some


Where to start with this one (besides with a fork).

Sometimes one random ingredient can be the catapult to multiple delicious results. That was the case when I received a bottle of Mandarano Balsamic Glaze & Sauce,

I love balsamic vinegar. Having a whole bottle of the glaze on hand? Oh yes....I was in a little bit of heaven. The tangy sweetness beckoned to me on so many levels. From sweet to savory and somewhere in between.

The first thing I did when I got home from work and opened the box was to make a drink. Not just any drink...I mean...a real drink. And yes, I used the Mandarano Balsamic Glaze & Sauce in it.


Think...Arnold Palmer gone wild.

Grab a shaker, filled almost to the top with ice. Fill half way with some good limoncello. Add a teaspoon or two (depending on your preference) of Mandarano Balsamic Glaze & Sauce. Shake vigorously. Strain into a cocktail glass and top off with some club soda. (If I had had a lemon on hand, I would've garnished my cocktail with a wedge.)

Repeat as necessary.

The balsamic cuts the edge off the sweetness of the limoncello and adds a little something extra while the club soda takes the intensity levels down (as both balsamic and limoncello have very strong flavors). It was interesting to see how they all worked together rather than fighting each other to see who would overpower whom. Mmmm mmmm mmmm. Good stuff!

Next up...since I was in the height of tomato picking and I had mounds of basil... my taste bud senses and cravings where on a caprese level. Of course I used Mandarano Balsamic Glaze & Sauce on a standard caprese salad. That's a no-brainer. But what about a pizza? With some chicken that's been marinating in balsmic? No you're talking!


Instead of a marinara sauce, just drizzle the dough with olive oil. Add lots of mozzarella cheese, some tomato slices, the chicken, throw in some red onions for good measure, sprinkle on some roughly chopped fresh basil and bake. Just before serving, drizzle some of that Mandarano Balsamic Glaze & Sauce over the top and there you go. 

Btw....did you know that you can buy fresh pizza dough from Whole Foods? Don't go looking in the refrigerator or freezer section. Go to the "food court" section...right up to the pizza counter and they'll bag up a nice ole wad of dough for you. For a price of course...but hey....if you're there already and you don't have time to make your own when you get home...its way better than anything you can get at the other markets. 

And now for the ultimate balsamic glaze application of all.....strawberries. There's just something deliciously...I dunno, complete? that happens when you combine those two. Take it to another level by injecting a bit of scotch whiskey blend....then heap that whole hot mess on top of cheesecake....and......I have no words. 

I'll just tell ya what to do....

My cheesecake recipe is always the same as this is "the best cheesecake ever!" All I do is change the topping to whatever fits the mood. 

Cheesecake

Preheat your oven to 325'. Place a baking dish on the rack below where you plan on baking your cake. 

Crust:
1 1/4 cup graham cracker crumbs
4 - 5 tablespoons melted butter
4 tablespoons sugar
Filling:
3 - 8oz packs of cream cheese at room temperature
4 eggs
1 cup of sugar
2 tablespoons vanilla
1/2 teaspoon lemon juice
Sour Cream Topping:
16 oz sour cream
1/3 cup plus 1 tablespoon sugar
1 tablespoon vanilla

For the crust:
Combine ingredients. Pat on the bottom of a spring form pan and up the sides a little. Place in the refrigerator while mixing the filling together.

For the filling:
Beat the cream cheese until smooth. Blend in remaining ingredients. Pour into your graham cracker crust. Place in the middle rack in your oven. Pour 1 cup of hot water into a dish (such as a roasting pan) on a rack below your cheesecake. Bake for 1 hour, turning the cake 180' halfway through. If needed, add another cup of hot water to the baking dish. This helps prevent big cracks by providing a humid atmosphere within your oven.


For the Sour Cream Topping:
Combing the ingredients and pour on top of the cheesecake. Bake for an additional 10 minutes. Cool and refrigerate for several hours or over night.

A few hours before serving, make the ultimate Strawberry Balsamic Glaze as follows:

1 1/2 TB cornstarch
1/2 water plus 3 TB
2 TB scotch whiskey blend
1 TB orange liqueur 
2 TB sugar
2 cups crushed strawberries
1 TB Mandarano Balsamic Glaze & Sauce
Whole strawberries for garnishing

In a small bowl, dissolve the cornstarch in the 3 TB water.

In a saucepan, over medium heat, bring the remaining 1/2 cup water,  the scotch whiskey blend, orange liqueur and sugar to a boil.  Stir in the cornstarch mixture and heat, stirring constantly until everything thickens.  If too thick, add a bit of water (1 TB at a time). If too thin, add a bit of cornstarch (1/2 tsp at a time). Stir in the crushed strawberries and balsamic glaze. If you want a stronger balsamic presence, add another TB. 

Pour everything into a bowl and set the bowl inside a larger bowl that contains ice water. Stir to cool. Spread over the top of your chilled cheesecake. Chill an additional 2 hours.

Or....just pour the whole thing over the top...and serve as is....one big beautiful hot nirvana-ish mess. 


And there you have it. Balsamic Glaze all over the place....from cocktail, to pizza to cheesecake. Hmm...I wonder how it would taste to have the balsamic glaze directly in the cheesecake. Well shoot...after all this...and my daughters dipping into the goods...I have none left to test that out. 

I think I need more. 

I want to thank Mandarano for sharing their delicious Balsamic Glaze with me. It has been a pleasure to play with and enjoy.  

Friday, May 10, 2013

Rustic Olive Oil Cake with Honey Syrup


Here's a delicious, adult kind of cake that's sweet but not too sweet. The complexity of the flavor surprised me. Sweet, slightly tangy, almost savory. The flavors come in layers, starting with the gooey, sticky sweet honey glaze....slightly citrus in the middle, ending with the subtle savory-sweet taste of olive oil.

I discovered this recipe in a newly acquired cookbook titled The Dahlia Bakery Cookbook. What a find! Full of dozens of wonderful recipes I'm anxious to try and taste and savor.

One note that was made for this cake is to do everything by hand. No electric mixers. Your arm might get a good workout, but the end result is worth it.

Rustic Olive Oil Cake with Honey Syrup
Printable Version

Cake
Vegetable Oil Spray for the pan.
2 cups all-purpose flour, plus more for the pan
1/2 tsp baking powder
1/2 tsp baking soda
1 tsp salt
1 1/4 cups whole milk, room temperature
1/4 cup Grand Marnier
1/4 up fresh orange juice
Zest from one lemon (about 1 heaping TB spoon)
3 large eggs
2 cups sugar
1 cup extra virgin olive oil

Honey Syrup
1/2 cup honey
1/2 cup sugar
1/2 cup water
1 clove
1 strip of orange or lemon zest (1/2" x 4")

Preheat the oven to 375' F. Spray a 9" round cake pan with cooking spray. Cut a 9" round of parchment paper and place it on the bottom of the cake pan. Spray the paper with cooking oil then coat the pan with flour, shaking off the excess.

In a small bowl, sift together the flour, baking powder, and baking soda. Add the salt, stir and set aside.

In a small bowl, combine the milk, Grand Marnier, orange juice and lemon zest. Set aside.

In a large bowl, and whisk the eggs by hand until well combined and smooth.

Gradually add in the olive oil in a steady stream and continue whisking the egg mixture until emulsified.

Add in 1/3 of the dry ingredients, whisking by hand until smooth. Add 1/2 of the wet ingredients, whisking by hand until smooth....add another 1/3 of the dry ingredients, the last 1/2 of the wet ingredients and then the final 1/3 of the dry ingredients, making sure you continue whisking in between each addition. Scrape down the sides as needed. Don't over whisk (I don't think your arm will allow this to happen).

Pour the batter into the prepared cake pan....tapping to release any air bubbles.

(This made me soooo very nervous. I mean...that batter was right up to the rim! I placed it on a baking sheet in case the cake spilled over the sides during baking. I also did the sideways crab walk as I inched my way to the oven. I'm happy to announce that not a drop spilled! Not during transporting nor during baking. Whew)

Bake until golden brown, a little domed and most likely cracked. This should take about 70 minutes or until a toothpick inserted in the middle comes out clean (a few moist crumbs is ok).


Allow to cool for about 15 minutes before removing from the pan. Run a knife around the edge. Place a plate over the cake, turn over to release the can from the pan. Peal off the parchment paper. Place another plate over the cake, turn over and there you have it....right side up.

To make the honey syrup (while the cake is baking):
Combine the honey, sugar, water, clove and orange zest in a small saucepan. Over medium-high heat, bring to a simmer, stirring to dissolve the sugar. Adjust the heat to keep it at a simmer. Continue simmering until it has reduced by about half (you should have about 3/4 cup of syrup). This will take about 10 to 12 minutes.

Remove from heat and allow to cool to room temperature.

Remove the clove and orange zest. Pour over individual slices as you serve the cake.

Or...poke the cake with holes, using a toothpick and pour the syrup over the whole thing, allowing all that gooey goodness to seep inside.


Sunday, March 3, 2013

Angel Food Cake


I didn't wake up one morning and decide....'hay, I want to make Angel Food Cake'. As much as I enjoy this cake, I don't think of it very often (it's usually a strawberry season thought). Believe it or not, my decision to make Angel Food Cake stemmed from my desire to make English Muffins.

It's a weird, twisted path but I needed rings to make English Muffins. Sorta like cookie cutter rings, and I didn't want to order them online. I'd heard that small tuna cans, with both ends removed, works well. The only problem was, my can opener couldn't remove the bottom of the can. I guess, somewhere along the line, tin can manufactures started making the can bottoms rounded and a can opener can't wrap it's little gears around it.

Bummed me out.

So I sat on the idea for a while. Searching stores for 3" cookie cutters that are sold separately. Searching different tuna brands. I even got so desperate that I started looking at the cat food cans at the market. (honestly, it would've grossed me out. I'd probably imagine that the can smelled like cat food, forever. No matter how many times I'd wash it). Then a fellow cooking buddy informed me that small pineapple cans were still made the "old fashioned way".

YAY!!!

But....what do I do with all that pineapple?!

That's when the same buddy mentioned Pineapple Bavarian Cream. Which happens to go very nicely with this very fluffy, spongy cake, know as Angel Food Cake.

And now you see the connection. I am working my way back to English Muffins. The Angel Food Cake is the first step. Which by the way, I totally missed steps in this recipe and did things out of order (in my defense, the instructions are written in paragraph form instead of in steps. I missed a sentence, I guess). The cake still turned out wonderfully. But I'd like to make it again. Using a proper pan and preparing it in the proper way.

Then I will make the Bavarian Cream. Then I will have the rings to make my English Muffins.

This particular recipe is from a very old book (The American Woman's Cookbook), binding falling apart, with a copyright of 1948. In the book, the cake is simply called Angel Cake. Same difference. It calls for the use of both vanilla and almond extract. Next time I'm only going to use the vanilla extract.


Angel Cake
Printable Version

1 1/4 cups sugar - divided
1 cup sifted cake flour
1 cup egg whites (8 - 10 eggs)
1 tsp cream of tartar
1/2 tsp salt
3/4 tsp vanilla extract
1/4 tsp almond extract

Preheat oven to 275' F

Sift 1/4 cup of sugar and the cake flour, 4 times. (I sifted it onto a piece of parchment paper...then emptied it back into the sifter). Set aside.

In a large bowl, beat the egg whites, cream of tartar and salt into a stiff foam. Add the remaining sugar, a little at a time, beating it in. Add in the extracts.

Fold in the sifted flour mix, sifting yet again as you add it, a little at a time, into the egg white foam.

Pour into a large ungreased tube pan (I used a bundt pan. not highly recommended). With a butter knife of spatula, cut through the batter to remove large air bubbles.

Bake for 30 minutes.

Increase oven temperature to 300' F and bake 40 - 45 minutes longer.

Remove from oven, invert pan for an hour before removing.


Carefully run a knife around all of the edges and remove from pan.

As you can tell from the picture at the top of my post, I left a lot of the "crust" behind when I removed the cake. I blame this on the bundt pan.

I am going to make this again. Possibly today. In a proper tube pan. I don't think Angel Food Cake is difficult to make. I mean, mine turned out nice and fluffy (I admit, it would've been fluffier I'm sure, had I done the proper thing) in spite of my mistakes. Are you wondering how I messed up?

Let's see. I added the extracts into the egg whites before beating them into a stiff foam. Not so bad....I wasn't too worried.

This next flub...had me worried.

I missed the step when the last cup of sugar is beaten into the egg whites. I just went straight to the folding in of the flour. Damn. When I realized what I had done, I proceeded to fold in the sugar too. I didn't beat it in. That would've really messed up the integrity of the stiff egg whites. Then I baked and prayed.


Friday, December 21, 2012

Tropical Fruitcake


Ya think it's too late to make fruitcake?

HA!! Think again my friend. This one can be eaten right away, or it can be made in advance and sit in the fridge for up to 6 weeks. Your choice.

I'm not a fruitcake person. At all. But an old friend from high school by the name of Beth was raving about this recipe so I had to give it a try. My twist...(cuz there always is one...mostly) is the fruit that I used. And the kind of rum. One of the things that I turn my nose up on with fruitcake is the candied cherries. So I decided to use tropical fruit. And the alcohol? Coconut rum.

And yes, I know there are cherries on the top of this this one. I put them there cuz they look pretty. But...there isn't a single candied cherry in that cake.


Tropical Fruitcake
Printable Version

Dried Fruit:
1 lb raisins
1/2 lb golden raisins
1/2 lb craisins
1 lb dried tropical fruit mix
1 lb mixed nuts
1 - 2 750ml bottles of coconut rum

Batter:
1/8 cup molasses
1/2 tsp baking soda
1/2 lb butter
1 1/8 cup brown sugar
6 eggs
1/2 apricot jam (or whatever flavor you have in the fridge that you like...strawberry?)
6 TB apple jelly (or whatever flavor you have in the fridge that you like)
1/4 cup whipping cream
2 TB almond extract
2 cups flour
1/2 tsp nutmeg
1 TB cinnamon
1 tsp ground cloves

1 day in advance combine the fruits and nuts. If you like them in smaller chunks, give them a couple of pulses in the food processor. I didn't do it this time but next year I will. Put them in a large bowl and fill with enough rum to cover them (you won't need all of the rum...besides, you need to save some for the end, in order to soak these babies). Cover with plastic wrap and let sit for 24 hours (I've actually let them sit for 2 days and it was fine).

On baking day, drain the rum off the fruits and nuts (save that rum!!! It tastes sooo good as a little something to sip during the rest of the process. Or ever poured over a bowl of vanilla ice cream).

Preheat the oven to 275' F. Butter two or 3 loaf pans. Or get creative and use round pans or bundt pans...whatever floats your boat.

In a small bowl combine the molasses and baking soda until light in color and frothy


Ok, so my bowl was a bit on the small side.

In a large....very large bowl, cream together the butter and brown sugar. Add the eggs, jam and jelly and beat well. Add the frothy molasses mixture, spices, whipping cream and almond extract. Beat well.

Get the bowl of nuts and pour the flour in there and stir until combine. Add 1 1/2 cups of the nut mixture to your butter mixture and mix well. Then add the remaining but mixture and mix well until everything is fully combined.


Divide the mixture between your prepared loaf pans. You can fill them almost to the top. This stuff doesn't rise all the much.

Bake for 1 1/2 or 2 1/2 hours (time frame depends on the size of the pans) or until a toothpick stuck in the middle comes out clean.

Cool for about 10 minutes than carefully remove from the pans and all to cool completely.


Once cooled, take a skewer or something similar and poke holes all over the place


Using about 1/4 to 1/2 cup of your coconut rum, and pour over the cakes. Top, bottom, sides.


And watch all that rummy goodness soak right into that cake.

Now, carefully wrap each cake with plastic wrap. Then wrap them in foil and either place them in tins and store in the fridge until you're ready to eat them. Or give them away.


Note: I don't have tins. So I just put them in the fridge without the tins. When I give them away, they'll just have a bow on the foil.

When you're ready to serve them...if you have some whole dried pineapple slices....soak in some rum. Dust the top of your cake with some powdered sugar and decorate with the pineapple and maybe some cherries if you have them.


And there you have a gorgeous Tropical Fruit Cake to share for the holidays.

Loaded with fruit and nuts....


And drowning in rum.

Of course...if you're still not into eating fruitcake. No worries.....there's always the doorstop alternative. Or the continuously recycled one that keeps going from one family to another...you can just add it to the rounds. But if I were you, I'd give this one a try. I think the tropical twist is a plus and the coconut rum wonderful!

Thank you Beth!!


Merry Christmas and Happy Holidays my friends.


Sunday, July 8, 2012

Strawberry Summer Cake


Yep....that's all there was left by the time I was able to snap a picture. This super easy, very yummy Strawberry Summer Cake doesn't last long once it comes out of the oven.

(As always) I have a little story about this cake. You all are familiar with (or most likely have an account with) Pinterest.com  I'm not as hooked on it as a lot of people seem to be. I play over there every now and then. I have a few "boards" with some "pins" hanging around. But I'm not there on a daily basis by any means.

So, with that said, I remembered a recipe I had "saved" for a strawberry cake a while back. It was time to make it but I needed to find it. I immediately went to my Google Reader and searched high and low through my tagged and starred recipes. Nothing. I knew it wasn't in a magazine or cookbook. I don't keep recipes all over the place on my computer or on the internet. Well, I try not to. I do have them stacked around my desk....but that's a different story. I went back to my Google Reader and searched again (just in case I had missed it....stranger things have happened). Still nothing. I went over to Facebook and whined about not being able to find something when you want it. Which is always the case. Someone commented about how they keep all those must try recipes in Pinterest. Duh! omg....THATS where I had tagged pinned the recipe....it was in Pinterest! I had completely forgotten about that handy little website. Whew......what a relief to know that I was not losing my mind (this time).

Strawberry Summer Cake 
Inspired by: Collecting the Moments
Printable Version

1 lb fresh strawberries
6 TB butter, at room temperature, plus more to grease pie plate
1 1/2 cups all purpose flour
1 1/2 tsp baking powder
1/2 tsp salt
1 cup sugar plus 2 TB for sprinkling the cake
1 egg
1/2 cup milk buttermilk
1 tsp vanilla extract

Preheat your oven to 350' F. Grease a 9" pan, with butter. You can use a cake pan, a spring form pan or a pie plate. I used a spring form pan.

First things first....take your beautiful strawberries


Hull them (ie: remove the stems) and cut them in half, length wise

In a small bowl, whisk together the flour, baking powder and salt.

In a medium bowl, beat together 1 cup of sugar and 6 TB of butter, until creamy and pale. Add the eggs, buttermilk and vanilla and continue beating until combined.

Add the dry ingredients to the wet ingredients and mix together just until its smooth.

Pour into your prepared pan. Place your strawberry halves on top of your batter, arranging as pretty as you can, cut side down.


Sprinkle 2 TB of sugar over the strawberries.

Bake for 10 minutes then turn the oven down to 325' and bake for an additional 50 - 60 minutes or until a toothpick comes out batter free. Cool in the pan, on a rack.

Now....grab a fork...quick before it's all gone.


If you have time...and it's not eaten up already, make a little whipped cream to serve on top. As  you can see....that didn't happen in my case.

Note: cake batter from a box does not have the same end result as this recipe. (been there, done that)

Thursday, June 28, 2012

Banana Bars with Cream Cheese Frosting


If you like Banana Bread...you're going to absolutely LOVE Banana Bars. Light, fluffy...and yes, very moist! Very much like the consistency of cake.

I saw this recipe posted on a very dear friends blog. Her name is Cathy and she is the awesome publisher of The Dutch Baker's Daughter. When I originally saw the post, I was so excited to have something else to make with those overly ripened bananas. That was about a year ago. I came across the post in my saved recipes on my feeder and was thrilled all over again. Only this time...I really made them.

And I am so glad I did. (and I'm so irritated with myself for not making them a year ago). The banana flavor in these bars really pops! I mean....there's some serious banana flavor going on. You can smell it before you even get it in your mouth. You can't stop eating them. It's a good thing that it makes enough to feed a crowd (a 15" pan is used).....otherwise no one else would ever get to see them let alone eat them. Although, had I been given the chance, I'm sure I'd have been able to consume the whole thing.

Let's put it this way.....as much as I like banana bread...I may never make it again.

Banana Bars with Cream Cheese Frosting
Printable Version

1/2 cup butter, softened
1 1/2 cups sugar
2 eggs
1/2 cup plain yogurt (I used Greek yogurt. Use what you prefer...even low fat as Cathy used)
1/2 sour cream (Cathy used light sour cream)
1 tsp vanilla extract
2 cups all purpose flour
1 tsp baking soda
1/4 tsp salt
2 medium very ripe bananas, mashed (about 1 cup)
8 oz cream cheese, softened
2 tsp vanilla
3 3/4 to 4 cups powdered sugar

Preheat your oven to 350' F. Grease a 15" x 10" jelly roll pan or line with parchment paper.

Cream together the butter and sugar until light and fluffy. Add the eggs, yogurt, sour cream and vanilla. Combine well.

In another bowl, combine the flour, baking soda and salt. Whisk together.

Gradually beat the flour mixture into the wet ingredients until all mixed together. Stir in the mashed bananas.

Spread into your prepared pan and bake for 20 - 25 minutes until a toothpick, inserted in the middle-ish area comes out clean and your cake is a pretty yellowish golden color


While your cake is cooling (ya I know...they're suppose to bars but honestly...its super moist like a cake), make your cream cheese frosting by beating the cream cheese, vanilla and powdered sugar together until you have the right consistency that makes you happy.

Once the cake is cooled, spread on the frosting.


Yep....there you have it. And it's ok to try some right away. I give you my permission and blessings to do so. Go ahead....take a biiiiiig bite


And tell me if you don't want to eat this for the rest of your life.

Thank you Cathy for being the wonderful person you are and for sharing this recipe! I love ya man!!

Saturday, March 3, 2012

Buttermilk Skillet Cake with Pecan Praline Topping


This week for the the Joy the Baker Cookbook Spotlight and Cook-Off sponsored by Hyperion and hosted at girlichef we got to choose what ever recipe we wanted to show you all. This recipe caught my eye on several levels........

I have a thing for cast iron skillets.

I have a thing for praline.

I have a thing for buttermilk in baking recipes.

And now...I have a very serious thing for this recipe alone. Ooh....MY....gawd! This cake is flippin' amazing. Light, fluffy....not too sweet because the praline has that roll. And it does it well! The scale is going to be yelling at me if I don't stop eating it.

If you end up purchasing Joy's cookbook....you'll find the recipe on page 113, titled Buttermilk Skillet Cake with Walnut Praline Topping.  I happen not to like walnuts. So I automatically swap them for pecans whenever called for in a recipe.

Buttermilk Skillet Cake with Pecan Praline Topping
Printable Version

1 1/2 cups all purpose flour
3/4 tsp baking powder
1/4 tsp baking soda
3/4 tsp salt
6 TB unsalted butter, at room temperature
1 cup granulated sugar
1 large egg
1 large egg yolk
2 teaspoons vanilla extract
3/4 cup buttermilk

Praline Topping:
3/4 cup packed brown sugar
1/2 cup unsalted butter
1/4 cup heavy cream
good pinch of salt
1 tsp vanilla extract
1 cup coarsely chopped pecans (or walnuts if that's your thing)

Preheat your oven to 375' F. Grease and flour an 8" over safe (ie: cast iron) skillet, along the bottom and up the sides. Joy says a 9" cake pan will work as well. Don't make up your mind yet....please.


I want you to see how big...errr...small an 8" skillet is. You'll see in a minute the importance of this.

In a medium bowl whisk together the flour, baking powder, baking soda and salt. Set aside.

In another medium bowl, with a stand or hand mixer, cream together the granulated sugar and butter until fully incorporated, about 3 minutes.

Add the egg and yolk, one at a time, beating for 1 minute between the two.

Beat in the vanilla.

Now....with the mixer on low, add half of the flour. Beat until incorporated. Add the buttermilk, and beat again until incorporated. Finally, beat in the remaining flour until almost fully incorporated. Stop beating and continue with a spatula to fully incorporate the flour.

Pour / spoon the batter into your prepared pan.


Smooth the batter in the pan evenly. (clears her throat)....put a pan on the bottom rack. Just in case. Bake for 30 minutes until a toothpick inserted in the center comes out clean.

While things of unknown magnitude are going on in the oven....you should make the pralines.

Combine the brown sugar, butter, cream and salt in a medium saucepan. Bring to a soft boil and let boil for 3 minutes. Keep an eye on it. It likes to get a little rambunctious....just stir it down.


After 3 minutes, remove from heat and stir in the vanilla and nuts. Allow to set for about 20 minutes to thicken up a bit.

I don't know why....something I did maybe? Or just one of those quirks...but (clears her throat)...I had a bit of a mishap.

I'm really glad that pan was in there to catch the mess. At first I was fretting a bit. But then I decided to let it ride. I turned the oven down to 350' and let it cook a bit longer since the center wasn't set yet. And hoped that my house wouldn't be inundated with that burned sugary smell.

Once I had determined (with aforementioned toothpick test) that he cake was done,  I let it cool for a minute and then placed the pan on a plate.


It needed examining. How was I going to pull this off? Scrap it and start over? I have a thing about throwing away perfectly good food. So that thought didn't linger long. I considered cutting off all the crunchy edges (oh the pain of the thought) and inverting the pan so the cake would come out. but I knew I'd mess it up even more.

I decided to....embrace the rustic. Forget the perfection and clean beauty of the intention. And just pour the praline over the whole thing....skillet and all


And then discovered the raw beauty that only a cast iron skillet can pull off with such comfort.

What happened next was pure taste-bud nirvana


I want to say....you should probably cook this cake in a 10" skillet or a cake pan. But there's a part of me that has a thing for this bad boy.....just as it is.