Yum Peaceful Cooking: Dip
Showing posts with label Dip. Show all posts

Saturday, January 16, 2016

Cajun Style Gyro


These gems are bursting with flavor....tender, juicy and a bit spicy. We have here some Blackened Chicken, a Cajun Salsa, some delicious Cajun Dip drizzled all over it....all wrapped up in a pita.

Pure yum factor going on here.

The inspiration for such a diverse concoction comes from the tahini I used in the dip. Sesame King Cajun Tahini to be more specific. I had no idea there were flavored tahini's out there....so cool! They currently have Garlic, Honey, Cajun and Olive Oil flavors. All of which would be great in so many recipes. Hummus of course (how fun to have various flavor themes), dressings, sauces, dips.


Before Sunshine International Foods sent me some of their tahini, I had only used it in hummus. They have unknowingly guided me to expand my ways.


Cajun Dip

6 tablespoons Greek yogurt
1 tablespoon Sesame King Cajun Tahini
1 1/2 teaspoons cilantro, finely chopped
1 teaspoon cajun seasoning
Salt and pepper to taste (about a pinch)

Combine all of the ingredients in a bowl, cover and refrigerate until ready to use.

Cajun Salsa
1 large tomato
2 green onions
1 - 2 tablespoons cilantro, finely chopped
1/4 cup bell pepper, diced (use which ever color you prefer)
1/4 teaspoon creole seasoning
1 garlic clove, minced
Salt to taste

Combine all ingredients in a bowl, cover and refrigerate until ready to use.


Blackened Chicken
3 or 4 Boneless, skinless chicken thighs (breasts can be used instead)
1 tablespoon creole seasoning
Olive oil

Preheat the oven to 400'F

Drizzle chicken with a small amount of oil then sprinkle a good amount of creole seasoning on both sides of the chicken.

Heat 2 teaspoons of oil an oven safe skillet over medium-high heat. Cook the chicken for a minute or so on each side. Place skillet in the oven and bake for 10 minutes.

Remove and cover lightly to rest. Slice thinly

Set up your station...


Grab a pita, and put it together the way you would a taco....meat, salsa and dip. Fold, wrap and chow!


The Cajun Tahini added depth to the dip. The tahini itself doesn't have heat to it, so don't worry about that if you shy away from spicy foods.

Sesame King Tahini is certified kosher, pasteurized and made in the USA. Plus, the list of ingredients is short and simple. Nothing in there that I don't recognize. Love that!

I was not compensated for this post, however Sesame King supplied me with product samples. All opinions are my own.

Sunday, March 1, 2015

White Bean and Basil Spread for #SundaySupper


It is a Bean-tastic Sunday and I've got a wonderfully easy, tasty and healthy spread for you that even a non-bean lover, like myself, would enjoy. I'm not saying I hate beans, but there are some that I really don't prefer. And there are some that are pretty darn good. I'm not sure if it's a texture thing or what but I have to say, I prefer bean spreads such as hummus and other dips over whole beans.

But...because beans are so good for you, being low in saturated fat, cholesterol and sodium and high in fiber, protein, folate, magnesium and iron, I do try to include them in my menu on occasion.

If I'm going to be honest, I must admit that beans are really versatile. They can go in soups and stews, salads, or just as a stand alone side. Why, they can even be an ingredient in a dessert (especially if you include the vanilla bean). Proof of this is in the line-up we have for you today, which you will find at the bottom.

I really love the combination of tomatoes and basil is this spread. They bring such a freshness to the palate that offsets the hardiness of the beans, while the olives have the supporting role of balance with their salty tang.

You will notice that the ingredients calls for the tomatoes to be seeded. Plum tomatoes have very few seeds and "juice" (which is also why they are preferred in salsas). If you don't remove the seeds for this spread, it will be too runny. So please, do not skip this simple step.

White Bean and Basil Spread

Recipe from: What Can I Bring by Anne Byrn

1 15 oz can great northern beans, drained
3 plum tomatoes, seeded and chopped, divided (about 1 1/2 cups)
1/3 cup pitted green olives, coarsely chopped
4 tablespoons extra virgin olive oil
1/4 chopped fresh basil, plus more to garnish
1 tablespoon minced garlic
1/4 cup crumbled feta cheese (I used a tomato and basil seasoned feta)
salt to taste, if needed
3 - 4 dozen toasted slices of french bread

Place the beans and garlic in a food processor and process until smooth. add 1 1/4 cups of the tomatoes (saving the rest to garnish with) olives, olive oil, and basil and pulse until everything is finely chopped but not completely smooth. Stir in some salt if needed.

This can be stored in the fridge for up to 2 days.

Just before serving, garnish with the cheese, remaining tomatoes and some basil. Serve with the toasted bread slices.


Beantastic Beginners:
Bean-a-rific Soups and Stews:
Bean-a-licious Sides:
Incredi-bean Main Meals:
Amaze-beans Sweet Endings:
Sunday Supper MovementJoin the #SundaySupper conversation on twitter on Sunday! We tweet throughout the day and share recipes from all over the world. Our weekly chat starts at 7:00 pm ET. Follow the #SundaySupper hashtag and remember to include it in your tweets to join in the chat. To get more great Sunday Supper Recipes, visit our website or check out our Pinterest board. Would you like to join the Sunday Supper Movement? It’s easy. You can sign up by clicking here: Sunday Supper Movement.

Sunday, February 15, 2015

Lemony Grilled Chicken for a Heart Healthy #SundaySupper


Today's Sunday Supper is all about heart healthy dishes. Whether it's a way of life, a new choice, a "sometimes" choice, or you're just trying to maintain that New Year resolution, we have some wonderful options for you.

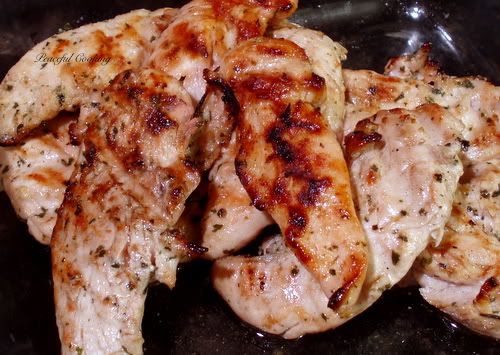
The dish I've prepared is a Greek dish called Lemonatie Kota sta Karvouna aka Lemony Grilled Chicken using boneless, skinless chicken breasts, marinated and grilled then served with a delightful sauce of your choice. The recommendations are Summer Peach Salsa or Tzatziki. Peaches aren't in season right now and since I drooled over all of the ingredients in Tzatziki, well....that's what my taste buds forced me to use.

Now let me confess a little something about my grilling skills. I'm learning. I know how to start the charcoal but I never really know how many coals to use. This chicken only grilled for about 10 minutes and I really felt guilty using all those coals. Is that typical? A starter full of coals for a 10 - 20 minute grill session?!

And I struggle with exactly when the coals are hot enough. Since Sir Sportsalot wasn't home when I tackled the Weber, I had to leave it up to my own judgement. I'm getting there...but I'm not a confident grill master by any means. Sure I could've used a skillet in the kitchen but it was over 80' outside. I really had no excuse other than my own insecurities. Therefore...I did it. And I didn't burn the chicken. I didn't over cook it. It was tender and juicy and oh so wonderful. Slowly but surely I'm getting there. The grill and I are forming the foundations of a beautiful friendship. I'm actually starting to look forward to my little grilling adventures.

Back to heart healthy. Low fat, low sodium and low cholesterol. I believe this dish covers that. Even with the Tzatziki which is made with Greek yogurt, olive oil and seasonings.

Lemony Grilled Chicken

Recipe from the It's All Greek to Me cookbook
Printable Version

1/4 fresh lemon juice (about 2 lemons)
1/4 olive oil
2 teaspoons dried oregano
5 green onions, thinly sliced, green parts reserved.
4 boneless, skinless chicken breast
1 teaspoon salt or to taste
1/2 teaspoon black pepper or to taste
4 cups loosely packed fresh greens
Tzatziki (recipe to follow)

In a medium bowl, whisk together the lemon juice, olive oil, oregano and white parts of the green onions. Set aside

Rinse and pat dry the chicken. If the breasts are really thick, I recommend butterflying them. Season with salt and pepper. Place them in a zip lock baggy and pour the lemon juice mixture over them. Seal the bag and place in the fridge for at least one hour or up to over night, turning once.

Get your grill nice and hot. Remove the chicken from the marinade and grill for about 4 - 6 minutes on each side. Let rest for 10 minutes before serving.

Serve over a bed of greens accompanied by Tzatziki spooned over the chicken and garnish with the greens from the onions if desired (I forgot).


Tzatziki

Recipe from the It's All Greek to Me cookbook
Printable Version

1/2 cucumber, peeled
1 teaspoon salt, divided
2 cups Greek yogurt
3 garlic cloves, mashed into a paste
1/3 cup extra virgin olive oil
1 tablespoon white wine vinegar
1 tablespoon minced fresh dill

Grate the cucumber and place in a fine mesh strainer. Toss in 1/2 teaspoon of salt and let set over a bowl for 10 minutes.

Working in small batches, squeeze the cucumber in your hand to get out as much liquid as possible. Place the strained cucumber in a medium bowl.

Add the remaining ingredients in with the cucumber, along with 1/2 teaspoon of salt and mix well.

Place in the fridge to chill for 2 hrs or more. The longer it chills, the more intense the garlic flavor will become.

Store for up to 5 days.

The chicken was extremely tender and juicy! How could it not be after marinating in fresh lemon juice?! I've discovered that I absolutely love Tzatziki! Bursting with flavor, fresh and cool, the ideal accompaniment. This meal was light and satisfying. Perfect for a "pretend" summer day in the middle of winter.

Better for you breakfasts:
Jump start your health with these appetizers and snacks:
Soups that'll win your heart:
Veggies, Sides, & Salads your heart will thank you for:
Healthy is the center of attention in these main courses:
Staying healthy doesn't mean giving up desserts!
We heart wine.
Sunday Supper MovementJoin the #SundaySupper conversation on twitter on Sunday! We tweet throughout the day and share recipes from all over the world. Our weekly chat starts at 7:00 pm ET. Follow the #SundaySupper hashtag and remember to include it in your tweets to join in the chat. To get more great Sunday Supper Recipes, visit our website or check out our Pinterest board. Would you like to join the Sunday Supper Movement? It’s easy. You can sign up by clicking here: Sunday Supper Movement.

Monday, April 15, 2013

Curry Tofu Hummus


Did you know that April is National Soy Foods Month? 

Neither did I. Until recently. 

My friends over at FoodieBlogRoll hooked me up with some soy foods products to help spread the word and share some ideas on what you can do with soy foods. 

I'm not a soy person, personally but one of my daughters is lactose intolerant and soy foods products is one of the ways she gets around her tummy aches caused by dairy. I also use soy flour in a lot of the breads that I make for her. Therefore, I'm not a stranger to soy. Plus...I really enjoy soy nuts and I absolutely love eating edamame...those ones you get at Costco. Omgohs.....They're so addicting. 

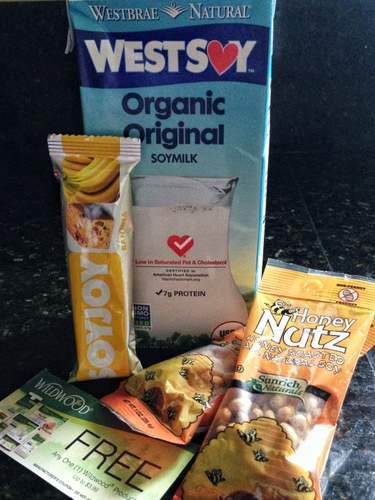
Anyways....this is what I received in the mail the other day....


These things are always a surprise. You never know what you're gonna get until it arrives. Hmmm...what to do...what do. I didn't want to do anything typical here so I started thinking about cheese. I've made cheese...soft cheese from milk, in the past so I figured you could do the same thing with soymilk. 

Only it's called tofu. 

Which sorta confused me because I know there's soy cheese out there. Apparently the beginning stages for both are the same. Some blogs even call tofu, soy cheese. Which confused me a little more. So I looked it up on that handy dandy website known as Wikipedia and it said that tofu is the curd that comes from soy milk which is pressed and is highly perishable while cheese starts off the same way but then its salted and ripened. Soy cheese is therefore more flavorful than most tofu.  

With all that said, I started on my tofu making adventure....with a little help from LAFujiMama


Tofu
4 cups soymilk
1/2 cup water
1 TB apple cider vinegar
1 TB lemon juice

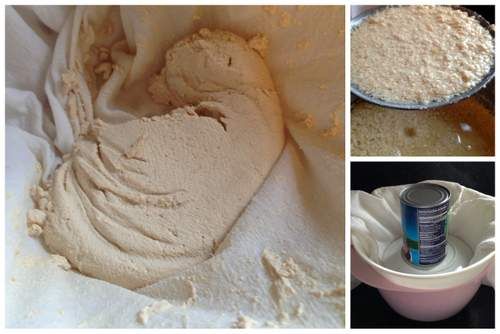
Bring the soymilk to a boil, stirring occasionally so it doesn't burn. While that's going on, combine the water, vinegar and lemon juice. 

Reduce the heat and simmer for 3 minutes. 

Remove from heat and add 1/2 of the water mixture. Stir vigorously about 5 or 6 times. Add the remaining water mixture and stir gently, in a figure 8 fashion until curds begin to form. 

Cover with a lid and let sit for 15 minutes. This is when you'll see the full separation. Now from what I've read, the size of the curd will vary depending on the protein content of your soymilk. 


Line a strainer with a cotton cloth and place over a bowl. 


With a large slotted spoon, remove the curds and place them into the lined strainer. Fold the cloth over the curds and place a plate (for even distribution) over the cloth and press until most of the liquid is gone. Place a heavy object on top to get the remaining liquid out. This should take a few minutes. The less liquid remaining will create a more firm tofu. 


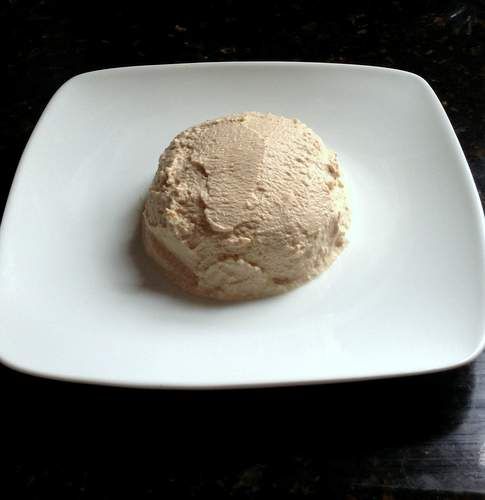
I ended up with a very soft tofu. I think it is from a couple of things. One...I had a very small curd formation. Two...I couldn't get anymore liquid out of my curds.

At this point you can place the tofu in a bowl of cold water and gently run cold water into the bowl (not allowing the water to run directly onto the tofu) for several minutes. This is suppose to make the tofu set up. I found that my tofu was just too soft to undergo this process and was dissipating into the water so I stopped. To store your tofu, you need to cover it with cold water and refrigerate.

I used mine immediately.


Another thing I noticed. My tofu is a tan color. The soymilk was a light tan coming out of the container so I'm not sure if that's the reason....but that's what happened. I've been told that it looks like coffee ice cream. (I assure you, it doesn't taste like it though.)

Well, never the less, the color wasn't an issue because this lovely silken mass was destined to become a dip.

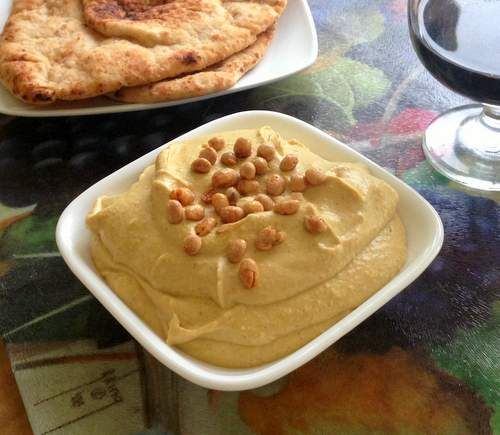
Tofu Curry Hummus
Printable Version
1 can garbanzo beans, drained, liquid reserved
5 oz silken tofu
1 TB tahini
juice from 1/2 lemon
2 - 4 tsp curry powder
Salt to taste
Roasted soy nuts to garnish
Olive oil to garnish

Combine garbanzo beans and tofu in a food processor. Process until smooth. Add about 1 TB of reserved garbanzo liquid, while processing, until just under desired thickness. add the tahini, lemon juice and curry powder (to taste) and process until smooth. If you desire a thinner hummus, add a bit more reserved garbanzo liquid. Salt to taste. Garnish with a sprinkle of soy nuts and a drizzle of olive oil. Serve with your choice of bread.


What an amazingly tasty dip....but you have to be a lover of curry! But wow...smooth, delicious and oh so healthy. I know this was a really long process to get from A to Z but the fun was in the making.

And now...a few words from our sponsor:


April is National Soyfoods Month which makes it the perfect time to learn how soy can help create a healthy diet and to discover easy ways to incorporate it into everyday meals.  Packed with protein and fiber, soyfoods are a great way to reduce calories, saturated fat and maintain your weight.

The Soyfoods Association of North America (SANA) provides information about the health benefits and nutritional advantages of soy. SANA offers fun recipes and convenient ways to incorporate soy into meals for everyone – from athletes to families. SANA is dedicated to spreading the word about soy, especially during National Soyfoods Month in April!

Soyfoods aren’t just for vegetarians anymore. In fact, dishes made with soy are quick, tasty, and often healthier than traditional protein sources.

Since April is National Soyfoods Month it’s the perfect time to tell your readers about the benefits and ease of cooking with soy!

Here are just a few ways that soy can help make your life easier and healthier:

Take this mixed berry smoothie up a notch with creamy and delicious WESTSOY Soymilk made from whole organic soybeans:
Berry Smoothie
WESTSOY Soymilk

Need a snack on-the-go?  Grab some gluten free SOYJOY bars to fuel up with nutrients in seconds.
SOYJOY bars

On those busy weeknights, add some Wildwood tofu to the standard stir-fry for more protein or this spinach fettuccini to your favorite pasta sauce.
Wildwood Tofu

Packing lunches with the same snacks can get a little boring, but honey roasted soy nuts are a sweet and crunchy snack packaged in individual sizes, perfect for the lunch box.
Honey Roasted Soy Nuts

Packed with protein and fiber, soyfoods are a great way to reduce calories, cholesterol and saturated fat.
They also serve as a great source of iron, calcium, vitamin B-12, magnesium and zinc.

To find out more about Soy Foods Month, visit the links below:

April is SoyFoods month! Explore the site for recipe ideas and ingredients!
Follow the SoyFoods Association on Twitter at @SocialSANA
SoyFoods Association on Facebook


This sponsorship is brought to you by the Soyfoods Association who we have partnered with for this promotion.

Sunday, May 15, 2011

Lay's New Dip Creations aren't just for chips


About a month ago, I was the lucky recipient of a few samples of Tostitos and Lays Dip Creations. I received them through the Tastemakers program with Foodbuzz. I'm not obligated to write anything in particular or anything at all, but when you play with an ingredient that's fun, you want to share it with your friends, right?

So what exactly did I get? Well.....


2 Seasoning Mix packets each of Freshly Made Guacamole, Garden Onion, Country Ranch. All made with 100% natural ingredients.

So far I've played with the Freshly Made Guacamole and the Garden Onion. Based on the picture up top, what do you think I did with the Garden Onion? Did I add it to the patty? Did I coat the fries? Well, you're just going to have a wait and see.....cuz.....

I started off with the guacamole mix. Since the packet is just seasonings....and not actual avocado, I decided to marinate some chicken with a bit of oil and vinegar (or lime juice) and let it hang out in the fridge for at least 30 minutes or a few hours, soaking in all those lovely, fresh spices. I then grilled the chicken (yes...all by myself....which is always an adventure).


(I apologize for the horrible picture. I don't know what my issue was that day...probably frazzled from dealing with the bbq)

Then I proceeded to make the most yummy quesadillas ever!!

(and another horrible pic)

But seriously...with some sauteed onions and bell peppers...a few slices of avocado and lots of cheese....not to mention the wonderfully tender and succulent chicken....this was one mighty tasty quesadilla.

Just a note....if you're taking the time to fire up the grill to cook the meat, do yourself a favor and grill the quesadillo as well. It adds such a wonderful flavor!

Of course I did use the other packet to make actual guacamole.


Quick and easy with wonderful results! All you need are the avocados. The Dip Creations does the rest. Not too spicy for those who like it mild. If you want heat....add your own :)...I'm sure the avocado won't mind.


Please, don't buy the pre-made guacamole in the deli section of your grocery store. It rarely tastes anything at all like guacamole (seriously). If you don't like guacamole, it could be because you've only had that processed, flavorless, weird stuff that comes in a plastic container. Even the texture is funky. If you ever see it at a party.....run away....fast. Don't let your lips or chips come in contact with the stuff. Grocery store brand, pre-made guacamole is that bad!

Promise me....if you're not going to make it from scratch....at least buy a packet of Lay's Dip Creations Freshly Made Guacamole mix, a few avocados, and smash them all together. Stick it in the fridge for an hour and enjoy. It's that simple

Now...what did I do with Garden Onion packet.....

Did I add it to the burger patty?

Nope

Did I add it to the fries?

Nope.....

I added it to the bun! I made a small batch of No-Knead Olive Oil dough and tossed in the whole packet.

I was originally going to make focaccia. Add some grilled onions on top before baking. But I forgot. Or subconsciously changed my mind. I had some Italian Sausage that needed to be used so I thought I'd remove the casings and make them into burgers.

So...I needed the buns.

This recipe is adapted from Artisan Bread in Five Minutes a Day

2 1/2 cups lukewarm water
2 1/4 tsp yeast
2 1/4 tsp salt
1 1/2 tsp sugar
2 TB extra virgin olive oil
1 packet Lay's Dip Creations Garden Onion Seasoning Mix
3 1/4 cups unbleached bread flour

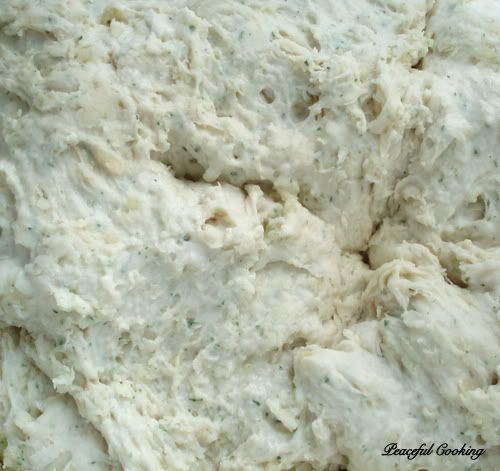
In a non-airtight container, with a lid, combine the water, yeast, salt, sugar, olive oil and Garden Onion packet. Add the flour and stir until combined. Do not knead. Cover lightly with a lid and let sit on the counter for 2 hours


I love seeing all that speckled flavor running through the dough.

Once the 2 hours are up,  you can either refrigerate the dough or continue on to make the burger buns. I find that it is a bit easier to work with if the dough is allowed to chill-out in the fridge first. It's not as 'sticky'.

Either way, you're going to work the dough into a ball by holding it in your hands and stretching the dough around to the bottom as your rotate it. Then divide the ball into 6 equal portions (about 3 oz each). Shape each portion into a ball as your did before, adding a small amount of flour if needed. Place them on a parchment paper lined cookie sheet and just barely flatten them a bit.


Cover with plastic wrap and a let rise for 40 minutes. (if you didn't refrigerate the dough, they only need 20 minutes to rise).

Preheat the oven to 350' (if you're using a baking stone...the preheat time is 30 minutes before baking. If no baking stone is used, you only need about 5 minutes to preheat).

Just before baking, brush the tops with melted butter. Bake for 20 minutes or until richly browned and firm.


As you can see, my buns didn't brown. I even let them bake a bit longer. The buttoms browned just fine but the tops decided to be a bit stubborn. I didn't stress over it much. Maybe my burgers can be considered "White Burgers"....turkey meat and pale buns. With a big ole slab of mozzarella cheese melted over that Italian Sausage patty....and some grilled onions in there....


Yes....it was a great burger....from patty to bun. I loved the addition of Lay's Seasoning Mix to the dough and plan on doing that again.

Thank you Lay's for this opportunity to play with your Dip Creations.

No, I have not forgotten about the Country Ranch. But you see....ranch dressing is my favorite. And I'm just going to use the 2 seasoning mix packets that I have to make just that....Country Ranch Dressing. To dip my fries in. To pour over my salad. Even to dip my pizza in. I am a true blue ranch dressing kinda gal.

Saturday, December 4, 2010

Jalapeno Popper Dip for a couple of dips


I love dips and appetizers. I have been known to eat nothing else all day long....to just graze on dips and finger foods all day and be perfectly content. About a year or so ago....Tango (aka Laurie) shared this recipe with me. It's good, it's easy and during the holidays it's not fattening (but watch out for the remainder of the year....cuz it'll attack your hips with a vengeance....it's only safe during the holidays...I swear. No lie.). Anyways...I've been craving this dip since the day after Thanksgiving (I think I saw the recipe in my folder and realized that I had all the ingredients and instantly went into crave mode). I wanted something I could munch on all day without reheating or assembling....just reach, dip, insert in mouth and go Mmmmmmmmm. But I didn't have any crackers. I have to have crackers. Actually Jalapeno Popper Dip would probably be even better with those Frito Scoopables....but I like crackers.

Crackers were bought Sunday....and by midweek when no one was home for dinner, this rich, slightly spicy, filling, ooey gooey dip made it on my dinner plate. Solo. No sides. No main. As is...alone. And it was a wonderfully sinful dinner. I mentioned this on my Facebook page and next thing I knew, there was my sister's friend in Alabama asking (kinda reminded me of a 3 yr old....i think she was whining most audibly on Facebook) for the recipe, and then my cousin from up north begging for it.....which reminded me of the old days when we'd beg our parents to let us do something, with promises of being good beyond our control.

I stood firm and told them both they'd have to wait. (To my delight....I was accused of being Evil.)

Ok, so I mentioned that Tango shared this recipe. She's one of my BakeSpace.com buds. She has a blog titled Tangos Treasures (btw....she's having a giveaway if y'all are interested....ends 12/8/10). Tango's blog is a fun mixture of recipes, experiences and some great quilting!! This lady is truly talented. You can also see a ton of her recipes in BakeSpace Kitchen.

Speaking of Giveaways.....there's still some time....not a whole lot, but some...to enter in my CSNStores.com $50 Gift Certificate Giveaway. You have until midnight pst 12/5/10 to enter for your chance to win :-)

-------->CLICK HERE TO ENTER<--------

Now.....As promised to a couple of dips, here is the recipe for the dip. I did alter it ever so slightly from the original recipe that was shared with me...but hey....isn't that what recipes are for? Make it your own!!

Jalapeno Popper Dip
Printable Version

2 - 8oz packages of cream cheese - room temperature
1 teaspoon garlic powder
1/2 cup mayonnaise
1/2 cup sour cream
1 cup shredded cheeses (suggestions: cheddar, jack, Mexican blend. I used what I had...cheddar and mozzarella)
1/2 cup parmesan cheese
1 - 4oz can chopped green chilies
1 - 4oz can chopped jalapenos (if you like it hot...add more)

Topping (mmmm.....topping. Don't you just love toppings?)
1 cup panko bread crumbs
1/2 cup parmesan cheese
1/4 cup (half stick) butter, melted


(btw...I very rarely probably never measure cheese)

You can either do this in a food processor....or the old fashioned way (hand mixer and spoon).

Preheat your oven to 375'F. Lightly grease a 2 quart casserole dish.

***If you're using a food processor, just dump it all in (except for the topping ingredients) and process until smooth.

***If you're using a hand mixer and spoon (like I did cuz I was too lazy to wash the parts for my food processor)....in a large bowl, cream together the cream cheese, mayonnaise and sour cream with your mixer, until smooth. Stir in the remaining ingredients (except for the topping ingredients) until combined well.

Spread the dip into your prepared casserole dish.


In a small bowl, combine the panko and cheese. Add the butter and mix well....making sure everything is "wet". Sprinkle over the dip.


Bake in your preheated 375' oven for 25 minutes until a little golden brown on top.


Allow to cool a little before serving. Best when served warm or at room temperature. Get's a little "stiff" when cold....so you'll want to reheat it if you have leftovers. I was talking to my sister about this recipe and she had the great idea of adding.....

Wait for it....

Waaaaaait for it.....

BACON!!!!

Yep....next time I make this, I'm adding more jalapenos and some bacon. Can you say....HEAVEN!!!

Friday, February 5, 2010

Black Bean Hummus and Homemade Pita


One of the gals at work mentioned Black Bean Hummus. My ears perked and interest piqued! Whaaaaat is it? I've never heard of it!! Tell me more!!

She said it was simple.....same recipe as regular [chickpea] hummus only you use black beans.

Well heck....I've gotta try me some of that!

Let me tell ya....YUM! Super YUM!!! Super EASY!!! and I'm thinking...let's serve this for the SUPER BOWL!!! Too bad a team with purple jerseys won't be playing. I'm not saying any team in particular. I'm just sayin....you know....cuz it's like.....I dunno.....a color thing?

Cuz my Black Bean Hummus came out kinda purple.....ya know?

2- 15 oz cans of black beans, drained. Reserve liquid
2 or 3 garlic cloves
1/4 cup tahini
juice from 1 lemon
Olive Oil and Paprika to garnish

In a food processor, chop up the garlic cloves. Add the beans, tahini and lemon juice. Just as it's coming together, starting adding some of the reserved bean liquid....until you have the desired constancy. Enough to make it smooth, but not runny.

Put it in your serving bowl. If you have an immersion blender, you might wanna give it a few pulses in the hummus....just to give it that extra smoothness. Drizzle with Olive Oil and sprinkle with paprika.

Serve with pita slices.

Wanna try your hand at making pita? It's the easiest thing ever!!!

You can find the Master Recipe for White Flour Dough here at the Artisan Bread in Five Minutes a Day blog.

So...you make that dough (4 ingredients...flour, yeast, water and salt....come on, I know you can do it!!)

Preheat your oven and stone to a piping hot 500'

After that first initial rise (there will be no second rise), grab about 1 lb of dough. Shape it into a ball (don't knead...just pull the dough under until you have a smooth ball.....this takes less than a minute). Place it on a well floured surface


Divide the dough into 4 and shape those into balls


Use enough flour to keep them from sticking but not so much that the dough dries out...don't stress over it...don't over think it......you'll be fine

Now....take one of those little balls....flatten it a bit....roll it out, turning, rolling.....kinda like you would for a pizza, until it's about 1/8 thick.


Slide it onto you stone and bake for about 5 - 7 minutes. After the first 4 or 5 minutes, I took the pita off the stone and continued to bake it directly on the rack (placement of racks is not important) so that it would brown a little.

Remove from the oven.....Oh look!!! It puffed up!! That means he's got pockets...wooo hoooo


Now let him cool. In order to maintain the pliable softness that pita's are known for.....cover this guy up with a little cotton towel and tuck him in until he cools off


He'll flatten out as he cools. Serve warm or at room temp.


(This was my whole wheat version)

Want more hummus variations? Check out the Southwestern Hummus that I make with cilantro and jalapenos

(this hummus tastes best with tortilla chips)

Soo....there ya have it. Black Bean Hummus and Homemade Pita and links to more. You have no excuse now. If you haven't tried hummus or if you tried the store bought stuff and thought you didn't like it....give it a second chance. It's good stuff.

Monday, January 25, 2010

Heart Attack on a Cracker


Unless you're taking it to a birthday party for someone who is turning 90 years old. Then that would just be insensitive, now wouldn't it?

That's when you call it something proper and delicious sounding, like....

Bacon and Cheddar Dip!

My dear neighbor had a 90th birthday party the other day and I couldn't possibly go empty handed. I mean, ya, I took her a little birthday present (btw...what on earth do you give someone who is 90!!) but being someone who is into food...how could I show up without something to eat? Right?

But if you're gonna serve this at a Super Bowl Party....Heart Atatck on a Cracker is totally acceptable.

My sister told me about this recipe. She found a version of it on another website. Between her small adjustments and mine....it's been altered a tiny bit, but if you wanna see how it was originally intended then check it out ----->here<------

As for me...this is what I did


6 - 8 slices of cooked bacon, crumbled
8 oz cream cheese, room temp
1/2 cup mayonnaise
1/2 cup sour cream
8 oz cheddar cheese, shredded
3 green onions, chopped
1/2 sleeve crackers (I used ritz) crushed
shredded parmesan cheese to top (optional)
a little more bacon and green onions to garnish

I know you don't really need step by steps for this so I'm not gonna give em.

I suggest that you use a mixer to cream the cream cheese first...(mixing by hand, no matter how many times I think...oooh, it will be fine.....it's just a lot of work) then add the mayo and sour cream. Then stir in the cheddar cheese and onions until mixed well.

Scoop into an 8x8 dish (no need to grease it...this baby has plenty of self-lube). Top with crackers and parmesan cheese


Bake in a 350' oven for about 20 minutes, or until bubbly and browned.

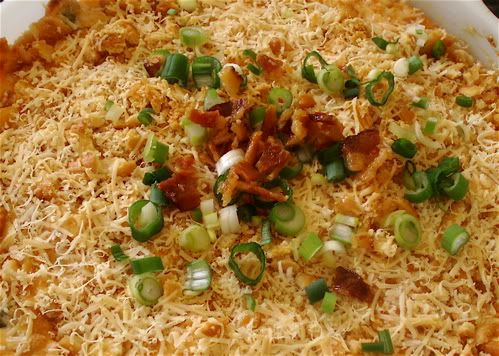
Garnish with more bacon and green onions and serve warm with crackers.

I wish I had a picture of it on a cracker....then you'd get the idea but you know what? There wasn't any left to bring home from the party (and I couldn't very well take it with a scoop missing, now could I? I did consider it though). Once someone dove into it, within 15 minutes it was 3/4 of the way gone....swear! And I hadn't even had any yet.

I do have to say though...once it cools off, it's not as good. But warm.....waaaaaay yum!!!

Not into cheddar? Oooooor....wanna try it differently? What about jack cheese...or pepper jack? Now that would be double yum!

Tuesday, January 19, 2010

Southwestern Hummus


Do you like hummus? Yes? No? Sometimes? Are you partial to the traditional plain hummus? Or do you like it spiced up a bit?

I love it both ways. Providing it's homemade. But I think I like it a little bit more with a little spice added.

I don't know what made me even try this recipe. Or where I found the recipe originally. Actually, over the years, I have tweaked and altered so is this where I get to call it my own?

Wouldn't you just love to serve this on Super Bowl Sunday and see the faces of the guys when they bite into it, thinking it's guacamole? hahaha!!! I have a brother in-law who doesn't like guacamole (gasp!!!) so it's a good thing my sister told him it was hummus otherwise he'd have missed out on this yummy, healthy treat.

Oh, and ya....he likes it too.

Basically it's the same original hummus recipe...with a few flavorful additions:

2 or 3 garlic cloves
2 - 15 oz cans of chickpeas (aka garbanzo beans) or...you can use fresh, cooked beans
1/4 - 1/3 cup of tahini
1/3 cup lemon or lime juice (fresh is best)
1/2 cup fresh cilantro
2 tablespoons sliced nacho style jalapeno chilies (from the jar) or more if you like it hot. remove seeds and veins to reduce heat
Olive Oil and Paprika to garnish

Drain the chickpeas and reserving the liquid


In a food processor, chop the garlic and jalapeno, scraping down the sides as needed. Add the chickpeas and cilantro


oooooh eeeeeeeeem geeeeeee....I just love this stuff!! I swear, I'd be happy just sitting there with my face shoved in a bunch of cilantro, inhaling!!

(clears throat)...ok, focus. Add the tahini


add the lemon juice


Grind for a second and then add some of the chickpea juice


Grind some more. If you need more juice, add some more, a little at a time until you get a nice smooth creamy texture going. You don't want it too watery though. And you won't need all of the juice....so just watch it.


Oh man....if you could smell this! Fresh, spicy with a hint of garlic. Right up my alley!!

Scoop it into a bowl and drizzle some Olive Oil over the top with a sprinkle of Paprika.

Now....what do you think we should we use to scoop up this yummy mouthful of goodness with?

Homemade whole wheat pita?


Talk about some good stuff here. Simple, easy.....unreal! I was amazed at how wonderful these babies turned out. Wanna make 'em? The recipe is in the book "Healthy Bread in 5 Minutes a Day". I'd love to share the recipe with you but have been sworn to secrecy. Sorry :(  I bet you could use just about any bread recipe. Just grab a ball of dough....(after 1st rise), roll it out to about 1/8" thick....bake in a preheated 500' oven for about 5 - 7 minutes and cool, covered with a cotton towel on a cooling rack. Yep...that easy. It puffs up and has the cool little pockets and everything. Maybe I'll dedicate a whole other post to these babies another day.

Anyways....as good (and traditional) as that combo is....I think this hummus is best with tortilla chips.

But this lazy cook didn't go to the grocery store and didn't have any tortilla chips in the cupboard.

What I did have was a bag of corn tortillas


Woooo hooooo!!! Just slice 'em up, pie fashion and fry 'em in a pan of oil until golden brown...only takes a few moments (or if you really must be healthy, bake them. but I have no idea how high or how long....you're on your own there)


Drain on a few paper towels (or if you're in the middle of an online wine club party over at BakeSpace, you'd be using power towels...but thats a story for another time that requires lamp shades and drew scribers.)


And low and behold....you have a gorgeous plate of yummies to present to your Super Bowl guests. Or...just keep it in the kitchen to munch on while you prepare a bowl of potato chips and onion dip for the guys. As if they'd notice anyway, right? (Unless of course you served it while wearing your bathing suit.).