Yum Peaceful Cooking: fruit
Showing posts with label fruit. Show all posts

Sunday, July 17, 2016

Ginger Peach Freezer Jam for #SundaySupper


I have a thing for freezer jam. A lifetime love affair actually. If my taste buds had them, they'd drop to their knees with each bite. It's the fresh fruit flavor that gets me every time because freezer jam is never heated which means the fruit isn't cooked. You mash, dice, mix and pour. The only heated ingredients are the water and pectin.

And it's super easy to make. No special equipment needed other than your clean sterile jars.

Peaches are in season right now....juicy and bursting with flavor. Perfect for making jam. Add a bit of ginger and you've taken things to a whole new level. Fresh, sweet and zingy.


Did I mention easy? (just want to make sure that sinks in).

Wash and peel your peaches and you're ready to roll!

Here's a little ginger tip before you get started. Use the edge of a spoon to scrape the skin off your ginger.

Want another tip? Keep your ginger in the freezer. Not only does it prolong the life, but frozen ginger grates super easily!

Ginger Peach Freezer Jam

Inspired by: Sure-Jell Peach Jam

3 cups cubed fresh peaches (about 2 lbs fully ripe peaches)
2 TB fresh grated ginger
2 TB fresh squeezed lemon juice
4 1/2 cups sugar
3/4 cup water
6 tablespoons fruit pectin

In a food processor, pulse your peaches until the desired chunkiness. Don't puree it. You want some of those bits and pieces of fresh fruit. This is jam, not jelly.


In a large bowl, combine the peaches, ginger, lemon juice and sugar. Let sit for 10 minutes, stirring occasionally
.
In a sauce pan, combine the water and pectin. Bring to a boil then stir while boiling, for 1 minutes.

Add the pectin to the peach mixture and stir for 3 minutes.


Pour into sterile jars within 1/2 inch from the rim. Put on the lids and let sit at room temperature for 24 hrs.


Store in the freezer for up to a year. Once opened, it keeps in the refrigerator for up to 3 weeks.


Spread a little yumminess over your bagel and cream cheese for a breakfast treat.

Besides the obvious toast or bagel application, this will be great as an ice cream topping, or used as a glaze for some grilled pork tenderloin.

Today is all about peaches and our Sunday Supper team has got a bushel of recipes where peaches are the star....

Starters:
Breakfasts:
Beverages:
Condiments:
Sides & Salads:
Main Dishes:
Desserts:
Sunday Supper MovementJoin the #SundaySupper conversation on twitter on Sunday! We tweet throughout the day and share recipes from all over the world. Our weekly chat starts at 7:00 pm ET. Follow the #SundaySupper hashtag and remember to include it in your tweets to join in the chat. To get more great Sunday Supper Recipes, visit our website or check out our Pinterest board. Would you like to join the Sunday Supper Movement? It’s easy. You can sign up by clicking here: Sunday Supper Movement


Saturday, October 3, 2015

Key Lime Cheesecake with Key Lime Custard


One of my chicas from work walked in with a huge bag full of what she called 'Mexican limes' (a.k.a. key limes). I'm not talking about one of those plastic bags from the grocery store. I'm talking about a huge thick plastic bag. I have no idea how many pounds it was (multiple) but I do know that I ended up with more than 6 cups of juice!

Her request? "Can you make a key lime cheesecake?"

I'm thinking....Ummm...sure. But I've never even tasted, let alone made a key lime pie. How will I know if it ends up right? I have nothing to compare it with.

There begins the challenge. I searched through several recipes. Read numerous reviews. Omitted any recipe that called for flour. Is that weird? I've just never made a cheesecake with flour. I don't understand why it would even be required. In my mind, something isn't right. Am I being a cheesecake snob? Do I need to be enlightened here? Please fill me in if I'm being ignorant about this.

Anyways....I came across a recipe that not only had a good solid cheesecake recipe, but included a delicious surprise inside.......

Key Lime Custard!! Yes, there is a layer of amazing key lime custard underneath all that cream cheese deliciousness.

There's also a layer of sour cream on top. In the reviews, several people whined about it. How it's not needed. They didn't understand why it was even in the recipe. I personally add this particular layer to just about every cheesecake I make. If it's not your thing...by all means, don't worry about it. just leave it off and bake the cheesecake an extra 10 minutes.

Key Lime Cheesecake with Key Lime Custard

Inspired by: Key Lime Cheesecake
Serves 10-12

Key Lime Custard
6 large egg yolks
3/4 cup sugar
6 TB key lime juice
1 tsp key lime zest

Crust
1 3/4 cups graham cracker crumbs
1/4 cup sugar
1/2 cup melted butter

Filling
2 - 8oz packs of cream cheese, room temperature
2/3 cup plus 3 TB sugar, divided
2 large eggs
3 TB key lime juice
1 TB key lime zest, plus more to garnish if desired
16 oz sour cream
Thin key lime slices to garnish


Key lime custard:
In a heavy sauce pan, over medium heat, whisk together all of the custard ingredients. Continue whisking until it boils and let boil, while whisking, for 30 seconds. This will take about 8 or 9 minutes.

I cannot stress enough how important it is to whisk! Not stir. Whisk!! You do not want the egg yolks to scramble. Scrambled custard would just be nasty.

Cool to room temperature, stirring occasionally, keeping in mind that it will thicken more as it cools. Set aside.

Crust:
Preheat the oven to 350'

Wrap the outside of a 8' or 9" springform pan with 3 layers of aluminum foil. You need the foil to go up the sides about 3".

In a medium bowl, combine the graham cracker crumbs and sugar. Stir in the melted butter until well combined.

Press the mixture inside your prepared springform pan, and up the sides about 2 inches.

Bake for about 5 minutes and allow to cool completely.

Filling:
Cream the cheese and 2/3 cup of sugar until almost smooth (don't stress about the lumps. They'll go away while baking). Mix in the key lime juice and zest. Add the eggs one at a time and blend until just combined. Don't over blend. You don't want air bubbles in your cheesecake. Air bubbles help create cracks.


Assembly and Baking:
Spoon the custard into your crust, making it as even as possible and smooth it over.

Spoon the filling over the custard, carefully.

Using a roasting pan that's big enough to hold the springform pan, place the springform pan into the roasting pan. Pour enough water in the roasting pan so that the water comes 1" up the sides of the springform pan.

In your already 350' heated oven, bake for about 45 minutes, or until just set. Just set means that it's still a slightly jiggly and the center is not all puffy.

While the cheesecake is baking, in a medium bowl, mix together the sour cream and 3 tablespoons of sugar.

When the 45 minutes is up, spoon the sour cream mixture over the top and bake for an additional 10 minutes.

Place on a cooling rack and let cool for about 10 minutes. Remove the foil and remove the springform pan siding. If needed, run a knife around the edge. Let cool completely then cover and refrigerate over night, allowing it to completely set.

Garnish with lime slices and zest if desired.


It is tart and sweet and absolutely delicious!

This was the first time I had done the whole foil with the pan in water thing. I almost didn't. I typically just place a pan of water on the rack below which creates steam and helps with the whole cracking thing. But because of the custard, I chose to do as I'm told. It worked and the 'mmmm' sound that came from my chica's as she ate it, told me that it was a success.


Thank you for the key limes, Nancy! 

Friday, July 3, 2015

BBQ Pork Tenderloin Stuffed with Pineapple and Cheese Curds


Happy 4th of July. 

I'm sure most of you are preparing for the biggest BBQ day of the year. Let me help you out a little with a deliciously tender BBQ Pork Tenderloin that I butterflied and stuffed with pineapple and cheddar cheese curds.

Yes, I said curds.

It wasn't planned. But became a must. I didn't realize my block of cheddar was gone (hate when that happens), but I did spy a packet of cheddar cheese curds. The substitution actually worked out better than I thought, and maybe better than the regular cheese would've. Surprisingly, the curds melted beautifully and just enough.

A recently received a couple of coupons for Stubb's BBQ Sauce. Stubb's is no stranger in my kitchen. I've been using it for a few years now, I love the consistency of their sauces. Not so thin that it runs right off your food, yet not so thick that you feel like you're applying a layer of frosting to your steak.
I usually buy the Original recipe, knowing I like and trust it for what I'm going to use it for. But when you get a couple of coupons for free stuff, you get to experiment with some abandon and try something new with no regrets.


That's how I came to fall in love with their Sweet Heat Legendary Bar-B-Q Sauce. There's a slight tang the rides along with the sweetness, and it's perfectly balanced. Then the heat joins in about a half a second later and takes it all to a new level. I'm not talking about the kind of heat that makes you grab for the nearest glass of water...I'm talking about a subtle warmth...just a few degrees, that accentuates the smokey under notes of chipotle and red chili.

Now picture this with the tangy sweet flavor of pineapple and creamy smooth melted cheese that's all pulled together with a juicy tenderloin.

And there you have it. My new favorite BBQ recipe.

Which really isn't much of a recipe, per-say. But I'll give you a list of what you need and what to do with it. How much you use of each ingredient will depend on the size of your tenderloin.

BBQ Pork Tenderloin Stuffed with Pineapple and Cheese Curds

1 pork tenderloin, butterflied (there are lots of videos on YouTube that can help you with this process much better than I can)
Cheddar Cheese Curds (or chunks of cheddar cheese)
1/4 cup or so of crushed pineapple
Stubb's Sweet Heat Legendary Bar-B-Q Sauce
Cooking twine

Get your coals started.

Place a good amount of cheese down the center of your tenderloin and then spoon some pineapple over the cheese.


Roll it up tight and tie it up with some twine, making sure everything is tucked in and can't get away.


Once the coals are good and hot, scoop them over to one side of your grill so that you have a direct heat side, and an indirect heat side. Place the rolled and trussed tenderloin over the side that's directly over the coals and seer it, turning as you go until all of the sides are good and brown.

Move the tenderloin to the other side of the grill where there are no coals, brush it with some bbq sauce, cover the grill and let it cook for about 15 - 20 minutes, turning occasionally.


Just before removing from the grill, brush on some more bbq sauce.

Let it rest for about 5 or 10 minutes before removing the twine and slicing


Don't worry if some of the stuff inside leaks out. Think of it as a tease...a sneak peek at what's to come.


Because you know it's going to be good. The acidic pineapple helps tenderize the meat. The cheese....well, 'nough said there. You can't ever go wrong when cheese is involved. And that bbq sauce. Well, let me just say it was the perfect compliment to everything going on, on my grill.


Serve it with a side of grilled corn and some homemade macaroni and cheese and you've got yourself a good ole down home American dinner.

Enjoy your celebration of our nations Independence Day!

Sunday, March 8, 2015

Raspberry Crunch for Retro #SundaySupper


Funny how food can take you back in time. So much so, that it seems my taste buds have a better memory than my mind does. Some good and some not so good.

Raspberry Crunch is definitely a good one. This recipe was handed down to me from Sir Sportsalot's grandmother many many years ago. She used to make it with cherry pie filling, I just happen to have a thing for raspberries. But when it comes right down to it, here's something about the crumbly cake topping that I just can't seem to get enough of.


I dunno if you've ever payed attention to what cake mix smells like before you bake it. Sweet, rich, enticing...demanding you to lick the bowl. But something happens in the oven and it changes. Maybe that's why cakes aren't my favorite dessert. They just don't taste the way the batter does.

Raspberry crunch fixes that.

This is one of the most simple recipes you'll find. It's versatile simply by changing the pie filling and has minimal ingredients. When I first started making it, I used a box of cake mix as instructed. However, you know how when something obvious just isn't noticed? Such as the ingredients in cake mix? There should only be a couple, yet if you were to look on the side of the box, there's a huge list of mostly unrecognizable ingredients.

My conscience began to nag me until I broke down and cried out for help. My buds on Facebook came to my rescue and introduced me to a wonderful Homemade Yellow Cake Mix recipe by iambaker.com. Basic ingredients, nothing too fancy...straight forward and delicious.

Raspberry Crunch


22 oz raspberry pie filling
1 cup plus 1 tablespoon flour
1 1/4 cup sugar
1 3/4 teaspoon baking powder
1/2 teaspoon salt
1/2 cup melted butter
1 1/2 teaspoons vanilla extract
1/2 cup chopped pecans or walnuts (optional)
1/4 cup melted white chocolate (optional)

Preheat the oven to 350'F

Pour the pie filling in the bottom of a 9" square or round baking dish. Set aside.

In a medium mixing bowl, whisk together the flour, sugar, baking powder and salt. Add the melted butter, vanilla and nuts, Stir until you have a crumbly texture. Sprinkle the crumbles evenly over the pie filling.

Bake for 40 - 50 minutes or until golden brown. 


Melt the white chocolate according to package instructions. (Please note that white chocolate does not melt the same as milk or dark chocolate). 

Drizzle over the top and let cool a bit before serving. 

Wish I had some ice cream right now. 

Since Sunday Supper is all about Retro food today, let your taste buds experience a blast from the past as you browse the these amazing, memory provoking recipes from decades ago. 

Bodacious Breakfasts and Appetizers:
Made in the Shade Main Dishes:
Swell Side Dishes:
Dreamy Desserts:
The Bee's Knees Beverages:
Sunday Supper MovementJoin the #SundaySupper conversation on twitter on Sunday! We tweet throughout the day and share recipes from all over the world. Our weekly chat starts at 7:00 pm ET. Follow the #SundaySupper hashtag and remember to include it in your tweets to join in the chat. To get more great Sunday Supper Recipes, visit our website or check out our Pinterest board. Would you like to join the Sunday Supper Movement? It’s easy. You can sign up by clicking here: Sunday Supper Movement

Sunday, February 8, 2015

Strawberry Love Bombs for a #SundaySupper Valentine


I'm so excited to be teaming up with Sunday Supper and Gallo Family Vineyards to celebrate Valentine's Day.

This year Valentine's Day falls on a Saturday which is kinda fun. It can be an all day event and not limited to just a nice special dinner. Valentine's can start with a lazy morning of brunch in bed along with a glass of sweet wine.


I'm not talking about a full fledged brunch. Sometimes it's nice to have a delicate treat that doesn't require utensils. Finger food can make us feel indulgent and decadent. We all deserve to experience that every now and then.

These aren't doughnut holes and they aren't cream puffs. These little gems are deep fried biscuits, that once bitten into expose a delightful filling of cream cheese and strawberries.


When you deep fry biscuit dough, it becomes a wonderful thing indeed. Crispy, crunchy on the outside and delicious and puffy on the inside. The perfect little host for tasty surprises.

Strawberry Love Bombs 

makes 6
Printable Version

Biscuit recipe:
1/3 cup milk
1/8 teaspoon baking soda
1 cup shelf rising flour - sifted
1/4 cup shortening

Filling:
3 oz cream cheese, at room temperature
1/3 cup strawberries, finely chopped
about 1 teaspoon sugar

Garnish:
Powdered sugar
1 oz bittersweet chocolate - melted (I add a smidge of shortening to make it thinner and easier to drizzle)

Oil for frying.

Heat oil to 325' F in a deep fryer or tall, thick bottomed pot.

To make the biscuit dough, in a small bowl, combine the milk and baking soda.
In a medium bowl, cut the shortening into the flour until mixture resembles coarse crumbs. Stir in the milk mixture just combined.
Knead about 3 or 4 times or until dough forms.
On a lightly floured surface, roll the dough to about 1/4 thickness. Using a 3" cooking cutter, cut out 6 circles.

Now for the assembly:
Gently smear a heaping teaspoon of cream cheese in the center of each round. Heap a teaspoon or so of the strawberries in the center. Sprinkle with a pinch or two of sugar. (now wipe your fingers off if they're a little messy so they don't interfere with the next process). Pinch the edges together to form a half moon (you may need a bit of water run along the edges to help this happen) and gently roll into something that resembles a ball, without disturbing the pinched seam.


Repeat until all 6 balls are formed.

Carefully place the balls into the hot oil, but don't over crowd. You may need to do this is batches, depending on how large your fryer or pot is.

Fry for 2 - 3 minutes, until a deep golden brown.

Carefully remove to cooling rack. Dust with powdered sugar and drizzle with melted chocolate.


Let cool slightly before enjoying.

Tips for tubed biscuit dough: If you are biscuit challenged, time restricted or just aren't in the mood to make the dough yourself, you will need to make the following adjustments:

Reduce the heat of the oil to 300' as these take a bit longer to fry and will burn before the inside is fully cooked. The tubed dough puffs up more and you don't want the inside to be doughy.

Split the biscuit rounds in half, and smash them flat until they're about 3" in diameter.


Just to give you an idea of the difference between homemade and tube results: The tubed dough is on the top and the homemade is on the bottom.


I personally prefer the homemade. The crust is slightly crispier and the ratio of fruit, cheese and biscuit is a bit nicer as well.


Now let's pair our brunch with some wine to complete our morning of leisure:


The two I have in mind are Gallo Family Vineyard's Riesling and Sweet Red.

The Riesling has a hint of honeysuckle, peach and citrus.

The Sweet Red is fruity, with a fresh fruit acidity and a soft velvety finish.

Both wines are versatile and pair nicely with an array of dishes. I chose the Riesling for my Strawberry Love Bombs because of it's slightly effervescent charm and citrus notes. The dish isn't as sweet as it looks, which is perfect with this wine.

For more information about Gallo Family Vineyards and the wines they have to offer, visit their website. You will also find the store locator there.  I recommend that you follow them on Facebook, Twitter, Instagram and YouTube for more ideas and updates.

Did you know that GFV also has a blog? Check out their Valentine's Day post that includes the round-up of today's Sunday Supper recipe links.

I hope you enjoy this delightful treat on such an indulgent day. Whether or not you have a significant "other" in your life, make sure you spend Valentine's Day with someone you love, be it a spouse, your children, sibling, or best friend.

Be sure to check out the other Sunday Supper recipes for more inspiration to help make your day special.

Alluring Appetizers and Brunch:
Magnificent Main Dishes:
Dazzling Desserts and Sweets:

Sunday Supper MovementJoin the #SundaySupper conversation on twitter on Sunday! We tweet throughout the day and share recipes from all over the world. Our weekly chat starts at 7:00 pm ET. Follow the #SundaySupper hashtag and remember to include it in your tweets to join in the chat. To get more great Sunday Supper Recipes, visit our website or check out our Pinterest board. Would you like to join the Sunday Supper Movement? It’s easy. You can sign up by clicking here: Sunday Supper Movement.

Compensation was provided by Gallo Family Vineyards via Sunday Supper, LLC. The opinions expressed herein are those of the author, and are not indicative of the opinions or positions of Gallo Family Vineyards.

Monday, August 25, 2014

Honey Dew Lime Ice Cream


We are in the height of honey dew melon season (along with watermelon and cantaloupe). I love them all but when you get a good one...nothing can beat the beautiful sweetness of a good honey dew.

I recently had 2 honey dew melons and knew I couldn't eat them both on my own before they went bad.
Sir Sportsalot and my youngest daughter aren't fans of it. My oldest daughter is, but she's so busy I hardly see her. With that in mind, I wanted to make something that would preserve the melon so nothing would go to waste.

I cut one of the melons open and was so disappointed. No flavor what so ever. Can't use that in ice cream. Honey dew has such a delicate flavor as it is, that it would've been completely lost in the cream. Thank God the second one was amazing! Plus this recipe only uses 2 cups so there was plenty leftover for enjoying on it's own.

Honey Dew Lime Ice Cream
Printable Version
Makes about 5 cups

2 cups chopped honey dew
juice from 1 lime (or 2 if your lime isn’t “juicy”)
2 ¼ cup whipping cream
⅔ cup sugar
pinch of salt
Zest from one lime

In a food processor or blender, puree the honey dew and lime juice.

In a medium size bowl, whisk together the cream, sugar and salt until sugar dissolves.
Pour honey dew mixture into cream mixture. Add the half of the lime zest and stir to combine. 

Cover and refrigerate for 1 - 2 hours or over night. The longer you chill it, the creamier your ice cream will be (says Alton Brown).

Taste your mixture. Add a bit more lime zest if desired. Save the rest to garnish.

Pour the mixture into your ice cream maker and process according to your ice cream maker’s instructions.

Garnish with lime zest and chunks of honey dew if desired and enjoy.


The lime is a surprising flavor enhancer and if used sparingly, doesn't over power the delicate flavors of the melon. This ice cream is refreshing and subtle in it's richness making you want to savor each bite before digging in for more. 


Sunday, August 10, 2014

Savory Fig and Sweet Onion Freezer Jam #SundaySupper


One of the best things about summer is the abundance of fresh fruits and vegetables. The gardens are filled with ripened produce and the farmers markets are loaded with whatever you can't / don't grow.

But soon enough, it all comes to an end. (boo-hoo)

No fear! Sunday Supper is hear! Today it's all about saving summer! We have how-to's on dehydrating, freezing, making sauces, jams, pickling, oh my gosh...there's so much you can do to save those summers flavors.


I recently made Grilled Fig Onion Glazed Pork Tenderloin and afterward I was bummed cuz I won't be able to make this year round. Figs aren't always in season. And that's when it dawned on me....I can make a savory jam with the very same ingredients I used to make the glaze....voila! My summer flavor has been saved for the whole year!


Savory Fig and Sweet Onion Freezer Jam
makes about 10 cups of jam
Printable Version

1 tsp light olive oil
1 1/2 cups thinly sliced sweet onions
2 tsps white balsamic vinegar
1 garlic clove, minced
7 cups chopped figs, stems trimmed off (about 2 1/2 lbs)
1/4 tsp ground black pepper
4 cups sugar
juice from 1 lemon
1 box of fruit pectin

Wash and sterilize enough jars and lids to hold a total of 10 cups of jam.

Heat the oil in a large heavy skillet or sauce pan over medium-low heat. Add the onions and saute, stirring often until tender and just starting to turn a nice golden color. Stir in the garlic and saute for another minute. Deglaze with the balsamic vinegar. Remove from heat.

Add in the chopped figs, sugar and black pepper. Stir to combine. If you prefer a less chunky end result, use a potato masher and smash everything up a bit.

Stir in the lemon juice and pectin. Place over low heat and bring to a boil. Reduce heat and simmer until thickened, about 30 minutes, stirring occasionally.

The way to test if your jam is ready, is to place a glass plate in the freezer. Place a dab of your jam in the middle of the very cold place and turn your plate on it's side. If the jam begins to quickly run, it's not thick enough. If it runs slowly or stays put, it's ready for the jars.

Carefully spoon the jam into your clean jars, leaving about 1/4" space at the top. With a clean, damp cloth, wipe up the spills and make sure the edge is clean and put your lids on.


Allow to cool to room temperature before freezing or using.

The aroma is mouth watering...the caramelized onion and balsamic vinegar seems to dominate the jar, but when you taste it\ you're surprised by the sweetness that accompanies the delectable flavor of fig while the onion is just a lingering after flavor that brings it all full circle.

Not only is this an amazingly delicious glaze, but if you really want to wow your taste buds (and who doesn't?) then you must try it with brie cheese in the center of a bundled up puff pastry!

So simple, easy and quick...

Preheat your oven to 400'
1 sheet of puff pastry, thawed (cuz I use the frozen kind)
1 wheel of brie cheese
about 2/3 cup of Savory Fig and Sweet Onion Freezer Jam
1 egg mixed with 1 TB water

Line a baking sheet with parchment paper.

Lay the puff pastry sheet on a floured surface. Place the brie in the center. Top with the jam


Pull all the sides up to the center and pinch a little so they stick together some, to resemble a cute little bundle fulled with surprises.

Brush the top and sides with the egg wash.


Carefully place it on the lined baking sheet and into your oven. Bake for about 30 minutes or until golden brown.


Allow to cool for about 10 minutes before serving. You might even want a little extra jam handy to toss a glob or two on your plate to ensure that you have a little of everything in each bite. The is the perfect balance of sweet and savory, gooey cheesy buttery flakiness.

I'm not sure if 10 cups is going to last me through the winter....

For more delicious tips and how-tos and fantastic recipes on saving summer, visit the other Sunday Supper blogs.


Learn how to …

Sip sunny cocktails and smoothies

Scoop up special salsas and sauces

Jump into jellies, jams and preserves

Pucker up for pickles

Slurp and spoon soup and a side dish

Dive into divine desserts


Sunday Supper Movement
Join the #SundaySupper conversation on Twitter on Sunday! We tweet throughout the day and share recipes from all over the world. Our weekly chat starts at 7 p.m. ET. Follow the #SundaySupper hashtag and remember to include it in your tweets to join in the chat. To get more great Sunday Supper Recipes, visit our website or check out our Pinterest board.


Would you like to join the Sunday Supper Movement?
It’s easy. You can sign up by clicking here: Sunday Supper Movement.


Wednesday, July 23, 2014

Grilled Fig & Onion Glazed Pork Tenderloin


Figs, Figs, and more figs!


That's what it's all about when you attend a Figology-Fest sponsored by California Figs

Just a few quick nutritional value and fun facts: they are high in fiber and a natural energy source. Fat, sodium and cholesterol free!

I personally think they are underrated. Of course those who love them, rate them highly but I don't think figs aren't 'out there' enough. Sure you see dried figs here and there and if you go to a specialty store, you'll find fig jams and spreads. But there's so much more you can do with them!

For instance...make an amazing glaze


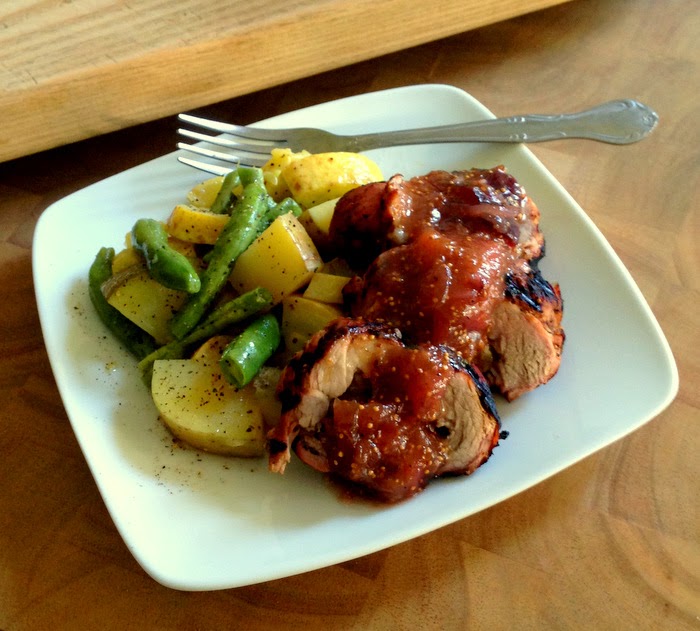
And use it to smother a pork tenderloin that's been stuffed with Brie cheese and a bit of the glaze.

Are you drooling yet?


I used three different kinds of figs for this glaze. There's Mission, Brown Turkey and Calimyrna figs. Use whatever you can get your hands on. It's all good!

Fig and Onion Glazed Pork Tenderloin Stuffed with Brie Cheese
Printable Version

2 tablespoons olive oil
12 large figs, stems removed and cut into quarters
1 medium sweet onion thinly sliced
1 garlic clove, minced
1/2 cup sugar
1/3 cup of white balsamic vinegar
juice from 1/2 lemon
Salt and pepper to taste
1 pork tenderloin (although you will most likely have enough glaze for 2 if needed)
16 oz brie cheese


In a heavy, large skillet, heat the olive oil over medium heat. Add the figs, onion, and sugar. Cook, stirring often, until tender and caramelized, about 15 to 20 minutes. Add the white balsamic to de-glaze the pan and continue cooking until desired thickness. Add salt and pepper to taste.


Cut the rind off the brie cheese and slice thinly


Take your pork tenderloin and butterfly it into thirds so that it opens up like a letter. Basically you're going to slice the top third, without going all the way through and then rotate you knife the other way and slice the bottom third, going in the opposite direction to complete. (this procedure can be googled for move visual instructions on youtube).


Drizzle the tenderloin with lemon juice and sprinkle with salt and pepper.

Lay a row of cheese along the center. Spread a bit of the glaze over the cheese and lay another row of cheese over that.

Roll up and truss your tenderloin up to hold everything together. You can also google the procedure for trussing for a more visual aid. I'm not a pro at it enough to instruct you. To be honest, this is the first time I've ever done it (shows you how easy it is).

Rub a bit of the glaze over the meat.


Place over direct heat on a hot grill to get a good sear all the way around, then move it over to indirect heat to finish cooking, about 20 minutes, depending on how hot your grill is.

Remove from the grill and let rest for about 5 minutes. Snip the twine away, slice and serve with glaze.


Sweet, tangy, a bit sour from the blasamic vinegar....and absolutely delish! So good, that I made a savory jam version of this recipe so that I can have it any time I want. I'll be posted that recipe soon.

In the mean time, let me share some amazing fig recipes that I enjoyed at the Figology-Fest:


Thank you to Erika, Judy, California Figs and everyone else who made this event come together. It was a lovely afternoon with amazing dishes and great company! 

Boozy Fig Milkshake
Recipe by Erika Kerekes, In Erika’s Kitchen
Created for Figology Fest LA Part II (7/12/14)
Ingredients
1 pound fresh figs, any variety
2 Tablespoons sugar
1 pint vanilla ice cream
2 cups whole milk
1/2 cup port
2 Tablespoons white balsamic vinegar
Instructions
Preheat the oven to 450 degrees F.
Wash the figs, cut off the stems, and slice the figs in half vertically. Line a baking sheet with parchment paper, then place the fits on the baking sheet cut side up. Sprinkle the figs with the sugar.
Roast the figs 15 minutes, until they are softened and starting to brown around the edges and on top. Remove the baking sheet from the oven and let the figs cool on the baking sheet to room temperature.
Just before serving, put the roasted figs (with any accumulated juices), ice cream, milk, port and vinegar into a blender. Blend until the ingredients are thoroughly distributed, although not a moment longer or you'll turn the whole thing to soup.
Serve immediately with both spoons and straws.
Prep time: 5 minutes
Cook time: 15 minutes
Servings: 4


Figs on Parmesan Crackers
Recipe by: Two Broads Abroad
Ingredients
1 cup Grated Parmesan Cheese
4 ounces Mascarpone
1/2 cup balsamic vinegar
5 Ripe figs I’d suggest black mission
Preheat oven to 350
To make crackers: On greased baking sheet spoon one tablespoon of grated Parmesan on one side of the sheet. Using your fingers, press the cheese into a circle. Continue making 16 cheese circles. Leave enough space between crackers as the cheese will spread. Bake in oven for 12 minutes or until the edges are browned
Remove baked crackers with spatula and place on cooling rack. Don’t leave on baking sheet because they will stick.
Balsamic reduction. Place balsamic in sauce pan over medium/low heat and reduce to 1/4 cup about 5 minutes. Cool
Assembly. Place crackers on a tray. Spoon one teaspoon of mascarpone on cracker. Depending on size of fig, slice in half or in quarters. Place fig piece on mascarpone. Continue until all crackers are complete. Drizzle reduced balsamic over finished crackers.
Crackers can be made up to two days before serving. Place in air tight container.


Stuffed Figs A La Blue
Recipe by Erika Kerekes, In Erika’s Kitchen
Created for Figology Fest LA Part II (7/12/14)
Ingredients
1/4 cup almonds, whole or sliced
12 fresh Mission figs
4 ounces blue cheese
1 Tablespoon honey
Instructions
Put the almonds into a nonstick skillet over medium-high heat. Toast the almonds, shaking the pan every 10 seconds, until they're starting to turn brown in spots and you can smell them. Pour the almonds onto a plate and let cool 20 minutes. Once the almonds are cool, chop them fairly finely with a knife or in a small food processor. Don't make yourself crazy; it's fine if the pieces aren't quite all the same size.
Wash the figs and cut off the stems plus about 1/2 inch. Poke your finger into the top of the fig and wiggle it down gently to make a little pocket in the middle of the fruit.
Now take a small lump of the blue cheese and stick it down into the pocket. Using the back of a spoon or a pastry brush, coat the top of the fig with a thin layer of honey. Dip the top of the fig into the chopped almonds, then set the fig on a platter. Repeat with the remaining figs.
Serve at room temperature so the cheese gets nice and soft.
Prep time: 10 minutes
Cook time: 10 minutes


Fig Olive Focaccia
Recipe by Judy Lyness, Two Broads Abroad (focaccia dough recipe from Jim Lahey’s My Bread)
Created for Figology Fest LA Part II (7/12/14)
Ingredients
1 cup Yukon Gold potatoes, peeled
2 ½ cups water
4 ½ cups flour
2 ½ teaspoons dried yeast
1 teaspoon granulated sugar
1 ½ teaspoons salt (fine grain)
¼ cup extra virgin olive oil or grapeseed oil
1 large onion, sliced into rings
1 pound fresh figs, assorted varieties, stemmed and cut lengthwise into quarters
1 cup pitted Kalamata olives
2 Tablespoons fresh rosemary, minced
Instructions
Put the potatoes and the water in a pot. Bring to a boil, turn down the heat, and cook over medium-low heat until soft, about 20 minutes.
Puree the potatoes in the cooking water with an immersion blender, blender or food mill until smooth. Let cool to 120 degrees.
Put the flour, yeast, sugar and half the salt in a large bowl. Stir to combine. Add the potato puree and mix with your hands or a large spoon. The dough will be sticky.
Cover the bowl and let the dough rise until it is tripled, 2-3 hours.
Heat 1 Tablespoon of the oil in a large, heavy skillet. Cook the onions until brown in spots but still firm enough to retain their circular shapes. Let the onions cool.
Oil a half-sheet baking pan lightly, using about 2 Tablespoons of oil. Put the dough on the pan and press it out gently to the edges of the pan. Distribute the onions over the dough, then the figs and olives. Let rise 30-60 minutes.
While the focaccia is rising, preheat the oven to 400 degrees.
Gently place the focaccia in the oven. Don’t bump the tray - the dough will fall. Bake 15-20 minutes, until the focaccia is golden brown on the bottom and starting to brown on top. Sprinkle with the chopped rosemary.
Cut into wedges and serve immediately.
Prep time: 30 minutes plus rising time
Cook time: 20 minutes
Servings: 12+


Turkey Confit With Fig Chutney
Recipe by Judy Lyness, Two Broads Abroad
(Fig chutney inspired by http://www.davidlebovitz.com/2012/09/fig-chutney-recipe/)
Created for Figology Fest LA Part II (7/12/14)
Ingredients
3 sprigs fresh rosemary
2 bay leaves
6 cloves garlic, sliced
2 turkey legs
Salt and pepper
1 quart duck fat
1 Tablespoon olive oil
1 large red onion, peeled and finely diced
½-inch piece of fresh ginger, peeled and minced
⅓ cup packed light or dark brown sugar
½ cup apple cider vinegar
Juice and zest of 1 lemon
1 ½ teaspoons mustard seeds
2 teaspoons ground cinnamon
¼ teaspoon ground allspice
¼ teaspoon salt
⅛ teaspoon ground cloves
Large pinch ground cayenne pepper
1 pound fresh figs, any variety, stemmed and diced
2 heads endive, ends trimmed, leaves separated
Instructions
Make the turkey: In a deep roasting pan big enough to hold both the turkey legs and the duck fat, place the rosemary, bay leaves and garlic. Season the turkey legs with salt and pepper and place on top of the herbs. Refrigerate overnight (uncovered).
Preheat the oven to 325 degrees F.
Pour the duck fat over the turkey legs. Place the roasting pan on the stove over medium heat until little bubbles appear.
Bake the turkey legs in the oven for 2-4 hours.
Remove the turkey legs from the duck fat and let cool. Remove the skin, then shred the meat and put in a bowl. Strain the duck fat into a container.
Pour 1 inch of the strained duck fat into a saute pan over medium-high heat. Fry the turkey skin until crisp, about 5-6 minutes. Drain the fried turkey skin (cracklings) on a rack set over a baking sheet, then chop into small pieces.
Make the chutney: In a sauté pan, heat the olive oil. Add the onions and cook about 10 minutes, stirring occasionally.
Add all the remaining ingredients except the figs. Cook at a steady simmer for 20 minutes. Add the figs, cover the pot, and cook for 5 to 10 minutes, until the figs are tender and cooked through.
Remove the lid and cook 10 to 15 minutes over low heat, stirring, until the mixture thickens and becomes jam-like.
To serve, lay the endive spears out on a serving platter. Top each one with a spoonful of the turkey confit and a dollop of the fig chutney. Sprinkle with the cracklings. Serve immediately.
Prep time: 20 minutes
Cook time: 4 hours
Servings: 12+

Note: If you don’t want to make the turkey confit, look for prepared duck confit at gourmet stores.


Fish Tacos With Fig-Fennel Salsa
Recipe by Erika Kerekes, In Erika’s Kitchen
Created for Figology Fest LA Part II (7/12/14)
Ingredients
1 cup finely chopped red onion
1 bulb fennel, fronds removed, finely diced
12 fresh figs, any variety, stemmed and chopped
1 cup cilantro leaves, chopped
½ cup fresh mint leaves, chopped
juice of 2 large limes
1 ⅛  teaspoon salt, divided
¼ cup mayonnaise
1 teaspoon Sriracha
½ cup finely ground corn flour, such as Maseca
1 pound Pacific rockfish fillets
½ cup grapeseed or canola oil, for frying
12 small corn tortillas
Instructions
Make the salsa: In a medium-sized bowl, gently toss together the onion, fennel, figs, cilantro and mint. Add the lime juice and ⅛ teaspoon salt, then mix gently to combine. Set aside to let the flavors combine.
In a small bowl, mix together the mayonnaise and the Sriracha.
In another medium-sized bowl, mix together the remaining 1 teaspoon salt and the corn flour.
Heat a large nonstick skillet over medium-high heat. Add the oil.
While the oil is heating, dip the fish fillets into the corn flour mixture and coat on all sides. Slip the fish into the hot oil and pan-fry until golden brown on both sides, turning once after about 2 minutes. When the fish is cooked, let it rest for a minute on a plate lined with paper towels.
Heat the tortillas quickly, either in another skillet over medium-high heat or for 10-15 seconds on each side directly over the burner (this works best with a gas stove).
To serve, place two tortillas on a plate. Put a small piece of fish and a heaping teaspoon of salsa on each tortilla. Top with a small dollop of the Sriracha mayonnaise. Serve immediately.
Prep time: 15 minutes
Cook time: 15 minutes
Servings: 6 (allow 2 tacos per person)


Roasted Figs On Socca (Chickpea Flatbread)
Recipe by Judy Lyness, Two Broads Abroad
(inspired by http://www.tastingpage.com/cooking/gluten-free-chickpea-flatbread)
Created for Figology Fest LA Part II (7/12/14)
Ingredients
1 cup chickpea (garbanzo) flour
¼ teaspoon ground cumin
¾ teaspoon kosher salt
1 cup water
1 large onion, sliced ¼ inch thick
3 Tablespoons olive oil, divided, plus more for frying the socca
1 pound fresh figs, any variety, stemmed and halved lengthwise
2 teaspoons fresh thyme
2 Tablespoons balsamic vinegar
½ cup roasted walnut pieces
Sea salt and freshly ground pepper to taste
Instructions
Make the socca batter: Mix the chickpea flour, cumin and kosher salt in a bowl. Add the water and 1 generous Tablespoon olive oil. Stir or whisk until smooth. Set aside to rest for at least 2 hours.
Prepare the topping: Preheat the oven to 400 degrees F. Spread the remaining olive oil on a baking pan and scatter the sliced onions on top. Bake until golden, about 10 minutes, then flip the onions and bake another 10 minutes.
Add the figs and thyme, sprinkle with the balsamic vinegar, and bake another 10 minutes. Remove the baking sheet from the oven, add the walnuts, and season to taste with sea salt and pepper. Let the roasted figs cool while you make the socca.
Turn on the broiler. Oil a cast-iron skillet or aluminum cake pan, then add about ½ cup of the socca batter and swirl to coat the bottom of the pan. Pop under the broiler until it is charred in spots, about 3-4 minutes. Remove the pan from the oven and slide the socca onto a board. Repeat until all the batter is used up.
Cut the socca into pieces and serve topped with the roasted figs.
Prep time: 15 minutes plus resting time
Cook time: 20 minutes
Servings: 8


Grilled Spicy Pork Tenderloin With Figs
Recipe by Judy Lyness, Two Broads Abroad
Created for Figology Fest LA Part II (7/12/14)
Ingredients
¼ cup soy sauce
¼ cup red wine vinegar
½ cup dark brown sugar
1-inch cube of fresh ginger, peeled and coarsely chopped
2-3 Thai chilis, stems removed
4 cloves garlic
1 pork tenderloin, cleaned and sliced into 1-inch pieces
1 pound Brown Turkey figs, stemmed and cut in half lengthwise
12 bamboo or metal skewers
Spiced Fig Not Ketchup, for serving
Instructions
Place the soy sauce, vinegar, sugar, ginger, chilis and garlic in a blender and blend until smooth.
Put the sliced pork into a baking dish. Pour the marinade over the pork, tossing to make sure all pieces are coated thoroughly with the marinade. Cover and refrigerate at least 3 hours or as long as overnight.
Heat a gas or charcoal grill, or heat a ridged grill pan over high heat.
Thread the pork slices onto half the skewers so the flat side will rest on the grill; put the halved figs on the remaining skewers, piercing them top and bottom as you thread them. You will have 3-4 pieces of pork or fig on each skewer.
Grill the skewers 3-5 minutes, or until the pork is cooked through and the figs are starting to caramelize.
Serve the skewers with Spiced Fig Not Ketchup for dipping.
Prep time: 10 minutes plus marinating time
Cook time: 10 minutes
Servings: 6


Fresh Fig Tart
Recipe by Judy Lyness, Two Broads Abroad
Created for Figology Fest LA Part II (7/12/14)
Ingredients
2 teaspoons plus ½ cup granulated sugar, divided
pinch of salt
1 ½ cups all-purpose flour
½ cup unsalted butter, cut into cubes
½ cup milk, divided
1 cup almond flour
1 pound whole milk ricotta cheese
2 eggs
1 egg yolk
zest of 1 lemon
½ teaspoon pure vanilla extract
1 pound fresh Mission figs, stemmed and cut in half lengthwise
Equipment: 9-inch tart pan with removable bottom
Instructions
Make the tart shell: Preheat the oven to 375 degrees. Place 2 teaspoons sugar, salt and flour in the food processor and pulse to combine. Add butter and pulse until the mixture looks like coarse cornmeal.
Add ¼ cup milk and pulse just until the batter holds together.
Scatter the almond flour on your work surface and roll out the dough on the almond flour. Place the dough in the tart pan and trim the edges. Prick the bottom of the tart all over with a fork.
Put the tart shell in the oven, checking it after 5 minutes to pop any bubbles. Bake the tart shell for a total of 15 minutes or until it is golden brown around the edges.
While the tart shell is baking, mix together all the remaining ingredients except the figs in a large bowl. Whisk until smooth.
Lower the oven temperature to 325 degrees. Pour the filling into the pre-baked tart shell. Bake at the lower temperature until gently set, about 20 minutes. Let the tart cool.
Arrange the cut figs on the top of the tart in a decorative pattern.
To serve, cut into wedges.
Prep time: 15 minutes
Cook time: 35 minutes
Servings: 8


Fig Zinfandel Sorbet
Recipe by Judy Lyness, Two Broads Abroad
Created for Figology Fest LA Part II (7/12/14)
Ingredients
2 pounds fresh Mission figs, stemmed and chopped
½ cup sugar
½ cup honey
1 cup white Zinfandel wine
Instructions
Cook figs with honey and sugar until soft and a bit thick.
Puree with an immersion blender - the mixture is hot, so be careful.
Pour in the wine and mix.
Chill the mixture in the refrigerator until very cold.
Pour into an ice cream maker and churn until frozen.
Serve immediately for softer consistency, or spoon into a freezer-safe container and freeze until firm.
Prep time: 5 minutes
Cook time: 20 minutes
Servings: 6-8