Yum Peaceful Cooking: Product Review
Showing posts with label Product Review. Show all posts

Monday, September 6, 2010

Combo Plate.....


Dinner was the result of several things all coming together.

1. I received some samples of these incredible eco friendly disposable Palm Leaf Plates from MarxFoods.com
2. I finely got the chance to use my Emerilware Cast Iron 20" Reversible Grill/Griddle that I used part of the CSNStores.com $100 Gift Certificate on when I won the GiveAway over at BigBlackDogs.net (Thank you Michelle!!!!)
3. Thin cut flank steak was on sale at Vallarta (our local mexican market)
4. Tortillas are so easy and fun to make

The combination of all those things made for a delicious dinner that was extra fun to make. You know what its like when you get to use new stuff, right?

Lets start from the beginning....

Flank steak. (or skirt steak can be used. They are very similar and come from the same area of the cow. I believe I've used both when making fajitas). You gotta love a a sale. So I picked up about 3 lbs of meat and instantly put that baby in a baggy with some incredible seasoning that I have (also from the mexican market).


When making fajitas, this is the best seasoning out there (that this gringo knows of). The only bummer is that it's loaded with MSG so I don't use it often. But I put 2 teaspoons per pound of meat along with the juice of 1/2 an orange per pound.....some sliced onion, and a handful of cilantro in a zip lock baggy and let it slosh around and get all soaked and happy for several hours (or even a couple of days).

I mixed up a small batch of corn tortillas and got to cook them on my new grill/griddle. Check this monster out


I love how big it is. I love how sturdy it is. (it is heavy but what cast iron "anything", isn't?). And do you see the space between the "grills"? Makes for easy cleaning...let me tell you! Helps to be able to fit your finger and sponge in between....you know?

And I could grill 2 tortillas at once...so it only took a few minutes to make 8 tortillas


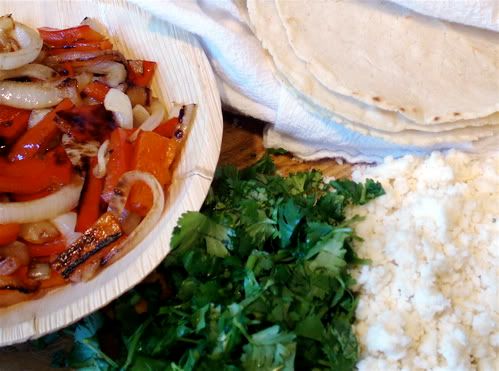
Once those were done, I sauteed some onions and bell peppers, (keeping the tortillas warm in a cotton towel), crumbled my queso fresco ranchero cheese and chopped up the cilantro


I flipped over my handy dandy griddle and used the grill side for my fajita meat


I've got grill marks baby!!!!


I love this meat. I could (and have been known to) stand in the kitchen just tearing off pieces of carne asada, and eating. All by itself. Nothing else for dinner...just these tasty bits of yumminess.

Now....a while back, I received a set of 5 disposable bowls and plates made from palm leaves by MarxFoods.com.


I had seen them advertised and thought they were pretty darn cool in a funky way, yet at the same time....classy.


Because they're made with palm leaves, each plate is different.  They're so..."island" like. Makes you want to have a Luau. And thats exactly what I wanted to do to show them off....only it didn't happen (life stuff sometimes messes with foodie plans). They're sturdy and durable. When I first got them I had used the bowls for a salad...and drowned my salad in dressing just to "test" the bowl. It passed with flying colors (see my HBin5 Gluten Free Cheddar Sesame Bread and Palm Plates post). No leaks, no bending or folding....no mess.

Marx Foods has a huge variety of Palm Plates (and cutlery) to choose from...various sizes, shapes, etc. Only they're a bit pricey for my pocketbook. But that's the only thing keeping me from placing an order. They appeal to me on so many different levels. Not just the aesthetic appeal, but the eco friendly benefits. Palm leaves. Ones that have fallen naturally from the palm trees. Not paper from chopped down trees. Or plastic...(we won't even go there with that mess). And....these are biodegradable. Mine are now in my compost bin. That makes me feel really good!

Oh, but I have to say one thing.....I don't think they really like going in the microwave. My bowl grew a bubble...a big huge bubble. Then it disappear real quick.....as soon as I opened the microwave door. Almost like it had been caught and was trying hide what it was doing. (the little stinker). In the bowls defense....it had been sitting in the fridge over night with veggies on it...so maybe it was a reaction to being "moist"?
Anyways....tortillas are made, carne asada has been grilled, fun fancy schmancy disposable plates are out....

And dinner is served.....


Chow down. Feel good about what you're eating and what you're eating it on.

Tuesday, August 3, 2010

Ravioli, Pasta and OMG my arms are killing me!


So innocent. So unassuming. So.....misleading!! Look at that soft, fluffy mound of flours. Run your fingers through it and feel it's powers to soothe. But when it's around a certain crowd of "friends", it's whole character changes. I don't even recognize it. It becomes stubborn and unyielding. It's almost as if it loses it's identity.

Or does it?

Maybe it becomes something better, stronger. Something with substance. Substantial . More enjoyable and actually versatile.

Something that can kick my butt!

Let me tell you the sequence of events that led to my ass kicking. It started out so pretty (that's how you get sucked in you know). I had won a $100 online Gift Certificate for CSNStores.com from a giveaway over at BigBlackDogs.net (Thank you sooooo much Michelle!!!) Oh man, can you say Excited?! I had some stuff tagged on CSNStores.com that I'd been wanting for a while and here was my chance.

I have to say, my experience with CSNStores.com was wonderful!

So...I bought a Belgian Waffle Maker, a Double Sided Grill / Skillet and

this Ravioli Tray:

(photo is not one I took....and those are not my ravioli's either)

I've been flirting with the idea of making pasta for quite some time. Now was the perfect opportunity. Only I don't have a pasta rolling machine thingy. But I watched lots of videos. I found one in particular that was wonderful! I just couldn't find it again (and still can't) when it came time to begin.

I did come across a recipe (found here)...although I'd like to try a different one next time (oh shit...did I say "next time?"). One that uses olive oil.

Pasta Dough

2 1/2 cups all-purpose flour (un-bleached)
1/2 cp semolina flour
1 teaspoon salt
4 eggs

Combine the flours and salt and make a nice "soothing" mound on the counter or whatever work area you'll be using. Make a "well" in the center of your flour mixture and crack the eggs into the center. With a fork, break the yokes and gently beat while carefully incorporating the flour into the mixture, gradually. Keep the walls of the flour in tact as you work your way around, clock-wise, incorporating the flour, being careful not to break through the walls, until you have a ball of dough that holds together and is not longer soupy.


Now for the work out.

Knead the dough until you have a nice smooth ball, adding flour if the dough is sticky but being careful not to add to much dough. In one of the videos I watched, they said that the kneading process would take about 5 or 10 minutes. For this novice....it took more like 20. Or maybe it took that long cuz I added a little too much flour? I dunno....I'm new to all this pasta making stuff.

Cut the dough into 4 equal pieces, wrap with plastic wrap and allow to rest for 20 minutes. Then on a lightly floured surface, evenly roll out one piece of dough until you have a nice thin sheet


Turn and roll and turn and roll....and discover something wonderful. As tired as you are....and your arms might feel like they're about to fall off.....pasta dough is amazing! It's not sticky like pastry or bread dough. It holds it's shape and even though you have to really "work" it....it does what it's suppose to....and you get this beautifully thin dough


Never did I dream that I could do that! See my hand through dough without my fingers poking through? OMG...I love this stuff!!

So...at some point (most likely while the dough was "resting), make a ravioli filling. I had some Roasted Winter Squash from a soup recipe that I had tried of Michael Chiarello (awesome stuff!!). Thats what I had decided to put in the center of my raviolis


So I put a sheet of dough over my floured ravioli tray...pushed the little "pockets" in and then filled each pocket with a teeny tiny amount of roasted squash. Applied a second sheet of dough and then rolled over the top with a rolling pin to cut through the dough and separating the raviolis. Only....Something went terribly wrong. Squash squished everywhere and I ended up with an awful wad of yuck.


omg....all that work and the dough is a slimy mess!!!

Ok, ok....pull youreslf together. Maybe a teeny tiny amount of squishy squash was too much. Thank God I still had a couple of balls of dough. I tried it again and used even less squash. Only this time I didn't really roll the rolling pin over the top, except for a little. Oh ya, and this time I wet the dough around each ravioli and along the edge to "glue" the two sheets of dough together. I then angled the rolling pin along the edge to cut the excess dough off. Then I dumped the tray over, releasing the sheet of 24 ravioli....grabbed a handy dandy steak knife and cut the them apart


After all that, I still had some dough left but by now I was so over the squash. I think next time I need a different filling....something that holds together really well. And doesn't squish.

With the remaining dough, I made some sort of noodle.


I fried the ravioli as an appetizer


(which puffed the ravioli and shrunk the squishy squash?)

They tasted really good. But like I said, next time they need a different filling

For the noodles, I just made a Mornay Sauce and poured that over them


Loved the noodles!!! I'd make the pasta dough all over again, just for the noodles.

This is my entry this week for the Two For Tuesday Blog Hop....Click on the photo below to visit Heather's place and see all the Real Food that the others are cooking up

24TbadgeGIRLICHEF

Oh, and about my arms....3 days later...they're still attached. And I think the soreness is almost gone. 

Sunday, July 18, 2010

Buitoni Ravioli - Fried with Sauce Mornay


Not that long ago I received a coupon from Buitoni for a free package of their Riserva refrigerated pastas, thanks to the Tastemaker program at Foodbuzz. I have tasted many of their pastas and the family has always like them. I particularly like the Wild Mushroom Agnolotti. 

Even though it was suggested that I try the Quattro Formaggi Agnolottie, I chose Spicy Beef and Sausage Ravioli. 


I wanted something meaty...and wasn't in the mood for a marinara sauce, which naturally leads me to a creamy cheese sauce. Quattro cheese + Sauce Mornay = to much cheese. I know...normally there is no such thing as too much cheese...but in this case, I thought it would be a little too rich. The Spicy Beef and Sausage Ravioli was the perfect match. 

With that in mind, and with a desire to make the ravioli in a non traditional way, I came across Giada De Laurentiis Fried Ravioli recipe. It was simple, quick and very satisfying. A fulfilling meal when served with some fantastic Cheesy Garlic Bread and a simple spring lettuce mix salad with sliced red onions, red grapes and topped with shredded parmesan cheese. Or serve them as a delightful appetizer. Either way, they're going to be a hit! Crispy on the outside and a wonderfully slightly spicy meatiness on the inside. 


Fried Raviolis

Oil for frying (about 2 inches in a medium sized sauce pan)
1 cup buttermilk
2 cups Italian-style bread crumbs
1 package Buitoni Spicy Beef and Sausage Ravioli
Sauce Mornay for dipping (recipe to follow)

Heat oil to about 325'. 

I have a confession to make. I had started out by heating my oil in one of my cast iron skillets (don't aske why). When I was about to fry the raviolis, I got a little nervous. You know how the oil bubbles up when you drop stuff in it? Well, I was concerned about having the oil spill over the side...thus causing an oil fire. I decided that the oil needed to be "carefully" transfered to a sauce pan (which is much deeper than a skillet...still not sure why I started with the skillet). I placed the sauce pan in the kitchen sink (to catch any oil that might spill). I noticed something unknown had dripped into the sauce pan, so I quickly rinsed it out and dumped out the water. I then proceeded to pour in the hot oil....which spit and splattered upon hitting the slightly wet surface of the sauce pan. So I backed up a bit to be on the safe side and waited for it to settle. Thinking that the water had all splattered away....I began pouring the remaining bulk of the hot oil....it started spitting again, I think some oil must've spilled into the sink...and boy did it get angry then!!! I backed away about 5 feet to wait for it to settle down. All of a sudden, the oil exploded!! I had an oil fountain spurting up from my sink into the air!!! It was a rather spectacular sight. I'm sure my eyes were huge and my moouth was gaping open. Thank God, not a drop landed on me. But I can't say the same for my kitchen. Oil was everywhere!! The ceiling, window, counter tops, clean dishes that were off to the side, dripping down the fronts of the cabinets...and puddles of it on the floor. What a mess! What a lesson! WOW.

Ok...so, you are safely heating your oil in a deep...DRY sauce pan with about 2" of oil.

And your raviolis are ready for their journey


Pour the buttermilk into a shallow dish and pour the bread crumbs into another shallow dish.

Dip the raviolis into the buttermilk...allowing the excess to drip off. Then coat with bread crumbs. 

Working in batches, fry the raviolis for about 3 minutes, turning occasionally, until golden brown. Remove and drain onto a paper towel lined plate and proceed with another batch until complete.


Giada shredded parmesan cheese over these little nuggets of goodness while they were still hot. Since I was serving them with a cheese sauce, I passed on that little step.

While those are cooling, make your Sauce Mornay, a.k.a. Cheese Sauce. For the cheese sauce I went to Julia Child's MtAoFC. Let me tell you something...I have been trying to make cheese sauce for years. I have followed several recipes. I have tried various cheeses. And I always ended up with something that really wants to be a creamy cheese sauce but somehow falls short. Sometimes the cheese wasn't right but always...the flour was detectable. 

Very frustrating.

Very demoralizing. 

Always a failure. 

Until now. 

Julie Child ROCKS!!! Her instructions, thought they are not typically laid out in the manner in which we are use to, explains in such a way that you know what you're looking for....not just doing. It doesnt just say "stir continuously for 2 minutes" but it says "stirring until the butter and flour froth together for 2 minutes without coloring".  That one simple word....Froth....spoke volumes to me. That was the point where the flour had truly dissolved and was no longer detected. Not only in flavor, but in texture. And what I ended up with was the most amazing creamy cheese sauce I have ever made or ever hoped to make. 

Sauce Mornay begins with a simple Sauce Bechamel, which is a basic white sauce. What makes it a Mornay are the simple ingredients that are added directly afterwards.

Sauce Mornay (Cheese Sauce) 

2 tablespoons butter
3 tablespoons flour
2 cups milk
1/4 teaspoon salt
Salt and Pepper

1/4 cup coarsely grated Swiss cheese
1/4 cup finely grated parmesan cheese
Salt and Pepper
Pinch of nutmeg
Pinch of cayenne pepper (optional)
2 tablespoons butter (optional)

In a small saucepan, heat to just a boil, while stirring, the 2 cups of milk and 1/4 teaspoon of salt. Remove from heat and set aside.

Melt 2 tablespoons of butter in a heavy-bottomed saucepan, over low heat. Blend in the flour and cook slowly, stirring continuously until "the butter and flour froth together for 2 minutes without coloring," thus creating a roux.

Remove from heat. As soon as it stops bubbling, pour in your hot milk all at once. Immediately start beating with a whisk, vigorously. Make sure you gather all of the roux from the sides, bottom and edges of the pan.

Return to a moderate heat and stir until the sauce comes to a boil. Boil and stir for 1 minute.

Remove from heat and beat in salt and pepper to taste.

Beat in the cheese until they have melted and are well blended into the sauce. 


Season with nutmeg, cayenne and salt and pepper (if needed). Stir in the butter a bit at a time until melted and blended.

Serve immediately.


Thank you Buitoni for the coupon and giving me a chance to review your wonderful Spicy Beef and Sausage Ravioli! I have served Buitoni refrigerated pastas several times and will continue doing so. They're tasty, convenient and the whole family (especially Sir Sportsalot) really likes them. 

Wednesday, July 14, 2010

HBin5 Gluten-Free Cheddar & Sesame Bread, Croutons and Palm Plates


Yep...them there are gluten-free croutons.

For HBin5 we were assigned to make Gluten-Free Cheddar and Sesame Bread. I don't have celiac disease and I don't know anyone personally that does. I do know some people who eat gluten free by choice. I asked my childhood friend, now nurse, what the benefits of such a choice is. Her response was...for a "clean" diet such as when one is cleansing the system.


Anyways....Michelle at BigBlackDogs has the Bread Braid up for this assignment if you'd like to view all the various results. It's always fun to see what others have done with the dough as well as learn from their experiences and tips.

For the soy that was called for, I used Oat Flour. I know there is some concern regarding how "gluten-free" Oat Flour is, due to whether or not it was milled near wheat. However, from what I've read, there are brands out there that make gluten-free Oat Flour. Just look for the statement on the label claiming so.

For the cornstarch, I used Potato Starch. I don't know how much of a difference it made, but that's what I have and that's what I used. I had originally did so in an attempt to alter the flavor. I find that gluten-free bread has a funky aftertaste that I'm not real fond of. I had thought the copious amounts of cornstarch was the culprit.

That's not the case. Now I think it's the Xantham Gum. I'd like to try Guar Gum and see how that is. Any imput? Experience? Words of wisdom?

What I did discover was that toasting the bread almost completely eliminates that aftertaste.

I mixed the dough as instructed (along with my changes) and let it sit for 2 hours on the counter


I was thrilled with the 1 rise!! Then I put it in the fridge for a couple of days. The dough is much easier to work with once it has chilled.

When I was ready to bake some bread, I grabbed a huge....cantaloupe sized handful of dough and roughly shaped it into a ball. Worked it into an oblong shape and placed it in a well greased loaf pan


A couple of things you might want to know about gluten-free dough is that it lacks elasticity. When forming the dough, you don't pull. You mold. Then you get your hands damp and smooth out the top. Very much like working with clay.

Cover with plastic and allow to rest for about an hour and a half. Preheat your oven and bread stone at 425' for 30 minutes. Blush the top of the bread with water and sprinkle some sesame seeds on top


I didn't seem to get much of a rise. If it wasn't so late, I might have let it rest for another 15-30 minutes. But...I was tired, therefore the bread was tossed into the oven....a pan underneath was filled with 1 cup of hot water and the baking began.

Once it was done, I removed it from the pan to place onto a rack. I instantly noticed that the bottom was a bit...soft. Which had me worried. I was afraid that the center might not be fully cooked so I placed the loaf back into the oven, directly onto the baking stone and cooked for a bit longer


The next morning was the unveiling.....


Not bad for gluten-free!! But I knew I wouldn't eat it as is. But what could I do? Grilled cheese came to mind. An open faced sandwich of some sort. A grilled panini...I dunno. Sometime during the day the light bulb finally came on...CROUTONS!!!

There are 3 ways that I know of to make croutons. Baked, grilled and panfried. I normally bake them. But when I got home, after a day of 102' weather.....the A/C wasn't working! There was NO way in hell I was going to turn on that oven. So I panfried them this time. (just letting you know...I prefer the oven method 350' for about 15 - 20 minutes)

I have discovered (from making toast with this bread) that it takes a while to crisp....especially all the way through. So I made sure the pan was over a very low heat.

I sliced the bread into cubes (size isn't much of an issue...what ever makes you happy)


I sprinkled them with some garlic powder and salt. I then heated up a pan with a little olive oil in it. Placed the bread cubes into the pan and drizzled more olive oil over them. Tossed them to make sure they were as evenly coated as I could possibly make them.


They need to be tossed occasionally during the cooking process, until they are golden brown. Normally this only takes a few minutes....but with this bread it took quite a while....maybe 20 or 30 minutes? Like I said, I was doing this over a very low heat....almost "simmer". That way they could get as crispy as possible all the way through without burning. Although some of them were still on the tender side in the middle.


Homemade croutons are so wonderful! And so easily customized to suit your pallet.

Can you guess what was for dinner tonight? Extreme heat + no air conditioning + homemade croutons = salad.

When I got home tonight, I saw a box on the table waiting for me. I opened it up and found samples of some really awesome disposable / biodegradable palm plates from MarxFoods.com  The box contained 5 bowls and 5 plates. Oooh so perfect for my salad!


I love how these look!! I remember seeing them a while back on their website and instantly thought "Island Party!!!" Well, I am lucky enough to be able to sample them and give my review. I'm not doing that tonight...but I just wanted to share my luck with you. I'll be doing a full on review of both the plates and the bowls in the near future. But I have to tell ya...so far so good. I drowned my salad (kinda on purpose) with Italian dressing....and let the salad sit in the palm leaf bowl the whole time I've been writing this post. (ya, I know....my salad is going to be soggy) And you know what?

Not a single leak. The bottom of the bowl (above picture does not reflect my review...I was just showing you what it looks liek) is not even a teeny tiny bit oily.

Oh ya...did I tell you what this bread tastes like? It's really good! I wish it had a more cheesy flavor but the nuttiness of the sesame seeds really stole the show. Aside from the aftertaste, this is a very nice bread!

Saturday, July 10, 2010

Crispy Chicken Sammy on a Natures Pride Country White Deli Roll


I was lucky enough to have received 3 packages of Nature's Pride's New line of Premium Harvest Deli Rolls and Bakery Buns as part of the Foodbuzz Tastemaker Progrom. This is my second post reviewing what I received. My first post was about a Chickepea Burger that I served on Natures Pride Premium Harvest 100% Whole Wheat Bakery Buns. It was fantastic!!


For the Country White Deli Rolls, I decided to go with meat. But not your typical deli sandwich with sliced meats. I wanted something hardy, full of flavor and appetite enhancing ingredients.

My daughter wanted something spicy. 

I found a recipe on BakeSpace.com called Double Dipped Spicy Chicken. It looked crispy and sounded great! 

The only change I made was to exclude the allspice. Oh, and I didn't have any buttermilk, so I mixed some lemon juice with milk....and that was that.

In a nut shell, combine the following:

1 1/2 cups flour
1 teaspoon paprika
1 teaspoon poultry seasoning
1/4 teaspoon cayenne pepper

Heat up some vegetable oil for frying. Probably about 1/4 inch in a heavy skillet.

I butterflied a chicken breast and then sliced that in half for the perfectly sized, crispy chicken slices to fit on the deli rolls.

Season the chicken with some salt and pepper. Dredge each piece of chicken through the flour mixture. Dip into 1 cup of buttermilk, and back into the flour for a final coating. 

Fry the chicken until golden brown and set onto a paper towel to absorb the excess grease


I then mixed about 3/4 cup of mayo with one minced garlic. Toasted the deli rolls. Spread the mayo on each slice (I'm one of those people who really likes mayonnaise).  And add your favorite sandwich fixings. For me this was some greens from a spring salad mix (it had all sorts of stuff in it that I don't even know what they're called), thinly sliced tomatoes and red onions and a couple slices of provolone cheese. 


It was a fantastic sandwich!! The Natures Pride Premium Harvest Country White Deli Roll was wonderful! It was soft yet held together...even to the last bite! None of that ripping, crumbling or falling apart. I loved the flavor. Not sweet, not overpowering. The perfect vehicle for holding together all the yummy good stuff inside. 

As for the chicken recipe. I think next time I'll add more cayenne pepper and paprika. I didn't find it spicy. It was good, don't get me wrong...but it didn't have the spicy flavor that I was looking for. I think in my head I was envisioning something more like those spicy crispy chicken sandwiches that you find at Jack-In-The-Box. Only better of course. I mean....homemade is always better, right?