Yum Peaceful Cooking: BakeSpace Challenge
Showing posts with label BakeSpace Challenge. Show all posts

Monday, April 19, 2010

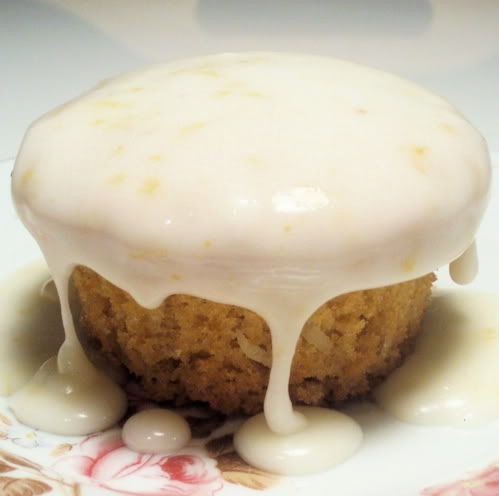
Mango Cupcakes with Lemon Glaze


I have a question for you all. What makes a cupcake....a cupcake? As opposed to it being a muffin? Is it the denseness? Or is it wether or not it is covered in icing? What if it's sorta in between? Would that make it a cuppin? ooor.......a muffcake? (giggles)

About once a month, the peeps over in the forums at BakeSpace hold an nonofficial "challenge". For the April Challenge we're making Haitian food (there's still time if you'd like to join in the fun. No pressure....just a nice way to stretch your cooking / baking muscles). These cupcakes (?) aren't Haitian....but they were inspired by a Haitian recipe for Mango Coffee Cake. Not that there was anything wrong with the coffee cake recipe but I knew I'd be bringing this dish to work (let's just call it "weight management"). I figured cupcakes would be more user friendly. So I got busy. made a few little changes in the ingredients and let me tell you....moist, subtle flavors (well...except for the glaze...but glaze isn't allowed to be subtle...goes against its calling) and ooooh so yummy!

I have another question for you....do you have a favorite salt shaker? You know the one...holds plenty, great, steady volume when shook, and a removable lid for easy access? I know that in my "ingredient pictures" I always use my salt grinder to pose for the shot but when it comes to baking, where I need exact measurements, I always use my handy dandy Tupperware salt shaker


I've had this thing since my girls were really little....back in the day when all things Tupperware were essential to a young mother. I haven't had a party in over 10 yrs but let me tell you...I earned a heck of a lot of free stuff. I've heard that they discontinued this style of salt and pepper shakers so I know when this one bites the dust....I'm going to be one bummed-out mamma.

Ok ok...back to the...ummm....cupcakes

Ingredients
1/2 cup butter
1 1/2 cups sugar
2 eggs
1 1/2 cups mango pulp (I used frozen pulp)
2 cups all purpose flour
1 1/2 teaspoon baking powder
1 teaspoon baking soda
1/2 teaspoon ground ginger
1/2 teaspoon salt
1/2 cup buttermilk
1 teaspoon vanilla extract
3/4 cup sweetened coconut flakes

Glaze:
2 cups powdered sugar
3 1/2 tablespoons fresh lemon juice
zest from 1 lemon

Preheat the oven to 350' F. Line 18 muffin tins with those cute little paper cupcake liners.

Cream the butter then gradually add the sugar. The recipe said that it would become fluffy.....


After a few minutes of beating....it still wasn't what I would consider "fluffy"....so I gave up.

One at a time, beat in the eggs. Add the mango pulp and....

Oh wait... let me tell you something about my mango pulp. I mentioned in the ingredients that I used frozen pulp. I was so excited when I found this nifty little bag in the freezer section of the middle eastern market (I've also seen them in the mexican market). I figured at least I wouldn't have to figure out how to tell when a mango is ripe...and how best to "pulp" it...ya know? BINGO!! I bought it. So the night before the planned baking, I took the bag out of my freeze and stuck it in the fridge. I was so proud of myself for even thinking of doing that. I usual forget those kinds of minor details. Anyways....the next day as I was gathering the ingredients, I pulled out the now not-frozen mango pulp....errr...mango liquid? Ya....I found myself with a bag of liquid. Ooookay....lets see where this leaves me....

So, add the mango pulp to the bowl and beat well...



Yep....that's really runny. At this point I needed to decide....omit the liquid (buttermilk in this case)...or forge ahead and let come what may?

What the heck...let's just do it. I mean it calls for a whole 2 cups of flour, right? Thats quit a bit...I hope it's enough.

Now, sift together the dry ingredients and alternately add them and the milk to the runny mango mess. Add the vanilla, blend. Stir in the coconut and let's see how the texture is:


Hey! Not bad. Nice and thick without being too thick. Whew! That was close....I thought I might have to start over and I really didn't want to do that.

Besides, I basically know nothing about mangos....so I'd probably end up with a mango that wasn't ripe. And that wouldn't taste very good, now would it? And I'd end up with mango chunks instead of pulp, I'm sure.

Fill your muffin cups about 3/4 full (they don't rise as much so you don't have to worry about "muffin tops".....unlike some of us.

Bake for about 25 minutes or until an inserted toothpick comes out clean.

Allow to cool completely


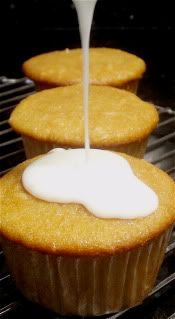
Mix together the powdered sugar, lemon juice and zest and begin the fun job of glazing these gorgeous oh so promising babies.


Printable Version: Mango Cupcakes with Lemon Glaze


I am submitting this recipe to Regional Recipes, hosted by Joanne at Eats Well With Others. Regional Recipes is "a blogging event that celebrates food from all over the world!" Her deadline for the Haitian recipes is April 30th, 2010.

Friday, September 18, 2009

Challenge of the Yeastie Beasties

Photobucket

I know I'm not alone. I've been told it's a common thing.

But still....it didn't make me feel any better.

I've been taking baby steps. Some forward, some backward.

A long slow process.

And I think today I reached a milestone. I have faced a fear. I have conquered the ever dreaded yeastie beasties!!

Now I know...I have a post here for No-Knead Bread. Which is wonderful! Easy....totally love it...might be my favorite ever.

But I needed to knead. I had to go through the process of knead, rise, knead rise....and see success.

Why now? Lemme tell you....over at BakeSpace, we have monthly challenges. This month we decided to make something from someone else's BakeSpace Kitchen who was also participating in the challenge.

I was thrilled when it was announced that I would have to make something from DD's Kitchen.

Then came the choosing. I kinda knew I wanted to do bread...but I didn't want to over extend my capabilities. Nothing like setting yourself up for failure, right? Thats also why I kinda stayed away from those awesomely beautiful cakes she makes! (Seriously, you got to check them out.)

So I decided to make DD's Italian Style Herb Bread.

I didn't change a thing. It's wonderful as is. Her instructions are easy to understand...clear, precise....and the results were a house full of that awesome aroma only obtained from homemade bread, and 4 baguettes that taste incredible!

I don't have any tips or special techniques to help you out with. If you want more info on the how-to's and what-to's, I highly recommend that you check out her blog DDPiesSlice.

But I will show you what I did.

Photobucket

2 1/4 cups warm water (120-125'F)
2 1/2 tsps Active Dry Yeast (or 2 pkgs) (I didn't realize that the yeast I have is for bread machines? is there a difference???)
3 tablespoons sugar
2 tablespoons olive oil
1 tablespoon garlic salt
1 tsp dried oregano
1 tsp dried thyme
1 tsp dried basil
5 1/2 - 6 cups bread flour
1 egg white, beaten with 1 tablespoon water (for crispy crust)

Oh ya...DD's instructions are for a stand mixer. I don't have one. So I'm just gonna tell you how I did it by hand.

Pour the warm water in a large bowl. Sprinkle the yeast and allow it to dissolve. Stir the yeast. Add the sugar, oil, garlic salt, oregano, thyme and basil.

Add about 3 cups of flour and mix well, scraping sides as needed. Gradually add in the rest of the flour, 1/2 cup at a time, incorporating well with each addition. At this point, the dough was getting too thick to stir with a spoon, so I turned it out onto a floured surface and continued to mix by hand, added the remaining flour gradually until the dough formed a ball that was not sticky to the touch.

I then kneaded the dough for several minutes until smooth and elasticy (hmm don't think thats a real word, but it sure works well).

Photobucket

Theeeeeen, generously rub olive oil into a large glass bowl and place the dough inside, turning to cover with oil. Place a cotton towel (not terry) over the bowl and let your little dough ball rise...for an hour....or until double in size. Punch the dough down and turn onto a floured surface. Cut the dough into 4 equal parts.

Photobucket

Shape into long, skinny loaves and place onto 2 cookie sheets that have been lightly greased with shortening and dusted with corn meal, 2 loaves per cookie sheet. Cover with a towel again and let rise for about 45 minutes, or until doubled in size.

Preheat your oven to 425'

Brush each loaf with the egg / water mixture. Bake on the middle rack for about 20 minutes (loaves will sound hollow when you thump 'em).

Photobucket

Allow to cool completely before slicing.

Photobucket

And ya....we had these babies with spaghetti. 2 of the loaves are already gone and I don't expect the last 2 to be around much longer.

DD....YOU ROCK! I LOVE YOU MAN!


Saturday, May 16, 2009

Strawberry Brie Popovers - BakeSpace Challenge


Who would've thought....here I am over, ummm.... 40 ....and I have never in my life had a popover, and I didn't even know it until I was almost done cooking these babies. I don't know what I thought popovers were...but I didn't expect a dessert version of Yorkshire Pudding. LOL

Soo sometime around 2 weeks ago, I came across a recipe for these little mini popovers on the Betty Crocker website. Bought the Brie cheese and then forgot about it. A couple of days ago I was scrounging around in one of the drawers in the fridge and came across this round box of Baby Brie Cheese and for the life of me, I couldn't figure out what the hell I had bought it for. I KNEW it was for something..... (getting old really sucks). Well...today I remembered (whew). So I dug through my email to find the recipe link I had emailed myself (ya, that reminder worked well to begin with LOL), and printed the recipe out. Then I figured in order to motivate myself to get some cleaning done I'd use the popovers as a "reward". Nothing like playing mind games with yourself. 

Then comes the BIG ta-da!!! We're in the middle of our monthly BakeSpace Challenge. Here's a little intro for this month:

OK, Calling all BakeSpace Challenge Entries... It's May and it's time to get your Challenge on!!! 

The Month of May all about Strawberries and Eggs; OK, it's also about gazpacho, but ya gotta draw the line somewhere. 

So the Challenge this month is a Strawberry and Egg-centric dish.... 

So let's see what everyone brings to the table Wink 


Ready, Set....... GO!

If you'd like to participate....please feel free to do so. We'd all welcome you with open arms! The link is: BakeSpace Challenge May 2009 - Strawberries and Eggs

Can you guess what thought went screeching through my head? OMG...popovers contain eggs....lets add STRAWBERRIES!! wooo hoooo. I was really having a hard time trying to figure something out for this challenge. I don't know why. Guess I was just stuck on "duh". Anyways....that's the background to these fabulous little bites of yummieness. Know let's get baking.

8 oz Brie cheese
8 - 10 oz strawberries (plus more for garnish)
1 tsp or so of sugar to sprinkle over the strawberries, if needed / desired
2 eggs
1 cup all purpose flour
1/4 teaspoon lemon zest
1 cup milk
1 teaspoon sugar
1/2 teaspoon salt

Preheat your oven to 450' F. Liberally grease 24 mini muffin tins. 

Divide your Brie Cheese into 24 pieces. I took that white paper-ish stuff off the cheese first. (obviously I'm not a cheese monger, otherwise I'd know what to call it). Whatever it's called, I'm not very fond of the flavor. If you like it, go ahead, keep it on. 

Now I have to admit something. Since I didn't know that popovers were hallow inside until later, when I was looking at those rather good sized pieces of cheese, I was thinking to myself...there's no way in hell that cheese is going to fit inside!! Plus the strawberries? But I dutifully continued with the recipe as directed. (sometimes I'm such a good girl ROFL)
Cut your strawberries into little bite sized pieces. The berries I had were from the grocery store, so I did sprinkle some sugar over them to sweeten them up a bit. Not to mention, when I'm having dessert....it has to be sweet! :)
In a medium bowl, beat eggs slightly with a fork or whisk. Add flour, lemon zest, milk, sugar and salt. Beat until smooth but don't over beat it. 
Fill your muffin tins about....well, the directions said 2/3 full, ROFL...umm...these tins are soo small and I had extra batter, so I ended up just about filling them up. Apparently, it's not a huge issue. Worst comes to worst, you might have to cook them a bit longer.
Pop them in the oven and bake for 5 minutes. Reduce the oven temp. to 350' F and continue baking for another 10 minutes, or until they are crusty and golden brown. 

Cut a slit in the top of each popover. Put a small spoonful of strawberries inside and then plug up that hole with a piece of cheese
Put them back in the oven for 5 minutes. Immediately remove them from the pan and serve.

If you want to get creative for breakfast, omg....there's soooo much you could do with these. Make them savory with basil or rosemary instead of the lemon zest. Or use orange zest. Fill them with scrambled eggs and pancetta, or Italian sausage. What about sauteed mushrooms and onions? Your imagination is the limit!