Yum Peaceful Cooking

Tuesday, May 4, 2010

Dinner for Breakfast


Yep....dinner for breakfast. And let me be more specific.....

Leftovers from dinner, for breakfast

We have here a little pork (not in the sausage or bacon form...but it's pork)...a little sauce (not necessarily gravy but it serves the same purpose) an egg and an english muffin. Put it all together and you have YUM!

Let me tell you what was for dinner the night before.

Pork in a Mushroom Gravy (I dunno what else to call it)
2 pork sirloins (or boneless pork chops) cut into 1" chunks
1/2 cup flour seasoned with salt and pepper
5 crimini mushrooms, sliced
1 medium onion, sliced
2 garlic cloves, mined
2 teaspoons parsley flakes
1/4 teaspoon nutmeg
1/4 teaspoon paprika
Vegetable oil to prevent sticking
1 - 1 1/2 cups chicken broth
1 cup milk, divided
2 tablespoons flour
Salt and Pepper to taste

Heat about a couple of teaspoons of vegetable oil a large skillet over medium heat (add more oil as needed). Dredge the pork in the flour and brown in the skillet, in batches (you don't want to over crowd the skillet, which would create steam, making the flour mushy and preventing the meat from browning). Remove pork from the skillet and set aside, keeping warm.

Drain off all but 1 tablespoon of grease from the skillet. Saute the mushrooms and onions until just tender. Add the garlic and saute for a minute or less more. Sprinkle in the parsley, nutmeg and paprika....give it a quick stir. Pour 1 cup of chicken broth into the pan, scraping the crunchies off the bottom (this is known as deglazing). Pour in 1/2 cup milk and stir. Mix together 2 tablespoons of flour and 1/2 cup milk until there are no lumps, and slowly pour into the pan, stirring constantly. Combine well. Add the pork back to the pan. Add salt and pepper to taste, if needed. Turn the heat down to simmer and cook until the meat is done and the sauce has thickened. If you find that the sauce is too thick, just add a bit more chicken broth (1/4 - 1/2 cup).

Soo....that was dinner. It was yummy and tasty and easy. But I had some leftover and the girls weren't home and Sir Sportsalot doesn't eat leftovers. (good lord!!!!)

So I had it again for breakfast....

Heat up a serving of Pork in Mushroom Sauce


I have the coolest little mini cast iron skillets that are perfect for single servings. Oh ya...this was a single serving breakfast. You see, for some weird, unknown reason, I was up before the butt-crack of dawn! 4:30 A.M.!!!! My eyeballs opened (even though I couldn't see shit cuz it was still dark) and that's how they stayed. After being up for 2 hours, I got really hungry. It was only 6:30 in the morning and no one in my household would be up for another 3 hours at best. So ya....this skillet was perfect for my little breakfast.

Reduce the heat to as low as possible and crack an egg in the skillet, over the meat and sauce


Put a lid on it and let it cook for about 2 minutes or until the egg is the way you like it. I like mine runny


You can either eat it as is....or get out your toaster and pour this over an english muffin or toast or a biscuit. It's all good.

And it tasted good. So good that when I made mine, I ate it without even thinking about taking pictures. Then realized that I needed to share it with you all cuz it was too good to keep to myself. So I made another one that I knew I wasn't even going to eat (I was full!!). I snapped shots of that runny egg and then saved it for my pork eating daughter, as opposed to my non-pork eating daughter. She LOVED it! Sir Sportsalot missed out on this one. I guess I could say...You Snooze, You Looze. But even if he wasn't sleeping half the day away, he wouldn't even try it.....cuz leftovers for breakfast are still leftovers. But he's really missing out cuz leftovers are so often better than the original. 

I think leftovers have a bad rap. They need a new name..."leftovers" just sound sooo....."been there, done that", used, second hand, "What are you having for dinner?" "......leftovers". What does that mean?  Thats just such a broad statement....and almost depressing in it's stigma. Leftovers....that could be anything and everything...and what comes to mind? An over cooked, reheated, dried piece of meat....shriveled up peas and some runny mashed potatoes (TV dinners are sooo leftover!!). But thats not what leftovers are these days. We do so much more with them...and reheating is done in a microwave instead of in the oven (omits the drying out part).....they aren't really leftovers anymore. They're almost a do-over. A second time around. I know....

They're an Encore! 

"What are you having for dinner?"

"mmmm....we're havning an encore!"


Saturday, May 1, 2010

Of Toast and Rolls...


We got to play with 2 different kinds of dough this time for our HBin5 bread braid assignment. The first one I played with was a familiar one since we messed around with it back in February...Whole Wheat Chocolate Espresso. If you want to see what I did the first time around, click --->HERE<---(muffins and biscotti)

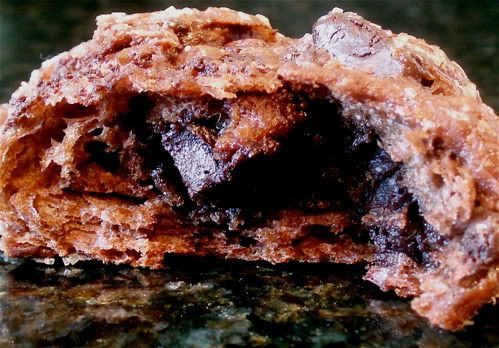
This time the Whole Wheat Chocolate Espresso dough became cinnamon rolls....sorta. Rolls in the shape of crescents. And for once, I did (this time) exactly as I was told and didn't mess with the recipe....too much. I mean, I'm still struggling with the whole....."whole wheat" flavor thing. So maybe I should call my breads "half wheat" since I cut the whole wheat flour in half and replace it with more all purpose flour.

Anyway...the dough contains not only cocoa powder and strong coffee, but nice chunks of bittersweet chocolate....mmmm...a girls best friend.

Soo...you roll the dough out into a rectangle, divide the dough in half length wise then into quarters, width wise....then you have 8 little rectangles. Divide each of those little guys in half, diagonally so that you end up with 16 triangles....just like the ones you get from the Pillsbury people.

I sprinkled half of the triangles with cinnamon sugar and then spread the other half with Nutella and proceeded to roll them up (it got kinda messy)


(I apologize for the weird colors....lighting is really getting on my nerves lately)


After letting them rise and bake, they were glazed with a mixture of cream cheese, vanilla and honey


And the best part about this? You don't have to wait until the bread cools off before eating!


Lovely flavors without being overly sweet...perfect with your morning java or for that something sweet that you crave after dinner.

And now...after all that yummy-ness, would you believe me if I told that I liked loved this next one even more?

It's true! We made Milk & Honey Raisin Bread!!

When I was a young girl, mom was pretty strict about what we ate. But I remember, as a treat, once in a while she'd buy Cinnamon Raisin bread. I can't remember the brand.....but it made good toast. So when I saw this dough, I knew I had to visit my childhood memories and turn this into Milk & Honey Cinnamon Raisin Bread.

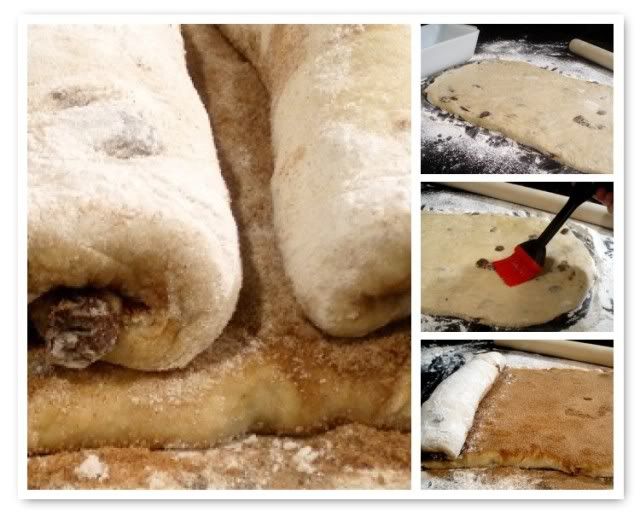
I rolled the dough out flat (making the width the same as the bread pan)....then I brushed the surface with melted butter and sprinkled cinnamon sugar over it. Then, instead of just rolling it up like a log, I rolled both ends to the center


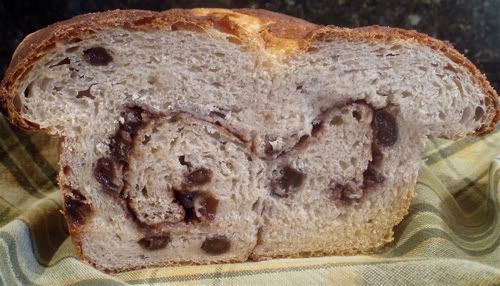
Placing the dough into the bread pan was a little bit of a challenge.....but it made it in, in once piece. After it did it's "rise thing", I brushed the top with butter and sprinkled some cinnamon sugar on it before  making a slit down the center (this was an attempt to avoid my ever present "faults" that I end up with in my loaf breads....but it didnt really work)...baked as directed although I noticed the top getting a bit dark so I covered it with a tent of foil during the last 10 minutes of cooking


Nothing says lovin' like the smell of cinnamon in the oven...oooooh eeeeem geeeeee.


I was kinda hoping for more of a dome. But thats cosmetic. This was a wonderful recipe with wonderful results. And it made awesome toast that tasted just like I remembered from my childhood.

Of course I can't eat this whole loaf just as toast....

It's French Toast tiiiiiiiiime..

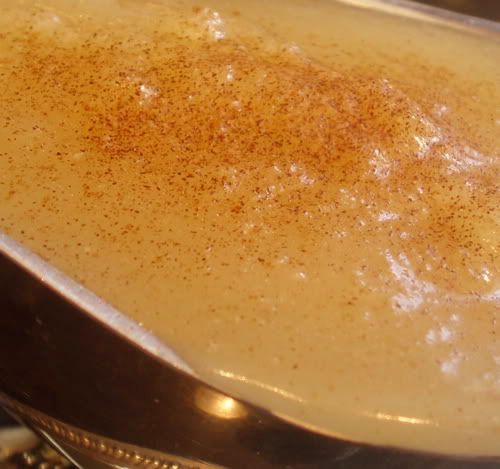
And another blast from the past (let's do the time warp agaaaaaain). Instead of maple syrup, mom would heat up some apple sauce with a little butter and honey and we'd pour that over our pancakes. Well...with Cinnamon Raisin Bread....Apple Sauce is kind of a natural addition, don't you think?


There really isn't a recipe per say.....we just sorta mixed it by taste but for the sake of a starting point, I thought I'd do my best to gauge the amounts:

1 1/2 cups apple sauce
1 tablespoon butter
2 tablespoons honey (if sweet isn't your thing, start with 1 tablespoon of honey)

Heat all ingredients on medium low in a small sauce pan, stirring occasionally until butter is melted and mixture begins to bubble. Garnish with cinnamon sugar if desired.

Pour over your favorite pancakes, waffles or french toast


If you'd like more info on how HBin5 works, click on the picture below


And while you're at it, go visit Michelle's web at Big Black Dog to see what some of the other members have done with this assignment.


Just so you know...you don't have to have a blog to participate. You don't have to take pictures and talk about it...you can just join the group (its a google group thingy) and learn from / with the rest of us :) Besides, this thing will be going on for many many more months with 2 assignments per month. You don't have to do all the assignments....you just participate when you want and when you can. No pressure, just a lot of fun. 

Just sayin

Wednesday, April 28, 2010

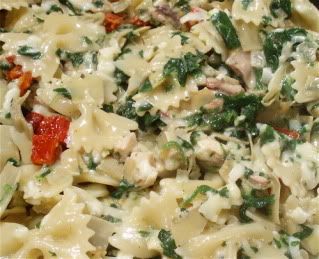
Chicken Florentine Artichoke Bake


Have you ever thought..."I wanna cook something with "such and such" ingredients...but what?" Then you spend the day wracking your brain (in the secret backgrounds of your mind while you're at work) trying to figure out what you're going to possibly come up with?

Well that was me....I knew I was making something "chicken" (that's a no brainer)....but I wanted to use artichoke hearts as well.

Sure, I could've made a nice creamy sauce with artichokes and mushroom poured over chicken. But that seemed too typical. And that's where my brain got stuck.

When I got home that night, my first issue of Better Homes and Gardens magazine had arrived, with my "free" Better Homes and Gardens All-Time Favorites 2010 Cookbook. I got coerced into this subscription because of the free cookbook with a $5.00 1 year commitment. How could I not? right? So I pulled out my "cookbook" (and I use that term loosely) which contained a whole 32 pages (index included) of recipes....2 per page.

But hey...it was FREE!!! I'm not complainin', I'm just sayin'

As I thumbed through my new freebee, I discovered this recipe, which happened to include my 2 main ingredients....

Chicken and Artichoke Hearts! WOW!!

I have to warn you...there are a ton of ingredients....19!


Better Homes and Gardens Chicken Florentine Artichoke Bake
Printable Version

8 oz bow tie pasta, cooked
1 small onion, chopped
1 tablespoon butter
2 eggs, lightly beaten
1 1/4 cups milk
1 teaspoon italian seasoning
Salt and Pepper to taste
1/4 - 1/2 teaspoon crushed red pepper
2 cups cooked chicken, chopped
1 - 14oz can artichoke hearts, drained and quartered (I used frozen artichoke hearts, defrosted and quartered)
1 - 10 oz frozen chopped spinach, thawed and well drained
2 cups shredded jack cheese (I used mozzarella cheese)
1/2 cup sun dried tomatoes in oil, chopped
1/4 cup grated parmesan cheese (divided)
1/2 cup soft bread crumbs
1 tablespoon butter, melted
1/2 teaspoon paprika
3 garlic cloves, thinly sliced (my addition)

Preheat your oven to 350'F

In a medium skillet, melt 1 tablespoon butter over medium heat and cook the onions until tender, stirring occasionally (about 5 minutes).
In a large bowl, combine the eggs, milk, italian seasoning, red pepper, salt and pepper.


(I look at this and I'm not sure if I see a flooded swamp, or if I wanna look for caricatures in the spices)

Stir in the chicken, artichokes and spinach


Lovin that color!!

Then stir in the cooked pasta, onion, jack (mozzarella) cheese, dried tomatoes and 2 tablespoons of parmesan cheese


Bake covered for 20 minutes

Meanwhile...in a small bowl, combine the bread crumbs, remaining 2 tablespoons of parmesan cheese, melted butter and paprika.

Now this is when I decided (and not soon enough) that this dish needed more.

I know, right? Seriously? with that long-ass list of ingredients?

When I removed the pan from the oven and saw it was on the dry side....and the flavors smelled bland....oooh. crud. Ok, so lets add garlic. Quick! Oh ya, maybe it was dry cuz I forgot to cover mine when I baked it? Damn! I hate when I miss a "minor" detail like that.

So...sprinkle the bread crumb mixture over the casserole and then sprinkle the garlic slivers over the crumbs. Continue to bake, uncovered this time, for 10 minutes or until golden. Let stand an additional 10 minutes before serving.


It's beautiful and has some wonderful ingredients. But it was lacking. I think it would be better with fresh spinach instead of frozen. Maybe marinated artichoke hearts would help as well? And garlic in the sauce for sure!!! More cheese? Always!

I dunno.....what would you do differently?

Oh ya...One more thing...wanna a chance a win Fresh MORELS?! Ya, so do I. If you win, so do I...how cool is that? Just click on the picture below and enter to win your (and my) 2 lbs of Fresh Morels.


Monday, April 26, 2010

Controversial Corn Fritters


The title said Corn Fritters.

The readers cried Hush Puppies.

Accusations of Fried Cornbread were flying.

All this over one little ole Paula Deen recipe over at Food Network. Granted, it got a 4 star rating...

I don't know about you, but I just love Paula Deen. Aside from her recipes and love for butter, I just think she's precious. Maybe its due to my ties to the south...and my love for all things southern. Maybe it's because she reminds me of what I call "home", even though I never actually lived there, but it's where my family is...or maybe it's all of the above.

Anyways, I stumbled up Paula Deen's Corn Fritters and decided to make them. I love corn fritters. I've never made them. And just so ya know, I've never made hush puppies either. So when I read through some of the reviews....well, I figured they'd be worth it, no matter what you wanna call 'em.

I did make several changes....there were a few reader complaints about lack of flavor, several about the consistency  and well.....the rest were either raves or debated about what they actually were. One or two people whined that they tasted like fried cornbread. Well, DUH!!! The ingredients are pretty much the same, aren't they? What did they expect?

Honestly

Oh...and before I go any further, I just wanna say...I'm still on the hunt for a really good Corn Fritter recipe. I want the kind that you find at the restaurants....the ones that are crispy on the outside and are like gooey creamed corn on the inside.

Got one you wanna share?
(said in her best Bartles and James impersonation) Thank you for your support!

Controversial Corn Fritters
Printable Version

1 1/4 cups cornmeal
1 1/4 cups self-rising flour
1/3 cup sugar
1 teaspoon salt
1 teaspoon garlic powder
1 teaspoon creole seasoning
1 cup buttermilk
1 large egg
1/4 cup melted butter
1 15.25 oz can whole corn, drained
1/3 cup finely chopped onions
Vegetable oil for frying

Heat at least 2" worth of vegetable oil in a heavy pot such as a dutch oven to 325'F

In a medium sized bowl, combine the dry ingredients: cornmeal, flour, sugar, salt, garlic powder and creole seasoning
In a small bowl, combine the buttermilk and egg. Add the milk mixture to the flour mixture and mix the two mixtures until mixed well (hee hee...how many times can you use "mix" or a derivative there of, in a sentence) (sorry, I just couldn't help myself)


Stir in the melted butter, corn and onions.

Drop the dough into the hot oil by tablespoons. Don't over crowd them...you don't want the oil to cool off too much or you'll end up with wads of greasy cornbread that isn't cooked in the middle.


You want to cook them for about 2 - 4 minutes, turning once, until golden brown


Can you say.....Crispaaaaaaaay!

Drain them on a paper towel. If you like 'em salty, now would be the time to sprinkle salt on them, while they're still hot.

Then get a plate and serve up a few of these wonderfully flavored, arterycloggingbutyoudon'tcare, little morsels of southern goodness.


Call 'em what you want, but all I can say is....Mmmmm Mmmmm Good! 

Oh man...and I just thought of something...imagine these puppies....errrr....fritters, with chunks of jalapenos and cheese! 

Now THAT would be pretty damn good. Southwestern Fritters, Here I COME!!!


Saturday, April 24, 2010

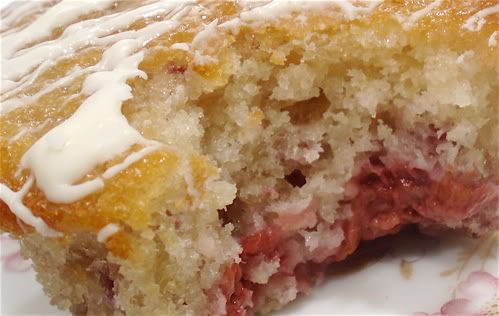
Lemon Raspberry Muffins Cranked Up a Notch


The other night I was informed that my kitchen skills would not be required due to outside influences.

The Lakers were scheduled to play and Sir Sportsalot wanted a particular dish from a particular eatery.

And what was the first thing that went through my mind?

"Not cook tonight? What on earth will I do? I'm going to be so bored!!"

Next thought:

"Ooooooh....what yummy thing should I bake to bring with me to work the next day!".

I asked a gal at work what I should make (I needed inspiration)....she immediately said "something chocolate..."

So I went on a quick hunt and came up with a few choices....one of them being Lemon-Raspberry Muffins. A lovely recipe that I had starred and tagged back in September from Debs blog, Kahakai Kitchen. Turns out it's a Nigella Lawson recipe....can't go wrong there. After some deep thought and consideration, the muffins beat out the other recipe I had picked out (which did included chocolate....shocking, I know!!).

Off to the store I went to make a few purchases...raspberries for one. And to my utter disbelief, the store didn't have fresh raspberries!! Seriously? (Vons....your store on Victory and Tampa kinda sucks! Just thought someone should know.)

I was forced to use frozen raspberries (even so, there were only 2 bags to choose from). I also picked up some Cran-Raspberry Juice cuz I wanted a light glaze for the muffins.

Then as I was walking down the baking aisle, I noticed all those bags of chocolate chips and picked up some (just in case I needed to make cookies in the near future. I hate it when we're out of basic stuff like...chocolate chips!) when suddenly the bag of white chocolate jumped out right in front of my eyes! You see, deep inside I was feeling, I dunno....not "right" because I wasn't making something "chocolate" as requested. The white chocolate became the answer and the soother of my inner self, (which, according to a certain coffee commercial, "speaks french").

Now I'm all excited and ready to go!

Lemon Raspberry Muffins:
Printable Version
1/4 cup butter
1 1/3 cups a.p. flour
2 teaspoons baking powder
1/2 teaspoon baking soda
1/4 teaspoon salt
1/2 cup sugar
Juice and Zest from 1 lemon
about 1/2 cup milk
1 large egg
1 teaspoon vanilla
5 oz fresh raspberries 12 oz frozen raspberries, defrosted & drained

Glaze:
1/4 cup cran-raspberry juice
1/3 cup powdered sugar

4 oz white chocolate

Preheat your oven to 400'F. Line 12 muffin tins with 12 paper baking cups.


Stir together the dry ingredients and lemon zest


Love that aroma of fresh lemon! 

In a measuring cup, pour in the lemon juice. Add enough milk to the lemon juice to measure just under 1 cup. Beat in the egg, melted butter and vanilla.

Pour the wet ingredients into the dry ingredients and stir just to combine, try not to over stir. Fold in the raspberries carefully, especially if you're using defrosted berries. (which reminds me...you can really use any berry you want in this recipe.)

Divide the batter between the 12 paper lined muffin cups


Bake for about 25 minutes. Leave in the pan to cool a bit for 5 more minutes as the muffins are moist and almost fragile. Then allow them to cool on a rack for another 15 minutes.


Meanwhile combine the juice and powdered sugar, mixing until the sugar has dissolved. Once the muffins are cooled, spread a spoonful of the glaze over each muffin top.

Melt the white chocolate according to package directions and drizzle some over each muffin.


And enjoy your labor of love....the product of your inner soothing....and be thankful the Lakers redirected your cooking focus for a night from a rushed dinner to an enjoyable treat

Friday, April 23, 2010

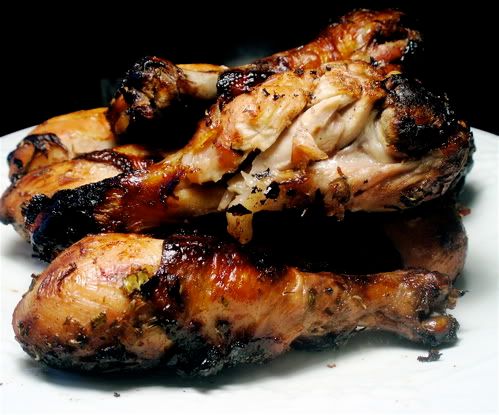
Haitian Chicken Thighs.....I mean Legs


Well, the recipe called for thighs. I thought I had thighs in the fridge. But no. They were legs.

And no. I did not fail anatomy. I swear!

And yes....this is one more Haitian dish that I prepared for the BakeSpace Challenge. And I think this will be the last for this challenge. I may have gone a little overboard. I mean I made 3 dishes....but in my defense, I couldn't make up my mind....and what does a gal do when she can't make up her mind?

She chooses ALL!

In case you haven't seen the other two (and you really should) here's the link to

Mango Muffins with Lemon Glaze (a Haitian Mango Coffee Cake turned Muffin)
&
Haitian Carnitas (inspired by Glazed and Braised Pork and became Carnitas with a Haitian influence)

Oh...and just so ya know....I found the recipe for these very tasty chicken legs --->HERE<---

And if you look really really close...you'll notice that I only changed 1 teenie tiny ingredient in this recipe (unlike the other 2)...out of need! A personal need. A need to stay away from all things thyme as much as I can. Why? Well...I don't like it. So I used savory instead. Which reminds me of thyme (do you pronounce that like "time" or do you include the "H".....?) hmmmm....where was I...Ooooh yes...savory reminds me of a more mild version of thyme.

Without further ado....


Haitian Chicken Legs:
Printable Recipe

Juice from 4 limes
Juice from 2 oranges
1/4 cup vegetable oil
1 teaspoon dried savory (or thyme or 1 tablespoon fresh minced thyme)
1 tablespoon fresh minced rosemary
1 tablespoon brown sugar
4 minced green onions
3 minced garlic cloves
1 1/2 teaspoons ground allspice
1 hot pepper, minced (I didn't want too much heat so I used a red jalapeno...which ended up not being hot enough)
10 chicken legs, or 8 chicken thighs
Salt & Pepper to taste

I have some handy dandy lemon and line squeezers (which are sometimes my hands).....but when it comes to oranges, that requires a whole different thing


I love this thing!!! I found it one day at...hmmm...Sav-On Drugs (way before it became CVS). I don't remember how much it cost. I have a feeling it was under $10..like around $7-ish. Anyways...I've had it for about 15 yrs, it's electrical and it still works great. Why don't they make things to last anymore? I mean....about 5 yrs ago I bought a Black and Decker food processor that barely lasted 3 yrs. Whats up with that?

But look how handy this thing is...


The juice is squeezed, seeded and de-pulped...then ready to pour! All in one shot! (sung in soprano voice) Looooooove iiiiit!

Now...mix all your ingredients together in a nice zip lock bag or non-reactive dish, covered....and mix it all up.  Oh wait...you might want to mix up everything except the chicken....theeen add the chicken (it'll be a little easier that way)


Marinate the chicken for at least 3 hours. Over night would be best. I think I did mine for about 6 hours though.


Grill or bake on medium high until cooked through. I baked mine at 350'F for about 35 - 45 minutes, turning the chicken halfway through. If grilling them...I think you're suppose to grill, skin sides down for 10 minutes then turn, move chicken to the cooler part of the grill, cover and continue grilling for another 10 or 15 minutes or until thoroughly cooked....or what ever method works best for you.

Now I didn't serve this meal with the traditional haitian beans and rice and such...I mean, my family can take only so much at a time when it comes to "new" stuff. Therefore I just had a simple side of white rice and corn.

`
I mean...everything goes with white rice and corn, right? And let me tell you....this was really really tasty! It even got a thumbs up by Sir Sportsalot, who is sometimes not into "new" or "improved" things. So that was a biggy.

I am submitting this recipe to Regional Recipes, hosted by Joanne at Eats Well With Others. Regional Recipes is "a blogging event that celebrates food from all over the world!" Her deadline for the Haitian recipes is April 30th, 2010....just in case you want to play too :)

Wednesday, April 21, 2010

Haitian Carnitas


Haitian Carnitas? Do they even make carnitas in Haiti?

Hell, I dunno. But it sounds intriguing, doesn't it? If they don't, they should. If they do....kudos!

Now I don't cook pork very often. Some cuts are a little pricey. Some cuts are a little ...I dunno....weird? (you will never....eveeeeeeeer see pickled pork feet in my kitchen....just sayin).

When I see pork chops, I think...(I know...this is bad!!!) shake-n-bake.

When I see pork butt, I think.....CARNITAS!!!!

When I was looking for some haitian dishes for the BakeSpace forum challenge, I came across a few that caught my attention. Since I couldn't make up my mind...I went with all of them. This is recipe #2 (there's still one more that I need to post). The first recipe was my Mango Cupcakes with Lemon Glaze. Which was another haitian inspired dish but not truly authentic.

Which brings me back to my Haitian Carnitas. The recipe called for pork loin. I had a pork butt that I wanted to use....and well, that led me to a nice alteration with fantastic results. Flavorful, tender... succulent....and a hint of heat (although you can turn up that heat if you want by added more peppers)

Haitian Carnitas

(Printable Version)

6 lbs pork shoulder (aka butt)
1 large onion, chopped
3 oz chopped shallots
1 cup orange juice
12 oz beer
1/4 teaspoon dried savory or thyme
salt and pepper to taste
1 hot red pepper, minced
1 teaspoon paprika
1 teaspoon cumin
1 - 2 tablespoon creole seasoning
3 garlic cloves, minced
2 or more jalapenos, minced
2 teaspoons chicken bullion

Preheat the oven to 250' F

Combine the savory (or thyme), salt and pepper, cumin, and creole seasoning. Rub the pork with the mixture. Place the pork in a large roasting pan. Add the, shallots, peppers, orange juice, beer and chicken bullion.

Cover and cook for a good 7 hours.

When the meat is done....and falls off the bone


let cool a bit then remove the bone and as much fat as you can. (In case you haven't noticed....this particular cut of pork is full of fat. Hmmm...maybe THATS why they call it "pork butt"), leaving the liquid in the roasting pan.

Heat a good sized skillet with a bit of oil and brown the chunks of meat. Remove the meat and set aside. While this is happening, skim as much fat as you can from the saved liquid that's still in the roasting pan. Heat the liquid and reduce....the more the reduce, the more flavor it will have. Add about 2 cups of the liquid to the skillet where you browned the meat and de-glaze the pan.


Pour liquid over meat and serve.


I couldn't serve carnitas, haitian or otherwise, without pico de gallo, guacamole, rice and a warm tortilla


Let's just say..... TASTE BUD HEAVEN!


I am submitting this recipe to Regional Recipes, hosted by Joanne at Eats Well With Others. Regional Recipes is "a blogging event that celebrates food from all over the world!" Her deadline for the Haitian recipes is April 30th, 2010....so there's still time to play too!