Yum Peaceful Cooking: November 2012

Monday, November 26, 2012

Classic Dinner Rolls


This is going to be short and sweet.

Classic Dinner Rolls
Printable Version

2 - 2 1/4 cups unbleached all purpose flour
1 envelope yeast (2 1/4 tsp)
2 TB sugar
1/2 tsp salt
1/2 cup milk
1/4 cup water
2 TB butter

Combine 3/4 cup flour, yeast, sugar and salt in a large bowl. Heat milk, water and butter until warm (120 - 130' F). Add to flour mixture. Beat 2 minutes at medium speed, scraping down the sides of the bowl occasionally. Add 1/4 flour; beat 2 minutes at high speed. Stir in enough remaining flour to make a soft dough.

On a lightly floured surface, knead until smooth and elastic, about 8 - 10 minutes. Cover, let rest 10 minutes.

At this point, you can place the dough in a lightly covered bowl (wiped down with a little oil) and put in the fridge until you're ready to continue...whether it's later that day or the next day. 

Divide dough into 12 equal pieces and shape into balls. Place in greased 8" round pan (I used a cast iron skillet). Cover and let rise in a warm, draft-free place until doubled in size, about 30 minutes (if you stored the dough in the fridge, it'll take a little longer for the dough to rise).

Bake in a preheated 375' oven for 20 minutes or until done. Remove from pan and if desired, brush with melted butter.

Enjoy!

BTW..when a recipe is found in the coupon section of your newspaper, who gets credit for it? Based on the highlighted ingredients, it's either from King Arthur, Fleischmann's or Land O Lakes. 

Saturday, November 24, 2012

Multi-Grain Cinnamon Raisin No-Knead Bread


The weather cooled down one weekend. The need to bake bread took over. The need to use some of the various flours I have stored in the fridge took over as well.

With this batch of no-knead bread, you can make about 5 1 lb loaves. But don't worry. You can either cut the recipe in half or, you can store the dough in your refrigerator for up to 5 days (the egg in the dough prevents it from being stored any longer). During that time frame, you can pull out a glob of dough and within a short time have yourself a fresh loaf of bread made with minimal effort.

(You can also store the dough in the freezer for up to 2 weeks, in 1 pound portions. When ready to use, thaw in the fridge for 24 hours then proceed as usual.)

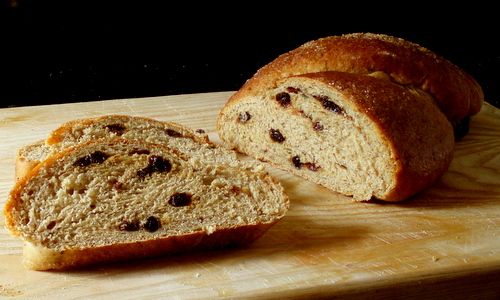
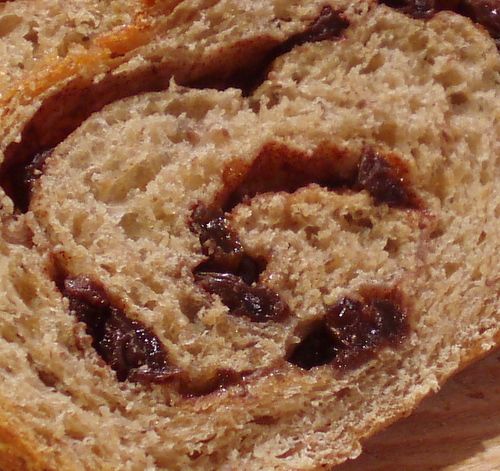
The egg in the recipe makes this a nice, light bread. The agave gives it a sweetness and the multiple grains that I used give it a lot of flavor. Not to mention the delicious combination of cinnamon and raisins.


Of course the cinnamon and raisins can be left out since they are added just before the 2nd rise so you can  just make a nice loaf of bread. Which I did. And used it in my Thanksgiving stuffing.

Multi-Grain Cinnamon Raisin No-Knead Bread
Printable version

3 1/2 cups whole wheat flour
3 1/4 cups bread flour (or all purpose flour)
1 cup oat flour
1/2 cup flaxseed meal
1/4 cup wheat germ
1 1/2 TB yeast (2 packets)
1 TB salt
1/4 cup vital wheat gluten
3 cups lukewarm water
1/4 cup neutral flavored oil (ie: vegetable oil or unsalted butter)
1/2 c agave syrup (or honey)
3 large eggs
4 tsp barley malt syrup (optional)
1 tsp vanilla extract
Cinnamon sugar mixture (1/2 cup sugar & 1 TB cinnamon. You won't use it all. Save it for cinnamon toast or something)
Handful of raisins
Egg wash (1 egg beaten with 1 TB water)
Raw sugar (optional)

In a large container with a lid (about 5 quarts would be good), whisk together the whole wheat flour, bread flour, oat flour, flaxseed meal, wheat germ, yeast, salt and vital wheat gluten.

In a medium bowl, combine the water, oil, agave syrup, eggs, barley malt syrup and vanilla extract.

Add the liquid ingredients to the dry ingredients. Stir until combined. You might need to get your hands (wet them a little first) in there to fully incorporate the flour.


Cover loosely (not airtight...the gases need room to expand) and let set on the counter for about 2 hours. During this time, your dough will rise and begin to collapse a little.

At this point, you can store the dough, lightly covered, in your fridge to use later or you can begin making your bread. However, if you have time...I recommend letting it sit in the fridge for a little while. It's easier to handle this way. This dough is a bit wet and sticky.

When you're ready to get started, sprinkle a good dusting of flour on the dough and grab a grapefruit sized wad (or any desired amount). If needed, dust the piece with a little more flour and shape into a ball by pulling the sides down and around to the bottom, rotating the ball as your go.


Get out a loaf pan, and grease it. Using the pan as a guide, on a floured surface (you may need to flour the surface more as your go along), flatten and roll the dough into a rectangle, making the width just short of being the same size as the length of the pan. (The purpose is to make sure your loaf of bread fits into your pan when you're done rolling it up.)


Sprinkle with your cinnamon sugar mixture and desired amount of raisins.


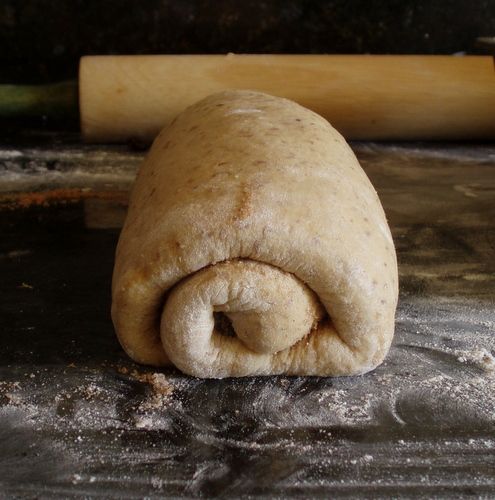
Now...carefully roll your dough, starting with a short end


Press the finished end of the roll to the dough in order to "seal".


Gently place into your prepared bread pan. Cover with plastic wrap and let rest.


If you used your dough without refrigerating first, then the rest time will be about 40 minutes. If the dough had been refrigerated, the rest time will be longer....about 90 minutes. I test it buy pressing two wet fingers into the dough a little. If it springs back immediately, it needs more time to rest. If it springs back very slowly, then it's ready to bake.

This would be a good time to preheat your oven to 350' F

Note: your dough may not double in size during this rest period (it's sometimes the nature of the no-knead beast). Often times you will have what's called an "oven spring"...where you will see an increase in volume during the baking process.


Once its done resting, brush the top with an egg wash and sprinkle with raw sugar if desired.

Bake in a preheated 350' oven for about 45 minutes or until the inside temperature of your bread is 185' F.

Remove from pan and allow to cool completely on a rack.

DO NOT cut into the bread until it has cooled completely. I know...its sooo tempting. It smells so very good and the idea of fresh warm bread is drawing you in. But trust me. The bread needs to cool. If you cut into it while it's still warm, you will end up with a funky texture inside. Allowing the bread to cool completely will give it the best flavor and texture. Plus, it's easier to slice. Btw....an electric knife is a wonderful tool to use for slicing your bread.


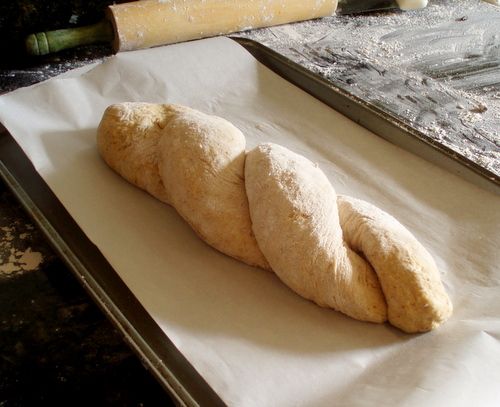
Do you want to get a little fancier? Let's do a simple 2 strand braid.

Take the initial ball that you formed in the beginning and divide it in half, rolling each portion into wide ovals.


Sprinkle each oval with cinnamon sugar and raisins then roll, starting from the long end. Press the end to the dough to seal.


Take both "ropes" and carefully place them on a parchment paper lined cookie sheet (seem side down). Pinch together the top ends.


Gently twist the rolls together so they are intertwined then pinch the end together and tuck it underneath.


Cover with plastic wrap and allow to rest (40 minutes if used right away, 90 minutes if the dough had been stored in the fridge).

Brush with an egg wash and sprinkle with raw sugar.

Bake in a preheated 350' F oven for about 35 minutes, until the inside temperature is 185'.

Allow to cool completely on a rack before slicing.


You don't want to go through all this? You have some dough leftover? Make that initial ball of dough and allow it to rest as is on a parchment paper lined cookie sheet. Time frames are the same as above. Just before baking, dust the top lightly with flour, score the top with an X (about 1/4 deep slices) and bake as above.

If you want a firmer, crispier crust, put a baking pan in the bottom of your oven during the preheating time. When you put your loaf into the oven, pour 1 cup of hot water in the bottom pan...this will create a nice steam in your oven and give you a more rustic, artisan type of crust.


Sunday, November 18, 2012

Mexican Meatball Quesadilla (made with leftover meat)


These are not your typical meatballs. Not because they're flavored with a Mexican flair. And not because they were put inside a quesadilla. What makes them so unusual is that they are made from LEFTOVER meat.

Cooked meat from the night before that I had leftover.

This concept was brought to my attention as I was searching for a recipe to make of Chef Jacques Pepin's. Jacques Pepin is a world famous french Chef. He co-started in a series on PBS back in the day with Julia Child, called Julia and Jacques Cooking at Home. This is just one of his many achievements.

This is the fifth and final recipe for my little Facebook challenge:

A quick and easy dinner, very similar to chicken piccata. Amazing flavor! 


Easy to make, with amazing results. This is one of my favorites out of this bunch.


3. Ina Garten's (altered a tiny bit) Apple Pear Pie in a Cast Iron Skillet
In this recipe, the pie crust stood out the most. I did enjoy the addition of orange with the fruit. 


Quick and easy and oooh so rich. Really enjoyed the puff pastry lattice on this baby.


Leftover meat. I don't know about you, but I struggle with this often. I've done sandwiches and cold salads with it. There are soups and casseroles and a whole crud load of recipes out there to help us with leftover meat.

But have you ever made it into meatballs? This concept captured my attention in a big way. As I read Chef Jacques's recipe, and realized the versatility....a whole new leftover world opened up for me. Jacques used leftover beef and then added a tomato sauce. Beef isn't eaten all that often around here. Chicken reigns queen in my kitchen. A few ingredient swaps, all was in order.

I'm thinking....in the very near future, with Thanksgiving just days away....this is a great alternative for turkey leftovers.


Mexican Meatball Quesadilla (made with leftover chicken)
Inspired by Jacques Pepin's Meatballs and Tomato Sauce
Printable Version

12 oz leftover cooked Mexican flavored chicken (or your meat of choice)
3 TB flour
1 tsp baking powder
1 tsp salt (or to taste)
1/2 cup minced onions
1/4 cup jalapeno, minced (or any veggie that goes with your meat and theme: celery, mushroom, etc)
1 clove of garlic, minced
1/4 tsp cumin (or any seasoning that goes with your theme; thyme, oregano, basil, etc)
1/4 tsp pepper (or to taste)
3 lg eggs
Vegetable oil to fry
Panko, bread crumbs, flour (optional, to coat meatballs)

For assembling quesadilla:
Tortillas (four or corn)
Cheddar cheese
Cilantro
Sour cream

Toss the meat into a food processor and process away... until finely chopped.

In a large bowl, combine the remaining ingredients except for the oil and panko. Squish everything together with your hands. Come on...we're the cooks...we're allowed to have a little fun with our food. Get dirty. Form into about 16 meatballs. Flatten them a little. Why not...I mean, when I make ground beef meatballs, they always ended up flattened anything (unless I boil them but that's a horse of a different color). Gently roll the meatballs in panko, bread crumbs or flour is desired. I used a panko flour mixture.

Heat a skillet with about 1/4" of oil until hot (Jacques says..."...until shimmering"). Cook the meatballs on high heat until brown. Gently turn them over, reduce heat to medium and cook for another 3 minutes.


Poof....done. Transfer them to a paper towel lined plate and get ready to serve them any way you desire.


They kinda resemble tiny patties. But honestly, what's the difference between a meatball and a patty? In my head...the shape and size.

By looking at the insides of that meatball, can you tell it was made with leftovers? Oh man...and is it good! Not the least bit dry. Full of flavor. The texture is just as it should be. Absolutely delicious!!


I can't tell you how excited I am about the results of these meatballs. Seriously....I might make a roast just so I can have some leftovers to give the beef version a try.


After popping a few in my mouth and savoring the success, I wrapped them in a tortilla, smothered with cheese, quickly cooked in a hot buttered skillet until cheese is melted, garnished with cilantro and sour cream.

How would you serve your meatballs? In a tomato sauce, bbq sauce, alfredo......?

Friday, November 16, 2012

Lady and Sons Chicken Pot Pie


First was Tyler Florence's Chicken Francese
Second was Ann Burrell's Braised Chicken with Tomatillos and Jalapenos
Third came a version of Ina Garten's Apple Pie; Apple Pear Pie in a Cast Iron Skillet

Now I'm on to Paula Deen. One of my favorite comfort foods is chicken pot pie. When I saw Paula Deen top hers with puff pastry.....well, it was a no brainer. I had to give it a try. Turns out that one of my daughter's liked the puff pastry more than what I normally do (which is pour bisquik over the top). My other daughter is lactose intolerant, has decided to eat gluten free and has slowly become a vegetarian. Sir Sportsalot wasn't home that night. My take? I'll tell you in a minute.

Btw, if you don't know what I'm doing....I'm cooking something from each of the celebrity chefs that some friends over on my Facebook Page, PeacefulCooking had listed as their favorite chefs. My next post will be a recipe from Jacques Pepin.

Back to the chicken pot pie. I cut the recipe in half and baked them in single serving bowls. With the girls grown (still living at home) and gone most of the time, I'm trying to teach myself how to cook less food. What a challenge that is! Anyway...I still had some "filling" leftover so I froze it for next time. Even though I cut the recipe in half, I'm going to share the full version recipe with you. Paula say's this will serve 4 people. I believe it could serve up to 6, but that depends on the appetites of those you're feeding.

Lady and Sons Chicken Pot Pie
Printable Version

4 sheets puff pastry, thawed (assuming you're using the frozen version)
1 egg, beaten
4 chicken breast halves or 2 cups leftover cooked chicken
Salt
Pepper
Garlic Powder
2 TB vegetable oil
1/3 cup melted butter
2/3 cup flour
1 quart heavy cream
1/4 cup chicken base (I used 4 tsp bullion instead)
1 TB minced garlic
1/2 small onion, minced
1 cup each of frozen peas and carrots (I used 2 cups of a frozen veggie mix)
pinch fresh grated nutmeg (optional)


Preheat your oven to 350'

Cut your puff pastry into 1" strips so they're a little longer than your baking dish (if you're making individual servings then cut the strips thinner to accommodate the size of the bowl). On a cookie sheet you're going to weave the strips together:

Lay out the vertical row. Then fold back every other strip halfway. Lay a strip in the middle horizontally. Take the strips you folded back and lay them flat again.
Now take the opposite vertical strips and fold them back. Lay another strip horizontally. Take the folded back strips and lay them flat again. Continue this until you've reached the end.

Then repeat the process going the other direction. I hope this helps....


**If you don't want to go through all that, then just take the strips and lay them across each other without weaving.

Make as many lattices as needed.

Brush your lattices with the beaten egg.

Bake for about 5 minutes, until the dough rises and turns a light golden brown. Set aside.


(after 5 minutes in the oven, mine still weren't brown so I had to stick them back in)

For the filling, season your chicken with salt, pepper and garlic. I cut up my chicken before hand but you can either saute them in the oil whole, or cut up. Either way, saute the chicken in a large skillet with high sides until cooked. Cut them into chunks if you didn't do so before cooking and set aside.

Drain out the oil and melt the butter in the skillet. Slowly add in the flour, stirring constantly. Don't let it turn brown. Slowly stir in the cream until fully incorporated and smooth.

Add the chicken base or bullion, the garlic and onions. Stir until thickened. Add your veggies and cooked chicken.


Remove from heat and divide the filling into oven proof bowls or casserole dishes. Lay your puff pastry on top


Place on a baking sheet in order to catch any spills. Bake in a 350' oven for about 5 minutes or so, until nice and bubbly.

Now...my take on this dish. I LOVE the puff pastry. The filling is a bit rich. You can use half and half or just plain milk to tone it down or "lighten" it up. You can add a little more milk or cream to get the consistency you like. The flavor was wonderful. I love making them into individual serving sizes. Although for me...one bowl was enough for two dinners...it was that filling!

This dish is quick and easy. Especially if you were to use leftover chicken. It's hearty and filling...perfect for those cold winter nights coming up.

Saturday, November 10, 2012

Apple Pear Pie in a Cast Iron Skillet (or two)


And the chef challenge continues.

First was Tyler Florence's Chicken Francese
Second was Ann Burrell's Braised Chicken with Tomatillos and Jalapenos

This week...Ina Garten.

I saw where someone had baked a pie in a cast iron skillet (thought that was totally cool!). Then I watched something about pie's on one of the cooking channels. By then pie was totally on the brain. Not only did I want to bake a pie...but I wanted to try my hand at making a lattice crust. A little research, a couple demos and I was ready to go.

Not trusting my pie crust skills (especially with the lattice experimenting)...instead of making one pie, I decided to make 2 small pies. One with a lattice top and the other just regular.

Safety net thing..ya know? In case the lattice top was a total fail, I'd still have one that looked...edible.

I have these two cute little cast iron skillets. They're about 5". Perfect for my two pies.

Well, guess what? I had so much fun with the lattice top, I ended up making them both the same


I went with the All American Apple Pie. Only...I didn't have enough apples. So I added pears. Plus, if I didn't use up my pears, they were going to go to waste. That was the only alteration I did to Ina's Deep Dish Apple Pie recipe.

The best thing about this recipe of hers is the crust! I absolutely loved, loved, LOVED the crust. (which is saying a hell of a lot cuz I'm not really into pie crust). Ina uses both butter and shortening. Plus she adds a bit of sugar. And....because of her....I now know how to make a crust, using my food processor. Homemade crust in a snap!

The pie itself is very good! However....I will make a few changes next time. Ina's a big fan of zest. I am too. It's just that....with the use of lemon and orange zest in the pie, it was a bit much. The apple and spice flavors were forced into the background. (pear isn't a strong flavor anyway....it was just a nice texture addition). I think a little less zest...or even none at all (but keep the orange juice)...would be a nice balance.

Or maybe the apples I used just weren't tart enough to carry the citrus flavors?

Apple Pear Pie in a Cast Iron Skillet
Printable Version

Perfect Pie Crust
12 TB very cold unsalted butter, diced
3 cups all-purpose flour
1 tsp salt
1 TB sugar
1/3 cup very cold vegetable shortening
6 - 8 TB ice water

Apple Pear Pie filling
2 lbs apples (I used honeycrisp) peeled, cored and chopped into chunks (or quarter or sliced)
2 lbs Bosc Pears (or some other type of firm pear), peeled, cored and chopped into chunks
1 lemon, zested
1 orange, zested
2 TB lemon juice
1 TB orange juice
1/2 cup sugar, plus more for sprinkling the top
1/4 cup all-purpose flour
1 tsp salt
3/4 tsp ground cinnamon
1/2 tsp ground nutmeg
1/8 tsp allspice
1 egg, whisked with 1 TB of water for the egg wash

Preheat the oven to 400' F
No prep-work needed for the cast iron skillets.

Note: I put my food processor bowl and blade in the refrigerator and chilled before using. The less opportunity your butter and shortening have to warm up, the better the crust.

Place the flour, salt and sugar in the food processor. Pulse a few times to mix it all up. Add the butter and shortening and pulse 8 - 12 times, until the butter is pea sized. While pulsing the machine, add in the ice water through the feed tube until the dough forms into a ball.

Turn the dough ball out onto a lightly floured surface and roll into a ball. Divide the dough in half and wrap each half in plastic wrap. Refrigerate for 30 minutes.

Just before the dough is done chilling, prepare your filling by combining the apples, pears, lemon and orange zest and juices, 1/2 cup sugar, flour, salt, cinnamon, nutmeg and allspice.

Take one half of the dough out (leaving the other in the fridge until you're ready to use). Because I used 2 small skillets, half of this dough will be for one little 5" pie, top and bottom crust. If I had used a 9" or 10" skillet, it would've been just the bottom crust.

Divide in half (set half aside for the top) and on a lightly floured surface, roll out the dough and drape it over the skillet. Gently fit the dough into bottom and sides of the pan and allow the dough to extend 1/2" over the edge, trimming the dough away as needed.

If you notice that your filling is very wet and moist, don't be afraid to sprinkle some corn starch on the bottom crust before adding the filling

Fill the pie with half of your apple mixture. Brush the edges of the dough with an egg wash.

With the other half that you just set aside, roll and place on top of the pie, trimming the edges to about 1" over the edge. Tuck and pinch and crimp the the two edges together. Make a couple of slits on top.

Or....Cut into 1" strips, laying them on top of the pie and weaving to make a lattice top. Here's a great demo on How to make a lattice pie crust


Repeat with the remaining dough and filling.

Brush the tops of your pies with the egg wash and sprinkle with sugar.

Take strips of aluminum foil and cover the edges of your crust (so they don't brown and burn too quickly). Place the pie on a foil line baking sheet (this will catch the messy juices that will bubble over).

Bake for about 45 minutes (if you made one large 9" or 10" pie, you will need to bake it for 1 to 1 1/4 hours), until the tops are brown and the juices in the pie begin to bubble out.


Serve warm, with a big scoop of vanilla ice cream.


What we have here is a nice flaky crust with a hint of sweet...firm yet tender apples, contrasting with the soft pears....and yes. I want to make these little pies again. And again.

I may never bake another full sized pie. They are the perfect size for sharing...and keeping, without being too committed to one flavor.

Sunday, November 4, 2012

Braised Chicken withTomatillos and Jalapenos


Part II of my Facebook celebrity chef cook-off. I guess that's what you'd call it. When you ask a group of people who their favorite chef is and no one picks the same chef, you can't chose a winner. So you kinda have to do them all. Last week's chef was Tyler Florence and I made his Chicken Francese. It was simple and delicious. This time I made Anne Burrell's Braised Chicken with Tomatillos and Jalapenos

In case you're interested, here's the line up:

Tyler Florence
Anne Burrell
Ina Garten
Paula Deen
Jacques Pepin

It took me some time to warm up to Anne. She had a particular expression (not facial...verbal perhaps) that really annoyed me. Once I got past that (and I think she's stopped doing it)...I really started enjoying her shows. She's funny in a a cool, corny..silly adult kind of way. And the tips and techniques she shares are great. This is the first recipe (I'm pretty sure...but don't always hold me to my memory) of hers that I've made, and....

WOW!

It's easy. Not quick (bone-in chicken takes time to cook). There are a few simple steps. I wouldn't take any short cuts. The results are absolute deliciousness. You start off by grilling the tomatillos and jalapenos. This adds a slightly sweet, smokey flavor and takes everything to another level. You end up with tender chicken covered in a delicately smooth sauce with hints of heat and something almost sweet in the end. I think what surprised me here was that the sauce doesn't look delicate with those little chunks of tomatillos and onions...but when it hits your pallet, you want to close your eyes and go...mmmmm.

Braised Chicklen with Tomatillos and Jalapenos
Printable Version

6 tomatillos, husked
2 jalapenos
Extra virgin olive oil
4 chicken thighs (trimmed of excess skin and fat)
4 chicken legs
salt
1 large onion (original recipe says Spanish onion, I used a white onion because that's what I had)
3 garlic cloves, finely chopped
2 cups chicken broth
2 limes, zested and juiced
1/4 cup chopped cilantro, plus more for garnish

optional cream:
1/2 cup sour cream (I used Mexican Crema)
2 limes, zested and juiced

You start off by grilling your tomatillos and jalapenos. Sure you can do this outside on the bbq grill. I used my indoor grill pan on my stove. If you don't have either....do it in a heavy, hot skillet (cast iron would be best). Or....broil them in your oven. The goal is to get them charred.

So...tomatillos have a papery husk on them that need to be removed before you do anything.


Underneath that husk, you have what looks like a miniature green tomato.


Thats kinda sticky. Wash em up and toss them on the grill


Once they're all charred, set them aside to cool.

Get out a large pan with high, straight sides (not a big ole pot...you just want something that will eventually be able to hold everything without slopping over), Coat it with olive oil and heat over medium-high heat.

Sprinkle your chicken with salt and place in the hot pan, skin side down. Brown on all sides (I had to do this is batches). Remove the chicken from the pan and set aside.

Get rid of the fat in the pan and add in a little oil. Add the onions, sprinkle with salt and saute (scraping up the good stuff on the bottom of the pan that the chicken left behind) until the onions are soft, about 7 or 8 minutes.

Meanwhile, chop the tomatillos into chunks. Finely dice the jalapenos into little bits. If you're not into heat...ditch the seeds before you start dicing (thats what I did).

Once the onions are tender and smell ooooh sooo good....add the garlic and continue sauteing for another minute or two. Add in the tomatillos and jalapenos, chicken stock, lime juice and zest. Give it a quick taste and add salt if necessary.

Put the chicken into the pan, bring to a boil. Cover, reduce heat and allow to simmer for 15 minutes. Remove the lid and simmer for another 15 minutes.


While that's going on, make the optional cream sauce but combining the sour cream, lime zest and juice (I added a small pinch of salt). Set aside until the dinner is ready.

Remove the chicken from the pan.


Toss the chopped cilantro into the sauce and stir.

Serve by spooning the sauce over the chicken and garnish with cilantro and lime sour cream. To be honest...this dish did not need the lime sour cream. Had I left the jalapeno seeds in, I might've needed the cream to tone down the heat.


All in all...I absolutely love this dish. I can't tell you what the rest of the family had to say. No one else was home and I dined alone (happens often since the girls are grown and Sir Sportsalot is out there coaching basketball). Good thing is....there's leftovers!!