Yum Peaceful Cooking: June 2011

Sunday, June 26, 2011

Newtons Mini Tarts


Several weeks ago (and I use that term lightly cuz I don't remember exactly when), I received a package in the mail. Through the Tastemakers Program at Foodbuzz.com, I was one of the lucky recipients of a box of Newton's Fruit Thins.


Let me just say.....Yum! Seriously good cookies. And not in an overly sweet way either. Yet they satisfy that sweet craving. They're crispy like a cracker and they have these little chewy bits of fruit in them that are just soooo dang good.


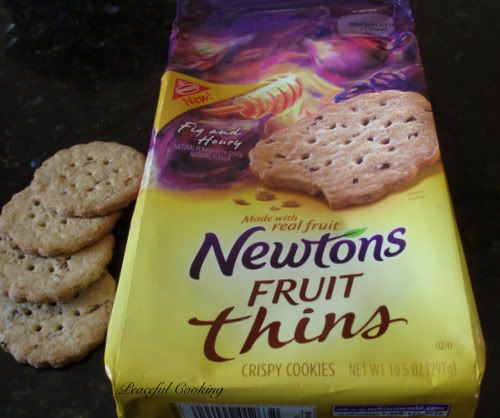
Kudos to Newtons! I've always enjoyed Fig Newton bars, but this new addition to the Newton family is fabulous.  And did I mention that they're made with whole grain? Niiiiiiiice

The letter that came with the cookies suggested crushing the cookies and sprinkling them over ice cream or yogurt. Which I'm sure tastes great. But that got my brain whirling and I came up with a different plan. Trouble was....by the time the weekend came around, there weren't enough cookies left. Apparently the girls and their friends enjoyed them as well. But I really wanted to make my little treat so I added Newtons Fruit Thins to my grocery list. And you know what? They have some great flavor combos out there. Oooooh....choices! I couldn't resist picking up a package of Chocolate Raspberry instead of the Fig and Honey version they sent me.


I don't know about you but I am a huge fan of raspberries and chocolate combined and this got me excited! (apparently I'm easy...)

The next phase of my quest had me searching for recipes for no-bake tart like fillings. Sure...I could've made the standard cream cheese filling with the sweetened condensed milk it in.

I could have.

I didn't want to. I wanted something different. (to me) Something new. (to me) Something not so dang sweet (sooooo not like me). And when I found something that satisfied all those requirements....it was back to the grocery I went. To purchase mascarpone.

Before we get into the nitty gritty details of the recipe and process, let me share with you a little something. A while ago (and again, I use that turn lightly....cuz it was seriously...months ago), I chose to review product from CSNStores.com instead of doing a giveaway. One of the items I picked were these darling little non-stick mini tart pans


This was the perfect time to break these babies in. I have a thing for individually sized desserts. They just seem more....special. I mean, not only do you get to eat the whole thing....but you get so see the completed product, not just a portion. Like...getting the "B" on your slice of cake from a birthday party, or half of a balloon. When you have mini desserts, you get to see the whoooooole thing as it was intended. And you don't have to share it with anyone. And in your mind...you're thinking....this cute little, delicious dessert as just for me.

I spose this is where I tell you how great these little tart pans are. Not cuz I have to. But because they are. Easy to work with. Easy to clean and they get the job done. What more could a cook / baker ask for? (besides someone else to clean up the mess....but that may be asking for too much).

This is a very simple, easy dessert. Minimal effort required.....great results! 

Newtons Mini Tarts
Printable Version

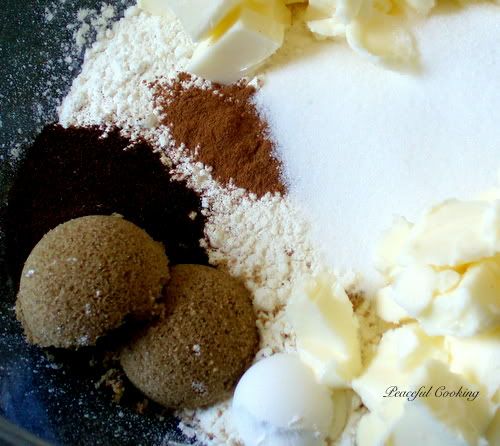
1 1/2 cups Newtons Fruit Thins Chocolate Raspberry (about 15 cookies)
5 tablespoons butter, melted
4 oz mascarpone cheese
1/2 cup heavy whipping cream
1 tablespoon sugar
1/2 teaspoon vanilla
Handful of fresh raspberries to garnish

Preheat the oven to 375'F
Spray mini tart pans with cooking spray

In a food processor, process the cookies until you have fine crumbs.


Add melted butter and mix until well combined.

Spoon about 3 tablespoons of the cookie crumb mixture into each tart pan. Press mixture to the bottom and up the sides so the crust is as even as possible.


Bake in preheated oven for about 5 - 7 minutes. Allow to cool in the fridge for about an hour.

Once the crusts have cooled, in a medium sized bowl, combine the mascarpone cheese, whipping cream, sugar and vanilla. Beat until soft and fluffy. Do not over beat....we're dealing with whipping cream here and we do not want butter now, do we?

Spoon filling into mini tarts, dividing it up as evenly as you can between them. Garnish with fresh raspberries. Allow to chill for about an hour so the filling sets and the flavors settle.


And there you have your little mini tart filled with a decadent filling that's reminisce of a smooth, homemade whipped cream...only creamier and not as sweet. This allows the crust to be the star in this show. As you take your bite, of course your mouth is filled with creamy goodness....but soon the chocolate raspberry cookie flavor bursts out onto center stage and steals the show. Your taste buds are bound to give a standing ovation, demanding an encore.

Are you wondering why I've served the tart still in the pan? Cookie crumb crusts are not made to support themselves....they sorta crumble.

By the way...don't worry if you don't have mini tart pans. Just make it a full sized tart. Or in a pie plate. Its all about the flavor. Be creative with the presentation.

Sunday, June 19, 2011

Soft Pretzels

I don't particularly like pretzels. I don't like mustard. I especially don't like pretzels and mustard combined. Sir Sportsalot likes both.

Before I'll eat a pretzel.....I have to be super duper hungry and limited in snack choices.

But I love soft pretzels. The chewiness. The smell. The texture of the firm outside crust and the soft pillow-y insides. Not to mention the bits of crunchy salt that litters the tops. Soft Pretzels are among the best things you can buy at the mall. (That and Hot Dog on a Stick....one of the very few things you will ever see me eat with mustard).

And believe it or not....they are among the easiest snacks to make at home. Had I known they were so easy...I would've made them ages ago!! (They've been on my list of fun things to try for years)

The recipe I used is Alton Brown's and can be found -----> here <----- if you want to check out the original. Although I did not change the recipe, I did add a minor step.

Soft Pretzels
Printable Version

1 1/2 cups lukewarm water (about 110'F)
1 tablespoon sugar
2 teaspoons salt
2 1/4 teaspoons yeast
4 1/2 cups all purpose flour (or 22 oz)
2 oz melted butter (cooled a bit, no hotter than 115'F)
Vegetable oil, for the pan
10 cups water
2/3 cup baking soda
1 egg beaten with 1 tablespoon water
Pretzel salt (if you have it....or course sea salt)

In a large bowl, combine the lukewarm water with the sugar and salt, then sprinkle the yeast on top. Set aside for 5 minutes at which time the yeast will have started to foam a bit.

Pour in the flour and butter and mix until well combined. Pour out onto a smooth surface (I found that I did not need to dust the surface with flour as the dough did not stick. If you find that it's sticking to your surface, dust slightly but try not to use too much. You don't want too much flour added to your dough). Knead the dough until smooth. This will take 5 - 10 minutes.

This is not considered smooth...


If that's what your dough looks like....knead on baby.....you've got a bit more work to do. You want it to look like this....


See the difference? Now it's ready for the next phase. Clean the bowl you had mixed it all in, dry it and oil it. Place your nice smooth ball into the bowl and cover with plastic wrap. 

Let it sit in a draft free place in your kitchen and allow to rise for about 50 - 55 minutes. At which point your dough has doubled in size

Niiiiiiiice! It's time to get rolling! 

Preheat your oven to 450'F. Line 2 cookie sheets with parchment paper and lightly grease the parchment paper with vegetable oil. 

In a large pot or stock pot, bring the 10 cups of water and the baking soda to a rolling boil. 

While the water is heating.....lightly grease your counter space where you'll be working the dough. Divide the dough into 8 equal pieces.


Roll each piece into a 24" long rope. I think that was the most challenging part for me. My ropes kept springing back. I probably should've let the 8 balls rest a few minutes before working them so much. 

Anyways....now that you have the ropes made, shape them into pretzels


Or some other shape.....My youngest daughter was helping me out and is never one to remain "in the box".


Place the pretzels on your prepared baking sheets.

Now....your water should be boiling like crazy. If not.....it will be soon. Once it is, gently and carefully place one pretzel in the water and boil for 30 seconds, carefully flipping it over halfway through the process. Using a slotted spoon, remove the pretzel from the water and return to the baking sheets. Repeat with the remaining pretzels, one at a time. 

Take your egg wash and brush over the tops...then sprinkle with course salt.


Bake for about 12 - 14 minutes or until a deep golden brown. Allow to cool on a cooling rack for a few minutes before eating.


Once cooled slightly....chow down. Or, if you must....break out the mustard. Me? I liberally applied melted garlic butter. And had a little lot on the side for dipping.

This recipe made 8. They were devoured within a few hours. They were in the oven after dinner....and by midnight....poof! They had vanished.

Let me just tell you about a personal observation....when I bit into one, fresh out of the oven...still warm and soft....it reminded me of salty soft bread. I was a bit disappointed at first. BUT....after they cooled a bit more...to room temperature, the pretzel flavor shined through and I was thrilled. And relieved. I didn't want Sir Sportsalot, the lover of all pretzels, to be unimpressed. I needn't have worried.

Now that I think of it...I just may have to make another batch today. After all, it is Father's Day. And I've been pondering the idea of a nacho version. Jalapenos chopped up and added to the dough during the mixing process and then maybe some shredded cheddar sprinkled on top just before baking. Aaaaand for that added gooeyness....a bowl of nacho cheese dip on the side. How's that for a Father's Day snack?

Happy Father's Day to all the dads out there. Now grab a beer and a pretzel and have a great day!

Sunday, June 12, 2011

Peanut Butter and Maple Ice Cream


Guess what I bought recently!!!

Yep...an ICE CREAM MAKER...and I am so excited. I had one years ago...loaned it out and never got it back. By the time I went to use it, I had forgotten who I loaned it to, or they forgot they borrowed it...and well, I found myself ice cream maker-less.

I was rather bummed. Don't you just hate when that happens?!

Before I made my purchase though....I ask everyone on my Facebook page what they recommended. The verdict? A resounding vote for Cuisinart.

And that's just what I did. Found myself at Bed Bath and Beyond (after searching a few other stores) with my 1.5 qt ice cream maker in hand....a 20% off coupon from the lady in line behind me (because I never actually "plan" on going to Bed Bath and Beyond) and when all was said and done, I spent under $45.00 for the easiest ever ice cream maker.

Btw.....when did they stop using ice and rock salt? (ya....it's been a while since I've owned one. Can you tell?)

Have I ever mentioned that I love peanut butter and maple? Oh ya....I did, in my Belgian Waffle post. Now I'm going to share the story that made it happen....

It all started years ago...when I was a young girl. One of my favorite sandwiches was peanut butter and honey. I'd make them often for my sack lunch. One morning when I had my taste buds set on having one for lunch that day, I discovered that we were out of honey. Mom?!! I have never been a bologna type of gal. Not sure why I just didn't use jelly (like everyone else)...soooo, I found myself pouring maple syrup all over my bread. Shoved it in a plastic baggy (not the zip lock kind.....the old fashioned kind....the ones that fold over. Remember those?) and off to school I went. When lunch time rolled around, I found myself with a bit of a sticky baggy....but something wonderful had happened. The syrup kinda crystallized and made the edges of my bread....the crust ....the part I NEVER ate....almost like candy. Not to mention the wonderful coming together of two great flavors. Meshing in your mouth to create something amazing. A love that apparently has lasted a lifetime.

And a love that has lead to this....

Peanut Butter and Maple Ice Cream (makes about 5 cups)
Printable Version

1 cup whole milk
1/3 cup sugar
pinch of salt
1/2 cup maple syrup
2 cups heavy cream
1 tsp maple flavoring / extract (if you don't have any....skip it)
2 tsp vanilla extract
1 cup peanut butter

In a medium sized bowl, on low speed, beat together the milk, sugar and salt. Stir in the maple syrup, heavy cream, maple flavoring and vanilla extract. Cover and let sit in the fridge for 1 or 2 hours or longer (over night if need be).

Follow the instructions on your ice cream maker. After the ice cream is done, fold in the peanut butter. Enjoy now or store in the freezer until you  have a harder set.


Scoop and server
And enjoy as you taste a bit of my childhood obsession.

Note: this is a very sweet ice cream. There's no denying the flavor of maple. If your a bit hesitant....maybe omit the sugar all together. You could even omit the maple flavoring (might be redundant) and then increase the vanilla extract by a teaspoon. Either way...I hope you find yourself enjoying the combo of peanut butter and maple as much as I do.