

 Like I said, quinoa is really good for you. Which I've heard numerous times. Today I decided to actually do a little research and see what's so healthy about it. Come to find out...it's pretty impressive stuff. Not only is it gluten free but it's high in protein, contains good amounts of essential amino acids, fiber, iron, calcium. And that's just to name a few. All that, packed into a teeny tiny little grain. Go figure.
Ok, so it's good for you. Yay! But what about the flavor? And what do you do with the stuff? Well, it has a nice nutty flavor. Providing of course that you rinse it thoroughly before cooking. Otherwise it tastes like soap. And what do you do with it? Whenever I asked that question, I was told...'the options are endless'.... 'there are sooo many recipes out there'.... etc etc. Which didn't really answer my question. Sure I looked up recipes. A couple of years ago I even made quinoa bread (I thoroughly enjoyed it) but I wanted to make a quinoa dish. For some reason I just couldn't wrap my head around quinoa.
Until the other day, when Lee from Retired With No Regrets opened my eyes with one comment: "Basically, use it like you would rice". As obvious as that is, I just never looked at it that way. Simple. I can do that. And I did.
I dedicated dinner to the ever impressive, highly nutritional, deceivingly tiny grain known as Quinoa!
Multigrain Burger Buns
Printable Version
1/4 cup rye flour
1/4 cup oat flour
1/4 cup flax seed meal
1/2 cup quinoa (thoroughly rinsed)
1 cup bread flour
1 1/2 cups white whole wheat flour
1 3/4 tsp salt
1 3/4 tsp yeast
2 TB vital wheat gluten
1 1/2 tsp barely malt syrup
1 3/4 cups warm water
Whisk together the dry ingredients. Dissolve the barely malt syrup in the warm water. Add to the dry ingredients and mix thoroughly with a wooden spoon. You will have a rather wet and sticky dough. Cover lightly and set aside (on the counter) for 2 hours. At this point you can either refrigerate the dough for about 5 - 7 days or use immediately. However, if you can refrigerate it for a few hours at least, the dough will be easier to handle.
Dust the dough with flour and divide into plum sized balls about 1/4 lb each, dust with more flour as needed. Shape into taut balls by pulling the sides down and around the bottom, rotating as you go. Place on a parchment covered cookie sheet. Flatten slightly and cover loosely with plastic wrap. Allow to rest / rise for 20 - 40 minutes. You will know when the buns are ready for the oven when you poke one with your finger and the dough doesn't immediately spring back.
Preheat your oven to 350' F while the buns are rising. Brush with an egg wash and bake for about 20 minutes or until golden brown and firm.
Allow to cool thoroughly before slicing

What a delightfully nutty, earthy bun this dough made. You see....I have a lot of different flours in my fridge. I really need to start using them up a bit. I figured the flour to water ratio for the no kneed doughs I've made over the years would be a great start for experimenting. Most dough batches are about 7 1/2 cups of flour to 3 1/2 - 4 cups of water. I cut this in half to make a smaller batch. Now that I know it's successful, we'll see what else I come up with.
I made the buns to go with pulled beef brisket that was slowly cooking in my crock pot. Simple recipe:
Crock Pot Pulled Beef Brisket
Printable Version
3 - 4 lbs beef brisket, trimmed of fat
1 or 2 large onions, sliced
Salt and Pepper to taste
1/2 tsp cumin
2 tsp Old Bay Seasoning
5 cloves of garlic
Place the onions in the crock pot. Combine the salt, pepper, cumin and Old Bay Seasoning. Rub all over the brisket. Place in the crock pot on top of the bed of onions. Drop the whole garlic cloves on top of the meat. Cover and cook on high for 8 - 10 hrs, depending on the size of the brisket. You'll know when its done because you can literally pull the meat apart with a fork. Which is what you will do once it's finished. Just remove the meat from the crock pot onto a cutting board, leaving the onions and liquid in there. Shred, using two forks and place it all back into the crock pot. Stir it all together and serve.
Note: if you feel that the meat is going to be done before you're ready for it, by all means, turn the heat down to low and carry on.
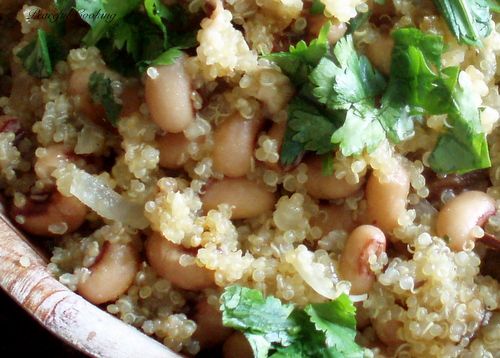
And now for the quinoa side dish, which I have christened as Quinoa Pilaf (for a lack of a better name)

Quinoa Pilaf
Printable Version
1 cup of quinoa, thoroughly rinsed, plus liquid for cooking
2 TB olive oil
1 TB butter
1 /2 tsp coriander seed
1/2 tsp cardamon powder
1 garlic clove, minced
1 cup diced mushrooms
1/2 medium onion diced
1 jalapeno, seeded and diced (unless you like it hot)
1 can black eyed peas, draining and rinsed
Salt and Pepper to taste
Fresh lemon juice to garnish
Cilantro to garnish
Cook the quinoa. I soaked it in water first, for about an hour...although from what I've read, 15 minutes is fine too. Or...just use a higher water to quinoa ration when cooking (1 cup quinoa to 2 cups of water) and skip the soaking all together. I however soaked my quinoa, drained and rinsed it, then cooked it in a saucepan with 1 1/4 cups chicken broth. For more info on cooking quinoa, I recommend visiting How to Cook Quinoa Perfectly
Heat up a good sized skillet over medium heat. Add the olive oil and butter. When the butter is melted, add the coriander seeds and cumin....stir constantly for about a minute, then add the garlic, mushrooms, onions and jalapeno. Saute until tender. Reduce the heat to low and add in the cooked quinoa and black eyed peas. Heat through. Season with salt and pepper to taste. Garnish with lemon juice and cilantro.
As I typed the above instructions, I realized something rather silly of me. Why didn't I just cook the quinoa with the seasonings and veggies? Then added in the black eyed peas at the end to heat through? Silly me. Next time...that's what I'll have to do.
The girls and I thoroughly enjoyed this dish. Sir Sportsalot? Na. He didn't even try it. I'm not sure if he was adverse to the fact that it's healthy, or to the word quinoa...."what?" "I said...quinoa. it's a grain that's very good for you." I probably should've just told him it was rice.


