Yum Peaceful Cooking: August 2011

Wednesday, August 31, 2011

Pork Tacos and Black Beans


Lisa Fain....who is this gal? Where have they been hiding her (from me)? I want to kick myself for not knowing who she was until recently.

She comes from a loooooong line of Texans but has moved to New York City (I can just hear the Pace Picante "guys" sayin'...'New York City?!'). And Lisa is the author of a fabulous cookbook that I have the pleasure of 'playing with'. It's called The Homesick Texan. It's packed with page after page of mouthwatering recipes.

By the way...she has a blog herself called Homesick Texan. I highly recommend you pay her a visit. You'll thank me for it, I'm sure. 

Several of us bloggers have joined with Heather over at Girlichef to spotlight The Homesick Texan and you know what? I am going to thoroughly enjoy this little glimpse of Texas.

Our first recipe is for Pork Tacos, Dallas Gas Station Style. Apparently them hungry cowboys get to feed on some good grub will filling their tank. I guess you could say...they're fillin' up both tanks. If I hadn't seen this recipe and it's history in this book....I know I would not even consider buying a taco from a gas station. Now? You bet your boots I'd grub on a gas station taco in Dallas. I'd probably stop at a gas station just to get one of these tacos....whether or not my car needed gas.

Pork Tacos

4 dried pasilla chiles (stems and seeds removed) (we'll have a little chat about these chiles in a minute)
2 lbs pork shoulder
1 chipotle chili in adobo sauce (not the whole can....just one)
4 garlic cloves, chopped
1/2 tsp dried oregano (I used Mexican oregano)
1/2 tsp ground cumin
Small pinch of ground cloves
1/4 cup orange juice
1/4 cup pineapple juice
1 TB white vinegar
2 TB olive oil
Salt to taste
1 TB vegetable oil

Lets talk about those chiles. You may not be able to find pasilla chiles. Or at least they may not be called that. Apparently here in the states, things get mixed up in translation. I found this great website for reference...talks about the chiles and their substitutes for dried chiles (as well as other things)....Foodsubs.com  There's also a great chapter in The Homesick Texan Cookbook called 'The Larder' that provides information and graphics that I found very helpful. I happen to live very close to a Mexican grocery store and was able to pick up "Chile Negro"...which is the same (from what I understand) as Pasilla Chiles. Which by the way is mild in the heat department.


 So...you have your chiles all ready, right? Take a nice heavy skillet (I love my cast iron skillets) and heat it up (no oil). Place the chiles in there and heat them for about 10 seconds on each side. Add enough water to cover the chiles. Bring to a boil and then remove from heat, letting the chiles soak until softened which takes about 30 minutes.


While the pasillas are enjoying their little hot tub experience, get out that pork shoulder and get ready to do a lot of chopping. Trim off the fat and cut the pork into little 1/2" pieces. This will most likely take up most if not all of that 30 minute chile hot tub time.


Once the pork is chopped and chiles are softened...drain the water out and rinse the chiles. Place them into a blender. Add the chipotle chile (if you're a-feared of the heat...remove the chipotle seeds), garlic, oregano, cumin, cloves, orange juice, pineapple juice, vinegar and olive oil. Puree it all. Taste it and add some salt.


In a zip lock bag (or non-reactive dish) combine the chopped pork with the pureed chile sauce


I love that rich, deep color....


Mix it all up to make sure all the pieces are covered and stick in the fridge for 8 hours. (yup...you're gonna wanna get this baby started rather early.)


Once all that time has passed and you've spent the day...I dunno...grocery shopping? Reading recipes? Lounging by the pool with a margarita.....


Take the pork out of the fridge and allow to come to room temperature for 30 minutes. Heat the vegetable oil in a skillet over medium heat.


Fry the pork until done. And tender. And tasty. (takes about 15 minutes or more). Don't forget to stir it every so often.


Serve in a warmed taco shell, topped with onions, cilantro and a little lime juice.


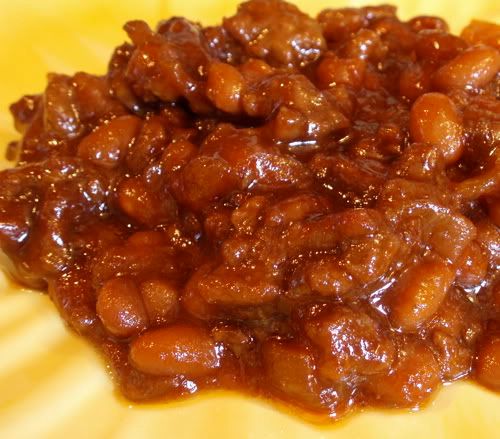
If you'd like a little side dish to go along with these Dallas Gas Station Tacos....I recommend the Austin-Style Black Beans.


I don't know if you know this about me or not...but I'm not a huge bean fan. Some I can tolerate more than others. And I can certainly do without. Let me just say....these beans are GOOD!!


Austin-Style Black Beans

1 lb dried black beans
1 TB vegetable oil
1 medium yellow onion (I think I used a white one) diced
1 carrot, diced
4 cloves of garlic, minced
2 canned chipotle chiles in adobo sauce, chopped
1/2 cup chopped cilantro, divided
1/2 tsp ground cumin
1 TB tomato paste
1/4 cup line juice
Salt to taste

Rinse and sort your beans to make sure there aren't any pebbles or other weird things in with the beans.


Place them in a large pot. Cover the beans with 1 inch of water and bring to a boil. Cook for about 15 minutes. Drain and rinse.


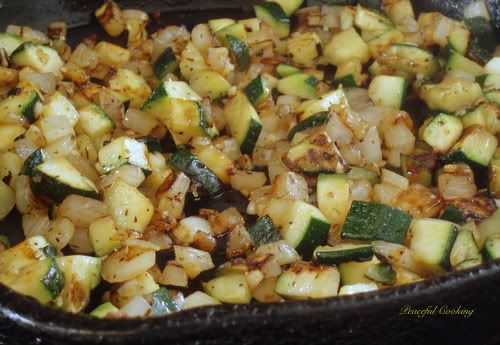
In the same pot, on a medium low heat, saute the onions and carrots in oil until the onions are translucent and the carrots are lighter in color. This takes a few minutes....8? 10? Just keep an eye on it and make sure you stir them up a bit occasionally. Add the garlic and cook for 30 seconds.

Add the beans to the pot with the veggies. Add the chipotle chiles and 1/4 cup of cilantro. Cover everything with 2 inches of water. Bring to a boil. Turn the heat down to low and simmer, uncovered for about 1 1/2 hours.

Once that time has passed (maybe this time you did a load of laundry and watched your favorite movie for the umpteenth time while sipping on another margarita)....

Add the remaining cilantro to the beans along with the cumin, tomato paste and lime juice. Salt to taste. Cook some more for about 30 minutes or until the beans are tender. Here, Lisa states that the actual cooking times may vary depending on how fresh your dried beans are (never thought about the freshness of dried anything before but apparently it does matter).

When the beans are done, smash a few of them on the side of your pan with a spoon to thicken things up a bit....and then get ready to enjoy the best beans ever! (I can say that since I don't like beans....and I think these are amazing!)


*This post is part of The Homesick Texan Cookbook Spotlight and Cook-Off sponsored by Hyperion and hosted at Girlichef*

Saturday, August 27, 2011

Poppy Seed Chicken Casserole


I have just returned from a lovely two week vacation, visiting my family in Alabama. Good-byes are always so difficult. The hugs, and kisses and tears...knowing that it'll be quit some time before I see my family again. I hate it. But...I always carry a little bit of each of them back home with me (especially the pounds I gained eating all the fabulous food we all cooked).

The older of my two sisters, Jenifer, picked me and my youngest daughter up from the airport. Our first night there we decided to keep dinner simple and easy. (it was something we had discussed and planned days in advance....1. I'm always thinking about what we're going to cook and eat. 2. Jenifer is a planner. She probably has Christmas already planned and began Christmas shopping months ago) Jenifer had the perfect meal in mind....Poppy Seed Chicken Casserole. Just a few simple ingredients thrown together with fabulous results. Comforting and tasty in no time at all. If I remember correctly, she said she found the recipe in Southern Living magazine. I poked around the internet a bit to see what was out there. I found a few variations of this recipe....some included cheese, others had onions....but this recipe is great as is. Not only because of it's simplicity but also because the ingredients are basic staples that most of us can find in our pantry on any given night. Which by the way is perfect for Jenifer. I mean....seriously...with her crazy life....working full-time, raising two wonderful children, keeping up with their activities....and maintaining a loving home, I don't know how she does it. This recipe is made for families like hers.

Poppy Seed Chicken Casserole
Printable Version

4 - 5 chicken breasts, cooked and chopped
2 cans cream of chicken soup
8 oz sour cream
1 tablespoon poppy seeds
1 to 2 sleeves of crushed crackers (she used Ritz)
1/2 cup melted butter

Preheat the oven to 350' F, spray a large casserole dish with cooking spray (for good measure)


In a large bowl, combine the chicken, soup, sour cream and poppy seeds. Put the mixture into the casserole dish. Top with crushed crackers and drizzle the melted butter over the crackers.
Bake at 350' for about 30 minutes, or until golden brown and bubble.

And that's it. With a quick salad tossed together...maybe a few slices of Texas Toast on the side and dinner is served, devoured and enjoyed.

Wednesday, August 24, 2011

Cheese Filled Rolls


I'm currently enjoying a nice little vacation visiting my family in Alabama. I've been here over a week now and will be heading home in a few days.

I hate when vacations have to come to an end.

I come from a good sized family....2 sisters, a brother.....lots of aunts and uncles, dozens of cousins and unknown numbers of second cousins. It goes on and on. I even met a sweet lady last week who's somehow related to me.....2nd or 3rd cousin to my dad. (What does that make her and I?) Unless a family reunion were to be arranged, there would be no way I'd get to see everyone. So, this trip I've spent my time with my immediate family. And as is typical....most of it centered around cooking. It's a good thing we all love to cook and are good at it. Even my brother is into cooking. Actually....to be honest, my brother is better at "plating" food than I am.

The day after I arrived, I was staying at the older of my two sisters, Jenifer's house (both are younger than I am), in Birmingham. We had decided to have a girls night since her husband and son would be gone most of the night doing boy things (football practice). Which left the house to us girls...both of my sisters (Jenifer and Nicki), my two beautiful, sweet nieces (ages 10 and 2) and one of my cousins, Rachel

We planned a great dinner, along with wine and beer and enjoyed each others company. My baby sister, Nicki, brought Bacon Cheddar Dip


Hers didn't look exactly like that (this is a photo of some I made a while back)...she had dipped into hers the night before. It's so good she couldn't wait. Or maybe she made it for herself and then decided to share it with us to save herself from eating the whole thing. It doesn't matter....it's a great dip, and very addicting.

Jenifer made our grandmother's Baked Beans


I made our grandmothers Lemon Ice Box


We had other dishes but these were the highlights of the evening.

Anyways, this post is about the yummy little delectable Cheese Filled Rolls that Jenifer and I made. I know it's not a new recipe. And I'd bet most of you have made them, or a variation of, in the past. I know it's not the first time I've had them....but I'd never actually made them before. So.... I felt they needed a spot on my blog.

I think we made some alterations to the recipe to accommodate some "particular" palettes....and that's what I love about recipes like this one....the fact that you can make changes to fit your needs, tastes or even ingredient limitations.

Cheese Filled Rolls
Printable Version

1 can of grand flaky biscuits (8 biscuits)
1 - 8 oz block of cream cheese, at room temperature
1 tsp garlic powder
1 tsp Italian seasoning
1/4 cup melted butter
3/4 cup grated Parmesan cheese
1/4 cup crushed, toasted pecans

Preheat the oven to 350' F. Line a cookie sheet with foil and lightly spray with non-stick cooking spray.

Peel each biscuit in half (so you have 2 disks) and flatten them out a little....stretching them a bit to make them bigger.

Cream together the cream cheese, garlic and Italian seasoning. Put a dab (about a scant tablespoons worth) of the mixture in the center of each biscuit disk


Fold each disk in half and pinch the edges together to secure


(Using a fork to pinch them is not necessary or even recommended. Although it looks 'purty' now, by the time these are baked, you don't even see the edges)

Now....get out medium smallish bowls. Put the melted butter in one bowl. In the other bowl, mix together the Parmesan cheese and crushed pecans.

Dip each biscuit in the butter and then roll it in the cheese mixture.


Place on your prepared cookie sheet.

Bake at 350' for 25 - 30 minutes.

Makes 16 rolls for your enjoyment.


These are even good the next day....cold!!

I'd like to try them again and add some finely chopped green onions to the cream cheese. Or little bits of bacon...or Italian sausage. Hmmm....of course my mind wanders over to the Mexican cuisine side...with jalepeno's and cheddar cheese. Desserts just around the corner with the thought of maple flavored cream cheese and bacon bits.....or a fruit version or....chocolate in there somewhere.

I gotta stop.....now!


Thursday, August 18, 2011

Godiva Chocolate Truffle Coffee Float


A couple of weeks ago, I told ya'll about the coffee I had received from Godiva  through the Tastemaker Program and the Double Nut Godiva Iced Coffee I made with their Hazelnut Creme Coffee. Well, I hadn't done anything with the Chocolate Truffle coffee yet. Then one morning I made myself a little pot of it and sat in my backyard to enjoy it.

(yes, I know. I put a lot of cream and sugar in my coffee. I've tried not to....but I just can't do it any other way.)

Well, let me tell you...this little cup (read: big mug) of coffee was amazing. The chocolate flavor was bold and silky and smooth. I've tasted chocolate coffees before but none as perfect as this. It was like chocolate heaven in my mouth but it wasn't too much chocolate. What I mean is....don't think "chocolate milk" or "chocolate flavoring".....those coffee beans must've been bred with cocoa beans or something because the two flavors meshed as one and it was obvious to my taste buds that they were made for each other.

That's when I decided....Yes, I need to do something special with this bag of coffee as well. So I quickly saved and chilled the rest of the coffee in the coffee pot. You see...I'm a 'one cup of coffee a day' kinda gal and I had made half a pot. And even though I knew I wouldn't have enough time to play with the coffee that day....I did not want to waste even a drop. So in the fridge it went while I pondered the possibilities for a few days.

I wish I could remember what lead me to the idea of a coffee float. (I wish I could remember a lot of things but that's a different story). I looked up some recipes but none of them were what I was imagining in my head. Part of the fun of a root beer float (the ideal model for my coffee float) is the foaming ice cream. And that comes from the fizz.

My coffee needed fizz.

Chocolate Truffle Coffee Float
(makes 2 floats)
Printable Version

1 1/2 cups strong Godiva Chocolate Truffle coffee
1/2 cup simple syrup
1/2 cup club soda
6 scoops vanilla ice cream (divided)

In a small saucepan combine the coffee and simple syrup. Over medium to low heat, reduce by half being careful not let it boil (nothing worse than burned coffee flavor).

Allow to cool a bit then chill in the fridge.

When ready to serve, put 3 scoops of ice cream in a tall glass. Add the club soda to the reduced coffee and pour 1/2 of the coffee mixture over the ice cream and there you have it.

What you'll experience is the creaminess of the vanilla ice cream followed by the wonderfully fizzy chocolaty flavor of this amazing coffee. Truly a delightful experience.

I just can't decide if this should be for dessert or breakfast....

Monday, August 15, 2011

Breakfast Bruschetta


I love me some bruschetta.

I love me some hummus.

I've made variations of both but I don't think (although I could be wrong) I've combined the two before. When I received a coupon through the Tastemakers Program for a free tub of Sabra hummus....(which I absolutely love), that's exactly what I did....in breakfast form.


At first I really had a hard time deciding what to do with the hummus. I mean...I like it so much as is, on pita or crackers that I just couldn't imagine what else I could possibly want to do with it. I asked some friends and was lead to the Sabra website (duh.....why didn't I just go there to begin with?) and discovered all sorts of wonderful recipes. One of them that really caught my eye was a recipe for Breakfast Nachos. I figured I'd make a variation of that....a sorta Mediterranean version. Well, in the process of actually making them, they morphed into a bruschetta instead. As I sit here, thinking about them.....they're morphing some more into all sorts of other ideas....like a breakfast casserole with the bread made into a chunky topping....crouton style. Or rolled up into little breakfast burritos, or folded up in a flat bread.

(Morphing food is a lot more fun than morphing transformers into automobiles and aliens)


Breakfast Bruschetta
Printable Version

Preheat oven to 350'

1 baguette, cut into 1/4"slices
Olive Oil to drizzle on bread
2 - 3 cloves of garlic to rub on bread
1/2 lb Italian sausage, casings removed and crumbled
1 medium zucchini, diced
1/2 large onion, diced
1/4 tsp Italian seasoning
1 minced garlic clove
pepper to taste
3 roma tomatoes, diced
8 eggs, beaten
salt and pepper to taste
1/2 cup mozzarella cheese
1/4 cup Parmesan cheese
3 or 4 fresh basil leaves, roughly chopped
Your favorite Sabra Hummus flavor(s) (I used roasted red pepper and roasted garlic cuz I couldn't decide which one I wanted).

For the baguettes, I could've toasted them in the oven but often times they come out too toasted...on the very crunchy side. I wanted the bread inside to be softer. Just do it the way you like it. What I did was drizzle the slices with olive oil then stuck a grill grate over my stove flame and toasted them over the open flame (I LOVE that open flame flavor on bread! It reminds me of camping and making toast over the campfire). Then I rubbed fresh garlic over one side of each slice of toast. Once those were done I set them aside to await their destiny.....being the vehicle that transports the "goods" from plate to face.

Preheat the oven to 350' F.

Heat an oven safe skillet over medium heat. Drizzle a bit of oil in there. Cook your crumbled sausage in the pan until no longer pink. Remove from pan (drain if necessary) and set aside.

Add a bit more oil and saute the zucchini and onion until just tender. Then add some pepper, Italian seasoning and garlic. Saute for another minute or so.


Note: I don't have salt added at this time because it will cause the vegetables to release their moisture.

Remove the seasoned vegetables from the pan and set aside with the sausage. Clean out the pan and heat some oil and / or butter.

In a good sized bowl, combine the sausage, veggies and eggs (now you can add your salt and pepper to taste)


Pour into your warm skillet. Top with the diced tomatoes, cheeses and basil.


Bake for about 30  minutes, or until the center is set...I cut the center a little to make sure it was cooked through.


Spread the toasted baguette slices with your hummus and top with a scoop of egg and chow down!

This is great for serving several people for brunch, or even for a holiday breakfast. You can cook and saute the meat and veggies ahead of time. You can even toast the baguette the night before then all you have to do is beat the eggs, add everything else and bake away.

If you don't know what your favorite Sabra Hummus is, I recommend trying them all. I haven't tasted one that I didn't like. As for my favorite...I'm torn between the Roasted Red Pepper Hummus (that I used in this recipe) and the Chipotle Hummus. Great flavor! If you're not gonna make it yourself...this is the next best thing. I wouldn't normally recommend a store bought hummus.....but honestly Sabra knows what they're doing.

Saturday, August 6, 2011

Cambodian Grilled Chicken


I learned a new word. A very weird sounding word that means something totally unexpected.

Spatchcock

If you had to guess, what would you think that word means?

Me? I dunno....it just sounds.....soooo not very appropriate for anything that has to do with food. But it does. Honest.

After deciding I wanted to try a recipe for Cambodian Grilled Chicken from the book Planet Barbecue,  I started reading the instructions. There were very few ingredients...most of which I already had. But when the instructions said to "spatchcock the chicken"...I was a little nervous to say the least.

Do what to the chicken?!!

Wikipedia: "A spatchcock is poultry or game that is prepared for roasting or grilling by removing the backbone and sternum of the bird and flattening it out before cooking"


(Who invents these words, anyway?!)

Ok...so it's a NOT so fancy word for butterflying a chicken.

Basically what you do is rinse and dry the chicken. Turn the chicken over on its tummy....ok....breast side down, and using a pair of kitchen shears, cut out the backbone.


 Step one accomplished.

Btw...if you're into making chicken broths and stock, save that back bone for your next batch.

Now we spread that chick open and proceed to remove the sternum by running a knife (recommended knife: pairing) along the edge of the sternum....run your thumbs along the cartridge and pop that baby out.

Now....there's a flap of skin laying over each thigh......using your paring knife, cut a little hole, about an inch long in the skin, then insert the end of each leg into a hole. Turn the bird over and snip off the tips of the wings.


And there you have it. A spatchcock.

Personally, I'd rather say I butterflied the damn thing.

The purpose of going to all this trouble? It speeds up the grilling time.

Now lets get cooking.

Cambodian Grilled Chicken
Printable Version

Marinade
1 whole chicken (3 1/2 - 4 lbs), spatchcocked
5 garlic cloves, cut in half
2 tablespoons sugar
1 teaspoon salt
1 tablespoon soy sauce
1 tablespoon fish sauce (or more soy sauce)

Glaze
2 tablespoons vegetable oil
1 garlic clove, crushed gently
2 teaspoons annatto seed (achiote) or sweet paprika

Do you have a mortar and pestle? If not....just use a mini food processor or something.

To make the marinade:
Place the 5 cloves of garlic, sugar and salt in your mortar. Pound away until you have a smooth paste (it smells amazing!). It only takes a minute. Seriously...it's quick and easy. Add in the soy sauce and fish sauce (in my case, I omitted the fish sauce and used more soy sauce due to allergies) and work it together. Pour over the chicken and rub it in good....getting it all over.


Cover the chicken and refrigerate for 1 to 4 hours. (I highly recommend the 4 hours if you have the time....the flavor will be more intense)

For the glaze:
Heat the oil in a small saucepan, over a medium heat. Add the gently crushed garlic and cook for about a minute....until the garlic just begins to brown. Remove the garlic with a slotted spoon and place in a heat proof bowl. Add the annatto seeds to the oil in the sauce pan and cook for about 2 minutes...until fragrant and brown. Strain the oil over the bowl with the garlic and set aside until ready to grill.

If you're using paprika powder instead of annatto seeds, then remove the oil from the heat...add the paprika and pour into the bowl with the garlic.


Once the chicken is ready to grill....or maybe when you're ready to grill the chicken...heat the grill to medium. You can either use direct or indirect heat....depending on how you like to roll. I think Sir Sportsalot is all about direct heat. I'm convinced indirect heat would be a better choice. 

Discard any excess marinade. Brush and oil the grill grate. During the last 10 minutes of grilling, brush the chicken with the glaze, on both sides. Grill for 12 - 20 minutes per side or until the meat is done (ie: meat thermometer reads 170' F, the juices run clear....you know the drill). 

Let the chicken rest a bit before serving. 

Now...this recipe also includes a "dip". I didn't care for it, but just in case you want the full experience and to be able to judge for yourself....here's the dip:

1 teaspoon salt
1 teaspoon pepper
1/2 teaspoon sugar
4 tablespoons fresh squeezed lime juice

Combine


Now...this is not a pretty picture. The skin...I don't know what happened to it. But it's almost all gone (and I love grilled chicken skin, so you can imagine my disappointment). I think this may have been the result of direct heat (and indirect attention). But still....the chicken was extremely tender and had great flavor. 

Sooo...I made it again. Only this time I used bone-in, skin on, chicken thighs (it's what I had on hand) and baked the thighs in a 350' oven for about an hour


Sure...there's not a single grill mark. I know....it doesn't have that smokey grilled flavor. But guess what? If it's winter and you can't grill, or maybe you don't own a grill, or what if you live in an apartment....well, this here is your alternative. It totally works and is still a wonderful dish.