Yum Peaceful Cooking: May 2010

Wednesday, May 26, 2010

Gluten Free...who woulda thunk it?


This isn't my first experience with gluten free bread.
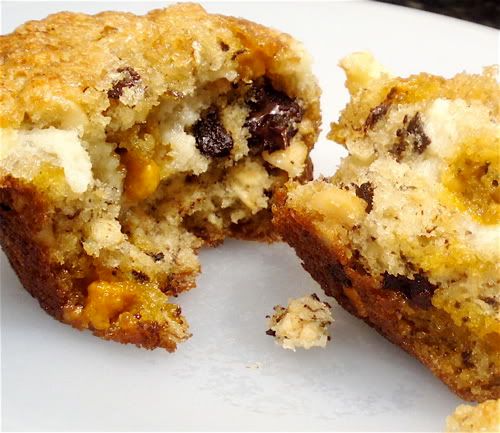
This is:


Huge difference!! Not only in looks, but texture, crumb, flavor and recipe! A girlfriend and I had gotten together to give it a try a few months ago.

It was a lumpy, dense mix with an awful, AWFUL after taste!!!

It was my first experience with gluten free anything in any form. And I was grossed out. Thoroughly.

So when HBin5 had a gluten-free bread dough as the assignment back in April....


I passed. And you can go to Big Black Dog's Gluten Free Bread Braid and see what the rest of the crew did

It was a painful decision. I wanted to participate in everything that the group did but that first loaf...well, no pun intended, but it left a bad taste in my mouth.

Apparently the stars were lined up against me though.

The May Recipe Challenge in BakeSpace was to make something gluten free!

Seriously?

This gluten free stuff just wasn't gonna leave me alone.

So I did what any good blogger / foodie would do. I bit the bullet, gritted my teeth...and forged ahead.

And thank God...a wonderful person in BakeSpace participated in this months challenge who has to eat gluten free, and she really gave us some great tips. I have to say....I learned more from this challenge than I have in any of the other challenges I've participated in over the past couple of years.

I did use the HBin5 Gluten-Free Olive Oil Bread recipe, as assigned in April, with a couple of changes.

1. Instead of brown rice flour, I used white rice flour. Not on purpose, really. I bought the white rice flour a while back...so I decided to use it instead of buying more.

2. I know people who can't eat soy, so in order to avoid soy I used Oat Flour instead.

3. The thought of using SO much cornstarch (which I believe contributed hugely to the nasty flavor of the first bread I made) grated on my conscience and taste-buds. Therefore I used Potato Starch instead.

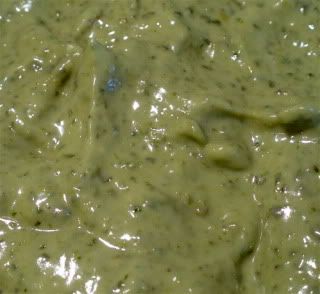
The dough is extremely lumpy


I was tempted to get in there and smash all those lumps with my fingers....but I refrained.

I let it sit on the counter for 2 hours...and was bummed when there was barely any rise at all. I then put it in the fridge for 24 hours as recommended.

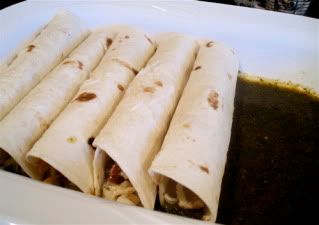
I then divided the dough in half and formed two baguettes. In the BakeSpace Recipe Challenge thread, our gluten-free experienced member said that the dough should be smoothed out before baking. GREAT tip!!! It was kinda like playing with clay. The dough doesn't stretch like wheat dough does....it gets formed and molded with damp hands.


I didn't want to go too crazy with the smoothing out part cuz I didn't want the dough to get soggy.

I let those little guys rise for about 2 hours. Once again, I was bummed that there was very little rise. So with trepidation, I slid them into a hot 450' oven and baked them for 30 minutes. Actually, I think I ended up keeping them in there for 35 minutes cuz they weren't all that dark. I have a feeling that gluten-free bread just doesn't get very brown.

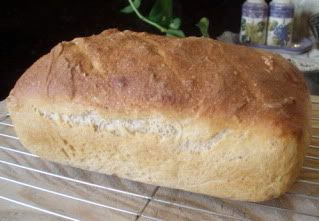
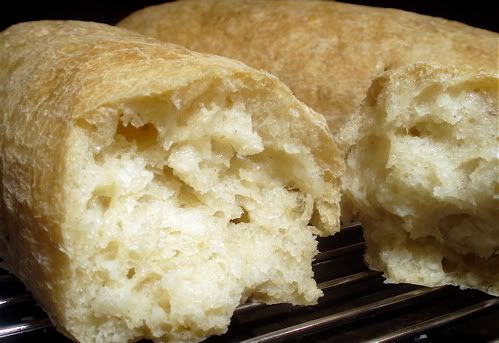
When I removed my baguettes, I was pleasantly surprised with how much they had popped in the oven


And how smooth the crust was....and how nice of a crumb it had. And for the big test....the taste. It barely had a bit of that "gluten-free" aftertaste. With a little butter, it was undetectable.

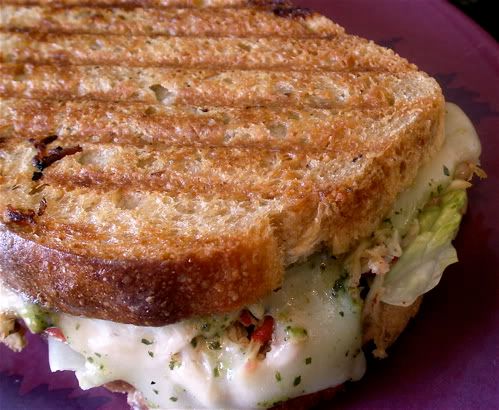
And made into a little mini smoked mozzarella grilled cheese sandwiches....


It was wonderful!

I'm so glad I went ahead and made this bread. Now I won't be afraid or turned off by the idea of participating the next time HBin5 has a gluten-free assignment. And there will be more. I mean, this bread baking thing will be going on well into 2011! :)

BLOG Note: I added something new to my blog....you see the bar at the bottom? (it can be collapsed by clicking the arrow on the far right side if you don't want to see it). Well....It has some fun little tools. I thought I'd give it a try and see if it turns out to be useful. One of the fun little gadgets is the "chat" option. I'm not sure if anyone will ever be in there at the same time as anyone else....but it would be fun to run into you once in a while...if for nothing else then to just say "Hi". Anyways....let me know what you think of my new "toy". If its a pain, I can easily remove it.

Monday, May 24, 2010

Grandmothers Southern Green Beans


As much as I love chicken and dumplings, beef stew, turkey sandwiches....for me there's nothing as comforting as good ole southern fare. It makes me feel connected to my family. To the basics of life and convictions of what's what. Some people call this "soul food". And for good reason. It's not just food that tastes wonderful....but it reaches into your soul and touches you in a deep way.

Now I grew up in California. I've never actually lived in the south but from the time I was a baby, I have spent a good share of summers and holidays there visiting family. Loving every minute and enjoying the food. I remember sitting with my grandmother in the living room after my bath, "poppin' peas" that we'd gathered from the garden that mornin. It wasn't fun....but it was something we did. It had to be done, after all, and someone had to do it. So grandmother and I (and who ever else happened to be by) would sit there in front of the TV and work them beans.

It was the time that we spent together that makes this memory special to me. There was meaning in our task. We were preparing food for freezing, canning, cooking. And we were just "chillin" together, in a way. An old fashioned, lost art sort of way.

So, the other night, Sir Sportsalot requested fried chicken and mashed potatoes for dinner. I decided to go all out and included these green beans on the menu.

When I cook, I enjoy having the TV on in the background. I was flippin' through the channels and what do I see on Comedy Network? Blue Collar TV....OMG....how perfect is that?!! I just love those guys!

So there I was....cooking my southern dinner, listening to them southern boys makin fun of themselves.
My idea of a perfect evening in the kitchen.


(Don't look too closely at this picture. I realized just as I was about to open the package of bacon that what I had was maple flavored bacon. damn it. I ended up getting the ham hocks out)

Southern Green Beans
Printable Version

1 lb green beans, washed
1 medium onion, diced
1/2 lb or so of some sort of cured pork: bacon, salt pork, ham hocks
Pepper to taste (lots!)

To prepare the beans, you want to remove the ends and break (or cut) the beans into about 1" lengths.

In a large pot, saute your pork for a few minutes to release some of the fat (don't need to fully cook it. It's there just for flavor. You're not gonna eat it)

Toss in the onions and saute until just tender. Add your beans, and cover with water. Lots of water cuz they're gonna simmer for a while. Sprinkle a good teaspoon of pepper in the pot and bring just to a boil


Reduce heat and simmer for about 30 - 45 minutes or until the beans are good and cooked. Not crisp tender....but soft! During the cooking time you may need to add another cup or two of water.

Remove pork and discard....(thanks for coming....you guys were wonderful)

Season as needed....most likely will not need much if any salt with all that salty, fatty pork.

Drain and serve


And there you have it....a wonderful bowl of green beans.

I know there's probably very little if any nutritional value left in them. I mean, the poor things are cooked to death. But they're good. For the soul.

I'm thinkin', once in a while, our soul needs food too.

Did I mention that this is one of those recipes where the amount is "just enough" and the cooking time is "'till it's done"?  It's a lost art I tell ya!

Friday, May 21, 2010

Drunk Strawberries and Sober Vodka


After this morning....I really could use one of these (but it's still early and I do have my boundaries....really. I do...honest). I wish I hadn't tossed out the strawberries. You see....after soaking in vodka for 2 weeks, the strawberries were thoroughly drunk! And very...un-strawberrish in looks and taste.

I woke up early this morning and started writing. I had a hard time to begin with. My mind wasn't awake and my body didn't want to be. But I got through it. I wouldn't say "with flying colors" but I was satisfied. Plus I had to get ready for work.

3 hours later I discover that blogger is now publishing with invisible ink? The only things that posted were the labels and the title (which happened to be the last things I added). I tried to crack the code by applyinig lemon juice and heat....

I made sure I was wearing my glasses. I double checked to make sure the monitor was turned on. I even contimplated the "I must've been dreaming" theory.
I then started to whine about it (hey, it works for the kids sometimes, doesn't it?)

My efforts were fruitless.

But my vodka isn't

When I saw Bo's Raspberry Infused Vodka over at Bo's Bowl, I was instantly intrigued. He has a great blog with lots of great things...you really should check it out if you're not already following him.

The vodka infusion process was so simple. I think the hardest part is the wait. 2 weeks. But the results are fun and festive and summery.

Strawberry Infused Vodka

1 750 ml vodka
1 pints strawberres, washed and cored (or whatever it's called that you do when you remove the leaves
1 large jar (Bo said to use a glass jar. I didn't have one big enough so I used plastic)


Fill the jar with your berries and vodka and place in a cool dark cupboard for 2 weeks. During this time, if any of the berries get mushy, remove them. It's normal for them to turn grey. Not pretty....but normal.


Once the infusion time is complete, strain the vodka through a coffee filter


You may be tempted to try one of those strawberries....but be prepared. It's not a good experience. No hint of a strawberry left. Just the form. With a sad heart....I tossed them. Into the trash. If I could think of something worthy to do with them, I would have.

Any suggestions?

What I had left was this gorgeous red vodka


With a light strawberry flavor. Not too strong. It didn't remind me of cough syrup like some of those ones on the market do. It was just a nice hint. And the vodka itself had mellowed. (more like transfused into the tossed strawberries) so what you have left isn't something that's going to kick your ass.

Perfect for those hot summery evenings we're all anticipating.

For my drink, I added equal parts of my Strawberry Infused Vodka and V8 Splash Berry Blend (I just love that juice!!!) and a squirt of fresh lemon juice.

Shaken not stirred.

Tuesday, May 18, 2010

Chicken Enchiladas


It's been a long time since I've made enchiladas. I like cheese enchiladas (anything cheese is a winner in my book) and I like chicken enchiladas. I'm just not a fan of the red sauce. Green sauce is my preference. One afternoon while I was grocery shopping, I bought a can of enchilada sauce. I thought I had picked up the green version but somehow I ended up with red. (I can't won't tell you how many times that sort of thing happens....I'm not sure what goes wrong between the second my eyes see something and my hand picks it up and plops it into the cart).

To make a long story longer.....

I was thumbing through a pretty cool little cookbook called What Can I Bring? by Anne Byrn when I came across her recipe for Chicken Enchiladas. It called for salsa....I used the "unwanted" can of red enchilada sauce. Well, at least some of it.

It also called for two 4 oz cans of green chilies. Which I thought I had. Turns out one of them was actually a can of diced jalapenos. Where did those come from? Seriously, I didn't even know they existed. So I substituted one can of jalepenos for one of the cans of green chili. Which turned out to be a great.

These were the best enchiladas I've ever had. (I can't say they're "authentic" or anything cuz I've never really researched homemade enchiladas). They weren't too spicy. Lots of cheese...and the sauce had a great depth of flavor. Man, were they good! Ok, let me put it this way....Sir Sportsalot....the KING of anti-leftovers, actually requested these for dinner the next night.

YES!! Can you believe it? He actually WANTED leftovers! I just about fell over. But instead I just smiled (and jumped for joy inside). When they were all gone, he said to me..."I hope you wrote down what you did so you can make them again!"

Yes Dear. Of course

(apparently he doesn't know all that much about food blogging)


Chicken Enchiladas (with my minor alterations)
Printable Version

Cooking spray
2 tablespoons olive oil
1 cup sliced or diced onion
1/2 roasted red bell pepper from a jar, chopped (a red bell pepper is what the cookbook says)
3 cups chopped cooked chicken (mine was sauteed in butter, parsley and lemon juice)
1 teaspoon cumin
4 oz mexican crema (or 4 oz cream cheese, cubed)
Salt and Pepper to taste
1 - 4 oz can of chopped green chilies (recipe called for 2 cans)
1 - 4 oz can diced jalepenos (not called for in the recipe)
2 cloves of garlic
1/2 cup of cilantro, packed (recipe said lightly packed. I happen to love cilantro)
2 teaspoons dried oregano
1 cup chicken broth
1 cup red enchilada sauce (or salsa)
10 flour tortillas (not the giant ones...they have to fit in your casserole dish, remember?)
Lots of shredded cheese!!! I used mozzarella, cheddar and queso fresco. The cookbook say 2 1/2 cups of mexican style cheese. HAHAHAHA!! Ya right! I probably doubled that. (just sayin')

Preheat your oven to 375'F. Lightly spray a 13x9 glass casserole dish with cooking spray. Metal is not recommended due to the acid in the tomatoes.

In a large skillet, heat olive oil over medium - low heat. Saute the onion and red bell pepper, stirring frequently until the onion is soft. Remove skillet from heat. Stir in the chicken and cumin. Add the mexican crema and return to heat. Cook, stirring constantly until heated through. If using cream cheese, stir until the cream cheese has melted. Season with salt and pepper to taste and set aside.


Place the chilies, jalapenos (if using), garlic, cilantro and oregano in a food processor (or blender) and process until smooth (about 30 seconds or so). Add the chicken broth and enchilada sauce and continue processing a few seconds more. Season with salt and pepper to taste.


Check it out!! I ended up with a deep green (almost brown) sauce!! It made me kinda nervous at first but I forged ahead.

Spoon 1/3 of the sauce into the casserole dish


Set aside and get ready to assemble the enchiladas

Lay out your tortillas on the counter. Dividing the chicken filling evenly amongst them all, spoon the filling down the center of each tortilla. Sprinkle some cheese over the chicken filling


Roll up the tortillas and place them seam side down, into the casserole dish


(bad lighting....I swear the sauce was not that dark!!)


You will most likely have to really squeeze these suckers in there so they all fit....but that's expected


Pour the remaining sauce over the enchiladas and top with more cheese. Bake for about 25 - 30 minutes, until the cheese is all melty and the sauce is bubbly.


Let stand for about 10 minutes before serving


I served myself 2 of them. But they were so filling that I could only eat one. The second one willingly became lunch the next day.

I wish I had more.

Oh ya....the author said that you can make a big batch (double the recipe). If you use a larger pan (roasting pan) then bake them at 350'F for almost an hour. Bring these babies to your next potluck or bbq and see who asks you for the recipe :)

Monday, May 17, 2010

Tuscan-Style Chicken Panini on HBin5 Whole Wheat Bread


It's been a while since the HBin5 group has made a simple, plain sandwich bread. And I hear this echoed by the other groups members....it's nice to get back to basics. Even if it's only for a minute.


This loaf of bread is the master whole wheat recipe found in the Healthy Bread in Five Minutes a Day cookbook. I do adjust the wheat flour content for flavor reasons. I halve the whole wheat and replace it with all purpose flour. So my loaves aren't as healthy as they're suppose to be....but they're still  much healthier than most.

Last month I had read a tip about using an electric knife to cut your loaf of bread. Such a simple thing, really. But in my head that electric knife had 2 jobs. One was to carve our Thanksgiving turkey. The other job was to slice the prime for Christmas and Easter. The rest of the year, it would sit in its old (very old because this knife use to belong to my mother in-law before I met my husband)...original box, in my cupboard above the fridge.

How silly!!!! It's wonderful for slicing bread and makes it so much easier...I mean, look what I was able to do....


They're not all perfect, and the exact same width...but so much better than what I can do on my own. Hey, I'm just excited that I don't have any slices that are 1/2" wide on one side and paper thin on the other side.

So...that's what I started off with for my panini's.

But I don't have a panini maker.

But that's ok...cuz I do have an old indoor grill and a heavy cast iron skillet.

Let's get to the chicken first. This recipe comes from one my Pillsbury Slow Cooker booklets. It's originally for a sandwich on a focaccia. (The first time I made this, back in 2004, was the first time I had ever heard of focaccia). The Printable version is for the sandwich version...not the panini, but that's easy enough to adjust, right?

Tuscan-Style Chicken
Printable Version

1 1/4 lbs boneless, skinless chicken thighs
2 garlic cloves, minced
1/2 cup roasted red bell pepper (from a jar), cut into bit sized pieces
1/2 teaspoon salt

Pesto Spread
1/4 cup mayonnaise
3 tablespoons pesto

12 slices of bread
Olive Oil
6 slices of tomato
12 slices of cheese (I used mozzarella, but wanted to use provolone. What ever you use, make them on the thick side so they don't melt off the sandwich before the bread is done grilling)
6 lettuce leaves

Place the chicken in your slow cooker. Add the garlic, roasted bell pepper and slat. Cover and cook on the low setting for 6 - 7 hours. Or if you want this for lunch and don't feel like getting up at 4am....cook it on high for about 4 hours.

Now, the directions said to remove the chicken and shred it with 2 forks. I didn't have to shred it. The chicken fell apart on contact. I applied a little pressure and poof...it was "shredded".


In a small bowl, combine the mayo and pesto


This is one of my most favorite sandwich condiments

Heat up your grill or skillet (which over you're going to use) over medium-high heat and lets start stacking this sandwich.

Brush one side of a slice of bread with some olive oil. put it down, olive oil side down, and spread the other side with the pesto-mayo. Add a slice of cheese...then scoop about 1/3 cup of chicken onto the cheese, top with tomato, lettuce and more cheese. Spread some pesto-mayo on another slice. Finally, brush the top of your sandwich with olive oil. 

Remove the grill / skillet from the flame and spray with cooking spray or treat with oil. Carefully place your sandwich on the grill / skillet. Balance a skillet (one that is smaller than the one you're cooking in, if using a skillet) on top of your sandwich.


Keep an eye on it cuz....the skillet just might slide right off your sandwich, taking the top half with it. 

Makes a mess. 

Trust me

After a couple of minutes, carefully check the bottom slice of bread to see if it's toasted. If so, flip it. (ya, have fun with that. Don't burn your fingers and don't let it fall apart....hahahahaha. No seriously...you want to do it carefully but not too slowly....thus giving it time to fall apart (again)).

After a few more minutes, your panini should be done and cheese should be all nice and melty and oooh man....


One of the yummiest sandwiches I've had in a long time. And filling and satisfying. 

You should all check out what the other HBin5'ers have done with their assignment. Head on over to Michelle's at BigBlackDogs.net and you'll see links to everyone's versions of this wonderful, easy loaf of bread.

Coming up in the near future....Garlic Knots and Pita. 

Friday, May 14, 2010

Triple Threat Banana Cream Muffin


Not another MUFFIN!!!!!

I don't know what it is....I just can't seem to get muffins out of my system. And I still have one more muffin in my head that I want to try. (just giving you fair warning that you will have to suffer through yet another muffin post in the near future)

This started out as a simple Banana Scotchie Muffin recipe that was shared with me over on FaceBook. The recipe originally came from the Great American Cookbook.

Do you know what happens when you make muffins at night, after dinner?

They become something for dessert rather than breakfast. That's the only explanation I can come up with.

Chocolate....peanuts....butterscotch morsels....and the same cream filling that I used in the Strawberries and Cream Muffins, were all added. I dunno....I couldn't stop myself. I kept seeing stuff in the cupboard that I wanted to add. I came to my senses when I saw two different kinds of chocolate and the add-ins out weighed the flour and oats.

So I put the white chocolate chips away.

How did they turn out? mmmm.....goood. Crumbly and moist at the same time (probably cuz by the time I mixed everything, there wasn't much left to hold it all together). They are sweet but only in bursts....the oatmeal does a great job of balancing that out. And this muffin really wants to be washed down with an ice cold glass of milk.

Triple Threat Banana Cream Muffin
Printable Version

Cream Filling:
4 oz. cream cheese
1 1/2 tablespoons from a beaten egg
1/3 cup sugar
1/4 tsp vanilla extract

Muffin:
1 cup flour
1 cup oats (I used old fashioned Quaker oatmeal)
1 tsp baking powder
1 tsp baking soda
1/2 tsp salt
1/2 cup sugar
1 ripe banana
1 egg (plus the rest of the egg from the filling)
1/4 cup buttermilk
1/4 cup melted butter
1 tsp vanilla extract
3 oz semi sweet chocolate chunks
3 oz chopped peanuts
3 oz butterscotch chips
Raw sugar (or regular sugar if that's all you have. Or no sugar if you don't want to)

Preheat your oven to 400' F. Spray 12 nonstick muffin tins with cooking spray.

Melt the butter and set aside to cool.

Combine the filling ingredients in a small bowl and set aside.

In a large bowl, combine the flour, oats, baking soda, baking powder, salt and sugar.

In another bowl mash up your banana and mix in the egg (don't forget the left over egg from the filling), buttermilk, melted butter (that has cooled but not hardened again...that would just be dumb) and the vanilla extract.

Add the flour mixture to the banana mess mixture and gently stir, but not too much. Dense muffins are no fun.

Fold in the chocolate, peanuts and butterscotch.

Fill each muffin tin halfway (there will be some batter left...if not, take it out and start over). Scoop a tablespoon'ish amount of filling in each cup and top with a tablespoon'ish amount of the remain batter.

Sprinkle the raw sugar over each muffin (for that nice sweet crispy texture)


Bake for about 12 - 15 minutes


Do you see that cream cheese filling making it's way out? (how could  you not, I know...but I just had to mention it). Good stuff, let me tell you.

If you want to lie to yourself justify this as a good breakfast, keep in mind you have the following:

Antioxidants from the semi-sweet chocolate
Fiber from the oats and a ton of other nutrients
30 essential nutrients and phytonutrients from the peanuts
Dairy from the cream cheese
Potassium from the banana, plus an abundance of other viamins and minerals that provide a natural source of energy.
Choline, protein and the right kind of fat from eggs. Choline helps to regulate the nervous sytem, cardiovascular system and the brain. (and we all know that the brain of a foodie needs regulating)

Sorry...I couldn't really find any health benefits for the butterscotch. We'll consider this ingredient a splurge. Or something good for your morale.

What ever your reason for eating this muffin is, enjoy!

Tuesday, May 11, 2010

Asian Avocado Cups


Nope....that's not guacamole.

There's nothing mexican about it except for the avocados.

This is my first entry into a food contest. (how exciting is that?!)

The "challenge" was to show how adaptable avocados are. And you know what? They really are....and I didn't even realize it.

I have lived my whole life (minus 4 months) in California. I have grown up on avocados. And avocados have always had a direct connection to mexican food.

Lo and behold....enormous amounts of years later, I discovered that avocados have the ability to blend with so many other flavor combos. They're kinda like the chameleon of the food world (or at least one of the chameleons...there are a few others out there...like, jicama, water chestnuts, etc. etc.). However, unlike other "chameleons"...avocados have the ability to stand on their own and shine like a star!

Anyways, my point is that you can take a mexican avocado and add it to any cuisine, in any region, along with the regional seasonings and you will have enhanced both the cuisine and the avocado.

With that being said...let me introduce you to my entry into the Adaptable Avocado Recipe Challenge

Asian Avocado Cups
makes 48 cups
Printable Version

5 - 6 Avocados, chopped
1/4 cup coarsely chopped bean sprouts
1 - 8 oz can water chestnuts
2 tablespoons, packed, chopped cilantro (also known as Japanese Parsley) plus more for garnish
2 green onions, chopped
1 garlic clove chopped
1/2 teaspoon grated fresh ginger
1/2 teaspoon salt
1/4 teaspoon pepper
1 1/2 teaspoons lite soy sauce
48 won ton wrappers
2 tablespoons olive oil
1/2 teaspoon sesame oil
Cooking Spray
Your favorite wasabi dipping sauce (I used a teriyaki wasabi dipping sauce)

In a small food processor, pulse together the bean sprouts, chestnuts, cilantro, green onions and garlic clove


You want it to be fine, but not mush. 

In a medium bowl, combine the bean sprout mixture, avocado, ginger, salt, pepper and soy sauce. I used my hands (kinda like how you do with hamburger meat) so that I didn't get a puree. A bit of texture with a few avocado chunks is always nice, right?

Cover with plastic wrap and refrigerate for at least 1 hour to allow the flavors to blend.

Meanwhile....lets work on those "cups". 

Preheat the oven to 375' F. Lightly spray a mini muffin pan with cooking spray. 

Mix together the olive oil and sesame oil. Brush each won ton wraps with the olive oil mix and fit them into the prepared mini muffin tins


Don't worry about perfection....it's the imperfect that creates character. 

Bake in your 375' preheated oven for 6 - 8 minutes, or until partially golden brown, without the edges getting burnt.


Fill each cup with the avocado mixture. Drizzle your favorite wasabi sauce over the mixture and then sprinkle some cilantro on top.


OMG!!! What a wonderful blend of flavors. It all melts together in your mouth...the smooth texture of avocado with a gentle mixture of ginger, soy sauce, garlic, cilantro...and wasabi, offset by the crunchy baked won ton.

They aren't messy. They aren't difficult. They're just good.

LOVE IT!! 

Sunday, May 9, 2010

Strawberries and Cream Muffins


Let me start off by saying Happy Mother's Day to you 
(or your mom...if you're not a mom)

I have been on a huge muffin kick lately. It all started with the Mango Coffecake that I put into cupcake tins, and wasn't sure whether to call them cupcakes or muffins. I think now I've decided that they are indeed a muffin. But they're still labeled Mango Cupcake.

Then I came across the lovely Lemon Raspberry Muffin that I cranked up with some melted white chocolate drizzled over the raspberry glaze soaked muffin.

And most recently were the moist and tasty Peaches and Cream Muffins that grew into an enchanted forrest, as they tried to emulate a mushroom patch. (Guess that's what happens when you fill the tins to overflowing.)

I have seriously enjoyed each of these muffins. They are all fantastic in there various flavors. I think before this little muffin frenzy of mine, my favorite go to muffin was the good ole Blueberry Muffin.  Just your basic standard muffin, nothing fancy. I had never considered anything else really.

Until I discovered how fun it is to play with your muffins. (we'll blame it all on the Mango Cupcakes).

The other day I was poking around in the world of blogs when I came across these gorgeous Strawberries and Cream Muffins at Janes Sweets. It was love at first site. So of course I printed the recipe and tagged the post. Then I read the instructions. With every intent of changing / altering something to make it my own. Some way of tweaking it. You know what I mean, right?

I couldn't change a thing. Pure perfection. At one point I was going to add a little balsamic vinegar to the strawberries to enhance the flavor. I pulled the jar out of the cupboard and then instantly put it back. The strawberries were begging to remain pure.....so I had mercy on them and let them be.

And I'm glad I did. I'm glad I didn't tamper with this recipe. I'm glad I left well enough alone and did as instructed.

Because these Strawberries and Cream Muffins are the....

Princess of all muffins.

(The title of Queen is reserved for cakes. Don't ask me why.....thats just the logic thats running through my head right now. And muffins are very princessy, don't you think? In a very cute, tea-party, dress-up and indulge sort of way. Besides, when they grow up and become cakes, then they can be queen.)

Well let me tell you....they are moist, delicious and just plain fantastic. When you bite into that sugar and strawberry crusted top and then find the surprise in the middle.....the cream cheese smothered berries.....not only do your taste buds sing....but you find yourself doing that little happy dance that can only be induced by food that gives you pure pleasure.

They are that good!

Please don't let the several steps or lengthy instructions send you off. All the steps are easy....and the extra couple of steps to get to muffin bliss is soooo worth it!

Strawberries and Cream Muffins
Printable Version

Filling: (yep...we're going to start with the filling)
4 oz cream cheese, room temperature
1 1/2 tablespoons of egg. (we'll talk about this in a minute)
1/3 cup sugar
1/4 teaspoon vanilla extract

Muffin:
1/2 cup butter
1 1/2 teaspoons vanilla extract
1/8 teaspoon almond extract
1 cup milk
2 eggs, lightly beaten
2 cups all purpose flour
3/4 cup sugar (plus extra for sprinkling on the tops)
2 1/2 teaspoons baking powder
1/2 teaspoon salt
1 cup fresh strawberries, chopped into very small pieces

Preheat the oven to 400'F
Line 12 muffin tins with paper liners

Ok...lets talk about that 1 1/2 tablespoons of egg. You're going to get an egg and beat it. Now don't try and scoop out a tablespoon of egg with your measuring spoon.....cuz the egg will just sorta slide out of the spoon. You gotta scoop the egg into the measuring spoon with another spoon. Be careful not to let any spill slide over the edge...cuz once it starts....the rest follow and you'll end up with an empty spoon again. (egg tends to act like sheep....where one goes, the rest will follow).

Filling:
In a small bowl, combine the cream cheese, 1 1/2 tablespoon of egg, sugar and vanilla extract. Mix with a spoon until its pretty smooth. Don't worry about the little lumps. Set aside (do not chill)

Muffin:
Over low heat, melt the butter. Add the vanilla and almond extracts and the milk. Stir to combine. Let the mixture cool a bit (actually the cold milk cooled my mixture pretty instantly.) Then whisk the eggs in.

In a large bowl, whisk together the flour, sugar, baking powder and salt. Pour the butter mixture into the dry ingredients and blend until just combined. Over blending will create dense / flat muffins. Lumps and flour streaks are acceptable and expected.

Fill each muffin cup, barely 1/2 full with muffin batter. Sprinkle a little bit of the chopped strawberries in each cup. Top the strawberries with a dollop of the cream cheese filling.


Add more muffin mix (about 1 - 2 tablespoons) to each cup.

Take a few more strawberries and sprinkle them over the tops of each muffin....gently pushing them in a bit.


Sprinkle a generous amount of sugar on top to create that nice crunch.

(I always make such a mess when it comes to sprinkling sugar. Is there anyone else out there who's as messy of a cook as I am?)

Bake for about 15-18 minutes...until golden brown and an inserted toothpick comes out almost clean (that cream cheese and the strawberries might get stuck to the toothpick...doesn't mean it's not done).

Let cool for a few minutes before carefully removing the muffins.


I hope this is normal....and I kinda think it is, considering the filling...but as my little babies cooled, the middles sank. Which actually looks adorable to me.....


But maybe I'm a bit partial....I mean, love is blind, right? 

Wednesday, May 5, 2010

Peaches and Cream Muffins and a Blooper


Ya I know...I'm going through a muffin obsession right now.

Maybe I'm relating to them a little too much.....

I like to think I'm just enjoying the until now, untapped, unknown (to me) versatility of the majestic muffin.

Last week, one of the gals I met on my fan page over in Facebook told me about a couple of her favorite muffin recipes. And she said I could blog about her muffins. Thank you Char! You're a doll!

This recipe is a version of her Blueberry Cream Muffin recipe, which she adapted from a recipe she found on Allrecipes.

Blueberries weren't on sale so I decided to use some canned peaches and then added some cinnamon. That's basically all I did differently. Oh...and I doubled the vanilla :)

I also had some bloopers. Stay tuned...I'll share them at the end of this post (just like how they do in the movies at the end)

Peaches and Cream Muffins (in this case, the cream is sour cream)

Printable Version: Peaches and Cream Muffins

4 cups flour
1 1/2 cups sugar
1 1/2 cups brown sugar
1 tsp salt
1 tsp baking soda
1/4 teaspoon cinnamon
4 eggs. beaten
1 cup oil
2 teaspoons vanilla extract
2 cups sour cream
2 - 15 oz cans of peaches, drained and diced

Preheat the oven to 375' and prepare 18 - 24 muffin tins

Combine the flour, sugars, salt, baking soda and cinnamon in a large bowl. In another large bowl combine the eggs, oil and vanilla extract.

Stir your dry ingredients into the egg mixture, alternately with the sour cream. Gently fold in the peaches. Don't over stir!

Scoop batter into the prepared tins and bake for about 20 - 25 minutes or until a toothpick comes out clean when poked in the middle of a muffin.

Let cool for about 5 minutes before removing from the tins.

If desired, top the muffins with a cinnamon sugar mixture prior to baking. If you forget (like I did for the second batch cuz I was so hung up on my blooper) then sprinkle the tops as soon as they come out of the oven. Or you can top them with a streusel prior to cooking, as Char recommended.

A nice gentle flavor, sweet, and very moist! A lovely recipe with great results. If I were to change anything, other than the fruit (cuz thats so easy to do)....I might add a little baking powder for a higher rise.

Just to warn you...I think I have about 2 more recipes I want to explore :)

Now for the bloopers.

Let me explain myself first. My desire was to make jumbo muffins. So I really really filled up those muffin tins. And well....


I ended up with one great big huge muffin top! (I swear they were mocking me!!!) I had to cut them in order to separate them. Then, when I tried to remove them? Well...the tops wanted to come off without the muffin (kinda wish my muffin top would do that!!!!!!)


Thats when I decided a different approach was needed. The old, cover and flip


Then flip again so I wouldn't end up with cooling rack grooves embedded in my muffins.

And well....in the end I had this....


The enchanted forrest of peaches and cream mushroom muffins. (I almost expect a smurf to appear).

I have to say though...that top, which was sprinkled with cinnamon sugar was the best part! All nice and crunchy on the edges and everything. Ya baby!