Yum Peaceful Cooking: January 2010

Sunday, January 31, 2010

Sammies and Buns


Have you ever wanted to make bread that's good enough to replace the sandwich bread you buy at the store?

I would love to be able to do that. To make something just as tasty yet so much better for you than that stuff.

It took me a couple of tries but this one is the closest I've gotten so far.

Now, it's no Roman Meal (Sir Sportsalot's favorite) but I think it's pretty darned good. And so do the girls. hmmm....I don't think the sports-man even tried it (his loss).

This is one of those infamous no-knead breads from the HBin5 bread braid club where we're baking our way through "Healthy Bread in Five Minutes a Day". A fabulous cookbook!! I can't tell you how much I've learned in just a few short weeks.


To see what everyone else has going on, visit Michelle's blog at BigBlackDogs. She has a wonderful place with incredible recipes and mouth watering pictures. I'm sure you'll enjoy yourself. :)

So, I tried making sandwich bread, using the master recipe and thought I'd make the Hearty Whole Wheat Sandwich Loaf.

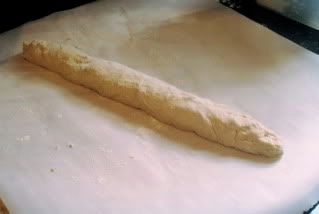
I pulled off 2 lbs of dough and let it rise in the bread pan as instructed


Let it bake as instructed and it looked beautiful


Until you turned it around


I mean...I know I live in California but does EVERYthing have to have a fault?? Good lord!!

And then from the underneath...something just wasn't right


It was just soggy. And it was dense (kinda like Sir Sportsalot but different)


and it was too....i dunno....wheaty? I just can't do it. I can't do the intense whole wheat thing.

So I went on a mission. I searched for White Whole Wheat Flour. Sounds like an oxymoron (man...sir sportsalot is popping up everywhere isn't he?) You see, I read about this flour in the book. It's just as healthy only it's more mild in flavor and lighter in color.

MUST TRY!!!

My local market didn't have any so I made a special trip to a health food store and picked up a bag.

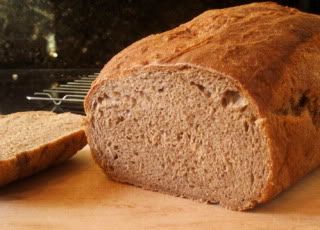
Aaaaaand....it just so happened that our HBin5 mission was to make a Soft Whole Wheat Sandwich Bread. The differences between the two recipes (besides the flour) is the fact that the soft bread has eggs, honey and oil in it....and ooooooh man....lookie at the difference....


Even the fault was smaller (still haven't figured out why that happens. Any answers out there besides geographical location?)


And I'm totally loving the color!!


It even looks like a real loaf of bread! I was so pleased with it. The texture, the flavor....everything.

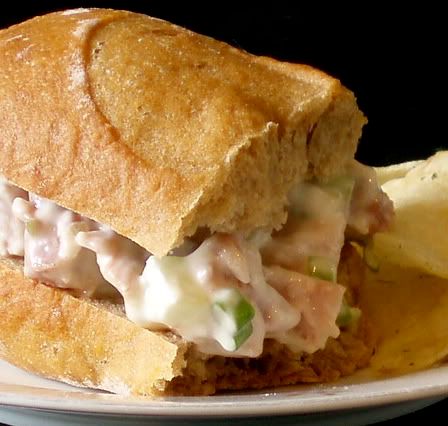
The sandwich at the top was the first thing I made with my new lovely loaf of healthy, yummy....good-for-you sandwich bread. I wanted the flavors to be pure so I could get a true measure of the flavor. It doesn't get any more simple than tomatoes and avocado. Especially since it insisted on having a (no matter how minor it was) "fault"....I stuck with a "California" theme.

Of course I had some more dough and there was more to our mission than just a loaf of sandwich bread. We also got to make hamburger buns or hot dog buns. Since my youngest doesn't like hot dogs, I stuck with the hamburger buns


These were even easier than the bread almost....just a little more fun

Form your dough into balls and flatten them a bit.


Cover and let rise for about 40 minutes.... then brush with an egg wash and bake for about 20 minutes


Let cool and then slice em and make your favorite burger. I decided to stick with "healthy" and make turkey burgers with homemade ranch dressing, cheese, avocado, tomatoes, onions and a baby spring lettuce variety. With a side of home baked potato wedges.


Oooooh....total hit!!

I have one more mission completed that I need to share with you....Apple Strudel. How did it turn out? Stay tuned and you'll find out. 

Same bat channel, same bat time....

Friday, January 29, 2010

Pork Tenderloin....That's Hot!


I know a lot of people out there don't eat pork. For whatever reason. I'm cool with that. One of my own daughters doesn't eat pork. She had wanted to become a vegetarian back when she was.....I dunno.....6th grade? I didn't want her to so we made a deal....I told her she could omit one meat group from her diet. Beef, Chicken, or Pork. The pig got the axe.

Whether you eat pork or not, do you realize how much it's still a part of your life in one way or another? I don't think there's another meat out there that is such a huge part of the english language. I mean, we have pork, pork chop, porker, porky, porky pig, pig, pigsty, piggy, pigpen, this little piggy, 3 little piggies, piggly wiggly, ham, ham hock, hamburger, hamming it up, bacon....(and for some reason, I have no idea why....but spankin' keeps coming to mind as a bacon slang. shhhh)


Anyways, you get the idea. In the food world, pork might not be the hottest topic, but I think its more versatile than any other meat group that I know of.

And that brings me to this delicious dish...Pork Tenderloin with Jalapeno Paste. It's been a family favorite for several years. As a matter of fact, when my daughter decided to go porkless, this was the one dish that she was sad about not getting to eat.

I found the recipe in Everyday Food and have only made a couple very minor changes. It's a "grill" recipe but...(ssshhhhh, don't tell Sir Sportsalot) I got tired of it coming out dry and charred. Bless his heart...I mean, he thinks he likes to BBQ, but he's not the type that's going to sit out there and work the grill. He looks at the clock...and runs inside the house to watch his sports and in 7 minutes will run back out to flip the meat. Meanwhile, how many flare-ups did he miss? Soooo, what's my point? I make this in the oven now.

 I start out with 1 pork tenderloin. The recipe calls for 2....but I like lots of Jalapeno Paste....I dunno..you be the judge.


For the Jalapeno Paste get out:

1/4 cup canola oil
4 garlic cloves
1 chopped jalapeno chile
1 teaspoon thyme savory
1/2 teaspoon salt (or to taste)
1/2 teaspoon coriander
1/4 teaspoon pepper (or to taste)
1/4 teaspoon cumin

I like the jarred "Nacho Jalapenos". Especially for this recipe. They seem to blend down really well and stick to the meat. Sooo....when you're dealing with pre-sliced jalapenos, how do know when you have enough to equal a whole?

Why......you stack 'em up and put it back together


Yep.....that looks like it's about the size of whole one, dontcha think?

In a food processor (and this is when I really really love my mini food processor) combine all your paste ingredients


and process until smooth......for about...I dunno...a minute?


The aroma is amazing!!

Preheat your oven to 400' F

I got out my heavy cast iron skillet and heated up a little oil in there. Covered the tenderloin with half of the paste and seared this little piggy in my very hot skillet.


The reason I'm using my skillet is because this baby is goin in the oven soon. But not yet...

Get it all nicely seared all around....then cover the top with the remaining jalapeno paste


Stick in a meat thermometer (if thats the way you roll) and plop this little fatty in your 400' oven for about 25 - 30 minutes, or until your thermometer reads 160'


Remove the meat to a warming platter, cover with foil and let it rest for about 10 minutes

Take that skillet with all those juices in there....remove all but 2 tablespoons of fat..errrr, juice from the pan. Put over a medium heat, and add about 2 tablespoons of flour....stir. Continue stirring until it's well combined...about a minute or so....let the flour get good and brown. Pour in 2 cups of chicken broth while stirring and stirring and stirring some more, until you're gravy is made. If necessary, season with a little salt and pepper.


I didn't want to keep those little blackened bits in my gravy so I strained them out before I served it.

But look how nice and juicy this tenderloin is


Pour some gravy over it and enjoy with a nice side of stuffing and steamed asparagus.

And poor Jacquie didn't get any cuz this little piggy had none.

Wednesday, January 27, 2010

Oven Fried Chicken


I just have to say I'm pretty excited about this post. It has been coordinated with the newsletter from BakeSpace! I will be writing a section of the newsletter every now and then for the Wednesday edition about techniques (I hope you enjoy my first attempt).

There's a different topic for each day of the week:
Monday is about Family, Culture, Heritage and Vintage Recipes.
Tuesday is all about Kitchen Finds.
Wednesday is Learn a new Technique (cooking, baking, pots/pans, kitchen crafting etc).
Thursday is dedicated to Gardening
Friday is "This Week in Food"

If you'd like, you can subscribe to the newsletter on the BakeSpace home page. You can also view it from their blog.

Btw....if you have any suggestions on techniques you'd like to see or you think I should write about....please feel free to let me though my comment section or email. I need all the help I can get in the idea area. :)

Now...onto the "meat" of this posting....
Fried Chicken isn't just a southern dish anymore. I think it's about as American as baseball, hot dogs and apple pie. When a lot of us hear "fried chicken" we think of a lot of fat and grease, an image of a famous fast food chain comes to mind and our arteries go into panic mode. Sure, if you fry your chicken in a pot full of oil, its understandable (but soooo yummy). But there are healthier ways to fry a chicken.

The healthiest alternative that I've found is to take a cookie sheet, spray it with cooking spray and bake your coated chicken in the oven. Which is good and fine. But to me, thats just baked chicken. If you really want that crispy outside that you can only get by keeping that skin on...then you do have to include a little "fat".

What I am going to share with you is a healthier version. Not the healthiest. Just healthier. The key is to keep this as a treat and not a staple. Depending on the method you usually use for frying your chicken (and I mean frying, not baking), you will save about 100 to 150 calories per serving. Granted....it'll still be pushing 350 calories (25 g. fat), depending on the chicken part that you eat and how many pieces you call a serving (this is based on two chicken legs per serving) but that beats almost 500 calories (41.5 gr fat) for a serving of skillet fried chicken. I wonder where that puts deep fried chicken on the calorie meter?

There is another benefit to oven frying...no splatters all over your stove to clean up afterwards. Wooo hooo!!! Gotta love that!

Sooo, without further ado, here's my favorite fried chicken recipe...


8 chicken legs with skin and bones
2 cups flour
1 cup buttermilk
The following seasoning to taste
Salt
Pepper
Garlic Powder
Paprika
Cumin
Poultry Seasoning

Rinse your chicken, pat dry and season with salt and pepper. In a pie plate, combine the flour and seasonings. In another pie plate pour the buttermilk.

Set up a station as follows: chicken, flour pan, buttermilk pan and a large plate lined with paper towel and covered with a cooling rack.


Does it sound backwards to you? Or are you with me? Just to clarify...I double dip my chicken. First flour, then liquid...drip dry. Then back into the flour and onto the pan.


This is how the first round of dipping looks.


And this is the drip drying stage. At this point, I like to put the plate of chicken in the fridge, along with the unused flour until I'm ready for my next step.

Because this was part of my New Years Day Dinner...I had lots to do. I was making my traditional good luck food from the south. Fried Chicken, Fried Okra, Creamed Corn (not to be confused with cream of corn because there isn't an ounce of cream in my corn), Corn Bread and of course.....Black-Eyed Peas.

Now back to the chicken....you will need a cookie sheet (mine are super old so I line them with aluminum foil which also makes for a super easy clean-up afterwards), 1/4 cup shortening and 1/4 cup butter or margerine. Don't use vegetable oil. It will spit and spatter and make a huge mess.

Preheat your oven to 425' and melt your shortening and butter on the prepared cookie sheet. Keep an eye on it cuz your butter will burn. (been there, done that)

Set up your work station again....starting with the chicken, then the flour and your prepared cookie sheet


Roll the chicken in the flour, coating thoroughly and place onto the cookie sheet, skin side down.


Cook, uncovered for about 30 minutes, then turn the chicken. Be careful that you don't leave any of the skin on the pan as you turn.


Cook for another 25 - 30 minutes, until the chicken is done and is nicely browned and crispy.

Remove from the oven, and carefully (again, trying not to leave any of the crispy skin behind) place the chicken on a plate that has been lined with paper towel in order to remove excess fat.


Let sit for a few minutes and enjoy your crispy, tender chicken with your favorite sides.

Monday, January 25, 2010

Heart Attack on a Cracker


Unless you're taking it to a birthday party for someone who is turning 90 years old. Then that would just be insensitive, now wouldn't it?

That's when you call it something proper and delicious sounding, like....

Bacon and Cheddar Dip!

My dear neighbor had a 90th birthday party the other day and I couldn't possibly go empty handed. I mean, ya, I took her a little birthday present (btw...what on earth do you give someone who is 90!!) but being someone who is into food...how could I show up without something to eat? Right?

But if you're gonna serve this at a Super Bowl Party....Heart Atatck on a Cracker is totally acceptable.

My sister told me about this recipe. She found a version of it on another website. Between her small adjustments and mine....it's been altered a tiny bit, but if you wanna see how it was originally intended then check it out ----->here<------

As for me...this is what I did


6 - 8 slices of cooked bacon, crumbled
8 oz cream cheese, room temp
1/2 cup mayonnaise
1/2 cup sour cream
8 oz cheddar cheese, shredded
3 green onions, chopped
1/2 sleeve crackers (I used ritz) crushed
shredded parmesan cheese to top (optional)
a little more bacon and green onions to garnish

I know you don't really need step by steps for this so I'm not gonna give em.

I suggest that you use a mixer to cream the cream cheese first...(mixing by hand, no matter how many times I think...oooh, it will be fine.....it's just a lot of work) then add the mayo and sour cream. Then stir in the cheddar cheese and onions until mixed well.

Scoop into an 8x8 dish (no need to grease it...this baby has plenty of self-lube). Top with crackers and parmesan cheese


Bake in a 350' oven for about 20 minutes, or until bubbly and browned.

Garnish with more bacon and green onions and serve warm with crackers.

I wish I had a picture of it on a cracker....then you'd get the idea but you know what? There wasn't any left to bring home from the party (and I couldn't very well take it with a scoop missing, now could I? I did consider it though). Once someone dove into it, within 15 minutes it was 3/4 of the way gone....swear! And I hadn't even had any yet.

I do have to say though...once it cools off, it's not as good. But warm.....waaaaaay yum!!!

Not into cheddar? Oooooor....wanna try it differently? What about jack cheese...or pepper jack? Now that would be double yum!

Saturday, January 23, 2010

Whole Wheat Epi Sammy


What do you do when you have a little dough? Why....you make an Epi of course. If you don't know what an Epi is, no worries, I had no clue whatsoever until recently. It's bread that is shaped like a wheat stalk. It's beautiful, impressive and not difficult at all.

You start out with a 1/2 lb. ball of dough, about the size of an orange (I used the whole wheat "Master Recipe" from the Healthy Bread in Five Minutes a Day cookbook. Recipe can be found ----> here <----) Form the dough into a ball and gently stretch it into an oblong shape and then fold into thirds (the way you'd fold a letter)


Then pinch the "letter" closed


This is beneficial to the outcome of the shape of the dough. although my ends should be more tapered. As you can see, I still have to work on mastering this technique.

Gently stretch the dough into a thick rope, about 1 1/2" in diameter. I then placed my dough onto some parchment paper so that when I transfered it onto the stone, it wouldn't get distorted and ruin my "wheat stalk" effect. Anyways....Loosely cover the rope with some plastic wrap and allow to rest for about 40 minutes.


Now is the time to preheat your oven to 450' and heat up your baking stone for about 30 minutes.

Onto the fun part....sprinkle your rope with some flour and get out some kitchen shears and start snipping away...


I tried to keep the scissors at a 45' angle. As I snipped, I'd use the scissor blade base to "carry" the "stalk" off to the side, alternating sides. Be careful not to snip all the way through....maybe about 1/4" from the bottom.


Slide your loaf onto the stone (including the parchment paper). Pour a cup of hot water into a roasting dish or broiling pan that's somewhere in your oven...(below, above...whatever). This will create steam and make for a wonderful crust.

You're going to bake the loaf for about 25 minutes. Set the timer for 17 minutes. At that time, slide the parchment paper out, leaving the loaf in. Continue baking for another 8 minutes, until nice and brown and firm.


Now tell me.....if you saw this served at a dinner party, wouldn't you be impressed? And check out the inside


It's just so fluffy! (I'm sure there's a proper term for that LOL).

Oh, and btw...this was one of the assignments from our HBin5 group


Lead fearlessly by Michelle over at BigBlackDogs.net

Soo...this loaf went pretty quickly. Tasted great with just butter. I love the little wheat stalks. They're perfect for breaking off individually. I made a little ham salad and used one of the stalks for a quick little sammy....perfect for lunch.

FYI: For this loaf I did use white whole wheat flour for the milder flavor.

Thursday, January 21, 2010

The Simplest Creamed Corn You Just Might Ever Make


Creamed corn. What does this mean to you?

Is the corn made with cream?

Or do you cream the corn?

When I called my grandmother to ask her how she makes it I was surprised that there was no cream in her recipe at all.

So what makes it so creamy? Corn juices!!! (and butter....love me some butter)

This is such a simple recipe and tastes great. The most time consuming part is cutting the corn off the cob without taking too much off initially. But you know what? It's really worth it. I don't think I've ever bought frozen or canned creamed corn.

Ya I know it's not corn season in the U.S. But if you have a hankering for it or can't have a particular dish without it, you just might be able to find it in your market. It won't be as juicy as your summer corn but it works. This particular time, I needed it. I can't have black-eyed peas, fried chicken and fried okra without creamed corn. So I suffered through the slightly dryer winter-available corn.


I got 4 ears. Husked and washed em and tried my best to get all the silk off. Does anyone have a good way to easily clean corn?

Then I cut the corn off the cob but just touching the edges of the corn...I don't go all the way to the husk.


If this had been a summer corn on the cob...their would be juice all over the place.

Then I stand the cob on end and run the knife up and down and all around the cob. Turn it over and stand on the other end and do it again...getting as much of those juices out


Ya...these pour pitiful winter cobs are just not giving it up. But thats ok....it's better than nothing

Put it all in a pan, add a bit of sugar..maybe a teaspoon or so.  Then add about 1 tablespoon of butter or so, per ear (sometimes I even add a little garlic....YUM!)


I wait until after it's cooked before adding salt or pepper. (salt makes corn tough when cooked with it) Cook over medium heat for about 15 minutes, stirring occasionally.

If needed...get out your tater masher


Look...it's creamy. And no cream was added. Just corn and corn juice. Season with salt and pepper to taste.


If you remember my New Years meal....this dish was part of it :)